
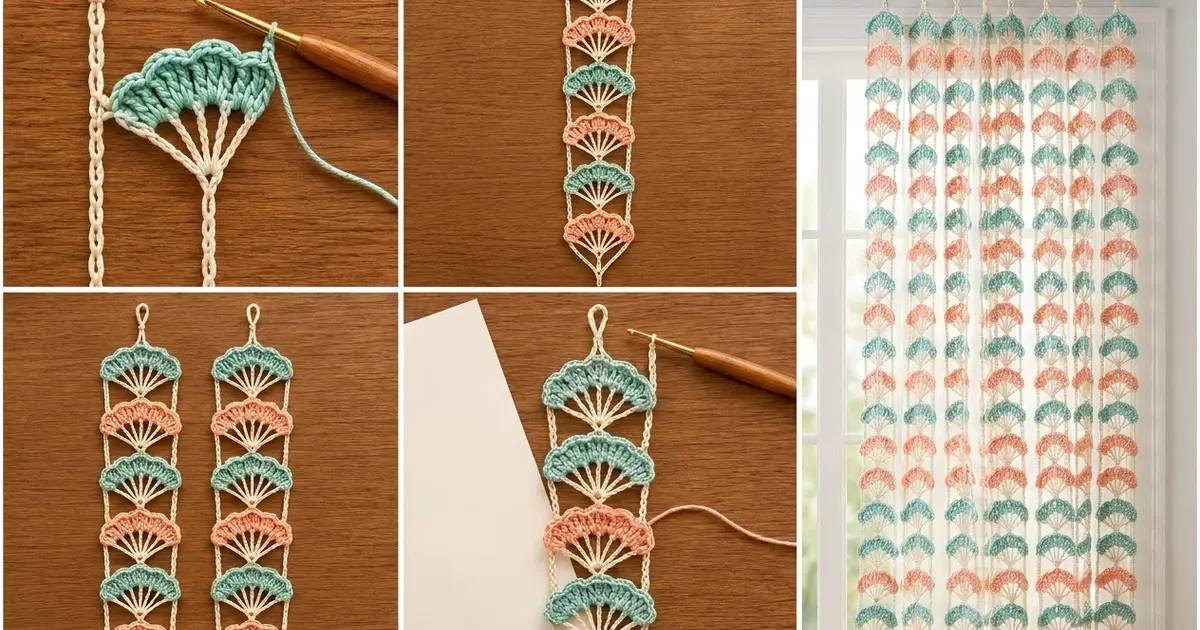
This hanging strip stacks six shell fans in a slim cream frame. The fans alternate soft aqua and warm coral. Each one has fine cream spokes that rise from a single point to a solid band of stitches with a scalloped edge. The look is light and airy with a vintage feel, like seashells strung on a line.
The finished strip measures about 4.25 in (10.8 cm) wide and 18.2 in (46.2 cm) long, including the hanging loop and bottom tail. One strip works on its own as a window or wall hanging. Several identical strips hung side by side on a rod, each from its own loop, make a see-through curtain like the one in the photo. The strips are never joined to each other.
This pattern uses US crochet terms throughout.
Construction is simple. You work each fan flat in three rows: a cream spoke row from a magic ring, then two colored rows for the solid band and the scallops. Next you stack the six fans point-to-center. Last, you work one continuous cream frame round that makes the hanging loop, both side rails and the bottom tail.
Finished Size and Construction
- Finished size: 4.25 in x 18.2 in (10.8 cm x 46.2 cm), loop and tail included
- Skill level: Easy+ (adventurous beginner)
- Terminology: US crochet terms
- Yarn weight: DK / light worsted (weight 3) cotton
- Hook: 4.0 mm (G-6)
- Number of pieces: 6 fans, assembled into 1 strip by the frame round
- Layout: 1 column of 6 fans, aqua and coral alternating, aqua at the top
- Fan size: 4 in wide x 2.5 in tall (10.2 cm x 6.4 cm)
- Size before border (stacked fans): 4 in x 15 in (10.2 cm x 38.1 cm)
- Border (frame) depth: about 0.125 in (0.3 cm) per side, plus a 2 in (5.1 cm) loop section at the top and a 1.2 in (3.0 cm) tail at the bottom
Materials
Use a smooth cotton in DK weight, either mercerized or matte, at about 115 m per 50 g. Cotton gives you crisp spokes and firm scallops. It also hangs straight without stretching, which matters for a strip.
Yarn (one strip):
- Aqua (Color A): 8 g / 18 m, for Fans 1, 3 and 5
- Coral (Color B): 8 g / 18 m, for Fans 2, 4 and 6
- Cream (Color C): 10 g / 23 m, for the spokes, frame, loop and tail
These amounts include about 25 percent extra to cover your gauge test and tails. For a curtain, multiply them by the number of strips.
Tools:
- 4.0 mm (G-6) crochet hook
- Tapestry needle
- Scissors
- Locking stitch markers (at least 2)
- Rust-proof pins and a blocking mat or folded towel
- Spray bottle
- Ruler or tape measure
Abbreviations (US Terms)
- ch – chain
- sl st – slip stitch
- sc – single crochet
- dc – double crochet
- dtr – double treble crochet: yarn over 3 times, insert hook, pull up a loop, [yarn over, pull through 2 loops] 4 times
- sk – skip
- sp(s) – space(s)
- st(s) – stitch(es)
- RS / WS – right side / wrong side
- MR – magic ring (adjustable ring)
Special stitch – Scallop: 5 dc in the same stitch.
Gauge and Checkpoints
Gauge: 18 dc and 10 rows = 4 in (10.2 cm) in dc.
Chain gauge: 5 ch = 1 in (2.5 cm), measured on a chain that isn’t stretched.
Make one complete fan first and use it as your swatch. Fan size controls every other measurement.
Checkpoints:
- After Row 1: each spoke is about 1.4 in (3.6 cm) from the ring to its top.
- After Row 2: the fan is about 1.9 in (4.8 cm) tall from point to top edge.
- After Row 3: the fan is 4 in (10.2 cm) wide across its outer ends and 2.5 in (6.4 cm) tall from the point to the top of the center scallop.
- After stacking: the six fans measure 15 in (38.1 cm) from the top of Fan 1 to the point of Fan 6.
Fan too big? Use a 3.75 mm hook.
Fan too small? Use a 4.5 mm hook.
Only the spokes are off? Change the spoke stitch alone. If they’re too long, use a tr (1 fewer yarn over). If they’re too short, use a tr tr (1 more yarn over).

Fan Motif (Make 6)
Make 3 fans in aqua (Color A) and 3 in coral (Color B). Every fan starts with cream spokes.
Row 1 (RS, cream): Make a MR, leaving an 8 in (20.3 cm) starting tail for stacking later. Ch 5 (counts as first dtr), [ch 1, dtr in ring] 6 times. Pull the ring tight. (7 dtr, 6 ch-1 sps)
Pull until the spoke bases close into one tight point. The spokes should open into a wide V of about 130 degrees, not a flat half-circle. Fasten off the working yarn and weave in that end only. Keep the long starting tail.
Row 2 (RS, color): With RS facing, join Color A or B with a sl st in the top of the first spoke (the turning ch-5). Ch 3 (counts as first dc). [3 dc in next ch-1 sp, dc in top of next dtr] 6 times. Turn. (25 dc: 1 + 6 x 4)
These dc posts make the solid colored band across the spoke tips. Each spoke ends under a single dc, so the spokes line up with the band.
Row 3 (WS, same color): Ch 1, sc in first dc. [Sk 1 dc, Scallop in next dc, sk 1 dc, sc in next dc] 6 times. Fasten off, leaving a 4 in (10.2 cm) tail. (6 Scallops and 7 sc; 37 sts total: 7 sc + 30 dc)
Why the count works: Each Row 3 repeat uses 4 stitches, plus 1 to start, so 25 = 4 x 6 + 1. The 7 sc land on Row 2 stitches 1, 5, 9, 13, 17, 21 and 25. The first and last sc are the fan’s left and right end stitches, where the rails attach. The 4th sc, on stitch 13, is the center sc between Scallops 3 and 4.
Weave in the color tails. Keep each fan’s cream starting tail for stacking. Check every fan against the 4 in x 2.5 in (10.2 cm x 6.4 cm) checkpoint before moving on.
Stacking the Fans
Lay the fans RS up in a column, in this order from top to bottom:
- Fan 1, aqua
- Fan 2, coral
- Fan 3, aqua
- Fan 4, coral
- Fan 5, aqua
- Fan 6, coral
Thread the cream starting tail of Fan 1 onto the tapestry needle. Center Fan 1’s point on Fan 2’s center sc. Sew through the center sc 2 to 3 times so the point sits right on that stitch, with no gap and no overlap. Secure the tail and weave it in along a spoke.
Repeat for each pair, working down: Fan 2’s point to Fan 3’s center sc, and so on, ending with Fan 5’s point on Fan 6’s center sc. Fan 6’s point stays free at the bottom of the strip. You can weave in its tail now or leave it until the end.
Checkpoint: The column measures 15 in (38.1 cm) from the top of Fan 1 to the point of Fan 6 (6 fans x 2.5 in / 6.4 cm). The fans’ end stitches should form two straight vertical lines, 4 in (10.2 cm) apart. Place a marker in the left end sc of Fan 1 and another in the right end sc of Fan 6.
Border: Frame Round
The frame is this strip’s border. It is one continuous cream round that makes the loop, the left rail, the tail and the right rail, then closes at the loop.
Border gauge: 5 ch = 1 in (2.5 cm). Each rail segment is 12 ch plus 1 sl st join, and together they span 2.5 in (6.4 cm). That is exactly one fan repeat.
Work with the strip RS up and Fan 1 at the top. Keep every chain relaxed and even, and don’t let it twist.
Hanging loop: With cream, make a slip knot. Ch 15, then sl st in the first ch to form a loop. (15 ch)
The loop hangs about 1.5 in (3.8 cm) long and fits a rod up to 0.75 in (1.9 cm) across.
Left side:
- Ch 12, sl st in the left end sc of Fan 1. This diagonal runs from the loop down to the corner of the top fan.
- Ch 12, sl st in the left end sc of the next fan down. Repeat from * 4 more times, for Fans 2 through 6.
- Ch 13, sl st through the gathered point of Fan 6.
Left side count: 85 ch (12 + 5 x 12 + 13) and 7 sl st joins (6 fan ends + 1 point).
Tail: Ch 7. Sl st in the 2nd ch from hook and in each of the next 5 ch. Sl st through the point of Fan 6 again. (7 ch, 6 sl st along the tail + 1 sl st at the point)
The tail measures about 1.2 in (3.0 cm).
Right side:
- Ch 13, sl st in the right end sc of Fan 6.
- Ch 12, sl st in the right end sc of the next fan up. Repeat from * 4 more times, for Fans 5 through 1.
- Ch 12, sl st in the base of the hanging loop, where you first closed it.
Right side count: 85 ch (13 + 5 x 12 + 12) and 7 sl st joins (6 fan ends + 1 loop base).
Fasten off and weave in the end through the loop chains.
Frame total: 192 ch (15 loop + 85 left + 7 tail + 85 right).
Why the math works:
- The rails match the fans. A new fan starts every 2.5 in (6.4 cm), and each 12-ch segment plus its join also spans 2.5 in (6.4 cm). The rails hang straight without bunching the fans or pulling them out of line.
- The bottom diagonals clear the spokes. Each one is 13 ch, about 2.6 in (6.6 cm). That is a little longer than the 2.5 in (6.4 cm) fan radius, so each rail runs just outside the outer spoke instead of pressing on it.
- The sides match. Each side has exactly 85 ch and 7 joins, so the strip hangs straight down from its loop without twisting.
- Width: The rails add about 0.125 in (0.3 cm) per side, so the 4 in (10.2 cm) fans become a 4.25 in (10.8 cm) strip.
- Length: 15 in (38.1 cm) of fans, plus 2 in (5.1 cm) of loop section, plus the 1.2 in (3.0 cm) tail, gives 18.2 in (46.2 cm).
Final Blocking
- Lay the strip RS up on a blocking mat or folded towel.
- Spray it evenly until it is damp but not soaked.
- Pin the hanging loop at the top. Measure 15.5 in (39.4 cm) down to the point of Fan 6 and pin there. That distance is the 0.5 in (1.3 cm) from the loop base to Fan 1 plus the 15 in (38.1 cm) column.
- Pin the two outer ends of each fan so the rails form straight parallel lines 4.25 in (10.8 cm) apart.
- Open each fan into its wide V and pin every spoke tip so the 7 spokes are evenly spaced.
- Round each Scallop with your fingertips. Pin the sc between the scallops so the valleys are even.
- Let the strip dry completely, then unpin.
- Hang it for a day. Cotton relaxes a little, so this shows you whether any rail needs a gentle re-press.
Final Quality-Control Checklist
- The six fans run aqua, coral, aqua, coral, aqua, coral from the top.
- Every fan has 7 cream spokes coming from one tight point.
- Every fan has 25 dc in Row 2, and 6 Scallops with 7 sc in Row 3.
- Every fan measures 4 in x 2.5 in (10.2 cm x 6.4 cm).
- Each fan’s point sits on the center sc of the fan below.
- The column measures 15 in (38.1 cm) before the frame.
- The left side and right side each have 85 ch and 7 joins.
- The loop is 15 ch and closed at its own base.
- The finished strip measures 4.25 in x 18.2 in (10.8 cm x 46.2 cm).
- All tails are woven in, and none show on the RS.
Troubleshooting
Spokes spread into a flat half-circle: The ring is too loose. Pull the MR tail firmly before joining the color, and block the spokes into a V of about 130 degrees.
Scallops ruffle or curl: Row 2 has more than 25 dc. Recount: there should be 3 dc in each space and 1 dc on each spoke top.
Scallops are uneven: Check that the sc land on Row 2 stitches 1, 5, 9, 13, 17, 21 and 25.
Rails pucker the strip: The chains are too tight. Rework them more loosely, or use a hook one size larger for the frame only.
Rails sag between fans: The chains are too loose. Use a smaller hook for the frame, or work 11 ch per segment, changing both sides the same way.
Strip twists when hung: The two sides don’t match. Count each side again; both must have 85 ch and 7 joins.
A fan tilts: Its point is sewn off-center. Sew it again, exactly on the 4th sc.
Care
Hand wash in cool water with mild soap, roll the strip in a towel to remove water, and dry it flat, re-pinning if needed. Don’t tumble dry, because heat and agitation can stretch the rails.
Final Notes
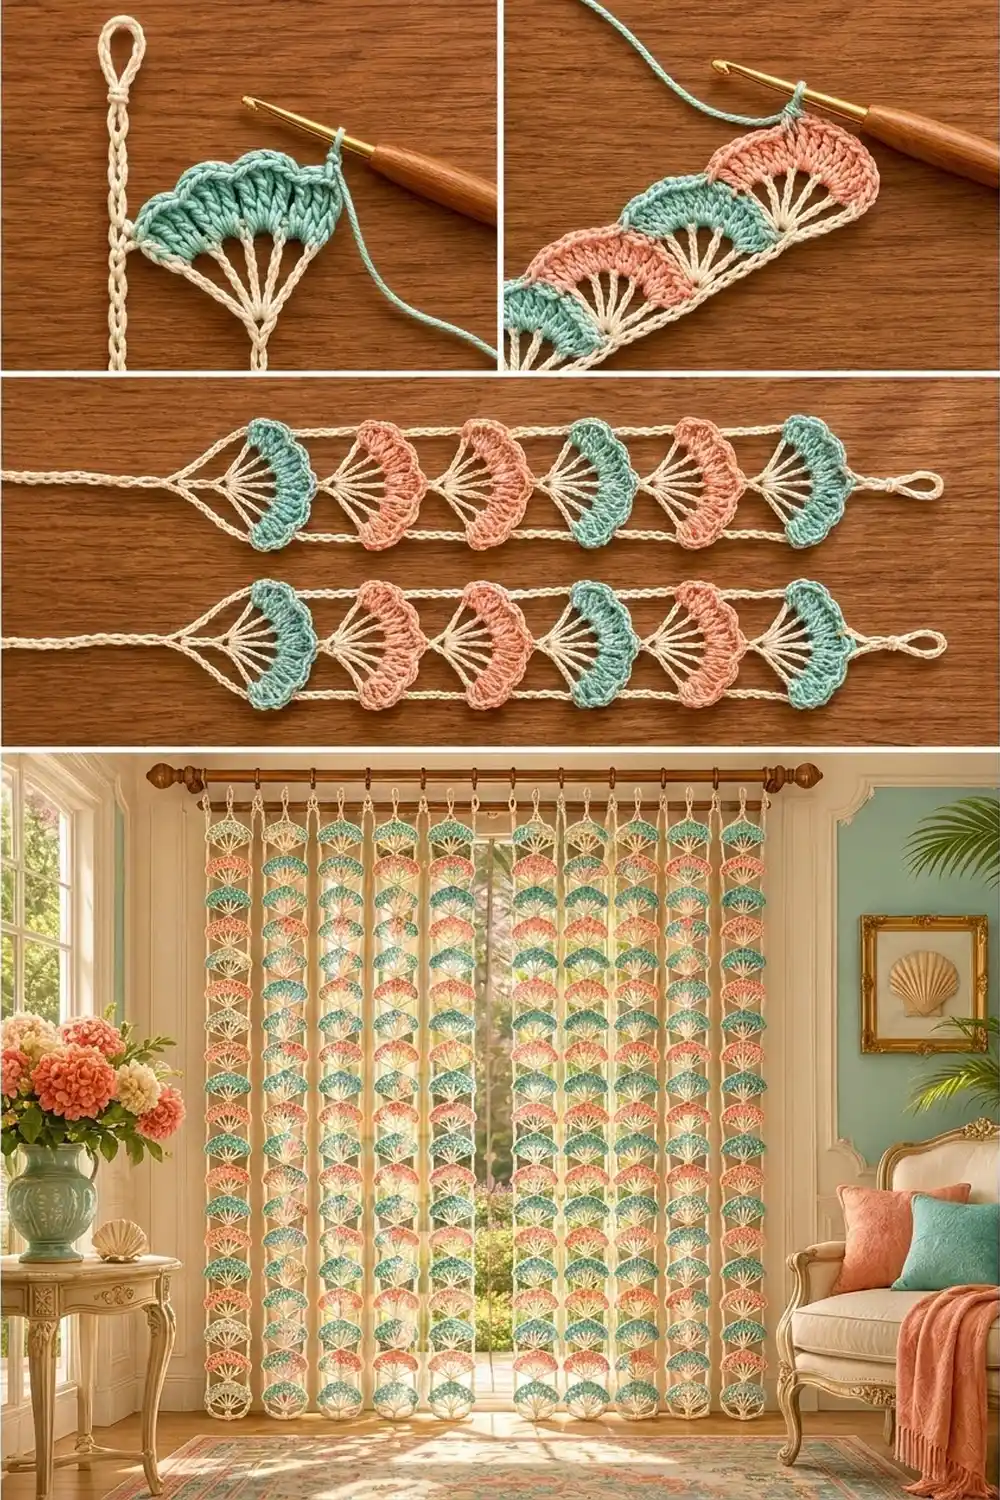
The whole strip follows one chain of measurements. Each fan is 4 in x 2.5 in (10.2 cm x 6.4 cm) and is built from 7 spokes, 25 dc and 6 Scallops. Six fans stack to 15 in (38.1 cm). The 12-ch rail segments match the 2.5 in (6.4 cm) fan repeat, and both 85-ch sides are identical. Together that gives a finished strip of 4.25 in x 18.2 in (10.8 cm x 46.2 cm). If your first fan measures correctly, the rest of the numbers will follow. For a curtain, make as many identical strips as your rod needs and hang each one from its own loop.
Happy crocheting!