

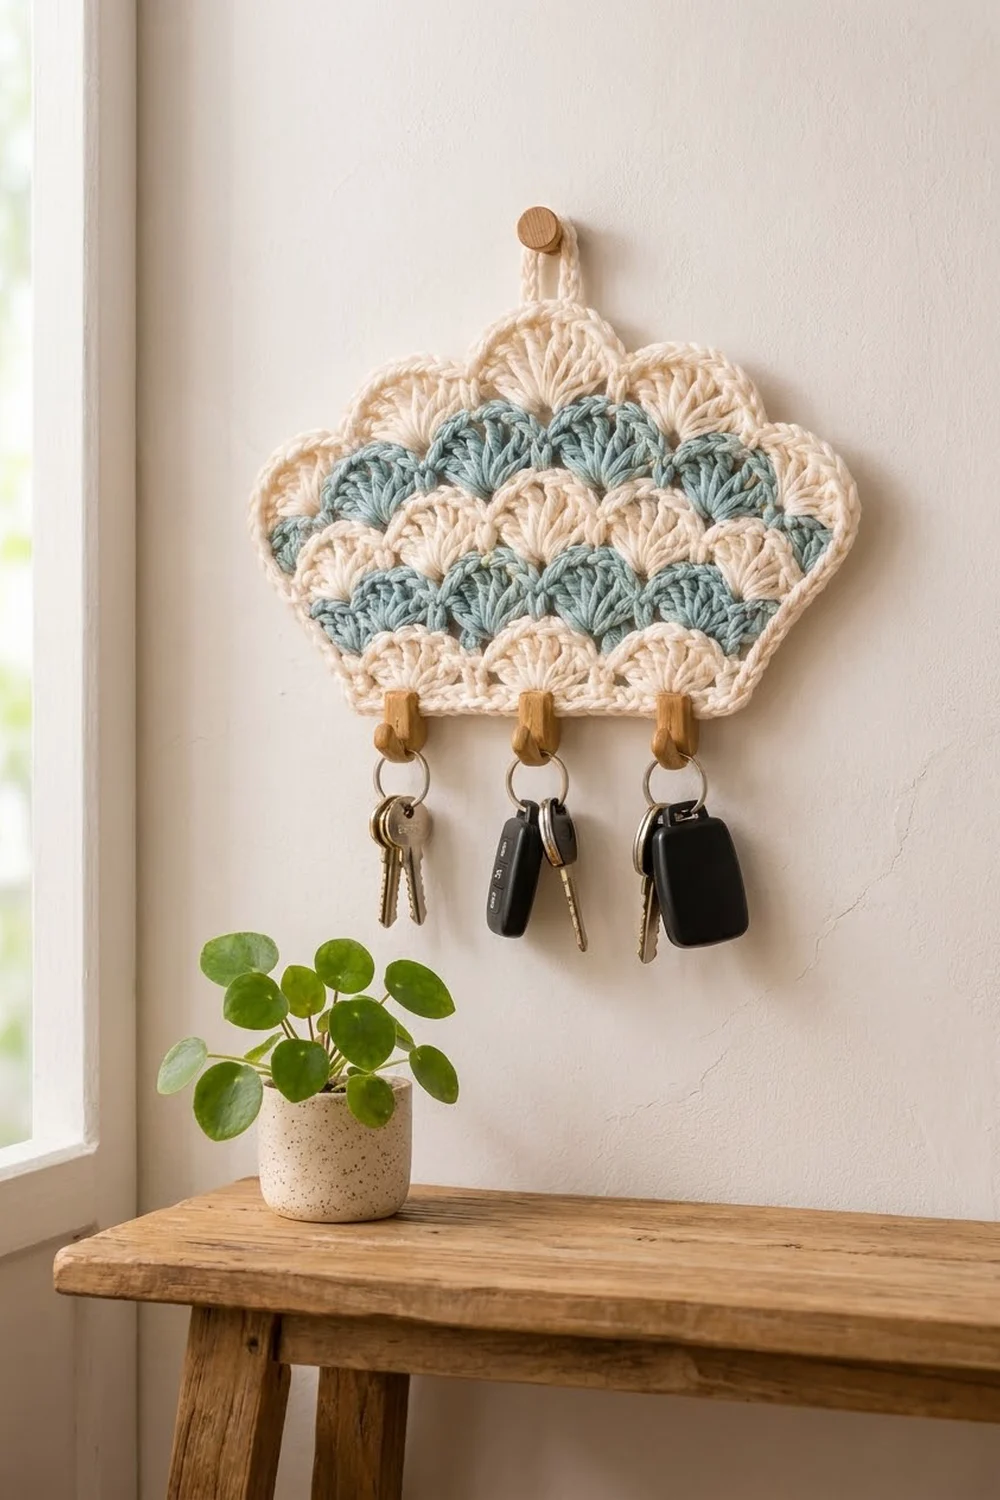
This little wall organizer is one crocheted panel with five rows of shell stitch in soft cream and dusty blue. The panel is shaped like an upside-down trapezoid, narrow at the bottom and wide at the top, so it reads as a fan of scallops. Three wooden peg hooks sit along the straight bottom edge to hold your keys, and a small loop at the top center hangs it on a wall knob.
The look is calm and coastal: two neutral colors, chunky fans of double crochet, and a rope-like crab stitch border that frames the whole piece. It suits an entryway, a kitchen wall, or a hall near the door.
This pattern uses US crochet terms. The finished panel measures 9 in (22.9 cm) across the top scallops, 5.75 in (14.6 cm) across the bottom, and 5 in (12.7 cm) tall, not counting the hanging loop.
You work the panel flat in rows from the bottom up. A single crochet base row sets the straight bottom edge. Five shell rows follow, and the shells fan outward at the row ends so the panel gets wider as it grows. A two-round border, a chain hanging loop, and the peg hooks finish it.
Finished Size and Construction
- Finished size: 9 in (22.9 cm) top width x 5.75 in (14.6 cm) bottom width x 5 in (12.7 cm) tall
- Skill level: Easy to intermediate
- Terminology: US crochet terms
- Yarn weight: Worsted (#4), cotton or cotton blend
- Hook: 5 mm (H-8)
- Number of pieces: 1 single panel
- Layout: One shaped panel, no joining
- Size before border: 8 in (20.3 cm) top x 4.75 in (12.1 cm) bottom x 4 in (10.2 cm) tall
- Border depth: 0.5 in (1.3 cm) on every edge
- Hanging loop: 1.5 in (3.8 cm) tall, at top center
Materials
Pick a smooth worsted cotton with clear stitch definition. Cotton holds the shell shapes crisply and doesn’t stretch much under the weight of keys. Acrylic works too, but the panel will be softer and may sag more.
- Cream (Color A): 45 g, about 90 m
- Dusty blue (Color B): 20 g, about 40 m
These quantities include a margin of about 25 percent for your gauge check and for weaving in ends.
Tools and hardware:
- 5 mm (H-8) crochet hook
- Tapestry needle
- Scissors and stitch markers
- 3 small wooden peg hooks, about 1.25 in (3.2 cm) long
- 1 thin wooden strip, 5 x 0.75 in (12.7 x 1.9 cm), for mounting the pegs
- Strong wood or craft glue
- Optional: plastic canvas or stiff felt cut to the finished shape, to back the panel
- A wall knob or nail for hanging
Abbreviations (US Terms)
- ch – chain
- sl st – slip stitch
- sc – single crochet
- dc – double crochet
- sk – skip
- st(s) – stitch(es)
- RS / WS – right side / wrong side
- rev sc – reverse single crochet (crab stitch)
Special stitches
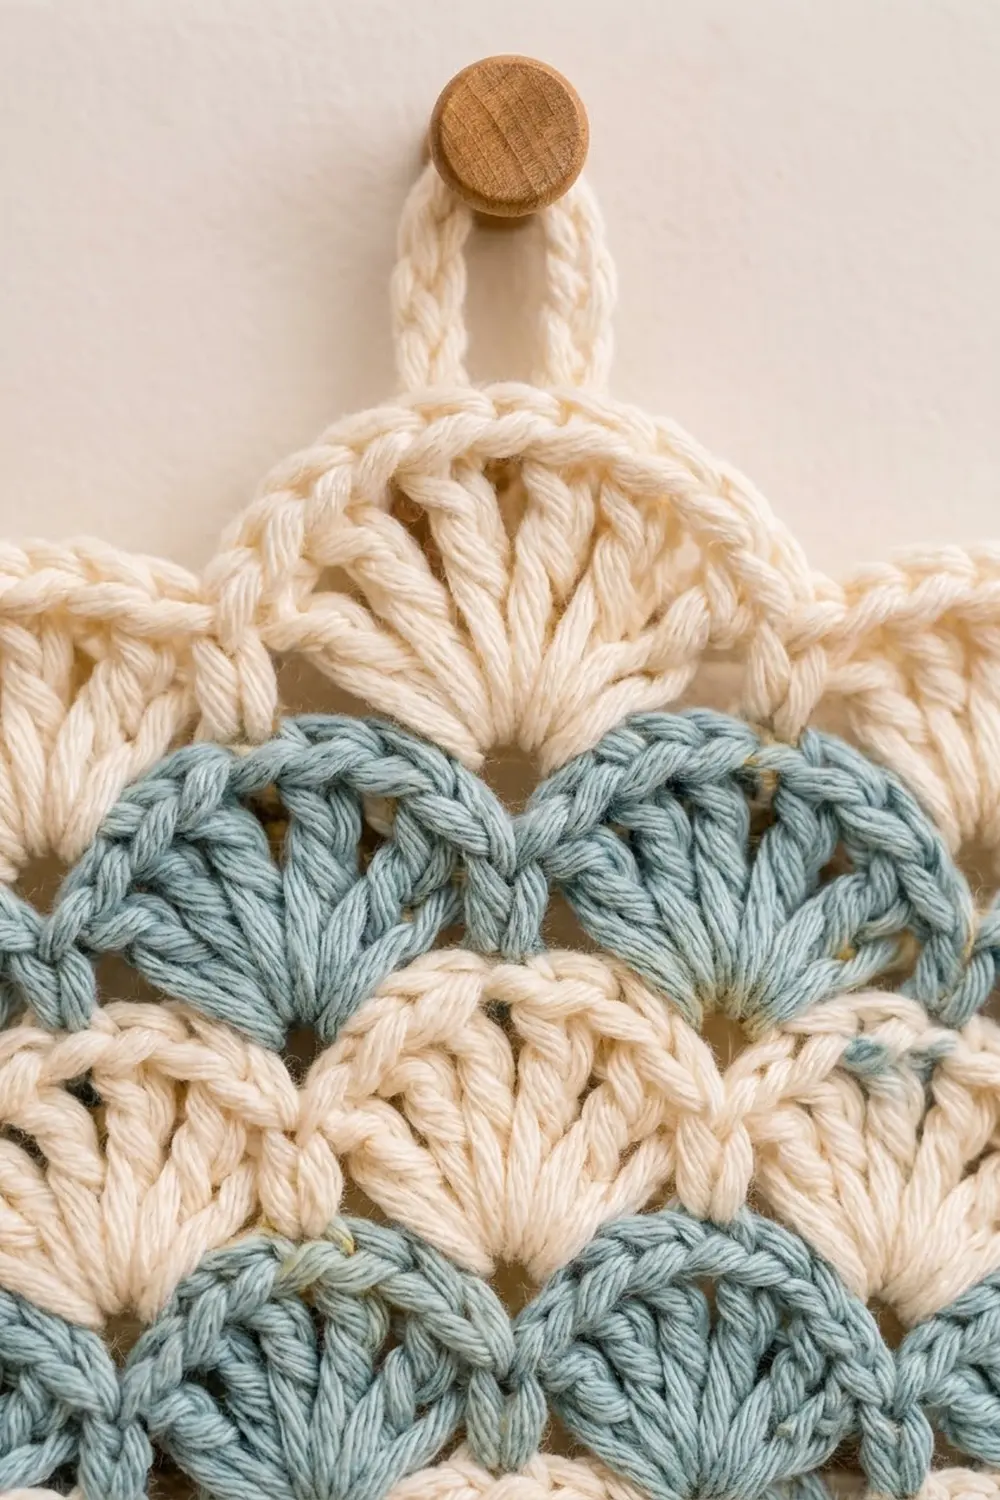
- Shell: 7 dc in the same stitch.
- Half shell: 4 dc in the same stitch. When it starts a row, work ch 3 (counts as the first dc) and then 3 dc in the same stitch.
- Reverse sc (crab stitch): Work from left to right (right to left if you crochet left-handed). Insert the hook into the next stitch to the right, yarn over, pull up a loop, then yarn over and pull through both loops.
Gauge and Checkpoints
Gauge: 16 sc = 4 in (10.2 cm). One shell row = 0.75 in (1.9 cm) tall.
The panel is small, so the easiest test is to work Rows 1 and 2 as your swatch. Row 1 should measure 4.75 in (12.1 cm) wide, and the piece should be 1 in (2.5 cm) tall after Row 2. If it matches, keep going. You’ve just made the start of the panel.
Checkpoints (total height from the bottom edge):
- After Row 1: 4.75 in (12.1 cm) wide, 0.25 in (0.6 cm) tall
- After Row 2: 4.75 in (12.1 cm) wide, 1 in (2.5 cm) tall
- After Row 3: about 6 in (15.2 cm) wide, 1.75 in (4.4 cm) tall
- After Row 4: about 6.5 in (16.5 cm) wide, 2.5 in (6.4 cm) tall
- After Row 5: about 6.5 in (16.5 cm) wide, 3.25 in (8.3 cm) tall
- After Row 6: about 8 in (20.3 cm) across the scallop tips, 4 in (10.2 cm) tall at the center peak
Widths from Row 3 on are approximate because the shells fan out. Heights are the more reliable check.
Too big? Go down to a 4.5 mm hook. Too small? Go up to a 5.5 mm hook. Shell rows that come out short usually mean your double crochet is tight, so pull up each loop a little taller.
Panel Pattern
The panel is worked flat in turned rows. Fasten off at each color change, leaving a 6 in (15.2 cm) tail, and weave in the tails along the edges as you go. In the counts below, every shell has 7 sts, every half shell has 4 sts, and a turning ch-3 counts as a dc.
Row 1 (Color A, base)
Ch 20.
Sc in 2nd ch from hook and in each ch across, turn. (19 sc)
This is the straight bottom edge where the peg hooks will go.
Row 2 (Color A, first shell row)
Ch 1, sc in first st, sk 2 sts, shell in next st, sk 2 sts, sc in next st; repeat from * 2 more times. Turn. (3 shells, 4 sc = 25 sts)
Check: 1 + (3 x 6) = 19 sts used, which matches Row 1. Fasten off Color A.
Row 3 (Color B, widening row)
Join Color B in the first sc. Ch 3 (counts as dc), 6 dc in same st (first shell made), sc in 4th dc of next shell, shell in next sc; repeat from * 2 more times. Turn. (4 shells, 3 sc = 31 sts)
Because full shells go into the end sc stitches, the two outer shells fan out past the edge. This is what widens the panel. Fasten off Color B.
Row 4 (Color A, half-shell row)
Join Color A in the first st (the last dc of Row 3). Ch 3 (counts as dc), 3 dc in same st (half shell made), sc in 4th dc of same shell, shell in next sc, sc in 4th dc of next shell; repeat from * 2 more times, 4 dc in top of turning ch-3 (half shell made). Turn. (3 shells, 2 half shells, 4 sc = 33 sts)
Check: (3 x 7) + (2 x 4) + 4 = 33. The half shells lean outward a little at each end, so the edge keeps a gentle flare. Fasten off Color A.
Row 5 (Color B, full shell row)
Join Color B in the first st. Ch 1, sc in same st, shell in next sc, sc in 4th dc of next shell; repeat from * 2 more times, shell in next sc, sc in top of turning ch-3. Turn. (4 shells, 5 sc = 33 sts)
The first and last sc sit on the outer edge of the half shells. This row holds the width steady and gives Row 6 a firm anchor at each end. Fasten off Color B.
Row 6 (Color A, top scallop row)
Join Color A in the first sc. Ch 3 (counts as dc), 6 dc in same st (first shell made), sc in 4th dc of next shell, shell in next sc; repeat from * 3 more times. (5 shells, 4 sc = 39 sts)
These five shells make the scalloped top edge. The third shell is the center peak, where the hanging loop will go. Don’t fasten off. Continue straight into the border.
Border
Border gauge: Round 1 follows the body gauge of 4 sc per 1 in (2.5 cm) along the straight bottom edge. Round 2 adds 1 rev sc per sc, with no increases. Each round adds about 0.25 in (0.6 cm), so the border adds 0.5 in (1.3 cm) on every edge.
Round 1 (Color A)
With the RS facing, ch 1 and turn the work to go down the side edge.
- First side: Work 3 sc along the side of the Row 6 shell, 2 sc in the end of Row 5, 3 sc in the end of Row 4, 3 sc in the end of Row 3, 2 sc in the end of Row 2, and 1 sc in the end of Row 1. (14 sc)
- Bottom: Working into the free loops of the foundation chain, 3 sc in the first ch (corner), sc in each of the next 17 ch, 3 sc in the last ch (corner). (19 + 4 = 23 sc)
- Second side: Repeat the first side in reverse order: 1 sc in Row 1, 2 in Row 2, 3 in Row 3, 3 in Row 4, 2 in Row 5, 3 along the side of the Row 6 shell. (14 sc)
- Top: For each of the 5 shells, sc in the first 3 dc, 3 sc in the 4th dc (peak), sc in the next 3 dc. Skip each sc between the shells. (35 + 10 = 45 sc)
Join with a sl st to the first sc. (96 sc)
Why the math works: The bottom has 19 foundation chains worked 1 per chain, plus 2 extra sc at each corner, for 23. The top has 35 shell sts worked 1 per st, plus 2 extra sc at each of the 5 peaks, for 45. Skipping the 4 valley sc keeps the dips between the scallops sharp. Each side gets 1 sc for the sc row, 2 or 3 for each taller row, and 3 for the top shell. That makes 14 per side, which keeps the edges flat without ruffling. Total: 14 + 23 + 14 + 45 = 96.
Round 2 (Color A, crab stitch)
Ch 1, rev sc in each sc around. Join with a sl st to the first rev sc. (96 rev sc)
Since it’s 1 stitch into 1 stitch, the count stays at 96. The crab stitch makes a corded, rope-like edge that holds the scallops crisply. Don’t fasten off yet.
Hanging Loop
Sl st along the top to the center st of the 3rd shell’s peak. Ch 12, sl st in the same st. Ch 1, work 16 sc into the ch-12 space, and sl st into the base. (16 sc)
The loop stands 1.5 in (3.8 cm) tall. Fasten off and weave in the end through the back of the border.
Attaching the Peg Hooks
Glue the 3 wooden pegs to the wooden strip: one at the center and one 2 in (5.1 cm) to each side of center. Let them dry completely.
Lay the panel WS up. Center the strip along the bottom edge so the pegs stick out just below the border. Sew the strip in place with Color A, wrapping the yarn around the strip between the pegs and stitching through the back loops of Row 1 and border Round 1. If you’re using a plastic canvas or felt backing, sew it to the back of the panel first, then sew the strip through both layers.
Final Blocking
- Lightly mist the panel with water, or soak it and press out the extra water in a towel.
- Lay it RS up on a blocking mat.
- Pin the bottom edge straight to 5.75 in (14.6 cm).
- Pin each scallop peak along a gentle curve so the top measures 9 in (22.9 cm) across.
- Pin the center peak so the panel is 5 in (12.7 cm) tall.
- Shape each shell with your fingers so the dc fan evenly and the blue shells sit neatly between the cream ones.
- Let it dry completely before you attach the hooks or hang it.
Final Quality-Control Checklist
- Row 1 has 19 sc and a straight bottom edge.
- Rows 2 to 6 have 3 shells, 4 shells, 3 shells plus 2 half shells, 4 shells, and 5 shells.
- Colors run cream, cream, blue, cream, blue, cream from the bottom up.
- Border Round 1 has 96 sc: 14 per side, 23 on the bottom, 45 on the top.
- Border Round 2 has 96 rev sc, with no ruffles or puckers.
- The panel measures 9 in (22.9 cm) x 5.75 in (14.6 cm) x 5 in (12.7 cm).
- The loop sits at the center peak.
- The pegs are evenly spaced 2 in (5.1 cm) apart and firmly attached.
- All ends are woven in on the WS.
Troubleshooting
The panel doesn’t widen. Check Rows 3 and 6. They must start with ch 3 and 6 dc in the first sc, and end with a full shell in the last sc.
The sides ruffle. You have too many border sc along the side edges. Use 2 sc in the taller rows instead of 3.
The bottom edge curls. Your border sc are too tight. Go up a hook size for Round 1 along the bottom only.
The shells look flat. Make sure each sc lands in the 4th dc of the shell below, not the 3rd or 5th.
The panel sags under keys. Add a plastic canvas or stiff felt backing, and make sure the strip is sewn through the back of Row 1, not only the border.
The crab stitch twists. Keep the loops loose and insert the hook from front to back each time.
Care
Take off the hooks and hardware, then hand wash in cool water and lay flat to dry. Reshape the scallops while damp.
Final Notes
Row 1 is 19 sc, which measures 4.75 in (12.1 cm). Each shell row adds 0.75 in (1.9 cm), so before the border the panel is 4 in (10.2 cm) tall and 8 in (20.3 cm) wide at the top. Two border rounds add 0.5 in (1.3 cm) on every edge, for a finished size of 9 in (22.9 cm) x 5.75 in (14.6 cm) x 5 in (12.7 cm). If your gauge matches at Row 2 and your counts match at every row, the shape will come out right.
Happy crocheting!