

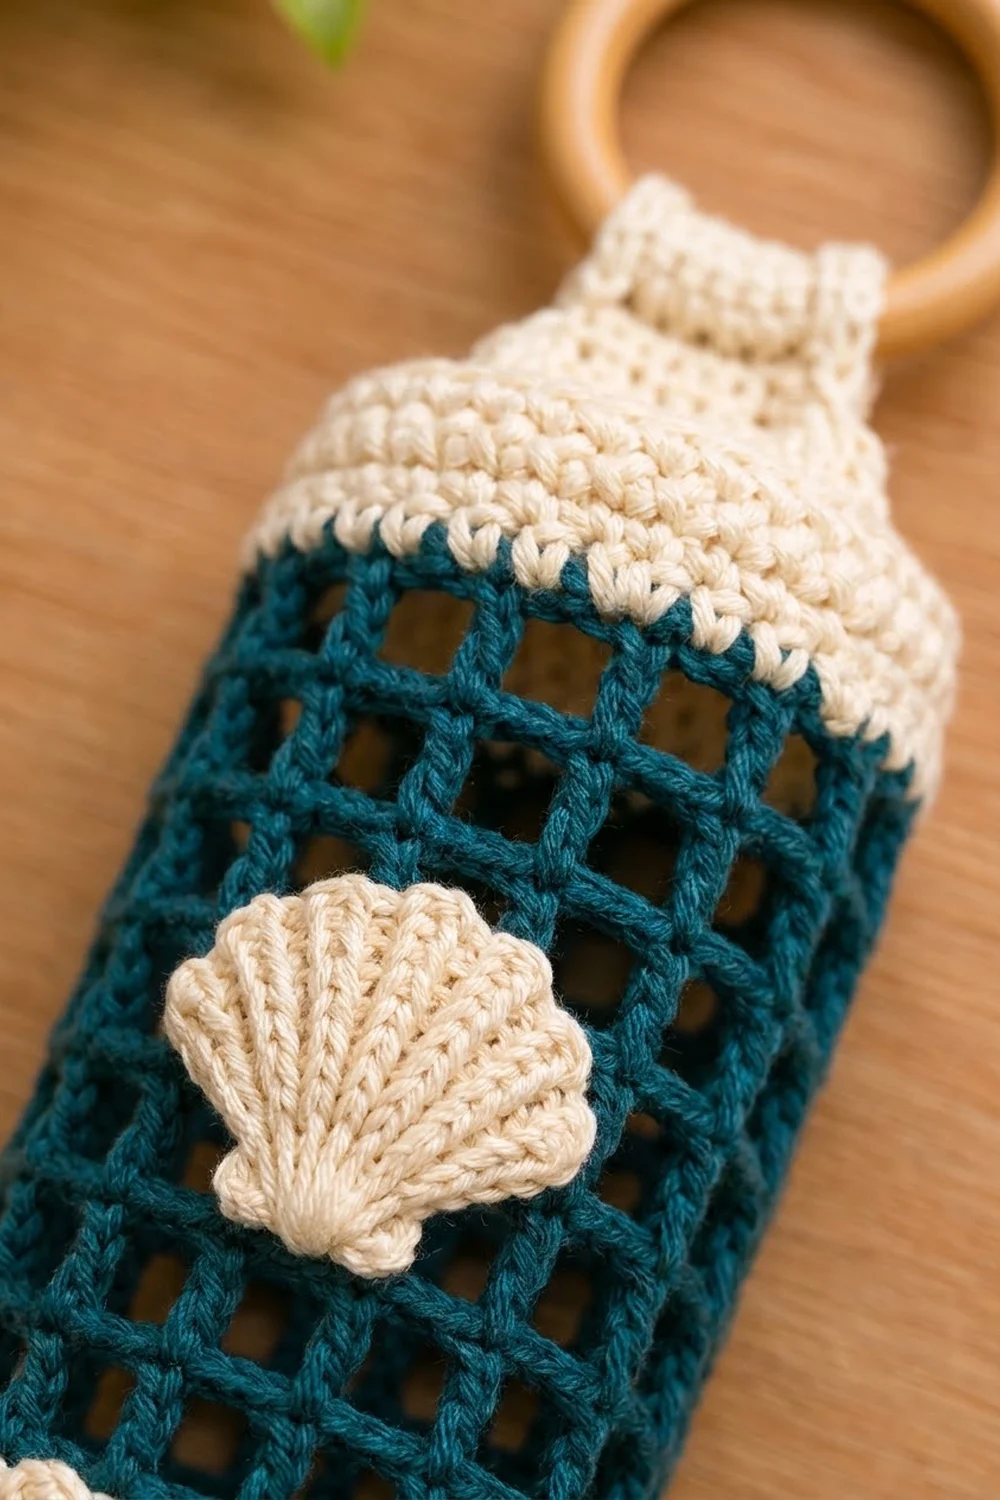
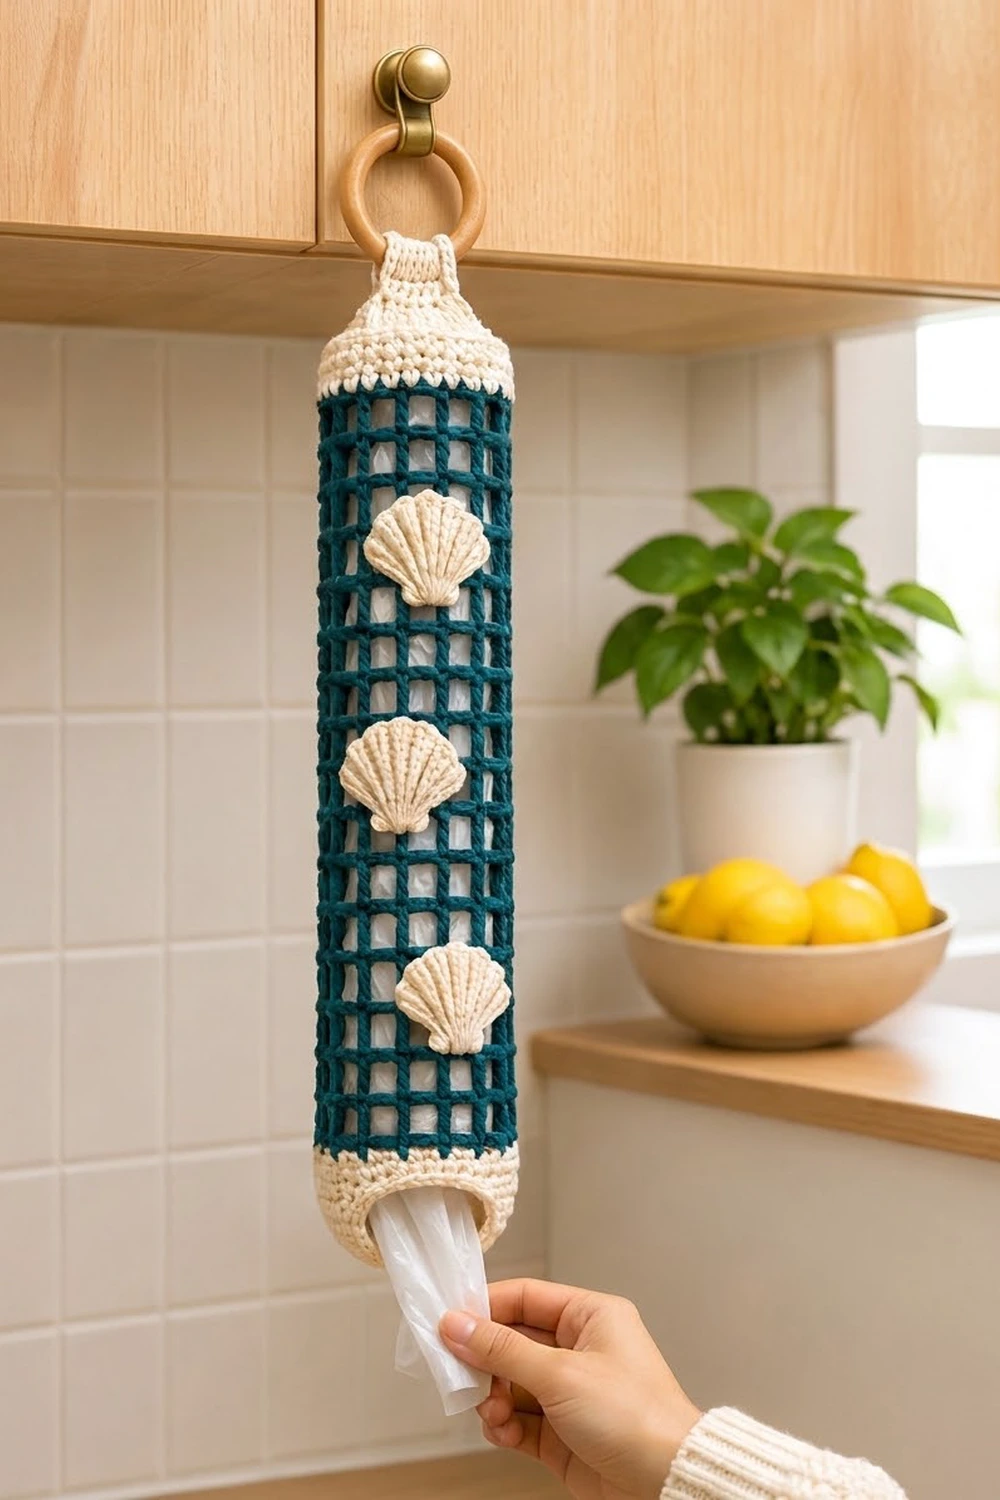
This bag holder brings a bit of the beach into your kitchen. It’s a long tube with a deep teal mesh body, a solid cream base with a pull-out slot, a cream top band, and three textured scallop shells running down the front. It hangs from a wooden ring, so it fits on a cabinet knob, a hook or the inside of a pantry door.
The colors are simple: teal for the open mesh and cream for the base, top band, hanging tab and shells. The mesh shows the bags inside, so you can see at a glance when it’s time to refill.
This pattern uses US crochet terms. The finished holder is 4.5 in (11.4 cm) wide when flat, 9 in (22.9 cm) around, and 16.25 in (41.3 cm) tall for the body alone. With the tab and ring, it hangs about 21 in (53.3 cm) long.
You start at the bottom with an oval single-crochet base, then work the cream walls in joined rounds and leave a chain slot for the bags to come out. Next, you switch to teal for 18 rounds of mesh, then finish with a cream top band. The tab and three shells are made separately and sewn on.
Finished Size and Construction
- Finished size: 4.5 in (11.4 cm) wide flat × 16.25 in (41.3 cm) tall body
- Circumference: 9 in (22.9 cm), 36 stitches
- Skill level: Easy-intermediate
- Terminology: US
- Yarn weight: Worsted (#4) cotton or cotton blend
- Hook: US H-8 (5 mm)
- Number of pieces: 1 tubular body + 1 tab + 3 shell appliqués, sewn into one item
- Layout: Shells stacked vertically down the center front, 3.5 in (8.9 cm) apart center to center
- Body size before top band: 15 in (38.1 cm) tall
- Top band (border) depth: 1.25 in (3.2 cm)
- Base oval: about 3.75 × 1.5 in (9.5 × 3.8 cm)
Materials
Choose a smooth, firm cotton. It holds the tube shape, doesn’t stretch out under the weight of the bags, and makes crisp shell ridges. Acrylic also works, but the mesh may sag a little more.
- Color A, Cream: 60 g / about 115 m (base, top band, tab, shells)
- Color B, Teal: 70 g / about 130 m (mesh body)
Tools:
– US H-8 (5 mm) crochet hook
– Wooden ring, 3 in (7.6 cm) outer diameter
– Tapestry needle
– 4 stitch markers
– Measuring tape
– Pins and a spray bottle for blocking
The yarn amounts include a safety margin of about 15%.
Abbreviations (US Terms)
- ch: chain
- sl st: slip stitch
- sc: single crochet
- hdc: half double crochet
- dc: double crochet
- sc2tog: single crochet 2 together
- blo: back loop only
- fpdc: front post double crochet
- sp(s): space(s)
- st(s): stitch(es)
- RS / WS: right side / wrong side
- rnd(s): round(s)
Special stitch — reverse sc (crab stitch): With the RS facing, work single crochet from left to right (right to left if you’re left-handed): insert the hook into the next stitch to the right, yarn over, pull up a loop, yarn over, and draw through both loops.
Gauge and Checkpoints
- Sc gauge: 16 sc × 16 rnds = 4 in (10.2 cm)
- Mesh gauge: 1 mesh square (dc + ch 2) = 0.75 in (1.9 cm) wide; 4 mesh rnds = 3 in (7.6 cm) tall
Work the base and Rnds 4–9 first and use them as your gauge test. Lay the cup flat. It should measure 4.5 in (11.4 cm) across, and the walls should be 1.5 in (3.8 cm) tall.
Checkpoints:
– After Rnd 3, the base oval measures about 3.75 in (9.5 cm) long.
– After Rnd 9, the cup measures 4.5 in (11.4 cm) wide flat.
– After 8 mesh rnds (Rnd 17), the mesh section measures 6 in (15.2 cm) tall.
– After Rnd 27, the body measures 15 in (38.1 cm) tall.
If the cup is too big, go down a hook size. If it’s too small, go up one size. Don’t change the stitch counts, because the mesh repeat depends on exactly 36 stitches.
Body: Cream Base
Use Color A. Join each round with a sl st to the first sc. The beginning ch 1 does not count as a stitch.
Ch 12.
Rnd 1: Sc in 2nd ch from hook, sc in next 9 ch, 3 sc in last ch. Working along the opposite side of the foundation chain, sc in next 9 ch, then 2 sc in the same ch as the first sc. Join. (24 sc)
Rnd 2: Ch 1, 2 sc in first st, sc in next 9 sts, 2 sc in each of next 3 sts, sc in next 9 sts, 2 sc in each of last 2 sts. Join. (30 sc)
Rnd 3: Ch 1, [sc in next st, 2 sc in next st] once, sc in next 9 sts, [sc in next st, 2 sc in next st] 3 times, sc in next 9 sts, [sc in next st, 2 sc in next st] twice. Join. (36 sc)
Each round adds 3 stitches at each end of the oval, so the long sides stay straight and the ends curve.
Body: Cream Walls and Slot
Rnd 4: Ch 1, sc blo in each st around. Join. (36 sc) This turns the edge up into a wall.
Rnd 5: Ch 1, sc in each st around. Join. (36 sc)
Before Rnd 6, find the center of one long side and mark it. This side is the front.
Rnd 6 (slot): Ch 1, sc in next 6 sts, ch 12, skip next 12 sts, sc in next 18 sts. Join. (24 sc + 12 ch = 36 sts) If the 12 chains don’t sit centered on your marked front, shift the 6 and 18 counts by the same amount until they do. The total stays 6 + 12 + 18 = 36.
Rnd 7: Ch 1, sc in each sc and in each ch around. Join. (36 sc)
Rnds 8–9: Ch 1, sc in each st around. Join. (36 sc) Fasten off Color A.
The slot is 12 stitches wide, which is 3 in (7.6 cm) at gauge. That’s wide enough to pull a bag through but small enough that the bags don’t fall out on their own.
Slot edging: With the RS facing, join Color A at one corner of the slot. Work 1 sc in the corner, 12 sc along the long edge, 1 sc in the other corner and 12 sc along the opposite long edge. Join. (26 sc) Fasten off and weave in the end. This round gives the opening a smooth, firm rim.
Body: Teal Mesh
Join Color B in the first st of Rnd 9.
Rnd 10: Ch 5 (counts as dc + ch 2), skip next 2 sts, dc in next st, ch 2, skip next 2 sts. Repeat from * 10 more times. Join with sl st to 3rd ch of beg ch-5. (12 dc, 12 ch-2 sps = 36 sts)
Rnds 11–27: Sl st into the top of the joining dc if needed. Ch 5 (counts as dc + ch 2), skip ch-2 sp, dc in next dc, ch 2, skip ch-2 sp. Repeat from * 10 more times. Join to 3rd ch of beg ch-5. (12 dc, 12 ch-2 sps per rnd)
That makes 18 mesh rounds in total. Stack each dc directly on the dc below it so the windows stay square and the columns run straight up the tube. Fasten off Color B.
Checkpoint: The mesh section measures 13.5 in (34.3 cm) tall, and the body is 15 in (38.1 cm) from the base fold to the top of Rnd 27.
Shell Appliqués (Make 3)
Use Color A.
Row 1 (RS): Make a magic ring. Ch 3 (counts as dc), 6 dc in ring, then pull the ring tight. (7 dc) Turn.
Row 2 (WS): Ch 3 (counts as dc), dc in same st, 2 dc in each st across. (14 dc) Turn.
Row 3 (RS): Ch 2 (does not count), fpdc around next st, 2 dc in next st. Repeat from * 6 more times. (7 fpdc + 14 dc = 21 sts) Turn.
The 7 front post stitches make the raised ridges that fan out from the base.
Row 4 (WS, scalloped edge): Ch 1, (hdc, dc) in next dc, (dc, hdc) in next dc, sl st in next fpdc. Repeat from * 6 more times. (7 scallops of 4 sts + 7 sl sts = 35 sts) Each scallop sits between two ridges, so the top edge waves.
Hinge: Without turning, rotate the shell and work along the bottom edge as follows: 2 sc across the row ends of Rows 4–3, 1 sc into the ring center, then 2 sc across the row ends on the other side. (5 sc)
Fasten off and leave a 12 in (30.5 cm) tail for sewing.
Each shell measures about 2 in (5.1 cm) wide × 1.75 in (4.4 cm) tall.
Hanging Tab
Use Color A. Ch 5.
Row 1: Sc in 2nd ch from hook and in each ch across. (4 sc)
Rows 2–20: Ch 1, turn, sc in each st across. (4 sc)
Fasten off and leave a 12 in (30.5 cm) tail. The tab measures 1 in (2.5 cm) wide × 5 in (12.7 cm) long.
Border: Cream Top Band
The top band works as the border of the body. It turns the open mesh into a solid, firm rim that holds the tube’s shape and gives the tab a strong place to attach.
Border gauge: Same as the body: 16 sc = 4 in (10.2 cm), 4 rnds = 1 in (2.5 cm).
Join Color A in any dc of Rnd 27. Lay the tube flat with the slot centered on the front. Place markers at the two side folds, so that 6 mesh squares sit on the front and 6 on the back.
Rnd 28 (conversion): Ch 1, sc in next dc, 2 sc in next ch-2 sp. Repeat from * 11 more times. Join. (12 sc into dc + 24 sc into sps = 36 sc; 18 front, 18 back)
Rnds 29–31: Ch 1, sc in each st around. Join. (36 sc; 18 front, 18 back)
Rnd 32: Ch 1, reverse sc in each st around. Join. (36 reverse sc; 18 front, 18 back)
Fasten off and weave in the ends.
Why the math works: Each mesh square holds 3 stitches’ worth of width: 1 dc + 2 chains. Rnd 28 puts back exactly those 3 stitches per square: 1 sc in the dc and 2 sc in the space. Twelve squares × 3 = 36, which matches the base count. The band therefore stays the same width as the cup, 4.5 in (11.4 cm) flat, and doesn’t flare or pull in.
That’s 5 rounds at 4 rounds per inch, so the band adds 1.25 in (3.2 cm). With the 15 in (38.1 cm) from the base fold to the top of Rnd 27, the body totals 16.25 in (41.3 cm).
Assembly
- Tab: Fold the tab around the wooden ring so the ends meet. Pin the overlapping ends to the inside of the back top band, centered between the side markers, with about 1 in (2.5 cm) of tab inside the band. Whipstitch all around the overlapped section through Rnds 28–31. The ring should sit centered above the opening.
- Shells: Lay the body flat with the slot facing up. Place the hinge (base) of each shell downward, centered over the middle mesh column.
- Shell spacing: Measure the mesh section from its top edge. Place the center of the first shell 3.25 in (8.3 cm) below the top band, the second 3.5 in (8.9 cm) below that, and the third another 3.5 in (8.9 cm) lower. That leaves 3.25 in (8.3 cm) above the cream base: 3.25 + 3.5 + 3.5 + 3.25 = 13.5 in (34.3 cm).
- Sew each shell around its outer edge and hinge, catching only the dc posts and chains of the mesh. Keep your stitches small so they hide under the scallops.
Final Blocking
- Weave in all remaining ends along the cream rounds, not through the mesh, where they would show.
- Roll a towel to 9 in (22.9 cm) around, or use a cardboard tube, and slide it inside the body.
- Mist the body evenly until it’s damp but not wet.
- Straighten the mesh columns so every dc lines up vertically. Square up the windows with your fingers.
- Pat the slot open into an even oval, and press the shell ridges and scallops into shape.
- Check the flat width: 4.5 in (11.4 cm). Check the body height: 16.25 in (41.3 cm).
- Let it dry completely on the form before hanging.
Final Quality-Control Checklist
- Rnds 3–9 and 28–31 each have 36 sc.
- Every mesh round has 12 dc and 12 ch-2 spaces.
- The mesh columns run straight, with no spiraling.
- The slot is centered on the front, and its edging has 26 sc.
- Each shell has 7 ridges and 7 scallops.
- The shells are centered and spaced 3.5 in (8.9 cm) apart.
- The tab is sewn securely and the ring hangs level.
- The body measures 4.5 × 16.25 in (11.4 × 41.3 cm) flat.
Troubleshooting
The mesh spirals or leans. You’re probably working the joining dc into the wrong stitch. Always start with ch 5 placed directly above the previous round’s joining dc.
The mesh windows are taller than they are wide. Your dc is tall. Try a tighter yarn-over, or go down one hook size for the mesh only.
The top band flares. Check Rnd 28. You should have exactly 2 sc in each space, not 3.
The slot gaps or sags. Work the slot edging snugly, or add a round of sl sts around it.
The shells cup or curl. Your Row 4 tension is tight. Block the shells flat and pinned before sewing them on.
Bags fall out on their own. Skip 10 stitches instead of 12 in Rnd 6 and work sc 7, ch 10, skip 10, sc 19 (still 36). The slot edging then becomes 22 sc: 1 + 10 + 1 + 10.
Care
Hand wash in cool water, press out excess water in a towel, and dry flat over a rolled towel to keep the tube shape. Don’t tumble dry, because heat can shrink cotton and flatten the shells.
Final Notes
Here’s how the measurements build on each other. The base reaches 36 stitches, which is 9 in (22.9 cm) around and 4.5 in (11.4 cm) flat. Six cream wall rounds add 1.5 in (3.8 cm). Eighteen mesh rounds add 13.5 in (34.3 cm), bringing the body to 15 in (38.1 cm). The 5-round top band adds 1.25 in (3.2 cm), for a 16.25 in (41.3 cm) body. Every stage keeps the same 36 stitches, so the tube stays straight from the slot to the ring.
If your gauge matches at the first checkpoint, everything after it will line up.
Happy crocheting!