

This lacy tree ornament is made from soft cream shell fans stacked in three tiers and finished with a little butter-yellow star. It’s light and open, and it looks lovely hanging in front of tree lights, which shine through every chain loop.
The design uses two colors: cream for the tree and hanging loop, and pale yellow for the star. The style is classic thread crochet with a vintage feel: half-circle fans of double crochet, chain scallops beneath each fan, and small V-shaped openings where the fans meet. All instructions use US crochet terms.
The finished tree measures 4 in (10.2 cm) wide and 3.75 in (9.5 cm) tall. With the star and hanging loop, the whole ornament is about 6.5 in (16.5 cm) tall.
The tree is worked flat in one piece from the top point down, in turned rows. Fan rows and loop rows alternate, and each new fan row adds one fan, so the triangle grows on its own with no shaping math to track. The star is a quick two-round motif that you sew over the tree tip. Then you add a chain hanging loop.
Finished Size and Construction
- Finished tree size: 4 in (10.2 cm) wide x 3.75 in (9.5 cm) tall
- Full ornament height: 6.5 in (16.5 cm) including star and loop
- Skill level: Easy-intermediate
- Terminology: US crochet terms
- Yarn weight: Size 3 mercerized cotton crochet thread (super fine / fingering range)
- Hook: 2.5 mm
- Number of pieces: 1 tree body + 1 star appliqué (one ornament, not a joined set)
- Layout: Three tiers of fans (1, 2, 3), worked top-down
- Piece size: Tree body 4 in x 3.75 in (10.2 cm x 9.5 cm); star 1.25 in (3.2 cm) point to point
- Size before border: 3.75 in (9.5 cm) wide x 3.25 in (8.3 cm) tall (after Row 5)
- Border depth: 0.5 in (1.3 cm), from the built-in scallop row (Row 6)
Materials
Choose a smooth, tightly plied mercerized cotton thread. It shows the stitches crisply and blocks into sharp fans. Fuzzy or loosely spun yarns blur the lace and make the fans look heavy.
- Cream (tree and hanging loop): 6 g, about 16 m
- Pale yellow (star): 2 g, about 5 m
These quantities include a margin for a gauge swatch and weaving in ends.
Tools:
– 2.5 mm crochet hook
– Fine tapestry needle
– Scissors
– Stitch marker (optional)
– Blocking mat or folded towel, and rustproof pins
– Spray bottle with water; fabric stiffener or starch (optional)
Abbreviations (US Terms)
- ch – chain
- sl st – slip stitch
- sc – single crochet
- hdc – half double crochet
- dc – double crochet
- sk – skip
- st(s) – stitch(es)
- MR – magic ring
Special stitches:
- Fan: 7 dc worked into the same ring or chain loop. In Rows 3 and 5, the first fan of the row starts with ch 3, which counts as the first dc, followed by 6 dc.
- Edge loop: ch 4, then sc in the same stitch you just worked into. This makes a closed loop that sticks out at the side of the tree. Each edge loop holds a fan on the next fan row.
Gauge and Checkpoints
Exact gauge matters less in ornaments than in garments, but it still sets the final size. Work Row 1 as a test fan first and measure it before going on.
Gauge: One 7-dc fan (Row 1) = 1.25 in (3.2 cm) wide across its lower edge x 0.75 in (1.9 cm) tall.
Checkpoints (measure flat, without stretching):
| After Row | Width | Height |
|---|---|---|
| Row 1 | 1.25 in (3.2 cm) | 0.75 in (1.9 cm) |
| Row 2 | 1.5 in (3.8 cm) | 1.25 in (3.2 cm) |
| Row 3 | 2.5 in (6.4 cm) | 2 in (5.1 cm) |
| Row 4 | 2.75 in (7.0 cm) | 2.5 in (6.4 cm) |
| Row 5 | 3.75 in (9.5 cm) | 3.25 in (8.3 cm) |
| Row 6 | 4 in (10.2 cm) | 3.75 in (9.5 cm) |
Each tier, meaning one fan row plus one loop row, adds 1.25 in (3.2 cm) of height. Each new fan adds 1.25 in (3.2 cm) of width.
If your fan is too big: go down to a 2.25 mm hook, or keep your dc stitches shorter by not pulling up the first loop as high.
If your fan is too small: go up to a 2.75 mm hook.
A difference of 0.125 in (0.3 cm) per fan adds up to about 0.375 in (1.0 cm) across the bottom tier.
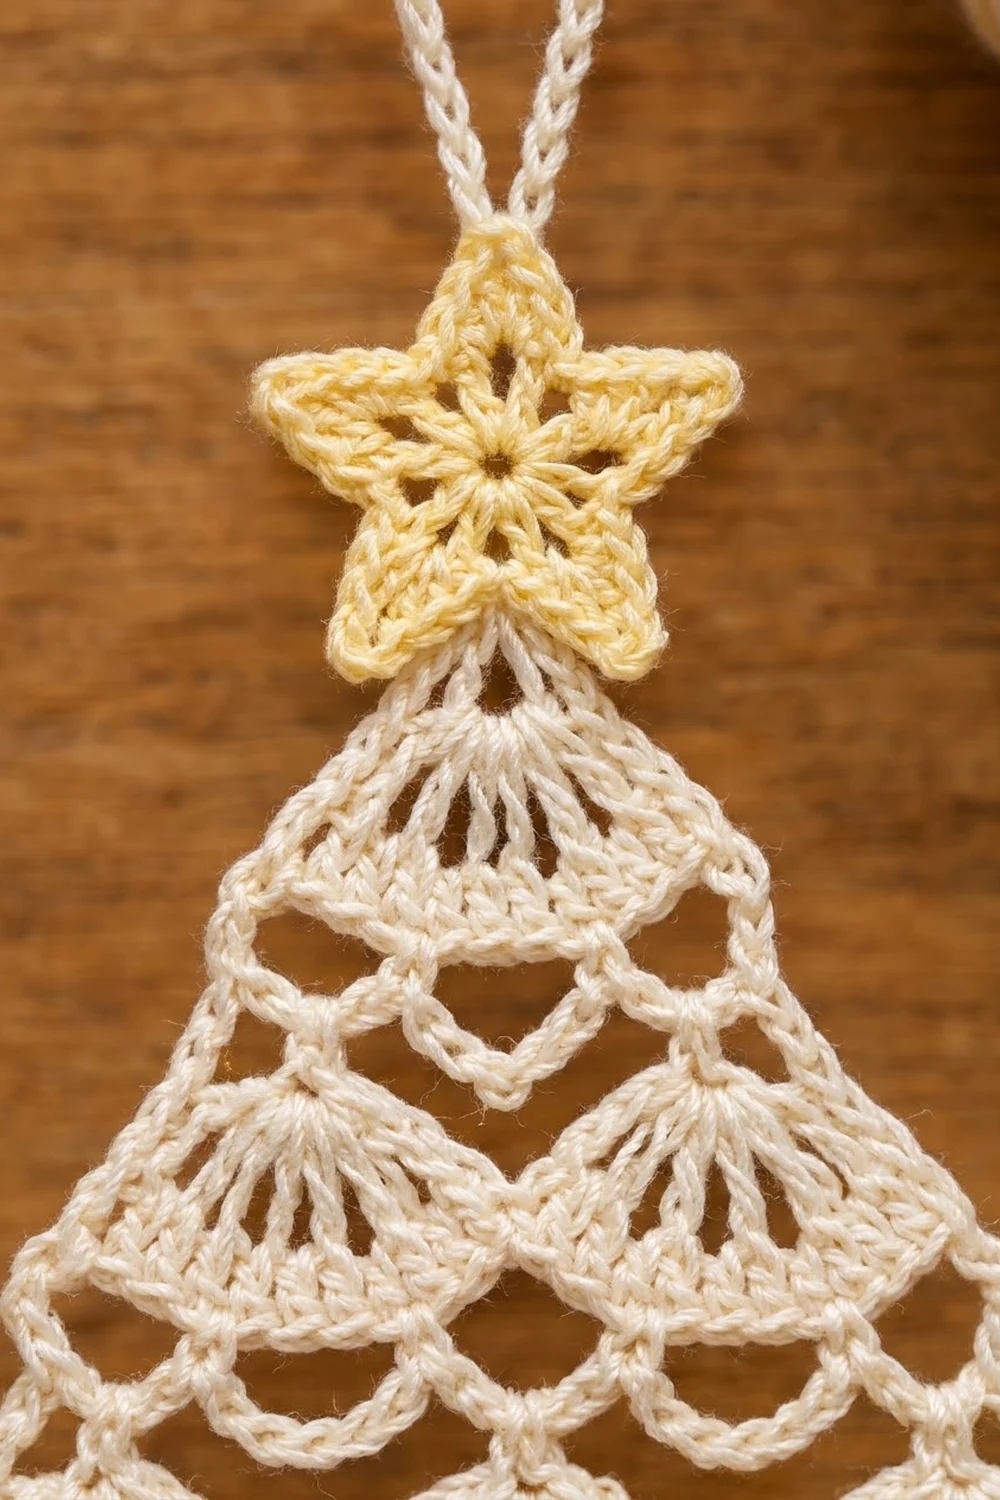
Tree Body
Work with cream thread. Turn at the end of every row. The tree is worked from the top point down.
Row 1 (tier 1 fan): Make a MR. Ch 3 (counts as first dc), 6 dc in ring. Do not join. Pull the tail firmly so the ring closes and the stitches form a half-circle fan, with the point at the top and the open arc facing down. Turn. (7 dc)
Row 2 (loop row, 1 fan):
1. Ch 1. Sc in the first dc, ch 4, sc in the same dc (edge loop made).
2. Ch 7, sk the next 5 dc, sc in the last dc (the top of the beginning ch-3).
3. Ch 4, sc in the same st (edge loop made). Turn.
(4 sc; 3 loops: 2 ch-4 edge loops and 1 ch-7 under-fan loop)
The ch-7 loop hangs as a scallop beneath the fan. The two edge loops stick out to the sides.
Row 3 (tier 2, 2 fans):
1. Ch 3 (counts as dc), 6 dc in the first ch-4 edge loop (fan made).
2. Sc in the ch-7 loop.
3. 7 dc in the last ch-4 edge loop (fan made). Turn.
(15 sts: 14 dc + 1 sc; 2 fans)
The sc between the fans pulls the fabric in and makes the V-shaped opening seen between neighboring fans.
Row 4 (loop row, 2 fans):
1. Ch 1. Sc in the first dc, ch 4, sc in the same dc (edge loop).
2. Ch 7, sk the next 5 dc, sc in the 7th dc of the first fan.
3. Ch 5, sk the sc, sc in the 1st dc of the next fan.
4. Ch 7, sk the next 5 dc, sc in the last st (top of ch-3).
5. Ch 4, sc in the same st (edge loop). Turn.
(6 sc; 5 loops: 2 ch-4 edge loops, 2 ch-7 under-fan loops, 1 ch-5 between-fan loop)
Row 5 (tier 3, 3 fans):
1. Ch 3 (counts as dc), 6 dc in the first edge loop.
2. Sc in the next ch-7 loop.
3. 7 dc in the ch-5 loop.
4. Sc in the next ch-7 loop.
5. 7 dc in the last edge loop. Turn.
(23 sts: 21 dc + 2 sc; 3 fans)
The center fan sits directly under the V between the two fans of tier 2, which gives the offset, brick-like stacking.
Row 6 is the scallop border, written out in the Border section below.
Stitch logic check: A fan row with F fans has 7F dc + (F − 1) sc, which equals 8F − 1 stitches. That gives 7, 15 and 23 for Rows 1, 3 and 5.
A loop row under F fans has:
– 2 edge loops
– F under-fan loops
– (F − 1) between-fan loops
That makes 2F + 1 loops in total, and 2F + 2 sc.
The next fan row places fans in every odd-numbered loop (both edges plus each between-fan loop) and an sc in every under-fan loop. That gives exactly F + 1 fans. This is why the tree grows by one fan per tier.
Star
Work with pale yellow thread.
Round 1: Make a MR. Ch 3 (counts as dc), 9 dc in ring. Sl st to the top of the ch-3 to join. Pull the ring snug but leave a small open center. (10 dc)
Round 2: Work this point sequence 5 times:
1. Ch 4.
2. Starting in the 2nd ch from the hook, sc in that ch, hdc in the next ch, dc in the next ch.
3. Sk 1 dc, sl st in the next dc.
The last sl st lands in the joining st. (5 points; each point uses 2 dc from Round 1, and 5 x 2 = 10)
Fasten off, leaving an 8 in (20.3 cm) tail for sewing.
Star checkpoint: 1.25 in (3.2 cm) from point to point.
Assembling the Star and Hanging Loop
- Place the star so that the notch between its two lower points sits over the MR at the tree tip. The star should overlap the tree apex by about 0.25 in (0.6 cm).
- With the yellow tail, sew through the star center and the two lower points into the top of Row 1, using small stitches hidden in the dc posts. Weave the tail in on the back.
- Hanging loop: With cream, join with a sl st in the tip of the star’s top point. Ch 25, then sl st in the same tip. Fasten off and weave in the ends.
The loop should measure about 1.75 in (4.4 cm) tall. The full ornament height is the loop’s 1.75 in (4.4 cm), plus the star’s 1.25 in (3.2 cm), minus the 0.25 in (0.6 cm) overlap, plus the tree’s 3.75 in (9.5 cm). That adds up to 6.5 in (16.5 cm).
Border
The tree has no separate border round. Row 6, the final loop row, works as the scallop border. It also matches the small corner loops that already run up both sides of the tree.
Border gauge:
– Each ch-7 scallop hangs 0.5 in (1.3 cm) below its fan.
– Each ch-4 edge loop extends about 0.125 in (0.3 cm) past the side of the tree.
Row 6 (scallop border, 3 fans):
1. Ch 1. Sc in the first dc, ch 4, sc in the same dc (edge loop).
2. Ch 7, sk the next 5 dc, sc in the 7th dc of the fan.
3. Work this repeat twice:
– Ch 5, sk the sc, sc in the 1st dc of the next fan.
– Ch 7, sk the next 5 dc, sc in the 7th dc of that fan (on the last repeat, this is the top of the beginning ch-3).
4. Ch 4, sc in the same st (edge loop).
Fasten off. (8 sc; 7 loops: 2 ch-4, 3 ch-7, 2 ch-5)
Counts per side:
– Bottom edge: 7 loops (2 ch-4 corner loops + 3 ch-7 scallops + 2 ch-5 loops)
– Left side: 3 edge loops, one each from Rows 2, 4 and 6
– Right side: 3 edge loops, one each from Rows 2, 4 and 6
The two bottom corner loops count toward both the bottom edge and their side. There is no double-counting in the stitch totals, because each corner loop is worked only once.
Why the math works: Row 6 follows the same 2F + 1 rule as every other loop row, with F = 3. That gives 7 loops and 8 sc. It adds 0.5 in (1.3 cm) to the height and 0.125 in (0.3 cm) on each side. Together those take the tree from 3.75 in x 3.25 in (9.5 cm x 8.3 cm) to 4 in x 3.75 in (10.2 cm x 9.5 cm).
Final Blocking
- Weave in all remaining ends along the dc posts. Trim them close.
- Mist the ornament with water until it is damp but not soaking. For a stiffer ornament, dip it in diluted fabric stiffener or starch, then press out the excess in a towel.
- Lay the tree face up on a blocking mat. Pin the tip and both bottom corners first to form a triangle 4 in (10.2 cm) wide and 3.75 in (9.5 cm) tall.
- Open each fan into an even half-circle. Pin each ch-7 scallop into a rounded arch 0.5 in (1.3 cm) deep.
- Pin each side edge loop into a small round loop.
- Pin the star points sharp, measuring 1.25 in (3.2 cm) across.
- Lay the hanging loop flat and straight.
- Let everything dry completely, usually several hours, before unpinning.
Final Quality-Control Checklist
- Tree has 3 tiers containing 1, 2 and 3 fans.
- Each fan has 7 dc, with even spacing.
- Fan rows count 7, 15 and 23 stitches.
- Loop rows have 3, 5 and 7 loops, with 4, 6 and 8 sc.
- V-shaped openings appear between neighboring fans in tiers 2 and 3.
- Bottom edge has 7 loops; each side has 3 edge loops.
- Tree measures 4 in (10.2 cm) wide x 3.75 in (9.5 cm) tall.
- Star has 5 even points and measures 1.25 in (3.2 cm).
- Star sits centered over the tree tip with a 0.25 in (0.6 cm) overlap.
- Hanging loop is about 1.75 in (4.4 cm) tall and firmly secured.
- All ends are woven in and invisible from the front.
Troubleshooting
Fans cup or ruffle: The ch-7 loop beneath is too short or too tight. Loosen your chain tension, or work ch 8 under each fan, staying consistent across all rows.
Fans look flat or splayed: The chain loops are too loose. Try ch 6 under each fan instead.
Tree leans to one side: You may have missed an edge loop at the start or end of a loop row. Every loop row must begin and end with an edge loop.
Wrong number of fans: Check the previous loop row’s count against the 2F + 1 rule. Fans go only into the edge loops and the ch-5 between-fan loops.
Star center is too open: Pull the MR tail tighter before joining Round 1.
Star points are floppy: Block with stiffener, or work the points with a 2.25 mm hook.
Ornament won’t hang straight: Re-center the hanging loop exactly on the top star point.
Care
Hand wash gently in cool water and lay flat to dry, re-pinning if needed. If you used stiffener, re-apply it after washing to restore the crisp shape.

Final Notes
This ornament follows a simple measurement chain:
– One 7-dc fan is 1.25 in (3.2 cm) wide.
– Each tier adds one fan and 1.25 in (3.2 cm) of height.
– Three tiers give 3.75 in x 3.25 in (9.5 cm x 8.3 cm) before the border.
– The scallop border brings the tree to 4 in x 3.75 in (10.2 cm x 9.5 cm).
– The star and loop bring the whole ornament to 6.5 in (16.5 cm).
Check your first fan, count your loops on every loop row, and the rest of the tree follows naturally.
Happy crocheting!