

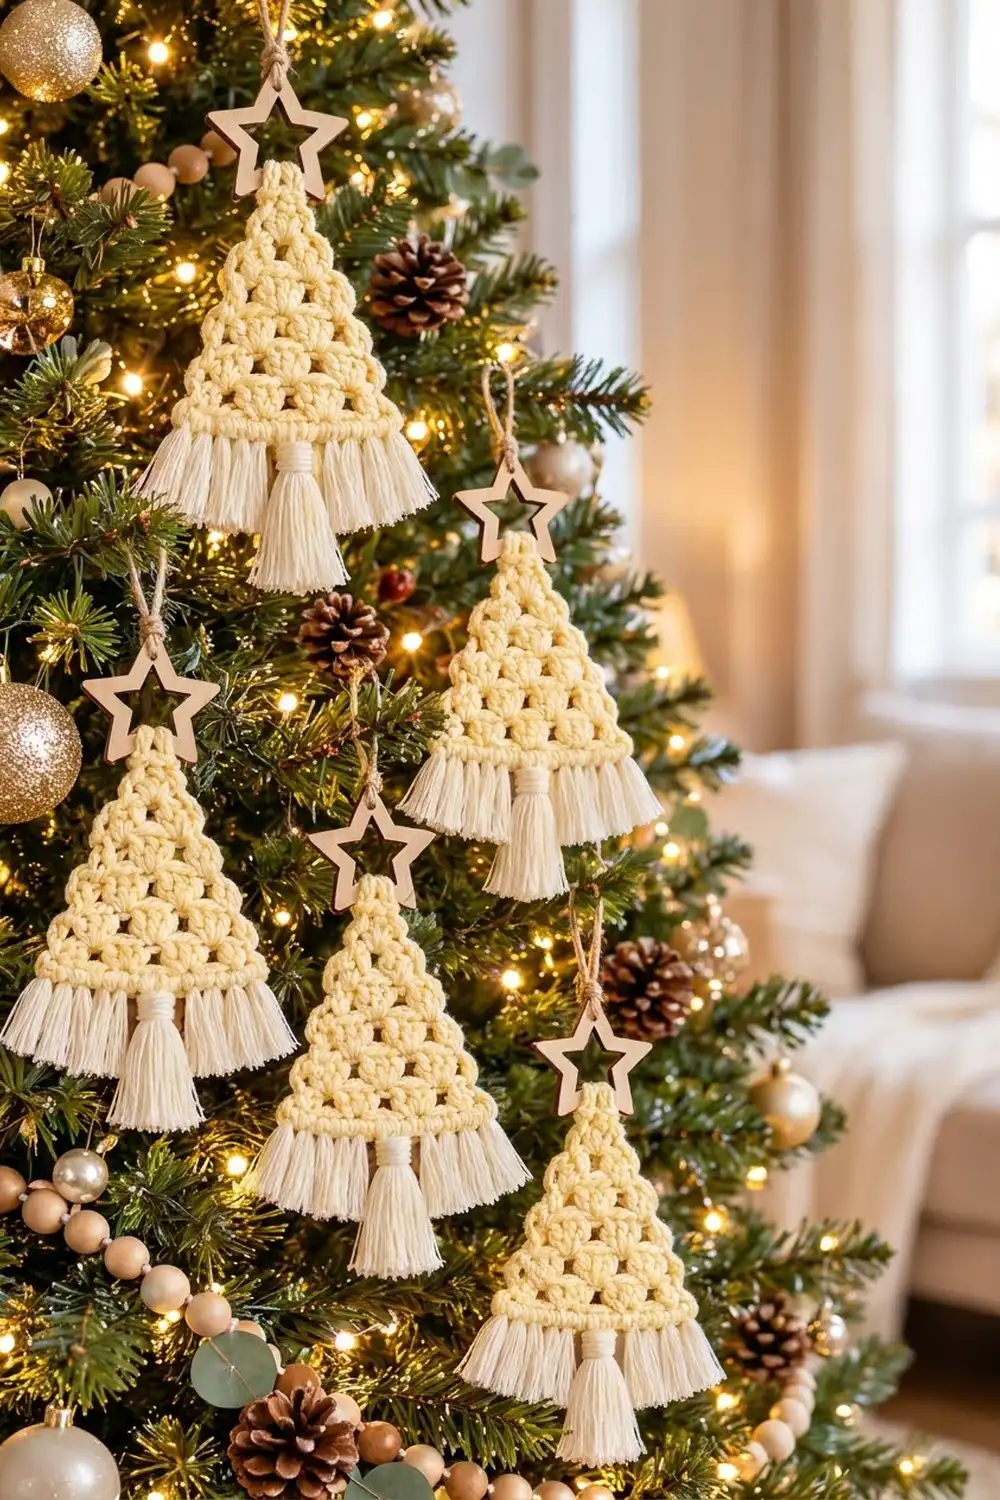
This little tree ornament combines lacy crochet shells with soft macramé-style fringe. The triangle is worked in pale butter-yellow cotton. Rows of 3-dc shells and tiny chain spaces build an open texture that lets the tree lights glow through. Ivory cotton fringe hangs along the bottom edge, a thick wrapped tassel forms the trunk, and a natural wooden star sits at the tip.
The look is warm, Scandinavian and a little boho. It suits a natural-themed tree, a gift topper or a garland of single ornaments hung side by side. This pattern makes one ornament, worked as one piece.
The pattern uses US crochet terms. The finished tree measures 5 in (12.7 cm) wide at the base and 4.5 in (11.4 cm) tall from tip to bottom band. With the tassel trunk, the total length is 8 in (20.3 cm), not counting the star or hanging loop.
Construction is simple. You work the triangle top-down in turned rows, starting with one shell at the tip and adding one shell per row for 7 rows. A single-crochet band finishes the base. Then you add fringe and the tassel with lark’s head knots, attach the star and tie on a jute hanger.
Finished Size and Construction
- Finished size: 5 in (12.7 cm) wide × 4.5 in (11.4 cm) tall (crochet only)
- Total length with tassel: 8 in (20.3 cm)
- Skill level: Easy
- Terminology: US crochet terms
- Yarn weight: DK (#3) cotton for the tree; 2 mm single-strand cotton cord for the fringe
- Hook: 4.0 mm (G-6)
- Number of pieces: 1 (single triangle)
- Layout: one upright triangle, top-down, 7 shell rows + 1 base band
- Piece size before base band: 5 in (12.7 cm) wide × 4.25 in (10.8 cm) tall
- Base band depth: about 0.25 in (0.6 cm)
Materials
Yarn advice: Use a smooth, mercerized or combed cotton DK. Cotton shows the shell definition clearly and holds the triangle flat without stretching. Acrylic works, but the shells will look softer and the edges may curl more.
- Color A – Butter Yellow (pale cream yellow), DK cotton: 15 g, about 35 m (38 yd)
- Color B – Ivory, 2 mm single-strand cotton macramé cord: 15 g, about 12 m (13 yd), for the fringe and tassel
- Natural jute twine: about 10 in (25.4 cm), for the hanger
- Wooden open star cut-out: about 2 in (5.1 cm) across
Tools:
– 4.0 mm (G-6) crochet hook
– Sharp scissors
– Tapestry needle
– Fine-tooth comb or pet slicker brush, to brush out the fringe
– A piece of card 4 in (10.2 cm) tall, for measuring tassel strands (optional)
– Blocking mat and rust-proof pins
– Spray bottle with water
All quantities include a small safety margin for the gauge swatch and trimming.
Abbreviations (US Terms)
- ch – chain
- sl st – slip stitch
- sc – single crochet
- dc – double crochet
- sp – space
- st(s) – stitch(es)
- tch – turning chain
- RS / WS – right side / wrong side
Special stitch – Shell: 3 dc worked into the same stitch or space.
Lark’s head knot: Fold the strands in half. From front to back, insert the hook through the stitch and pull the fold through to make a loop. Pull the cut ends through the loop and tighten.
Gauge and Checkpoints
The ornament is so small that the piece itself is your gauge swatch. Work Rows 1–3, measure, and adjust your hook before you continue.
- Base band gauge: 27 sc = 5 in (12.7 cm), which is about 5.4 sc per 1 in (2.5 cm)
- Shell gauge: each shell plus its ch-1 sp is about 0.7 in (1.8 cm) wide; each dc row is about 0.6 in (1.5 cm) tall
Checkpoints (measured flat, unstretched):
– After Row 3: 2.1 in (5.3 cm) wide × 1.8 in (4.6 cm) tall
– After Row 5: 3.6 in (9.1 cm) wide × 3.0 in (7.6 cm) tall
– After Row 7: 5 in (12.7 cm) wide × 4.25 in (10.8 cm) tall
– After Row 8: 5 in (12.7 cm) wide × 4.5 in (11.4 cm) tall
If your piece is too big by more than 0.25 in (0.6 cm) at the Row 3 checkpoint, go down to a 3.75 mm (F-5) hook. If it is too small, go up to a 4.5 mm (7) hook. Small errors grow quickly in a triangle, so fix them early.
Tree Triangle (Color A)
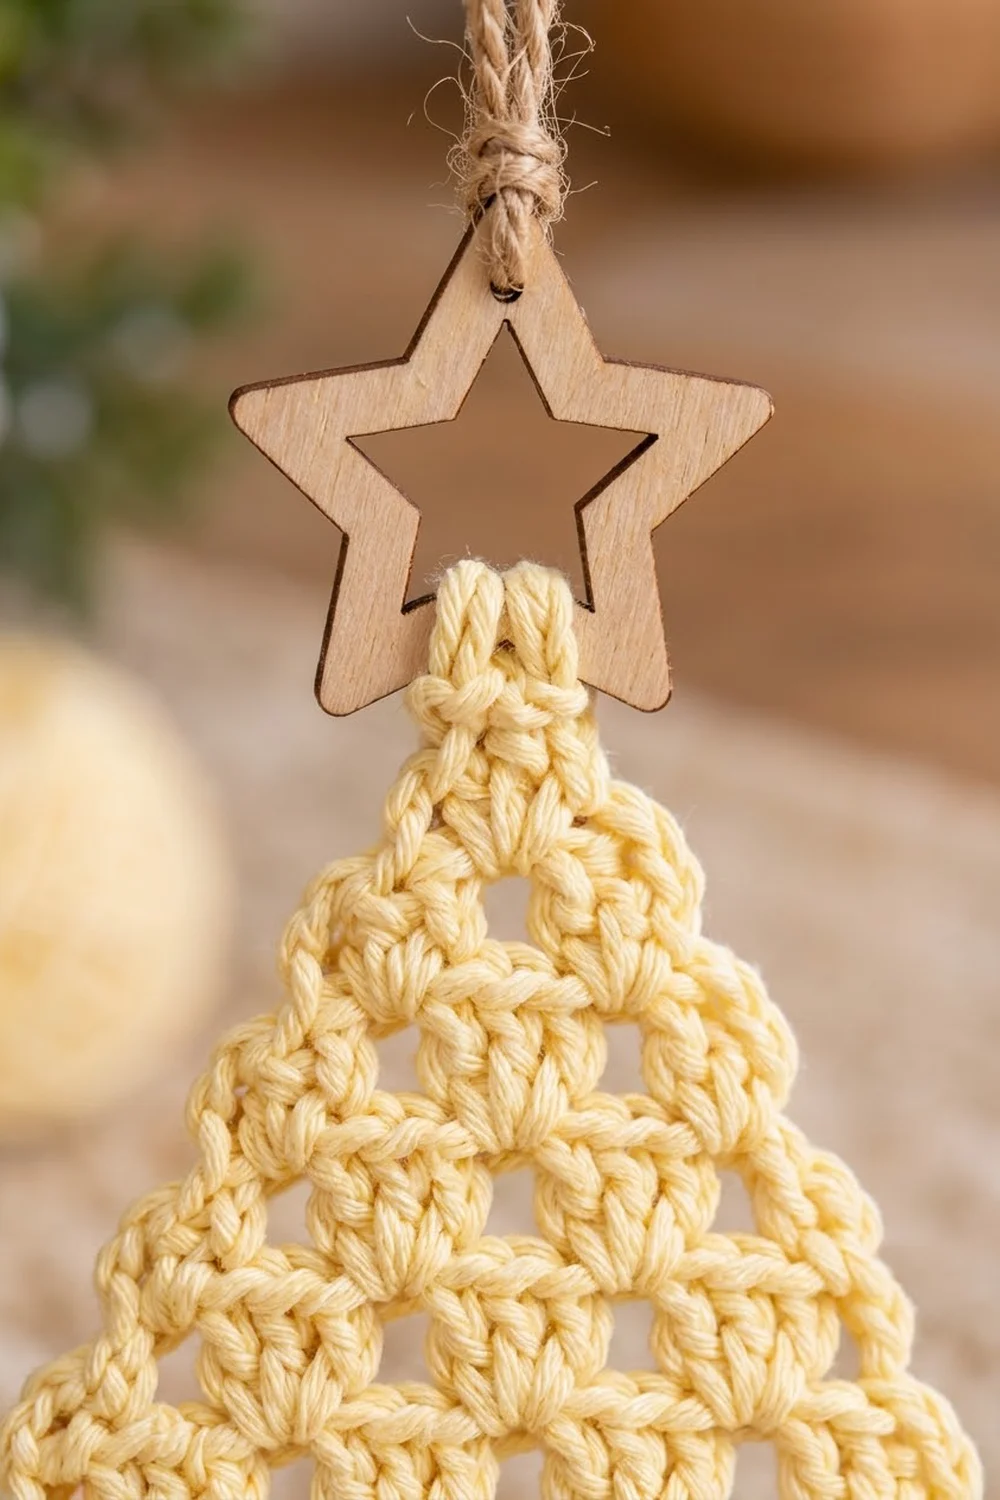
The triangle is worked top-down in turned rows. The turning chain counts as a dc throughout. In every row, the first shell goes into the first dc and the last shell goes into the top of the turning chain. This adds half a shell at each edge every row, which creates the tree slope and the softly scalloped sides.
Stitch formula: Row n has n shells and (n − 1) ch-1 sps, for a total of 3n dc + (n − 1) ch = 4n − 1 sts.
Row 1 (RS): Ch 4. Work 2 dc in the 4th ch from hook (the skipped 3 ch count as the first dc). Turn. (1 shell; 3 sts)
Row 2: Ch 3 (counts as dc). Work 2 dc in the first dc, at the base of the ch-3. Ch 1, skip the next dc, then work 3 dc in the top of the tch. Turn. (2 shells, 1 ch-1 sp; 7 sts)
Row 3: Ch 3. Work 2 dc in the first dc, then ch 1. Work 3 dc in the next ch-1 sp, then ch 1. Skip the remaining dc and work 3 dc in the top of the tch. Turn. (3 shells, 2 ch-1 sps; 11 sts)
Measure now and compare with the Row 3 checkpoint.
Rows 4–7: Ch 3. Work 2 dc in the first dc, then ch 1. *Work 3 dc in the next ch-1 sp, ch 1; repeat from * across to the last shell. Skip the remaining dc and work 3 dc in the top of the tch. Turn.
Each of these rows adds 1 shell, and therefore 4 sts:
– Row 4: 4 shells, 3 ch-1 sps (15 sts)
– Row 5: 5 shells, 4 ch-1 sps (19 sts). Check the Row 5 measurement.
– Row 6: 6 shells, 5 ch-1 sps (23 sts)
– Row 7 (RS): 7 shells, 6 ch-1 sps (27 sts)
Do not fasten off. Continue straight into the base band.
Border: Base Band (Row 8)
The border is a single base band on the bottom edge only. The sloped sides keep their natural shell edge, which gives the scalloped “branch” outline shown on the finished tree.
Border gauge: 27 sc = 5 in (12.7 cm).
Row 8 (WS): Ch 1 (does not count as a stitch). Sc in the first dc and in each dc across, sc in each ch-1 sp, and finish with 1 sc in the top of the tch.
Count for Row 8: 21 sc worked 1 per dc (including the tch) + 6 sc worked into the ch-1 sps = 27 sc.
Per-side counts:
– Bottom edge: 27 sc
– Left and right sides: no border stitches. The shell edges are left as they are.
Fasten off, leaving a 6 in (15.2 cm) tail. Weave in all Color A ends along the WS of the band and the edge shells.
Why the math works: Row 7 has 27 sts, and Row 8 places exactly one sc on top of each of them, so the band stays flat. It neither ruffles nor pulls in. Because 27 is odd, there is a true center stitch, sc 14, which is exactly where the trunk tassel goes.
Fringe and Tassel Trunk (Color B)
Hold the tree RS facing with the base band at the bottom. Number the band stitches 1 to 27 from right to left.
Fringe placement: sc 2, 4, 6, 8, 10 and 12, then sc 16, 18, 20, 22, 24 and 26. That gives 12 fringe bundles, 6 on each side. Each position mirrors one on the other side, for example sc 2 and sc 26, or sc 12 and sc 16. Sc 1 and 27 at the corners stay empty, as do sc 13 and 15 beside the tassel.
Fringe:
1. Cut 48 strands of Color B, each 6 in (15.2 cm) long (4 strands per bundle).
2. Hold 4 strands together, fold them in half and attach them with a lark’s head knot through sc 2.
3. Repeat at each fringe position.
4. Brush out the cord with the comb, working from the ends up to the knot.
5. Each bundle now hangs about 2.75 in (7.0 cm). Leave it untrimmed until after blocking.
Tassel trunk:
1. Cut 12 strands of Color B, each 8 in (20.3 cm) long. Cut one more strand 20 in (50.8 cm) long for wrapping.
2. Hold the 12 strands together, fold them in half and push the fold through sc 14 from front to back with your hook. If it is tight, stretch the stitch slightly with the hook.
3. Pull the cut ends through the loop and tighten firmly. The tassel hangs about 4 in (10.2 cm).
4. About 0.25 in (0.6 cm) below the band, wrap the 20 in strand tightly around the tassel, covering 0.5 in (1.3 cm) of length. Thread the end onto the tapestry needle, pass it up under the wraps and pull it out at the top so it disappears into the tassel.
5. Brush out the tassel below the wrapped neck.
Star and Hanger
- Thread the jute twine onto the tapestry needle, or wrap the end with tape.
- Pass the twine through the narrow tip of the tree, through the gap between Row 1 and its beginning chain.
- Bring both ends of the twine up through the open center of the star, then over the top point of the star.
- Settle the star so its lower points sit just above the tip of the tree.
- Tie the twine ends in an overhand knot about 3 in (7.6 cm) above the star to form the hanging loop. Trim the ends to about 0.5 in (1.3 cm) and fray them slightly.
- Optional: Use a short length of Color A to tack the bottom star point to the tree tip with 2–3 small stitches, so the star doesn’t spin.
Final Blocking
- Lay the triangle RS up on the blocking mat, with the fringe hanging off the bottom edge of the mat.
- Mist the crochet until it is damp but not dripping.
- Pin the two bottom corners 5 in (12.7 cm) apart.
- Pin the tip so the height from the tip to the bottom of the band is 4.5 in (11.4 cm).
- Ease the sides into straight slopes and pin through the center dc of each edge shell, so the scallops stay visible.
- Open each ch-1 sp gently with a fingertip so the holes look even.
- Mist the fringe and tassel lightly and comb them straight down.
- Let everything dry completely, usually 4–6 hours.
- Trim the fringe level at 2.5 in (6.4 cm) below the band. Trim the tassel to 3.5 in (8.9 cm) below the band, measured from the band, not from the neck wrap.
Final Quality-Control Checklist
- Row 7 has 7 shells and 6 ch-1 sps (27 sts).
- Row 8 has exactly 27 sc and the band lies flat.
- The width is 5 in (12.7 cm) and the crochet height is 4.5 in (11.4 cm).
- There are 12 fringe bundles, 6 per side, set in matching stitches on each side.
- The tassel sits in sc 14, exactly centered.
- The neck wrap is 0.5 in (1.3 cm) deep and the wrap ends are hidden.
- The fringe is 2.5 in (6.4 cm) and the tassel 3.5 in (8.9 cm), both trimmed level.
- The star sits straight above the tip and the twine knot is secure.
- All Color A ends are woven in and invisible from the RS.
Troubleshooting
The triangle leans to one side. You probably missed the final shell in the top of the turning chain on some rows. Count the shells on every row: Row n should have n shells.
The base band ruffles. You have more than 27 sc. Check that you worked only 1 sc in each ch-1 sp.
The base band pulls in. You have fewer than 27 sc, or your sc is too tight. Rework the band with a looser hand, or use a hook half a size larger for Row 8 only.
The sides curl forward. This is common with tight cotton. Block it firmly, pinning through each edge shell.
The fringe looks thin. Use 5 strands per bundle instead of 4. Add 12 more strands of 6 in (15.2 cm) to your cutting list.
The tassel neck slides down. Wrap more tightly, and tie the wrap ends with a square knot before hiding them.
The star tilts. Add the optional tacking stitches at the tip.
Care
Spot clean only with a damp cloth, then reshape and lay flat to dry. Store the ornament flat in tissue so the fringe stays straight between seasons.
Final Notes
The whole ornament follows one simple measurement chain:
– Each shell plus its ch-1 sp is about 0.7 in (1.8 cm) wide.
– 7 shells give a 27-st Row 7 and a base width of 5 in (12.7 cm).
– 7 rows of dc give 4.25 in (10.8 cm) of height, and the sc band brings it to 4.5 in (11.4 cm).
– The 27-sc band gives a true center stitch for the tassel, plus 6 matching fringe positions on each side.
– 2.5 in (6.4 cm) of fringe and a 3.5 in (8.9 cm) tassel bring the total length to 8 in (20.3 cm).
If your Row 3 checkpoint matches, every later measurement will follow. Make one ornament, check it, and then make as many as your tree needs.
Happy crocheting!