

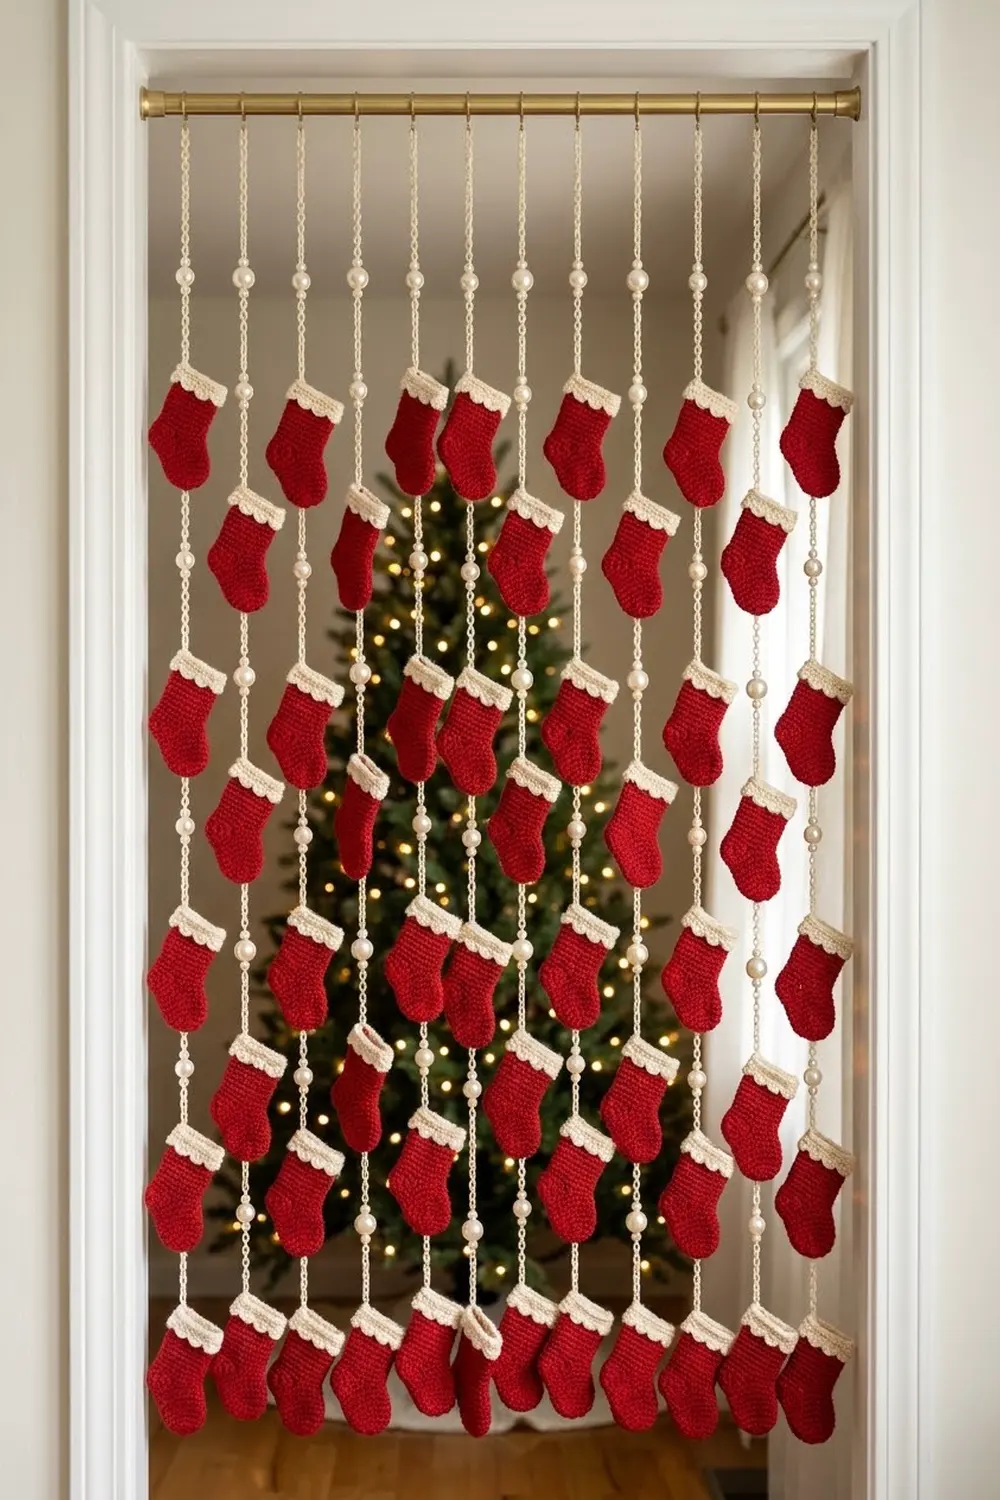
This curtain is a doorway full of tiny red stockings. Each one has a cream scalloped cuff and hangs from a slim cream chain strand, with a pearl bead between stockings. The strands hang at staggered heights, so the stockings look like they are scattered across the doorway.
The palette is bright Christmas red with soft cream, and the pearls add a little shine. The effect is classic and cozy, and it looks especially good in front of a lit tree.
This pattern uses US crochet terms. Each stocking measures about 2.17 in (5.5 cm) wide by 2.75 in (7.0 cm) tall. The finished curtain is 10 strands spread across 31.5 in (80.0 cm) of rod, with a drop of 66–70 in (167.6–177.8 cm).
For construction, you crochet each stocking flat in single-crochet rows from the sole up, then add a cream cuff border. Next you chain each strand, sliding a pearl into place as you go and joining the stockings with a slip stitch. Finally, you loop the strands over a rod.
Finished Size and Construction
- Finished curtain: 31.5 in (80.0 cm) wide on the rod; strands drop 66 in (167.6 cm) and 70 in (177.8 cm)
- Skill level: Easy
- Terminology: US crochet terms
- Yarn weight: Sport (#2 Fine) mercerized cotton
- Hook: 2.5 mm
- Number of pieces: 80 stockings + 10 strands
- Layout: 10 strands, alternating Type A and Type B, 8 stockings per strand
- Piece size: 2.17 in (5.5 cm) wide × 2.75 in (7.0 cm) tall
- Size before border (red body only): 2.17 in (5.5 cm) wide × 2.17 in (5.5 cm) tall
- Border depth (cream cuff): about 0.58 in (1.5 cm)
Materials
Use a smooth mercerized cotton. It gives crisp stitch definition, holds its shape when hanging and doesn’t fuzz. This pattern assumes about 50 g = 155 m per ball.
- Red: 85 g (264 m), for 80 stocking bodies
- Cream: 60 g (186 m), for 80 cuffs and 10 strands
- Pearl beads: 80 needed, buy 90; 8 mm, with a hole of at least 1.5 mm
These yarn quantities include a margin of about 25–30%. The actual use is roughly 2.6 m red and 1.1 m cream per stocking, plus about 5.5 m cream per strand.
Tools:
– 2.5 mm crochet hook
– Tapestry needle
– Stitch markers
– Big-eye beading needle or dental-floss threader
– Scissors and tape measure
– Blocking mat, rust-proof pins and spray bottle
– Curtain rod or tension rod, at least 32 in (81.3 cm) long
Abbreviations (US Terms)
- ch – chain
- sl st – slip stitch
- sc – single crochet
- dc – double crochet
- sc2tog – single crochet 2 together: (insert hook in next st, yo, pull up a loop) twice, yo, pull through all 3 loops
- st(s) – stitch(es)
- RS / WS – right side / wrong side
- yo – yarn over
Special stitch – Shell scallop: Work 5 dc in the same stitch.
Special technique – Bead lock: Slide a pre-strung pearl up against the hook, then ch 1 snugly behind it. The pearl sits inside that chain and can’t slide.
Gauge and Checkpoints
Gauge: 12 sc × 12 rows = 2 in (5.1 cm) square, or 6 sc and 6 rows per 1 in (2.5 cm).
Chain gauge (strands): 5 ch = 1 in (2.5 cm).
Make one complete test stocking before you start the rest. Use these checkpoints:
- After Row 2 (13 sc): 2.17 in (5.5 cm) wide
- After Row 4: foot is 0.67 in (1.7 cm) tall
- After Row 13: leg is 1.33 in (3.4 cm) wide and the red body is 2.17 in (5.5 cm) tall
- After Cuff Row 2: cuff is 1.67 in (4.2 cm) wide
- Finished stocking: 2.75 in (7.0 cm) tall
If the stocking is too big, go down to a 2.25 mm hook. If it’s too small, go up to a 2.75 mm hook. If the size is right but the fabric looks lacy, tighten your tension rather than changing the hook. The stockings are meant to be firm, flat little shapes.
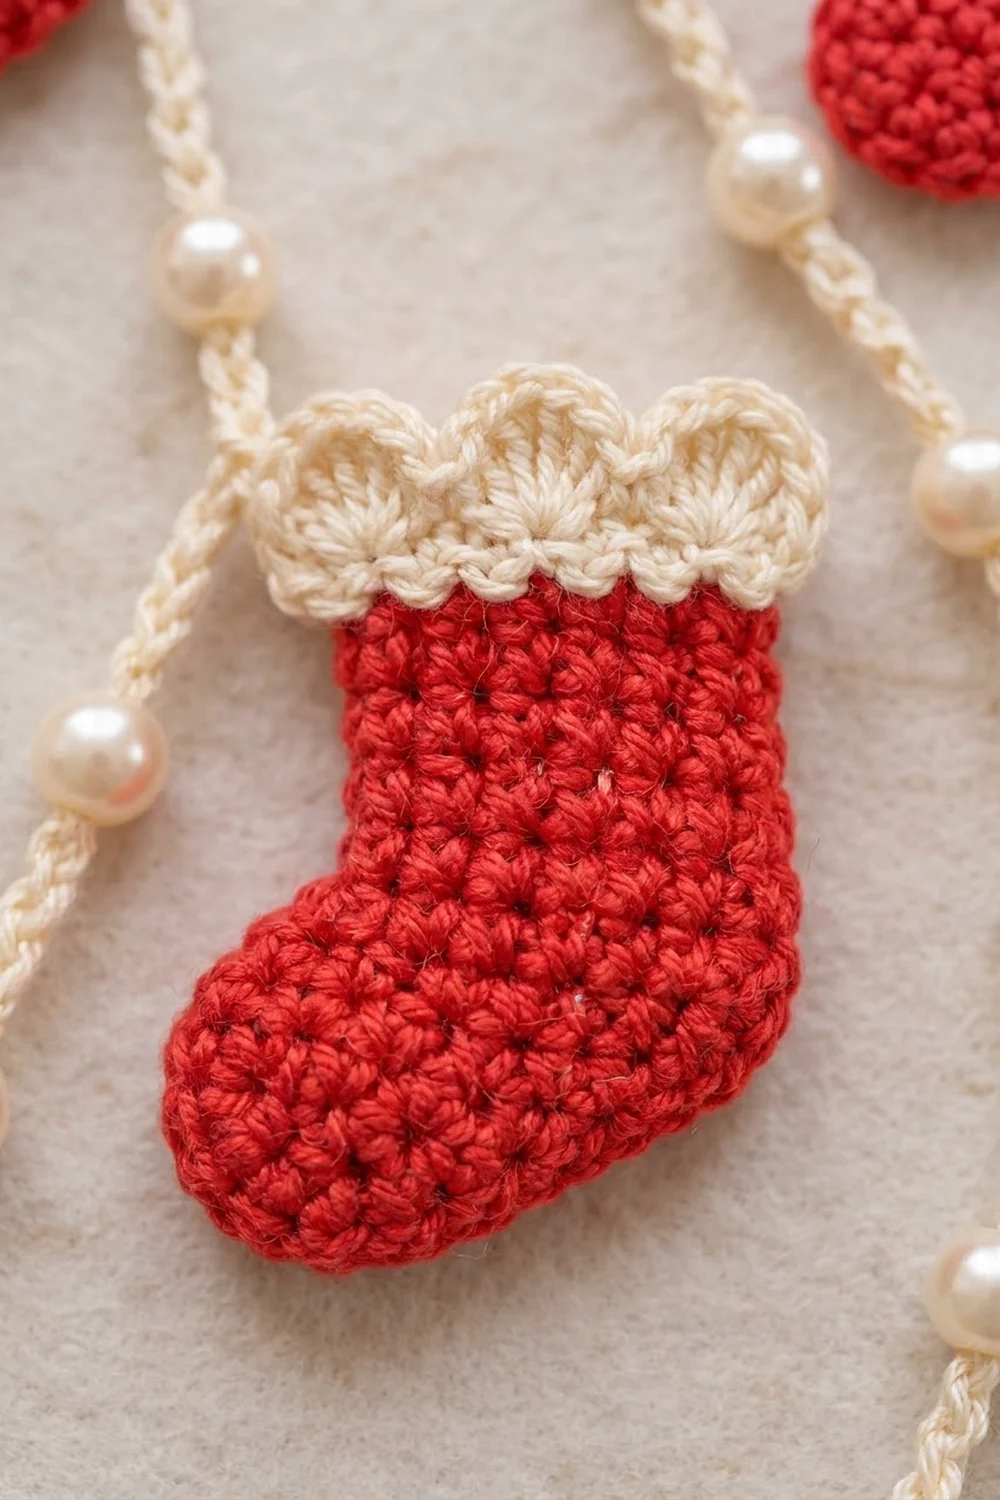
Stocking (Make 80)
The stocking is worked in turned rows. Each row begins with ch 1, which doesn’t count as a stitch. Row 1 is the RS.
To keep track of direction, place a marker at the toe end after Row 1. Odd rows run from heel to toe, and even rows run from toe to heel.
With red, ch 12.
Row 1 (RS, heel to toe): Sc in 2nd ch from hook and in each ch across. (11 sc) Mark the last st; this edge is the toe.
Row 2 (toe to heel): Ch 1, turn. 2 sc in first st, sc in next 9 sts, 2 sc in last st. (13 sc) This rounds the heel and the toe.
Row 3 (heel to toe): Ch 1, turn. Sc in each st across. (13 sc)
Row 4 (toe to heel): Ch 1, turn. Sc2tog, sc in each of next 11 sts. (12 sc) This rounds the top of the toe.
Row 5 (heel to toe): Ch 1, turn. Sc in next 8 sts. Leave the remaining 4 sts unworked. (8 sc) The 4 unworked stitches form the instep; the leg now rises from the heel side.
Rows 6–13: Ch 1, turn. Sc in each st across. (8 sc each row)
Row 13 ends at the toe side. Fasten off red and weave in the ends on the WS.
Red body checkpoint: 13 rows = 2.17 in (5.5 cm) tall. The foot is 2.17 in (5.5 cm) at its widest, and the leg is 1.33 in (3.4 cm) wide. Run a finger along the heel edge: it should be a straight line from the rounded heel up to the top of the leg.
Make All Pieces
Complete all 80 stockings, including the cuff from the Cuff Border section below, before you start any strands. Lightly block them flat now (see Final Blocking). Flat stockings are much easier to join neatly.
Quantities:
– Red bodies: 80
– Cream cuffs: 80
– Strand Type A: 5, with 8 stockings and 8 pearls each
– Strand Type B: 5, with 8 stockings and 8 pearls each
Layout grid: The grid shows positions measured down from the bottom of the rod loop. S = stocking, P = pearl, . = plain chain.
STRAND:                     1 2 3 4 5 6 7 8 9 10
TYPE:                       A B A B A B A B A B
6 in (15.2 cm):             S . S . S . S . S .
10 in (25.4 cm):            P S P S P S P S P S
14 in (35.6 cm):            S P S P S P S P S P
18 in (45.7 cm):            P S P S P S P S P S
22 in (55.9 cm):            S P S P S P S P S P
26 in (66.0 cm):            P S P S P S P S P S
30 in (76.2 cm):            S P S P S P S P S P
34 in (86.4 cm):            P S P S P S P S P S
38 in (96.5 cm):            S P S P S P S P S P
42 in (106.7 cm):           P S P S P S P S P S
46 in (116.8 cm):           S P S P S P S P S P
50 in (127.0 cm):           P S P S P S P S P S
54 in (137.2 cm):           S P S P S P S P S P
58 in (147.3 cm):           P S P S P S P S P S
62 in (157.5 cm):           S P S P S P S P S P
66 in (167.6 cm):           P S P S P S P S P S
70 in (177.8 cm):           . P . P . P . P . P
On every level, a stocking on one strand sits beside a pearl on the next. That is what creates the scattered look.
Joining (Strands)
Each stocking is joined with a slip stitch as you chain its strand, so there’s no sewing.
Before you start each strand: Thread 8 pearls onto the cream yarn with the beading needle and push them well down the ball.
Rod loop (both types): Ch 30, then sl st in the first ch to form a ring. That’s 6 in (15.2 cm) around, which fits rods up to 1.5 in (3.8 cm) in diameter.
Lead chain:
– Type A: ch 30, for 6 in (15.2 cm)
– Type B: ch 50, for 10 in (25.4 cm)
Stocking repeat (40 ch = 8 in / 20.3 cm):
1. Join the stocking. Hold the stocking RS facing you, with the cuff up. Insert the hook from front to back through the first sc of Cuff Row 3, at the heel-side top corner. Yo and pull through both the stitch and the loop on the hook. This is a sl st and does not count as a chain.
2. Chain down to the pearl. Ch 19, then work a bead lock, which uses 1 ch. That’s 20 ch, or 4 in (10.2 cm).
3. Chain down to the next stocking. Ch 20, for 4 in (10.2 cm).
Work the repeat 8 times. On the 8th repeat, stop after the pearl (skip step 3). Fasten off and tie a small knot close under the pearl. Trim the end to 0.25 in (0.6 cm) and add a dot of fabric glue if you like.
Drop totals (not counting the rod loop):
– Type A: 30 + (7 × 40) + 20 = 330 ch, or 66 in (167.6 cm)
– Type B: 50 + (7 × 40) + 20 = 350 ch, or 70 in (177.8 cm)
Stitch-to-stitch logic: Each stocking is joined through exactly one cuff stitch, always the same heel-side corner stitch. Because of that, every stocking hangs at the same angle and faces the same way.
Tension advice: Keep the chain relaxed and even, at 5 ch per 1 in (2.5 cm). Make the join sl st snug but not tight; a tight join puckers the cuff corner. Pull each bead-lock chain firmly so the pearl doesn’t wobble.
Size checkpoint: Lay each finished strand flat beside a tape measure. Type A should measure 66 in (167.6 cm) and Type B 70 in (177.8 cm) from the base of the rod loop, within 1 in (2.5 cm). If a strand is too long, your chains are loose; redo it with a tighter pull.
Hanging: Slide the loops onto the rod in the order A, B, A, B and so on. Space them 3.5 in (8.9 cm) apart, so the 9 gaps total 31.5 in (80.0 cm).
Cuff Border
The cuff is the border of each stocking. Work it in cream onto the top edge of Row 13. It covers that one edge, from the heel side to the toe side.
Border gauge: Same as the body, 6 sc per 1 in (2.5 cm). The two sc rows measure 0.33 in (0.8 cm) and the scallop row about 0.25 in (0.6 cm), for a border depth of about 0.58 in (1.5 cm).
Cuff Row 1 (RS, heel to toe): With RS facing, join cream with a sl st in the heel-side top corner of Row 13. Ch 1, then work 2 sc in the first st, sc in next 6 sts and 2 sc in the last st. (8 sts worked 1-per-stitch + 2 extra = 10 sc) That’s 1.67 in (4.2 cm), slightly wider than the 1.33 in (3.4 cm) leg.
Cuff Row 2 (toe to heel): Ch 1, turn. Sc in each st across. (10 sc)
Cuff Row 3 – scallops (heel to toe): Ch 1, turn. Sc in first st, then work [skip 1 st, 5 dc in next st, sc in next st] 3 times. (4 sc + 15 dc = 19 sts; 3 scallops) Fasten off and weave in the ends on the WS. The first sc of this row is where the stocking joins the strand.
Why the math works: The scallop repeat uses 3 stitches (skip 1, shell 1, sc 1), and the row starts with 1 sc. So it needs 1 + (3 × 3) = 10 stitches, which is exactly the count from Cuff Row 2. The row starts and ends with an sc anchored at each corner, so the scallops sit evenly and the edges stay square. The 2 increases in Cuff Row 1 make the cuff stand slightly proud of the leg, as on a real stocking.
Final Blocking
- Pin each stocking flat, RS up, on the blocking mat at 2.17 in (5.5 cm) wide × 2.75 in (7.0 cm) tall.
- Set the heel edge straight with 2–3 pins, and pin the toe and heel curves smooth.
- Open each scallop with a pin at its center tip.
- Spray until damp, not soaked.
- Let them dry completely, usually 4–6 hours.
- Once the strands are hung, let the curtain hang for 24 hours. The weight of the stockings straightens the chains naturally.
Final Quality-Control Checklist
- [ ] All 80 stockings measure 2.17 in (5.5 cm) × 2.75 in (7.0 cm), within 0.13 in (0.3 cm)
- [ ] Every stocking has 13 red rows and 3 cream cuff rows
- [ ] Every cuff has exactly 3 scallops
- [ ] All toes point the same way, and all stockings are joined RS facing
- [ ] Each strand has 8 stockings and 8 locked pearls
- [ ] Type A drop is 66 in (167.6 cm) and Type B drop is 70 in (177.8 cm)
- [ ] Strands alternate A, B, A, B, spaced 3.5 in (8.9 cm) apart
- [ ] All ends are woven in on the WS and trimmed
Troubleshooting
The stocking leans or twists. It was joined through a stitch other than the first sc of Cuff Row 3. Undo the join and rejoin at that heel-side corner.
The toe looks square. Check the increase in Row 2 and the sc2tog in Row 4. Both shape the toe.
The cuff ruffles. You have more than 10 sc in Cuff Row 1. Recount and redo the row.
The scallops are uneven. Make sure you skip exactly 1 stitch before each shell.
A pearl slides. The bead-lock chain was too loose. Rework that chain more firmly.
A strand is too long. Chain gauge is loose. Pull each chain to 5 per 1 in (2.5 cm).
A stocking curls. Re-block it damp and pin it until it’s fully dry.
Care
Hand-wash cool with a mild soap, roll the curtain in a towel and dry the stockings flat. Store each strand loosely coiled in a bag so the chains don’t tangle.
Final Notes
Everything comes back to the measurement chain. Gauge of 6 sc per 1 in (2.5 cm) gives a red body of 2.17 in (5.5 cm) square. The cuff adds 0.58 in (1.5 cm), for a stocking 2.75 in (7.0 cm) tall.
At 5 ch per 1 in (2.5 cm), each 40-ch repeat spaces the stockings 8 in (20.3 cm) apart. The strands drop 66 in (167.6 cm) and 70 in (177.8 cm), and 10 strands spread across 31.5 in (80.0 cm) of rod. Check your test stocking and your first strand, and the remaining 79 stockings and 9 strands will match.
Happy crocheting!