

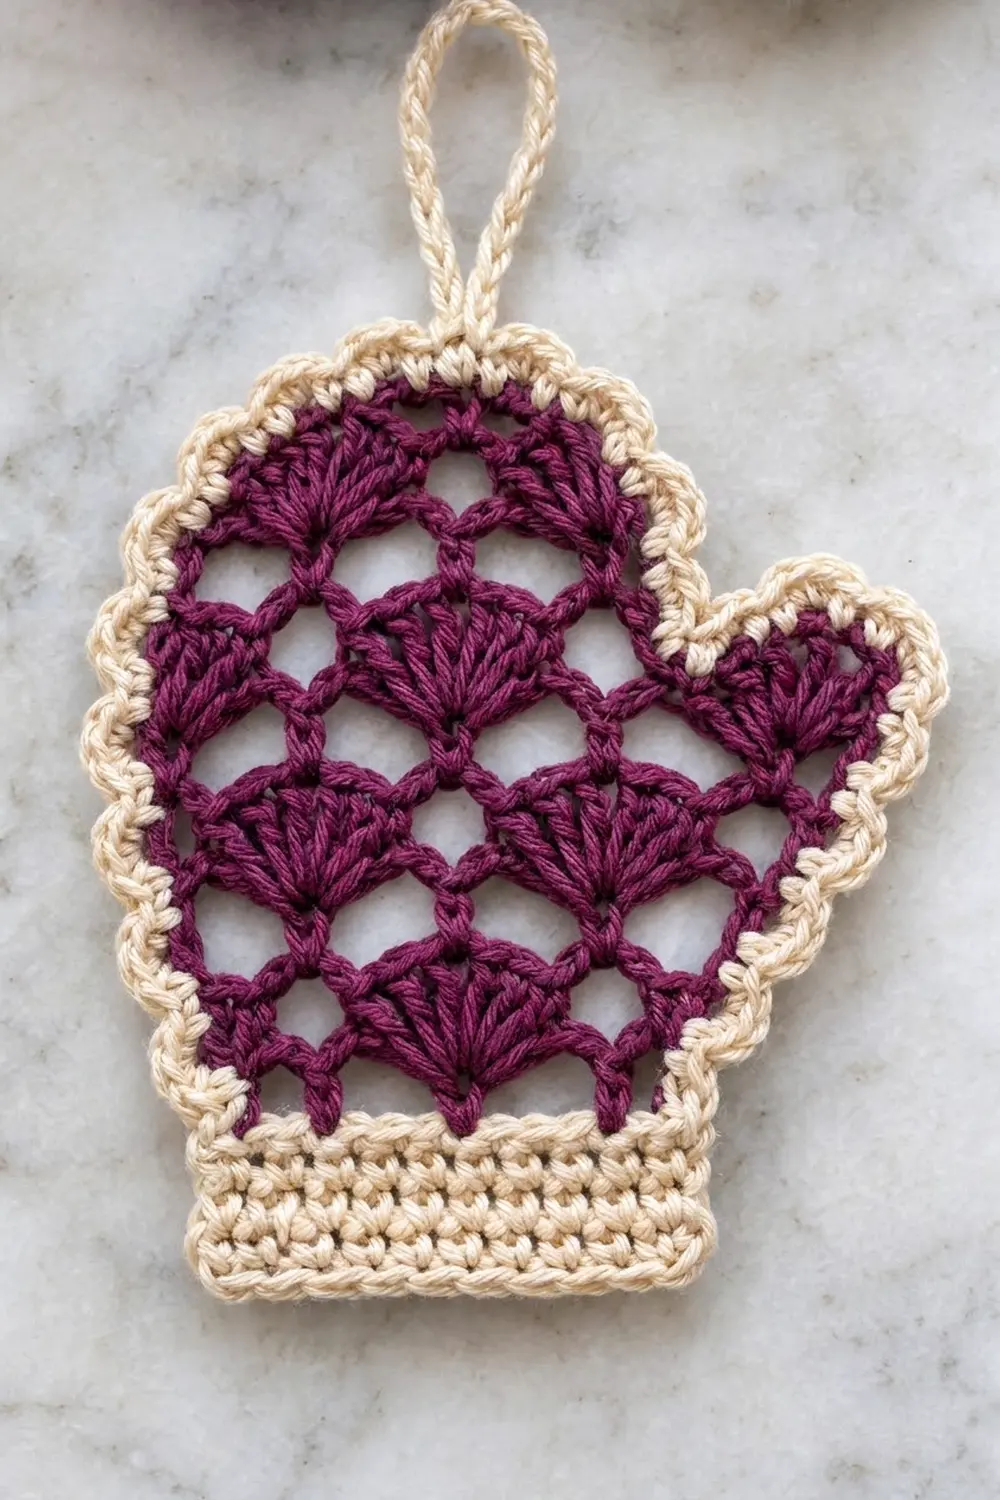
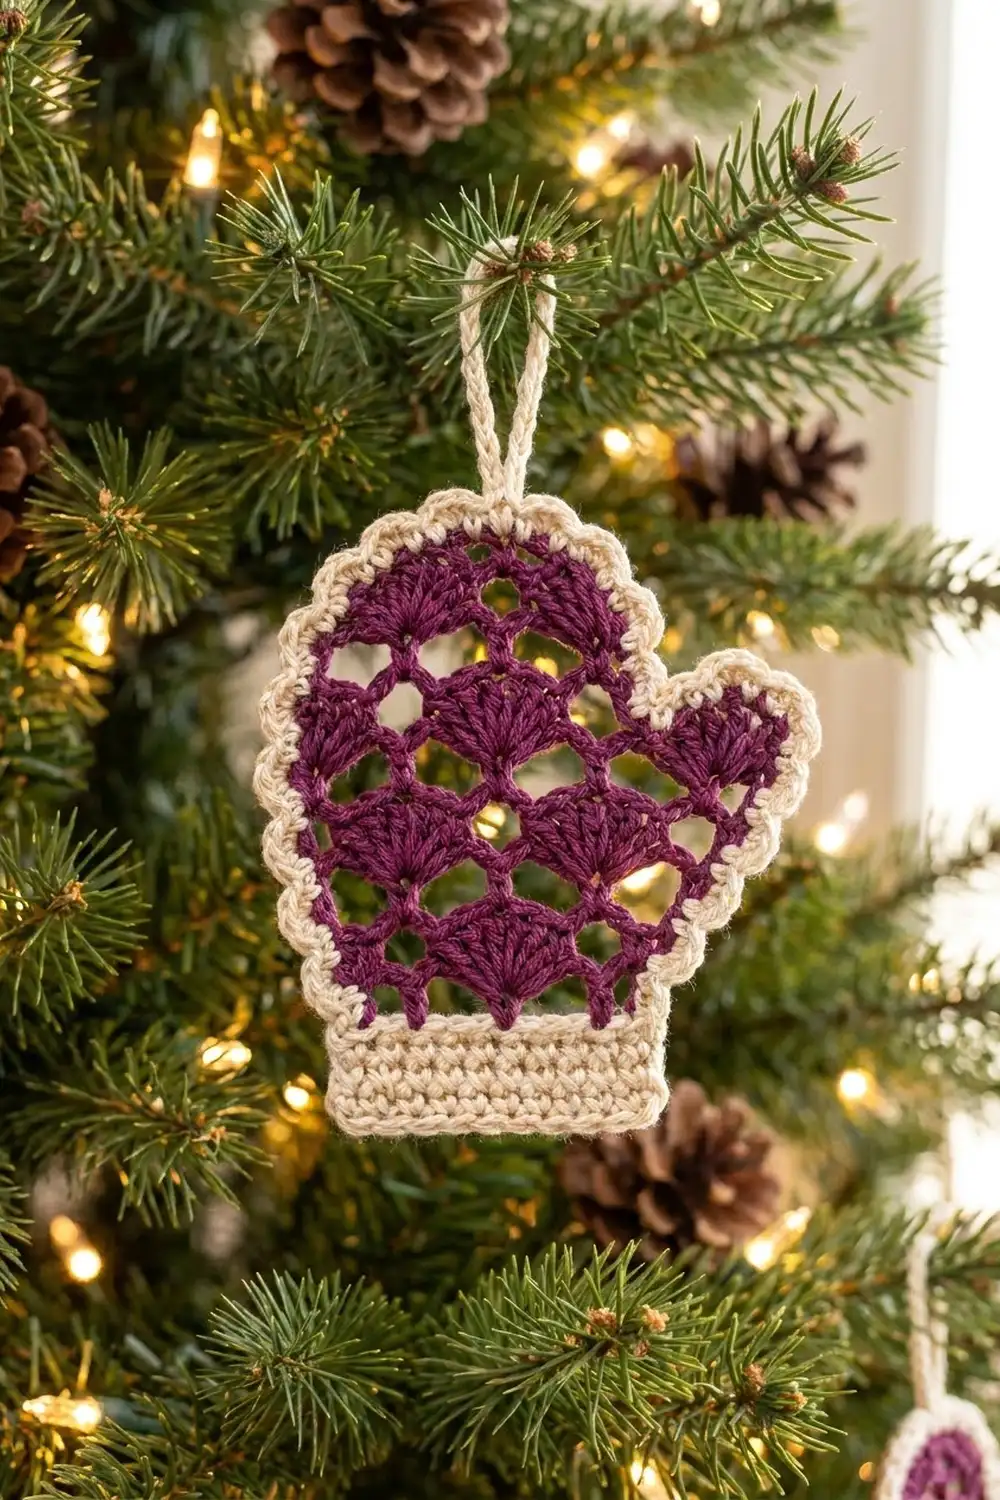
This little mitten ornament pairs a solid cream cuff with a lacy plum hand made of fan shells. Small diamond-shaped gaps open up between the fans, so light shows through when the mitten hangs on a lit tree. A cream scalloped edge frames the whole outline and makes the piece look like a tiny iced cookie.
The colors are deep plum and natural cream: rich enough to suit traditional decor and soft enough for a Scandinavian-style tree. The finished mitten is about 5.25 in (13.3 cm) wide and 5 in (12.7 cm) tall, not counting the hanging loop, which adds about 2 in (5.1 cm).
This pattern uses US crochet terms throughout.
You’ll work the cuff in rows of single crochet. Then you switch to plum and work up the hand in alternating loop rows and fan rows, stepping in at the top to round it off. The thumb is worked straight into the side edge, so there’s no sewing. To finish, you add two rounds of cream border and a hanging loop.
Finished Size and Construction
- Finished size: 5.25 in (13.3 cm) wide × 5 in (12.7 cm) tall, plus a 2 in (5.1 cm) loop
- Skill level: Easy-intermediate
- Terminology: US
- Yarn weight: DK (3) cotton or cotton blend
- Hook: 3.5 mm (E-4)
- Number of pieces: 1 (the thumb is worked onto the hand)
- Layout: Single standalone motif
- Piece size before border: 4.75 in (12.1 cm) wide including the thumb × 4.5 in (11.4 cm) tall
- Border depth: 0.25 in (0.6 cm) on every edge
Materials
Yarn: Use a smooth DK cotton or cotton blend. Mercerized cotton shows the fan texture best and holds its shape on the tree. Avoid fuzzy yarns, because they fill in the open diamonds.
- Color A (Plum): 10 g, about 23 m
- Color B (Cream): 10 g, about 23 m
These amounts include a safety margin of roughly 25%. One ornament uses about 8 g of plum and 7–8 g of cream.
Tools:
– 3.5 mm (E-4) crochet hook
– Tapestry needle
– Scissors
– Stitch marker
– Rust-proof pins and a blocking mat or folded towel
– Spray bottle with water
Abbreviations (US Terms)
- ch – chain
- sl st – slip stitch
- sc – single crochet
- hdc – half double crochet
- dc – double crochet
- sk – skip
- st(s) – stitch(es)
- sp – space
- rep – repeat
Special stitches:
– Fan: 7 dc worked into the same ch-5 loop. The center dc is the 4th dc.
– Scallop: 3 hdc worked into the same stitch.
Gauge and Checkpoints
Gauge: 20 sc and 24 rows = 4 in (10.2 cm) in sc with a 3.5 mm hook. That works out to 5 sc and 6 rows per 1 in (2.5 cm).
The cuff doubles as your gauge swatch. Measure it before you start the plum section.
Checkpoints:
1. After the cuff (6 rows): 3.4 in (8.6 cm) wide × 1 in (2.5 cm) tall.
2. After hand Row 6: about 3.75 in (9.5 cm) wide across the fans. Total height from the bottom of the cuff is about 3.1 in (7.9 cm).
3. After hand Row 10: the full height is 4.5 in (11.4 cm). Rows 1–10 together add 3.5 in (8.9 cm) above the cuff.
4. After the thumb: the thumb sticks out 1 in (2.5 cm) from the side, so the total width is 4.75 in (12.1 cm).
5. After the border: 5.25 in (13.3 cm) × 5 in (12.7 cm).
If your cuff is too wide, go down a half size to a 3.25 mm hook. If it’s too narrow, go up to a 3.75 mm hook. A difference of up to 0.25 in (0.6 cm) is fine, because blocking evens it out.
Cuff (Color B, Cream)
Foundation: Ch 18.
Row 1: Sc in 2nd ch from hook and in each ch across. Turn. (17 sc)
Rows 2–6: Ch 1 (does not count as a stitch), sc in each st across. Turn. (17 sc per row)
On the last yarn-over of the final sc in Row 6, pull through with Color A. Cut Color B, leaving a 4 in (10.2 cm) tail.
Checkpoint: 3.4 in (8.6 cm) × 1 in (2.5 cm).
Hand (Color A, Plum)
The hand alternates loop rows (sc anchors joined by ch-5 loops) with fan rows (7 dc fans worked into those loops). Each new set of fans lands between the fans of the row below, which staggers them and opens the diamond gaps.
Row 1 (loop row): Ch 1, sc in first st, ch 5, sk 3 sts, sc in next st; rep from * 3 more times. Turn. (5 sc, 4 ch-5 loops)
The sc land on cuff sts 1, 5, 9, 13, and 17, so 17 sts fit exactly.
Row 2 (fan row A): Ch 1, sc in first sc, Fan in next ch-5 loop, sc in next sc; rep from * 3 more times. Turn. (4 fans, 5 sc = 33 sts)
Row 3 (offset loop row): Ch 5 (counts as dc + ch 2), sc in center dc of first fan, ch 5, sc in center dc of next fan; rep from * 2 more times, ch 2, dc in last sc. Turn. (2 edge dc, 4 sc, 3 ch-5 loops, 2 ch-2 sps)
Row 4 (fan row B): Ch 3 (counts as dc), 3 dc in first ch-2 sp, sc in next sc, Fan in next ch-5 loop, sc in next sc; rep from * 2 more times, 3 dc in last ch-2 sp, dc in 3rd ch of turning ch. Turn. (2 half fans of 4 dc each, 3 fans, 4 sc = 33 sts)
Check: 4 + 1 + (7 + 1) × 3 + 4 = 33.
Row 5 (loop row): Ch 1, sc in first dc, ch 5, sc in center dc of next full fan; rep from * 2 more times, ch 5, sc in top of turning ch. Turn. (5 sc, 4 ch-5 loops)
Row 6 (fan row A): Work as Row 2. Turn. (4 fans, 5 sc = 33 sts)
Checkpoint: about 3.75 in (9.5 cm) wide and 3.1 in (7.9 cm) tall overall.
Top Shaping
Row 7 (loop row, decrease): Sl st in each of first 5 sts, ending in the center dc of the first fan. Ch 1, sc in same st, ch 5, sc in center dc of next fan; rep from * 2 more times. Leave the remaining 4 sts unworked. Turn. (4 sc, 3 ch-5 loops)
This leaves 4 sts of Row 6 uncovered at each end (1 sc + 3 dc). These are the “steps” you’ll edge in the border.
Row 8 (fan row): Ch 1, sc in first sc, Fan in next loop, sc in next sc; rep from * 2 more times. Turn. (3 fans, 4 sc = 25 sts)
Row 9 (loop row, decrease): Sl st in each of first 5 sts, ch 1, sc in same st, ch 5, sc in center dc of next fan; rep from * once more. Turn. (3 sc, 2 ch-5 loops; 4 sts uncovered at each end)
Row 10 (fan row): Ch 1, sc in first sc, Fan in next loop, sc in next sc; rep from * once more. (2 fans, 3 sc = 17 sts)
Fasten off.
Checkpoint: 4.5 in (11.4 cm) tall in total.
Thumb (Color A, Plum)
Choose the side you want as the front. With the front facing you, turn the mitten so its right-hand side edge runs along the top.
Thumb Row 1: Join Color A with a sc around the edge st of hand Row 2. Ch 5, sc around the edge st of hand Row 4, ch 5, sc around the edge st of hand Row 6. Turn. (3 sc, 2 ch-5 loops)
Thumb Row 2: Ch 1, sc in first sc, Fan in next loop, sc in next sc; rep from * once more. Turn. (2 fans, 3 sc = 17 sts)
Thumb Row 3: Sl st in each of first 5 sts, ch 1, sc in same st, ch 5, sc in center dc of next fan. Turn. (2 sc, 1 ch-5 loop; 4 sts uncovered at each end)
Thumb Row 4: Ch 1, sc in first sc, 9 dc in ch-5 loop, sc in last sc. (11 sts)
The 9-dc fan makes a rounded thumb tip. Fasten off and weave in all plum ends.
Checkpoint: the thumb sticks out 1 in (2.5 cm), for a total width of 4.75 in (12.1 cm).
Border (Color B, Cream)
Border gauge: Round 1 adds about 0.15 in (0.4 cm) and Round 2 adds about 0.1 in (0.3 cm), for 0.25 in (0.6 cm) on every edge.
Edge rule for row ends: work 2 sc into the side of each loop row and 3 sc into the side of each fan row. Fan rows are taller, so this keeps the edge flat. At each step, work 1 sc into each uncovered stitch.
Round 1: With the front facing, join Color B in the first foundation ch at the bottom left corner of the cuff. Work counterclockwise:
- Bottom edge: 3 sc in first ch, sc in next 15 ch, 3 sc in last ch. (21 sc)
- Right cuff side: 1 sc in each row end. (6 sc)
- Hand Row 1, right end: 2 sc
- Thumb, lower side: Thumb Row 1 end (2), Row 2 end (3), step (4), Row 3 end (2), Row 4 end (3). (14 sc)
- Thumb tip: sc in each of the 11 sts of Thumb Row 4, with 3 sc in the 5th dc (the center of the fan). (13 sc)
- Thumb, upper side: mirror of the lower side, 3 + 2 + 4 + 3 + 2. (14 sc)
- Right upper hand: step on Row 6 (4), Row 7 end (2), Row 8 end (3), step on Row 8 (4), Row 9 end (2), Row 10 end (3). (18 sc)
- Top edge: sc in each st of Row 10. (17 sc)
- Left upper hand: mirror of the right, 3 + 2 + 4 + 3 + 2 + 4. (18 sc)
- Left hand, Rows 6 to 1: 3 + 2 + 3 + 2 + 3 + 2. (15 sc)
- Left cuff side: (6 sc)
Sl st to the first sc. (144 sc total)
Check: 21 + 6 + 2 + 14 + 13 + 14 + 18 + 17 + 18 + 15 + 6 = 144.
Round 2 (scallops): Ch 1, sl st in first sc. Sk 1 sc, Scallop in next sc, sk 1 sc, sl st in next sc; rep from * around, ending with sk 1 sc, Scallop in next sc, sk last sc, and join to the first sl st. (36 scallops)
Why the math works: each scallop repeat uses 4 sc, and 144 ÷ 4 = 36 exactly, so the round closes with no half repeat. The 17-st top edge has an odd count, so its 9th sc sits at the exact center of the top, above the sc between the two top fans. That is your anchor for the loop.
Do not fasten off.
Hanging Loop
Sl st along Round 2 to the scallop or sl st closest to the 9th top sc of Round 1.
Ch 20 and sl st into the same st to form a ring. Work 30 sc into the ring, then sl st into the base. The covered loop measures about 2 in (5.1 cm).
Fasten off, leaving a 6 in (15.2 cm) tail. Thread the tail through the base twice to secure the loop, then weave in all ends.
Final Blocking
- Spray the ornament lightly until it’s damp but not dripping.
- Lay it face up on the mat and pin the cuff’s bottom corners square, 3.75 in (9.5 cm) apart. This is the 3.4 in (8.6 cm) cuff plus the border on both sides.
- Pin the highest point of the top edge 5 in (12.7 cm) above the bottom edge.
- Pin the thumb tip so the total width is 5.25 in (13.3 cm).
- Use your fingertip to open each diamond gap and fan out each shell.
- Pin the scallops into an even curve, one pin every 1 in (2.5 cm).
- Pin the hanging loop straight up.
- Let it dry completely, at least 4 hours.
- For a crisper ornament, mist it with light spray starch before it dries.
Final Quality-Control Checklist
- [ ] The cuff has 17 sc in every row and its sides are straight.
- [ ] Fan rows have 33 / 33 / 33 / 25 / 17 sts (Rows 2, 4, 6, 8, 10).
- [ ] Fans sit staggered between the fans of the row below.
- [ ] The diamond gaps are open and roughly even.
- [ ] The thumb has 2 fans plus a 9-dc tip.
- [ ] Border Round 1 has 144 sc and Round 2 has 36 scallops.
- [ ] The hanging loop is centered over the top edge.
- [ ] Finished size is 5.25 in (13.3 cm) × 5 in (12.7 cm).
- [ ] All ends are woven in and hidden.
Troubleshooting
The hand ruffles. Your dc tension is loose or the ch-5 loops are too long. Try making 6 dc fans or ch 4 loops, or switch to a smaller hook for the plum section only.
The hand pulls narrower than the cuff. Your chains are too tight. Ch loosely, or go up a hook size for the loop rows only.
The border cups. You added too many sc at the row ends. Check that you work 2 sc per loop row and 3 per fan row.
The border waves. You worked too few sc at the row ends or steps. Check each section against the counts above.
The scallops don’t come out even. Recount Round 1. It must be exactly 144 sc (a multiple of 4).
The thumb tilts down. Block it angled slightly upward and let it dry pinned.
The loop sits off-center. Count the top edge again and anchor the loop at the 9th of the 17 sc.
Care
Hand wash in cool water with a mild soap, press out the water in a towel, and reshape it flat to dry. Store the mitten flat in tissue paper so the scallops and loop keep their shape.
Final Notes
The measurements build on each other in this order:
- The cuff checks your gauge at 3.4 in (8.6 cm) × 1 in (2.5 cm).
- The fans widen the hand to 3.75 in (9.5 cm).
- The step-ins round the top to a full height of 4.5 in (11.4 cm).
- The thumb brings the width to 4.75 in (12.1 cm).
- The 144-stitch border adds 0.25 in (0.6 cm) on every edge, for a finished ornament of 5.25 in (13.3 cm) × 5 in (12.7 cm).
Check each measurement as you go and the finished mitten will come out at the right size. Make a few in plum or try another color, and you’ll have a set of lacy mittens for your tree or gift toppers.
Happy crocheting!