

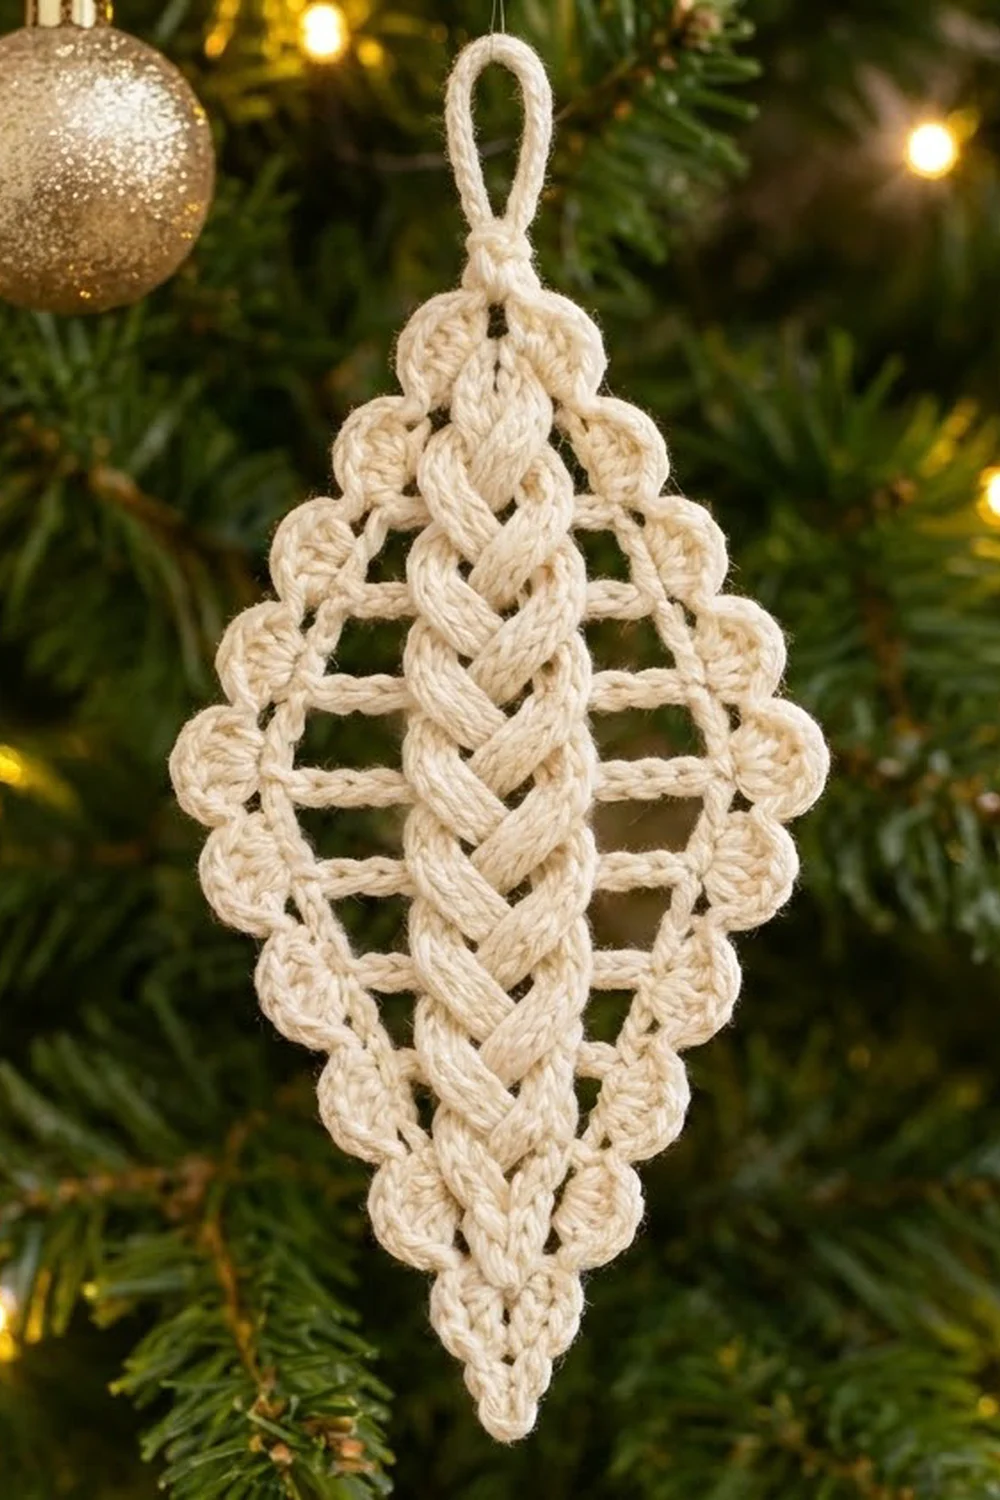
The Winter Braid Diamond is a light, lacy Christmas ornament with a raised braid down the middle. Short chain bars run out from the braid to a smooth outline, and a row of small shell scallops trims the edge. It looks a little like a frosted leaf or a snowflake, and it looks right on a real tree, a garland of branches, or a gift tag.
This sample uses one color, a soft cream cotton. Light colors show off the braid and the open bars best. White, ivory, pale gold, or silver-gray all suit a classic Christmas look.
The pattern uses US crochet terms. The finished ornament is 3.75 in (9.5 cm) wide and 6.25 in (15.9 cm) tall, plus a 1 in (2.5 cm) hanging loop. That makes it 7.25 in (18.4 cm) tall in total.
You make the ornament in four stages. First you work a narrow braided strip in rows. Next comes one round of sc with chain “bars” that stick out from the strip. A chain frame connects the tips of the bars, and then you work sc over that frame to make a solid outline. Last, you add a shell border and cover the hanging loop. It is all one piece, with no sewing between parts.
Finished Size and Construction
- Finished size: 3.75 in (9.5 cm) wide × 6.25 in (15.9 cm) tall, plus a 1 in (2.5 cm) loop
- Skill level: Intermediate (front-post cables, working into row-ends)
- Terminology: US
- Yarn weight: DK (light worsted, #3) cotton
- Hook: 3.5 mm (E-4)
- Number of pieces: 1
- Layout: a single diamond, made with the long axis vertical
- Braid strip: 1.25 in (3.2 cm) × 4.4 in (11.2 cm)
- Size before border: 3 in (7.6 cm) × 5.75 in (14.6 cm)
- Border depth: 0.375 in (1.0 cm) on each side
Materials
Yarn: DK-weight mercerized or combed cotton in cream, about 12 g / 28 m for one ornament. Cotton holds the braid crisply and blocks flat. Acrylic works too, but its bars will curl more.
The yardage includes a margin of about 20% for gauge swatching and weaving in ends. To make a set of 8 ornaments, a 100 g ball is plenty.
Tools:
– 3.5 mm (E-4) crochet hook
– Tapestry needle
– Scissors
– 2 stitch markers
– Rust-proof pins and a blocking mat
– Spray bottle, plus spray starch (optional)
Abbreviations (US Terms)
- ch: chain
- sl st: slip stitch
- sc: single crochet
- dc: double crochet
- FPdc: front post double crochet
- FPtr: front post treble crochet
- sk: skip
- sp: space
- st(s): stitch(es)
- tch: turning chain
- RS / WS: right side / wrong side
Special stitch – Bar(n): Ch n+1, then sl st in the 2nd ch from hook and in each of the next n−1 ch, ending back at the base. This makes a firm bar n sts long. The ch you skipped at the outer end is the bar’s tip. Example: Bar(3) = ch 4, then sl st back along 3 ch.
Standing sc: Start with a slip knot on the hook, insert the hook into the st, and work the sc as usual.
Gauge and Checkpoints
- Main gauge: 20 dc × 10 rows = 4 in (10.2 cm) in plain dc
- Chain gauge: 5 relaxed ch = 1 in (2.5 cm)
Make one complete ornament before starting a set. Measure it at each checkpoint:
- After the strip (Row 11): 1.25 in (3.2 cm) wide × 4.4 in (11.2 cm) tall. The cables pull the 8 sts in a little narrower than plain dc would be.
- After Round 1: 2.85 in (7.2 cm) across the middle bars × 5.6 in (14.2 cm) from top bar tip to bottom bar tip.
- After Round 3: 3 in (7.6 cm) × 5.75 in (14.6 cm).
- Finished: 3.75 in (9.5 cm) × 6.25 in (15.9 cm), plus the loop.
If your strip is too big by more than 0.25 in (0.6 cm), go down half a hook size. If it’s too small, go up half a size. If only the bars are off, adjust your chain tension. Tight chains make the outline pucker, and loose chains make it ripple.
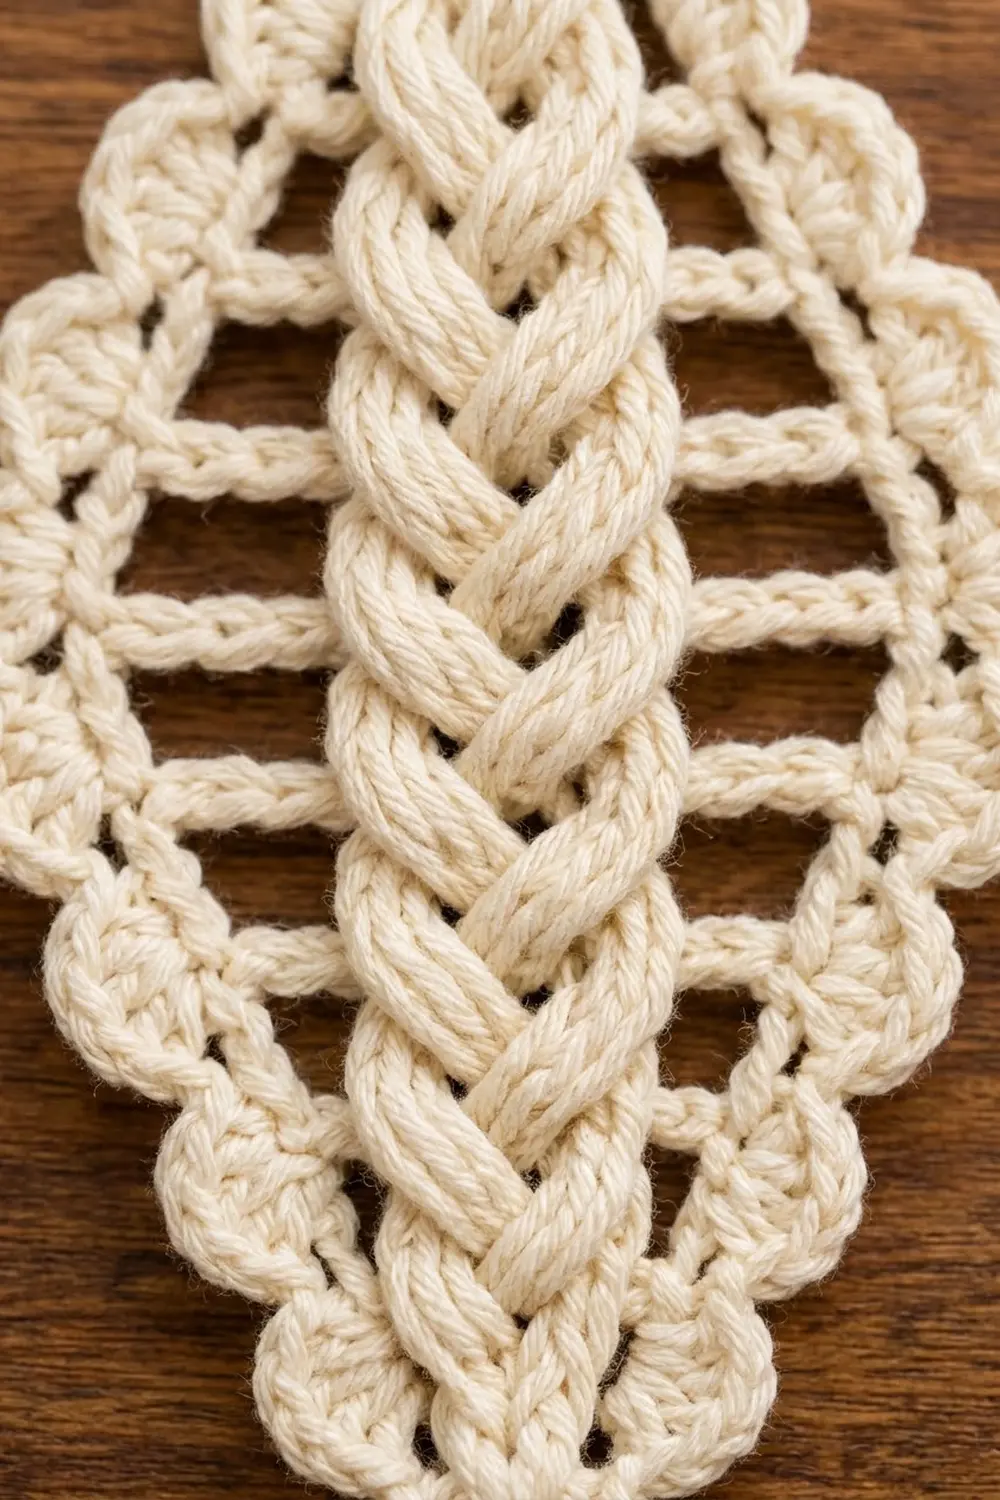
The Braid Strip
You work the strip from the bottom up. Row 1 is a WS row. On the RS rows (even numbers) you cross the cables, and on the WS rows (odd numbers) you work plain dc.
The braid uses 6 center sts, grouped as three pairs (left, center, and right), with one plain dc edge st on each side.
Row 1 (WS): Ch 10, dc in 4th ch from hook (the skipped ch count as 1 dc) and in each ch across, turn. (8 sts)
Row 2 (RS, Cross A): Ch 3 (counts as dc), sk next 2 sts, FPtr around each of next 2 sts. Working in front of the sts just made, FPtr around each of the 2 skipped sts. FPdc around each of next 2 sts, dc in top of tch, turn. (8 sts)
In Cross A, the left pair crosses over the center pair to the right.
Row 3 (WS): Ch 3, dc in each st across, turn. (8 sts)
Row 4 (RS, Cross B): Ch 3, FPdc around each of next 2 sts, sk next 2 sts, FPtr around each of next 2 sts. Working behind the sts just made, FPtr around each of the 2 skipped sts. Dc in top of tch, turn. (8 sts)
In Cross B, the right pair crosses over the center pair to the left. Switching between A and B is what makes the braid.
Row 5: Repeat Row 3.
Row 6: Repeat Row 2 (Cross A).
Row 7: Repeat Row 3.
Row 8: Repeat Row 4 (Cross B).
Row 9: Repeat Row 3.
Row 10: Repeat Row 2 (Cross A).
Row 11: Repeat Row 3. Fasten off. (8 sts)
That gives 5 crosses in all. Check checkpoint 1: 1.25 in (3.2 cm) × 4.4 in (11.2 cm).
Round 1: Bars
Work this round all around the strip with the RS facing you. Work 2 sc into each row-end, inserting the hook under the side post of the dc or the turning ch.
Bar placement on each side:
– Row 2: Bar(2)
– Row 4: Bar(3)
– Row 6: Bar(4)
– Row 8: Bar(3)
– Row 10: Bar(2)
Each bar goes right after the first sc in that row-end.
Round 1: Join with a standing sc in the first st of Row 11 (top right corner). Sc in each of next 3 sts, Bar(3), sc in each of last 4 sts. That finishes the top.
Work down the left side, Rows 11 to 1:
– Row 11: 2 sc.
– Row 10: sc, Bar(2), sc.
– Row 9: 2 sc.
– Row 8: sc, Bar(3), sc.
– Row 7: 2 sc.
– Row 6: sc, Bar(4), sc.
– Row 5: 2 sc.
– Row 4: sc, Bar(3), sc.
– Row 3: 2 sc.
– Row 2: sc, Bar(2), sc.
– Row 1: 2 sc.
Working across the opposite side of the foundation ch: sc in each of 4 ch, Bar(3), sc in each of 4 ch.
Work up the right side, Rows 1 to 11, placing the bars the same way. Sl st to the first sc and fasten off.
Count: 60 sc (22 per side + 8 at the top + 8 at the bottom) and 12 bars (5 per side + 1 at the top + 1 at the bottom).
Lay the piece flat. The bars should stick straight out and get longer toward the middle, giving a rounded diamond shape. This is checkpoint 2.
Round 2: Chain Frame
This round touches only the bar tips. The open gaps between the bars stay open.
Round 2: Join with a standing sc in the tip of the top Bar(3), ch 2, sc in the same tip. Then:
– Ch 9, sc in the tip of the left Row 10 bar.
– [Ch 4, sc in the tip of the next bar] 4 times. Now you are at the Row 2 bar.
– Ch 9, (sc, ch 2, sc) in the tip of the bottom Bar(3).
– Ch 9, sc in the tip of the right Row 2 bar.
– [Ch 4, sc in the tip of the next bar] 4 times. Now you are at the Row 10 bar.
– Ch 9, sl st to the first sc. Don’t fasten off.
Count: 14 sc and 72 ch. That is four ch-9 sps (36 ch), eight ch-4 sps (32 ch), and two ch-2 tip sps (4 ch).
The ch-9 spans are for the longer diagonal at each point (about 1.6 in / 4.1 cm). The ch-4 spans are for the shorter steps between bars (about 0.8 in / 2.0 cm).
Round 3: Solid Outline
This is a conversion round. You work 1 sc into each sc and into each side ch, then add extra sc at the two tips.
Round 3: Sl st into the top ch-2 sp, ch 1, (sc, ch 2, sc) in the same sp. Then:
– Sc in next sc, 9 sc in ch-9 sp, sc in next sc.
– [4 sc in next ch-4 sp, sc in next sc] 4 times.
– 9 sc in ch-9 sp, sc in next sc.
– (sc, ch 2, sc) in the bottom ch-2 sp.
– Sc in next sc, 9 sc in ch-9 sp, sc in next sc.
– [4 sc in next ch-4 sp, sc in next sc] 4 times.
– 9 sc in ch-9 sp, sc in next sc.
– Sl st to the first sc. Fasten off.
Count: (14 sc + 64 side ch, worked 1 per st) + 4 extra sc at the tips = 86 sc, plus 2 ch-2 tip sps.
Each side has 43 sts from tip sp to tip sp: 1 + 1 + 9 + 1 + 20 + 9 + 1 + 1 = 43.
Check checkpoint 3: 3 in (7.6 cm) × 5.75 in (14.6 cm).
Border and Hanging Loop
Border gauge: Each 5-dc shell spans 6 sts, about 0.75 in (1.9 cm) along the edge, and stands 0.375 in (1.0 cm) high.
Round 4: Join with a standing sc in the top ch-2 sp, ch 12, sc in the same sp. This makes the loop. Then work the left side’s 43 sts:
– Sc in first st.
– Sk 2 sts, 5 dc in next st, sk 2 sts, sc in next st. Repeat from * 6 more times, for 7 shells.
In the bottom ch-2 sp, work 5 dc to make the tip shell. Then work the right side’s 43 sts:
– Sc in first st.
– Sk 2, 5 dc in next, sk 2, sc in next. Repeat from * 6 more times, for 7 shells.
Sl st to the first sc.
Count: 15 shells (75 dc), 18 sc, and the ch-12 loop.
Covering the loop: Sl st into the ch-12 loop. Work 18 sc over the loop, packing them tightly, then sl st into the sc at the base. Fasten off and weave in all ends along the outline, not through the bars.
Why the math works: Each shell repeat uses exactly 6 sts (sk 2, shell, sk 2, sc). The sc that closes one repeat also starts the next. So one side needs 1 + (7 × 6) = 43 sts, which is exactly what Round 3 gives each side. The tips sit in their own ch-2 sps, so they never take stitches from a side. That keeps both sides symmetrical, with a shell at the bottom point and the loop at the top.
Final Blocking
- Wet the ornament fully, or spray it until it’s damp all the way through.
- Press out the extra water with a towel. Don’t wring it.
- Pin the top loop and the bottom tip shell in a straight vertical line 6.25 in (15.9 cm) apart, not counting the loop.
- Pin the outline out to 3.75 in (9.5 cm) at the middle shells.
- Straighten each bar so it sits horizontal and square to the braid.
- Open each shell into a rounded scallop with a pin at its center dc.
- Press the braid gently with your fingers so the crosses lie smooth and raised.
- Spray lightly with starch if you want a stiffer ornament.
- Let it dry completely before unpinning, usually 6–12 hours.
Final Quality-Control Checklist
- [ ] The braid shows 5 clean crosses that switch direction each time.
- [ ] You can see 5 bars on each side, plus one bar hidden at each tip.
- [ ] The bars are longest at the middle (Row 6) and the shape is mirror-symmetrical.
- [ ] Round 3 has 43 sts per side.
- [ ] There are 7 shells per side plus 1 tip shell.
- [ ] The loop is fully covered and centered at the top.
- [ ] The size is 3.75 in × 6.25 in (9.5 cm × 15.9 cm), and the loop is 1 in (2.5 cm).
- [ ] All ends are hidden in the solid outline.
Troubleshooting
Braid looks twisted instead of braided: Cross A and Cross B both crossed the same way. Check that Cross A is worked in front and Cross B is worked behind.
Strip is wider at the cable rows: Your FPtr sts are too loose. Pull up shorter loops, or use FPdc for the outer pair.
Bars droop or curl: The sl sts are too loose. Work the sl sts into the back bump of the ch, and block with starch.
Outline puckers between bars: The chains are too tight. Chain more loosely, or go up a hook size just for Round 2.
Outline ripples: The chains are too loose. Go down a hook size for Round 2.
Shell count doesn’t fit: Recount Round 3. Each side must be exactly 43 sts. The usual mistake is working 8 or 10 sc into a ch-9 sp.
Loop flops over: Pack more sc onto it (up to 20) and stiffen it with starch.
Care
Hand wash in cool water with mild soap, press dry in a towel, and re-block flat. Store flat or hanging, away from heavy decorations that could crush the bars.
Final Notes
Every stage builds on the one before. The 8-st, 11-row braid strip measures 1.25 in × 4.4 in (3.2 cm × 11.2 cm). Round 1 adds bars that reach 2.85 in × 5.6 in (7.2 cm × 14.2 cm). Rounds 2 and 3 close the outline at 3 in × 5.75 in (7.6 cm × 14.6 cm), with exactly 43 sts per side. Round 4 fits 7 shells into those 43 sts, for a finished 3.75 in × 6.25 in (9.5 cm × 15.9 cm) ornament with a 1 in (2.5 cm) loop.
If you check each measurement as you go, every ornament in your set will match. Happy crocheting!