

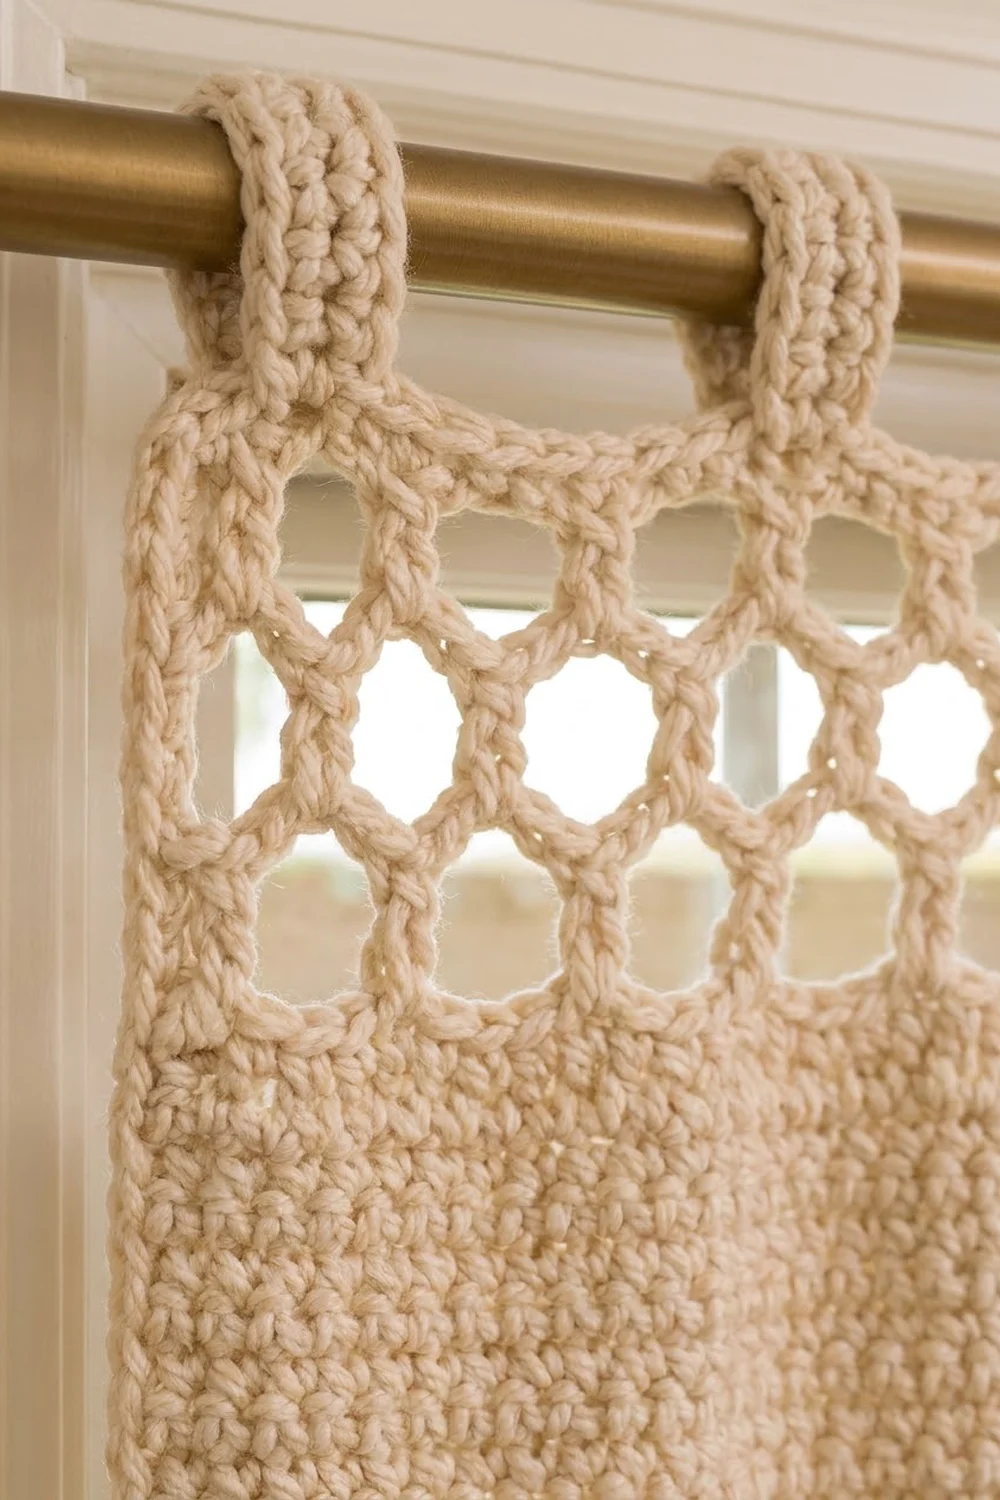
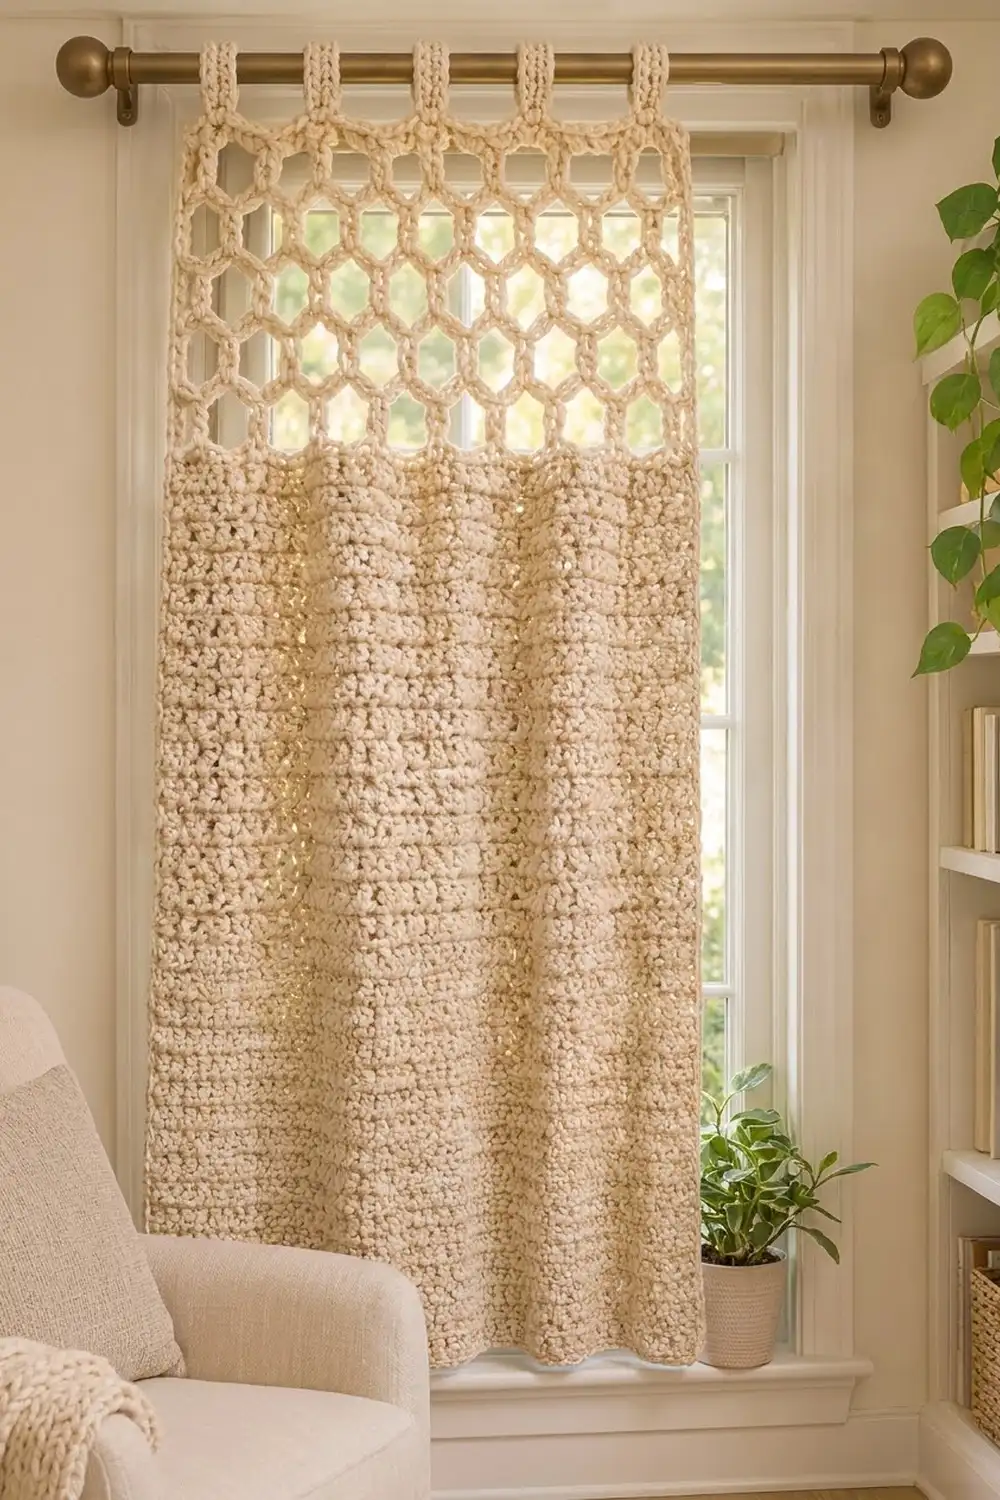
The Honeycomb Window Curtain is a single cream panel that hangs from a rod by chunky tab loops. The top section is an open honeycomb mesh that lets daylight through. The lower section is a dense, pebbly fabric that gives privacy and soft texture.
The whole curtain uses one color, a warm cream or natural ivory. The style is calm and cottage-like. It suits a reading nook, a bedroom window, or a doorway, and it works well in neutral rooms that need some texture without a busy pattern.
This pattern uses US crochet terms. The finished panel measures about 29.5 in (74.9 cm) wide and 56.1 in (142.5 cm) long, not counting the tabs. The tab loops add about 2.5 in (6.4 cm) above the top edge.
The construction is simple and all in one piece. You work the textured body from the bottom up in griddle stitch, then switch to a honeycomb mesh. One flat sc row closes the mesh. Then you add nine tabs and finish with a two-row sc border along the sides and bottom.
Finished Size and Construction
- Finished size: 29.5 in x 56.1 in (74.9 cm x 142.5 cm), plus 2.5 in (6.4 cm) tab loops
- Skill level: Easy to intermediate
- Terminology: US crochet terms
- Yarn weight: Bulky (#5)
- Hook: 6.5 mm (US K-10.5)
- Number of pieces: 1 single panel; the tabs are worked directly onto the top edge
- Layout: Textured body at the bottom, honeycomb mesh at the top, 9 tabs across the top edge
- Piece size before border: 28.3 in x 55.5 in (71.9 cm x 141.0 cm)
- Border depth: about 0.6 in (1.5 cm) on each long side and on the bottom; the top edge has no border
Materials
Choose a smooth bulky yarn with good stitch definition. Cotton or a cotton blend hangs well and gives crisp hexagons. Acrylic is lighter and easier to wash, but it may stretch less evenly. Avoid fuzzy or brushed yarns because they blur the mesh.
- Cream (one color only): 900 g, about 990 m (1,083 yd) of bulky yarn
This amount includes a margin of about 10 percent for your gauge swatch and for small differences in tension.
Tools:
- 6.5 mm (US K-10.5) crochet hook
- Tapestry needle
- Stitch markers (at least 10)
- Measuring tape
- Rust-proof pins and a blocking surface
- Spray bottle or steamer
- Scissors
Abbreviations (US Terms)
- ch = chain
- sc = single crochet
- dc = double crochet
- sk = skip
- st(s) = stitch(es)
- sp = space
- RS / WS = right side / wrong side
Special stitch: pair = (sc, ch 1, sc) all in the same space. Each pair forms the short flat top and bottom sides of a hexagon in the mesh.
Griddle stitch = rows that alternate sc and dc across, so every sc sits on a dc and every dc sits on a sc. This gives the body its pebbly, granular texture.
Gauge and Checkpoints
Body gauge: 12 sts and 10 rows = 4 in (10.2 cm) in griddle stitch.
Mesh gauge: 1 mesh row = about 1 in (2.5 cm). One pair plus one ch-4 space = about 1.3 in (3.3 cm) wide.
Edge gauge for tabs and border: 12 sc and 13 rows = 4 in (10.2 cm).
Test first: Make a swatch before you start the curtain. Ch 26 and work 20 rows of griddle stitch with 25 sts, following Rows 1-3 below. The swatch should measure 8.3 in (21.1 cm) wide and 8 in (20.3 cm) tall.
- Swatch too big: go down to a 6 mm hook.
- Swatch too small: go up to a 7 mm hook.
Checkpoints on the curtain:
- After Row 10: width 28.3 in (71.9 cm), height 4 in (10.2 cm)
- After Row 50: height 20 in (50.8 cm)
- After Row 100: height 40 in (101.6 cm)
- After the mesh and Top Row: height 55.5 in (141.0 cm)
- After the border: 29.5 in x 56.1 in (74.9 cm x 142.5 cm)
If the width at Row 10 is off by more than 0.5 in (1.3 cm), start again with a different hook. Width is the hardest measurement to fix later.
Part 1: Textured Body (Griddle Stitch)
Ch 86.
Row 1 (RS): Sc in 2nd ch from hook, *dc in next ch, sc in next ch; rep from * across. Turn. (85 sts: 43 sc and 42 dc)
Row 2: Ch 3 (counts as dc), sk first st, *sc in next st, dc in next st; rep from * across. Turn. (85 sts: 42 sc and 43 dc, counting the turning ch)
Check that each sc sits on a dc and each dc sits on a sc.
Row 3: Ch 1, sc in first st, *dc in next st, sc in next st; rep from * across, working the last sc in the top of the turning ch. Turn. (85 sts)
Rows 4-100: Repeat Rows 2 and 3 in turn, so Row 100 is a Row 2 repeat. (85 sts in every row)
Place a marker on the side edge every 10 rows. The markers help you count rows and space the border stitches evenly later.
The body should now measure 28.3 in x 40 in (71.9 cm x 101.6 cm). Do not fasten off.
Part 2: Honeycomb Mesh
Every mesh row works into 21 spaces. Even rows place a pair in each of the 21 spaces. Odd rows place pairs in the ch-4 spaces between the pairs below, which offsets the hexagons into a honeycomb.
Mesh Row 1 (set-up): Ch 1, turn, sc in first st, *ch 5, sk 3 sts, sc in next st; rep from * 20 more times. Turn. (21 ch-5 loops and 22 sc)
Check: 1 + (21 x 4) = 85 sts used. The last sc lands in the top of the turning ch.
Mesh Row 2: Ch 5 (counts as dc and ch 2), pair in first space, *ch 4, pair in next space; rep from * 19 more times, ch 2, dc in last sc. Turn. (21 pairs and 20 ch-4 spaces)
Mesh Row 3: Ch 1, sc in first dc, ch 2, *pair in next ch-4 sp, ch 4; rep from * 18 more times, pair in last ch-4 sp, ch 2, sc in 3rd ch of turning ch. Turn. (20 pairs, 19 ch-4 spaces, and 2 ch-2 end spaces)
Row 3 leaves 21 spaces for the next row: the 2 end ch-2 spaces plus the 19 ch-4 spaces.
Mesh Rows 4-15: Repeat Mesh Rows 2 and 3 six more times. On each Row 2 repeat, the first and last spaces are the ch-2 end spaces. (Row 2 repeats: 21 pairs; Row 3 repeats: 20 pairs)
You now have 15 mesh rows, ending with a Row 3 repeat. When gently stretched, the mesh section measures about 15 in (38.1 cm).
Top Row (conversion row): Ch 1, turn, sc in first sc, 3 sc in ch-2 sp, *sc in ch-1 sp of next pair, 3 sc in next ch-4 sp; rep from * 18 more times, sc in ch-1 sp of last pair, 3 sc in ch-2 sp, sc in last sc. Turn.
Count: (2 end sc) + (6 sc in the 2 ch-2 spaces) + (20 sc in the pairs) + (57 sc in the 19 ch-4 spaces) = 85 sts.
This row brings the count back to 85 sts so the tabs line up with the body. The curtain now measures 28.3 in x 55.5 in (71.9 cm x 141.0 cm). Fasten off.
Part 3: Tabs
There are 9 tabs. Each is 5 sts wide, with 5 unworked sts between tabs. On the Top Row, the tabs sit on sts 1-5, 11-15, 21-25, 31-35, 41-45, 51-55, 61-65, 71-75, and 81-85.
Check: (9 tabs x 5 sts) + (8 gaps x 5 sts) = 85 sts.
Mark the first st of each tab before you begin.
Each tab:
Row 1: With RS facing, join yarn in the first st of the tab, ch 1, sc in same st and in next 4 sts. Turn. (5 sc)
Rows 2-16: Ch 1, sc in each st across. Turn. (5 sc)
The tab strip measures about 1.7 in x 4.9 in (4.3 cm x 12.4 cm). Fasten off, leaving a 10 in (25.4 cm) tail.
Fold the tab to the back so Row 16 lies against the back of the Top Row. Whipstitch the 5 sts of Row 16 to the back loops of the same 5 Top Row sts. This makes a loop about 2.5 in (6.4 cm) tall that fits a rod up to 1.25 in (3.2 cm) across.
Part 4: Border
The border runs down one long side, across the bottom, and up the other long side. The top edge stays plain so the tabs sit neatly.
Border gauge: 12 sc = 4 in (10.2 cm), the same as the tab gauge.
Border Row 1: With RS facing, join yarn at the top corner of the right side edge. Ch 1, then work evenly down the side:
- Along the Top Row edge: 1 sc
- Along the 15 mesh rows: 3 sc per row end, 45 sc total
- Along the 100 body rows: 6 sc per 5 rows, 120 sc total
Side total: 166 sc.
At the bottom corner, work 3 sc in the first foundation st. Sc in each of the next 83 foundation sts. Work 3 sc in the last foundation st. Then work up the second side in reverse: 120 sc along the body, 45 sc along the mesh, and 1 sc on the Top Row edge.
Count: 166 + 89 (bottom, including 2 corner groups of 3) + 166 = 421 sc. Turn.
Border Row 2: Ch 1, sc in each of the 166 side sts. At the corner, sc in the first corner sc, 3 sc in the center corner sc, then sc in the third corner sc. Sc in each of the 83 bottom sts. Repeat the corner. Sc in each of the 166 side sts. Fasten off.
Count: 421 sts worked one in each st + 4 extra sts (2 added at each corner) = 425 sc. Each side has 166 sc. The bottom has 93 sc: 83 plus a 5-st group at each corner.
Why the math works: Before the border, the panel is 55.5 in (141.0 cm) long. At 12 sc per 4 in, that length calls for 166.5 sc, so 166 sc lies flat without ruffling or pulling in. The bottom has exactly 1 sc per foundation st, so it matches the body width. The two sc rows add about 0.6 in (1.5 cm) to each long side and to the bottom. The final width is 28.3 + 0.6 + 0.6 = 29.5 in (74.9 cm). The final length is 55.5 + 0.6 = 56.1 in (142.5 cm).
Final Blocking
- Weave in all ends along stitch paths. In the mesh, hide the ends inside the pairs, not along the chains.
- Lay the curtain flat, RS up, on blocking mats or on a clean towel on the floor.
- Mist the whole piece until it is damp but not soaked. For acrylic, use light steam instead and hold the iron above the fabric without touching it.
- Pin the width to 29.5 in (74.9 cm): 28.3 in (71.9 cm) of body plus the border.
- Pin the length to 56.1 in (142.5 cm), not counting the tabs.
- Open the mesh with your fingers. Pin the center of each ch-4 space in the top row of hexagons so the cells sit evenly.
- Shape each tab into a round loop and check that all 9 are the same height.
- Let the piece dry completely, for at least 24 hours, before you unpin it.
Final Quality-Control Checklist
- Body: 85 sts per row, 100 rows, 40 in (101.6 cm) tall
- Mesh: 15 rows, alternating 21 and 20 pairs, ending on a 20-pair row
- Top Row: 85 sc
- Tabs: 9 tabs, each 5 sc x 16 rows, with 5 sts between tabs
- Border Row 1: 421 sc; Border Row 2: 425 sc
- Side edges are straight, with no waves or pulled-in sections
- Hexagons are evenly sized and line up in offset rows
- All ends are woven in securely
- Final size: 29.5 in x 56.1 in (74.9 cm x 142.5 cm)
Troubleshooting
The body is narrower at the top than at the bottom. Tension usually tightens as you work. Check the width every 20 rows. If it shrinks by more than 0.5 in (1.3 cm), go up half a hook size.
The texture looks like vertical columns. You are stacking sc on sc. Check that Row 2 starts with ch 3 and that Row 3 starts with ch 1 and a sc.
The hexagons look like diamonds. Your pairs may be missing the ch 1. Without it, the short flat sides of each hexagon collapse into points.
The mesh is wider than the body. Your chains are too loose. Work the ch-4 spaces with a 6 mm hook, then switch back to the 6.5 mm hook for the pairs.
The tabs twist or lean. Join each tab with the RS facing, and sew it straight down onto the same 5 sts it was worked from.
The side border ruffles. You have too many sc. Count the stitches between markers and use 12 sc per 10 body rows.
Care
Hand wash, or machine wash on a gentle cold cycle inside a laundry bag. Lay flat to dry and re-pin the mesh. Do not hang the curtain while it is wet, because the weight will stretch the body.
Final Notes
The measurement chain is short and easy to check. The 85-st foundation gives 28.3 in (71.9 cm) of width. One hundred griddle rows give 40 in (101.6 cm) of solid body. Fifteen mesh rows plus the Top Row bring the panel to 55.5 in (141.0 cm), and the Top Row brings the count back to exactly 85 sts for the nine tabs. The border’s 166-st sides and 89-st bottom bring the curtain to its final 29.5 in x 56.1 in (74.9 cm x 142.5 cm), with tab loops 2.5 in (6.4 cm) tall on top.
If your checkpoints match at each stage, the finished panel will hang straight, with soft, even hexagons letting the light in.
Happy crocheting!