

This little lace umbrella is a cheerful ornament for a tree, a window, or a gift tag. The canopy is a sunny yellow half-circle of open fans, chain arches, and small shells. A bright orange picot border runs around the curved top and the scalloped lower edge, and an orange handle hangs from the center and curls into a classic J hook.
The whole ornament is one single piece. You work the canopy in turned rows out from a magic ring, add the orange border in one round, then work the handle and a yellow hanging loop straight onto the border. Nothing gets sewn on later.
The pattern uses US crochet terms. The finished canopy measures about 4.5 in (11.4 cm) wide and 2.25 in (5.7 cm) tall. With the handle, the ornament is about 4 in (10.2 cm) tall, not counting the loop.
Here is the construction in short: seven yellow rows build the half-circle, one orange round frames it with picots, a short orange cord makes the handle, and a yellow chain loop lets you hang it. Starch and pins give the final crisp shape.
Finished Size and Construction
- Finished size: canopy 4.5 in (11.4 cm) wide x 2.25 in (5.7 cm) tall; overall height about 4 in (10.2 cm) without the loop
- Skill level: Intermediate (lace rows, picots, working into row ends)
- Terminology: US crochet terms
- Yarn weight: #1 super fine (fingering-weight mercerized cotton)
- Hook: 2.25 mm (US B-1)
- Number of pieces: 1, worked in one continuous build
- Layout: a single half-circle canopy with the handle at the bottom center and the loop at the top center
- Piece size: same as finished size
- Size before border: about 4.3 in (10.9 cm) wide x 2.15 in (5.5 cm) tall
- Border depth: about 0.1 in (0.3 cm), plus picots
Materials
Choose a smooth, mercerized cotton in fingering weight. It shows the lace openings clearly and holds starch well. Acrylic will work, but it won’t hold the curl of the handle as well.
- Yellow (canopy and hanging loop): about 6 g, 25 m (27 yd)
- Orange (border and handle): about 4 g, 15 m (16 yd)
These quantities include a small margin for your gauge swatch and for weaving in ends.
Tools:
- 2.25 mm (US B-1) crochet hook
- Tapestry needle
- Small scissors
- 1 stitch marker
- Foam blocking mat and rust-proof pins
- Spray starch or fabric stiffener
- A pencil or dowel about 0.5 in (1.3 cm) across, for shaping the handle curl
Abbreviations (US Terms)
- ch – chain
- sl st – slip stitch
- sc – single crochet
- hdc – half double crochet
- dc – double crochet
- sk – skip
- sp – space
- st(s) – stitch(es)
- tch – turning chain
- rep – repeat
- RS – right side
Special stitches:
- Picot: ch 3, sl st in the 3rd ch from hook. A picot is not counted as a stitch, and you never work into it.
- Scallop: (hdc, 2 dc, picot, 2 dc, hdc) all worked into the same row end. That counts as 6 sts plus 1 picot.
Gauge and Checkpoints
Exact gauge is not critical for an ornament, but it controls the size and how the lace drapes. Make one test umbrella before you commit to a batch.
Base gauge: 9 sc = 1 in (2.5 cm) in a row of sc worked into a foundation chain.
Checkpoints: measure across the straight lower edge, with the piece lying flat and unstretched.
- After Row 3: 2 in (5.1 cm) wide
- After Row 4: 2.6 in (6.6 cm) wide
- After Row 5: 3.3 in (8.4 cm) wide
- After Row 6: 3.9 in (9.9 cm) wide
- After Row 7: 4.3 in (10.9 cm) wide
- After the border: 4.5 in (11.4 cm) wide
If your piece is too big, go down to a 2.0 mm hook. If it’s too small, or the rows cup upward, go up to a 2.5 mm hook. A canopy that ruffles means your tension is too tight on the chains. Loosen the ch-5 arches a little, but leave the stitch counts alone. Change hook size only between test pieces, never partway through one umbrella.
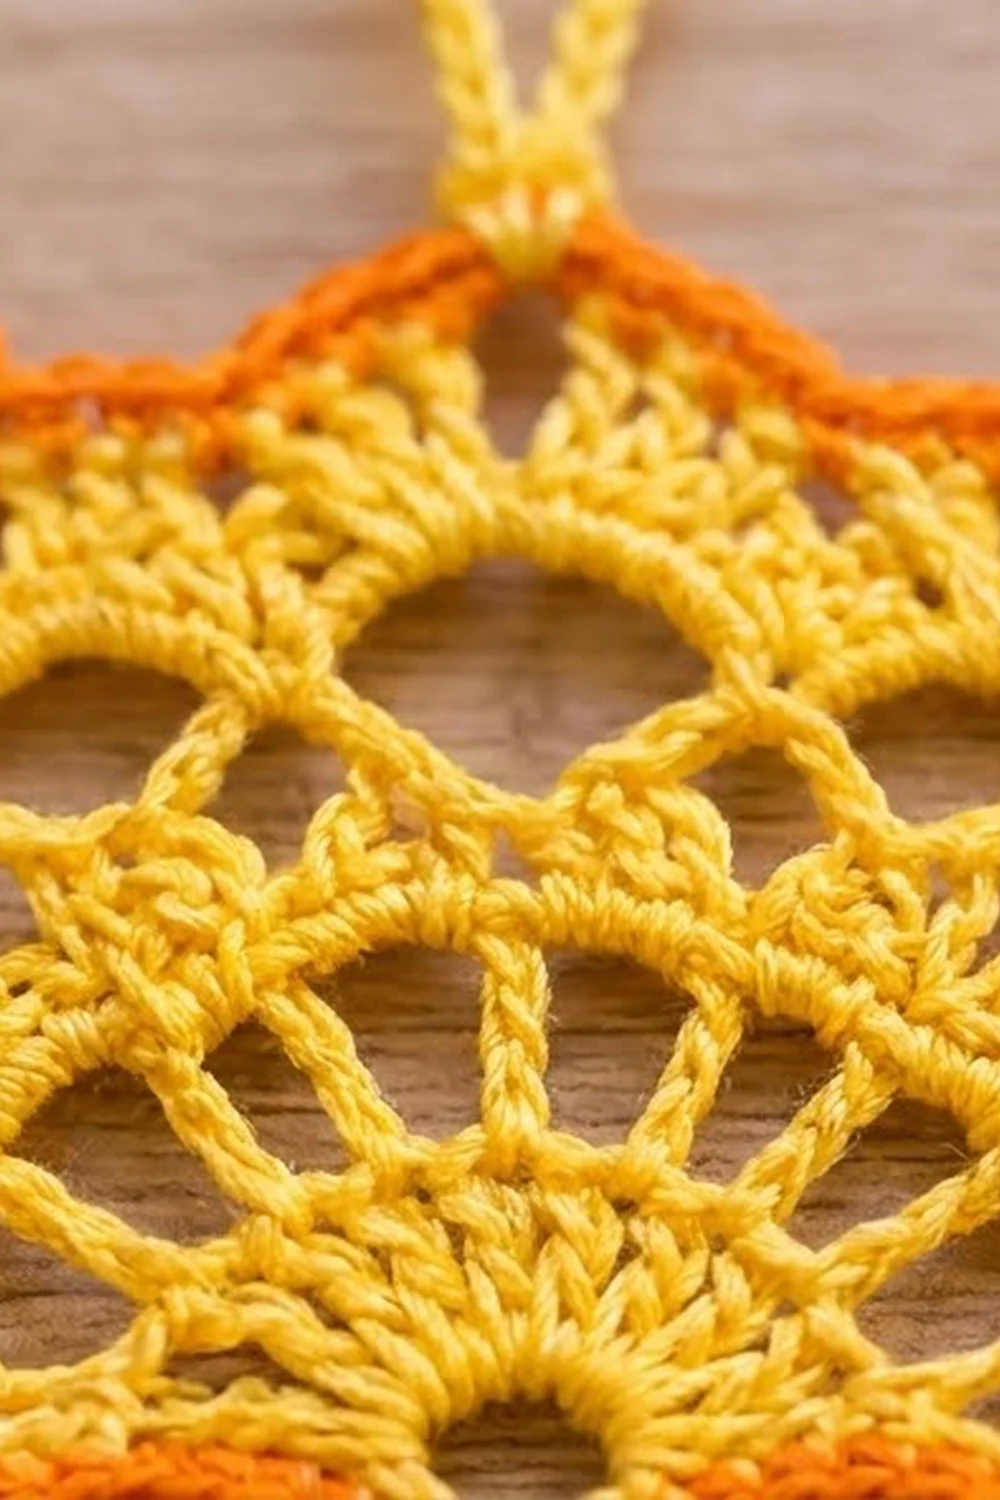
Canopy (Yellow)
The canopy is worked flat in turned rows. Each row is a half-circle that sits around the one before it. The straight lower edge is made up of the row ends. Treat Row 1 as the RS, so all the odd rows are RS rows.
Row 1: With yellow, make a magic ring. Ch 3 (counts as dc), 8 dc in ring. Pull the ring snug but not fully closed, so a tiny center hole stays. Turn. (9 dc)
Row 2: Ch 4 (counts as dc + ch 1). Dc in next dc, ch 1; rep from * 6 more times, then dc in top of tch. Turn. (9 dc, 8 ch-1 sps)*
This row makes the open spokes you can see around the small center fan.
Row 3: Ch 3 (counts as dc). 2 dc in next ch-1 sp, dc in next dc; rep from * 7 more times, working the last dc in the 3rd ch of the tch. Turn. (25 dc)*
Check: 1 + (8 x 3) = 25. This solid row is the inner fan band.
Row 4: Ch 1, sc in first dc. Ch 5, sk 2 dc, sc in next dc; rep from * 7 more times, working the last sc in top of tch. Turn. (9 sc, 8 ch-5 loops)*
Check: 1 + (8 x 3) = 25 sts used, so every dc from Row 3 is covered.
Row 5: Ch 3 (counts as dc), 2 dc in first sc (half shell made). Ch 2, sc in next ch-5 loop, ch 2, 5 dc in next sc; rep from * 6 more times. Ch 2, sc in last ch-5 loop, ch 2, 3 dc in last sc. Turn. (41 dc in 7 shells and 2 half shells, 8 sc, 16 ch-2 sps)*
Check: 3 + (7 x 5) + 3 = 41 dc. The 7 full shells sit on the 7 middle sc of Row 4. The half shells sit on the two end sc, which keeps the straight edge flat.
Row 6: Ch 1, sc in first dc. Ch 5, sc in next sc, ch 5, sc in 3rd dc (center) of next shell; rep from * 6 more times. Ch 5, sc in next sc, ch 5, sc in top of tch. Turn. (17 sc, 16 ch-5 loops)*
Check: 1 + (7 x 2) + 2 = 17 sc, and (7 x 2) + 2 = 16 loops. Doubling the arches here gives you the larger lace openings in the outer canopy.
Row 7: Ch 1, sc in first sc. 3 dc in next ch-5 loop, sc in next sc; rep from * 15 more times. (65 sts: 17 sc and 16 three-dc shells)*
Check: 17 + (16 x 3) = 65. Fasten off the yellow and weave in the ends.
The canopy should measure 4.3 in (10.9 cm) across the straight edge and 2.15 in (5.5 cm) from the ring to the top center.
Border (Orange)
The border is one round. It goes along the curved top, then turns and runs across the straight lower edge through the row ends.
Border gauge: each 3-dc shell plus the sc after it takes 4 border sc. On the lower edge, each dc row end takes one scallop and each short row end takes one sc.
Round 1 – Curved edge: With RS facing, join orange with a sl st in the first sc of Row 7. Ch 1, sc in same sc. Sc in next dc, sc in next dc, picot, sc in next dc, sc in next sc; rep from * 15 more times. (65 sc, 16 picots)*
Check: 1 + (16 x 4) = 65. Each picot sits above the center dc of a shell. Sc number 33 is the top center, directly above the 9th sc of Row 7. Place a marker in it for the hanging loop.
Round 1 – Lower edge (continue without fastening off): Rotate the piece to work across the row ends. The last sc you made is the corner.
- Sc in end of Row 6
- Scallop in end of Row 5
- Sc in end of Row 4
- Scallop in end of Row 3
- Sc in end of Row 2
- Scallop in end of Row 1
- Sc in the center of the magic ring (the bottom center, where the handle goes)
- Scallop in end of Row 1
- Sc in end of Row 2
- Scallop in end of Row 3
- Sc in end of Row 4
- Scallop in end of Row 5
- Sc in end of Row 6
Join with a sl st to the first sc of the round. Fasten off. (Lower edge: 43 sts and 6 picots)
Check: each half has 3 sc + (3 scallops x 6 sts) = 21 sts, so 21 + 1 + 21 = 43. Round total: 65 + 43 = 108 sts and 22 picots.
Why the math works: The corner stitches are the first and last sc of Row 7, and you count them only once, in the 65. The dc rows (1, 3, and 5) have tall row ends, so they get the 6-stitch scallops. The short sc and arch rows (2, 4, and 6) get a single sc, and that is what makes the gentle wave along the lower edge.
Handle (Orange)
Handle: With RS facing, join orange with a sl st in the bottom-center sc of the border. Ch 21.
Work back along the chain: 2 sc in 2nd ch from hook, 2 sc in each of next 5 ch, then sc in each of the remaining 14 ch. Sl st in the bottom-center sc again. Fasten off, leaving a 6 in (15.2 cm) tail. (26 sc)
Check: (6 x 2) + 14 = 26. The 12 crowded stitches at the tip make the cord curl on its own into the J hook. The 14 plain sc form the straight shaft, about 1.75 in (4.4 cm) long.
Use the tail to weave up through the shaft, then secure it behind the border so the handle hangs straight down.
Hanging Loop (Yellow)
Join yellow with a sl st in the marked top-center sc. Ch 30, sl st in the same sc. Fasten off and weave the ends into the border.
The loop measures about 1.75 in (4.4 cm) tall. For a sturdier loop, sl st back along each chain before you fasten off.
Final Blocking
- Wet the ornament, then roll it in a towel to press out the extra water.
- Lay it RS up on the blocking mat.
- Pin the two lower corners 4.5 in (11.4 cm) apart, keeping the lower edge straight.
- Pin the top-center sc 2.25 in (5.7 cm) above the middle of that line.
- Pin out every picot on the curve so it points straight out, keeping the curve even.
- Pin each scallop picot on the lower edge so it points down.
- Open each ch-5 arch and shell with your fingertip so the lace openings show.
- Wrap the handle tip once around the 0.5 in (1.3 cm) pencil to form the J, and pin it in place.
- Spray with starch until the piece is damp, not soaked.
- Let it dry completely, 2–3 hours, then unpin.
Final Quality-Control Checklist
- Canopy measures 4.5 in (11.4 cm) wide x 2.25 in (5.7 cm) tall
- Row 7 has 65 sts, with 16 shells and 17 sc
- Border has 65 sts on the curve and 43 sts on the lower edge
- 16 picots on the curve and 6 picots on the lower edge
- Lower edge lies straight, with the scallops evenly spaced
- Handle hangs from the exact bottom center and curls to one side
- Loop is centered at the top, so the ornament hangs level
- All ends are woven in and none show on the RS
Troubleshooting
Canopy cups upward: your tension is too tight. Go up one hook size, or work looser ch-5 arches.
Canopy ruffles: your tension is too loose, or you have extra dc in the shells. Recount Row 5 (41 dc) and Row 7 (65 sts).
Ornament hangs crooked: the loop or the handle is off center. Count again to sc 33 on the curve and to the ring-center sc on the lower edge.
Handle won’t curl: check that each of the first 6 ch has 2 sc in it. Starch the tip again around the pencil.
Lower edge pulls in: you skipped a row end. There should be 6 stitch groups on each side of the center sc.
Picots lean sideways: pin each one straight while the piece is damp.
Center hole is too big: pull the magic-ring tail tighter before you weave it in.
Care
Hand wash in cool water with mild soap, press out the water in a towel, and re-block with starch. Store flat or hanging, away from anything heavy that could crush it.

Final Notes
The measurement chain goes like this: Row 3 is 2 in (5.1 cm) wide, Row 5 is 3.3 in (8.4 cm), Row 7 is 4.3 in (10.9 cm), and the border brings the canopy to 4.5 in (11.4 cm) wide by 2.25 in (5.7 cm) tall. With the handle, the ornament is about 4 in (10.2 cm) tall.
If your checkpoints match, the border counts of 65 + 43 fall into place and the picots line up over the shells. Make one, check it, and then make a whole sunny row of umbrellas.
Happy crocheting!