

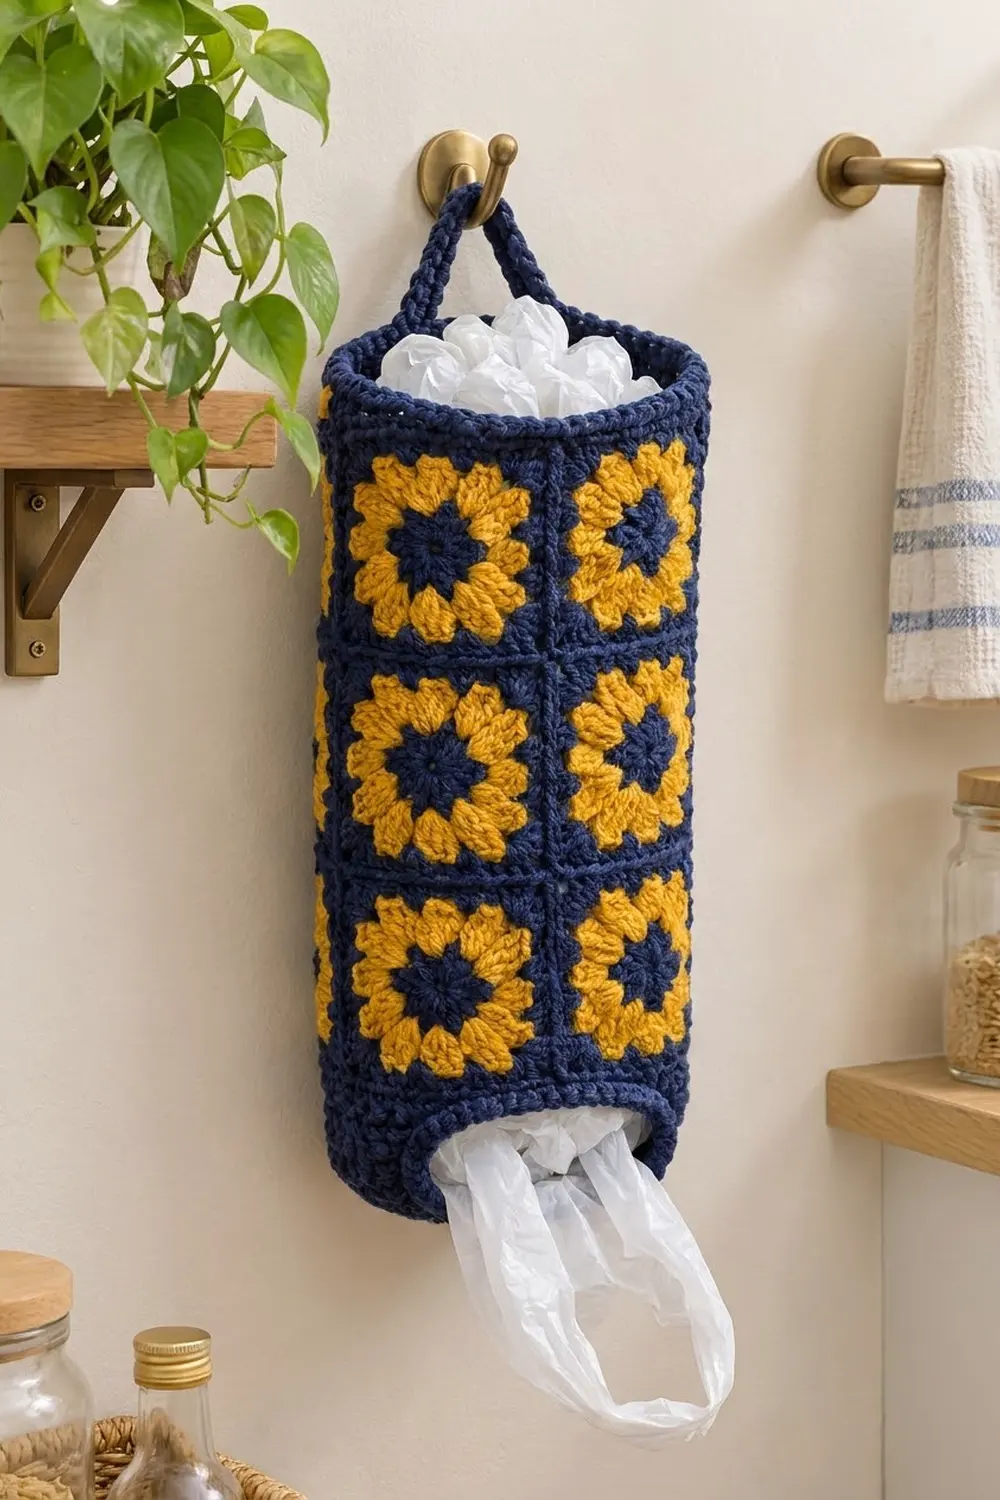
Plastic bags tend to multiply under the sink. This bag holder keeps them in one tidy column on a hook. You stuff bags in at the top and pull them out one at a time from the opening at the bottom.
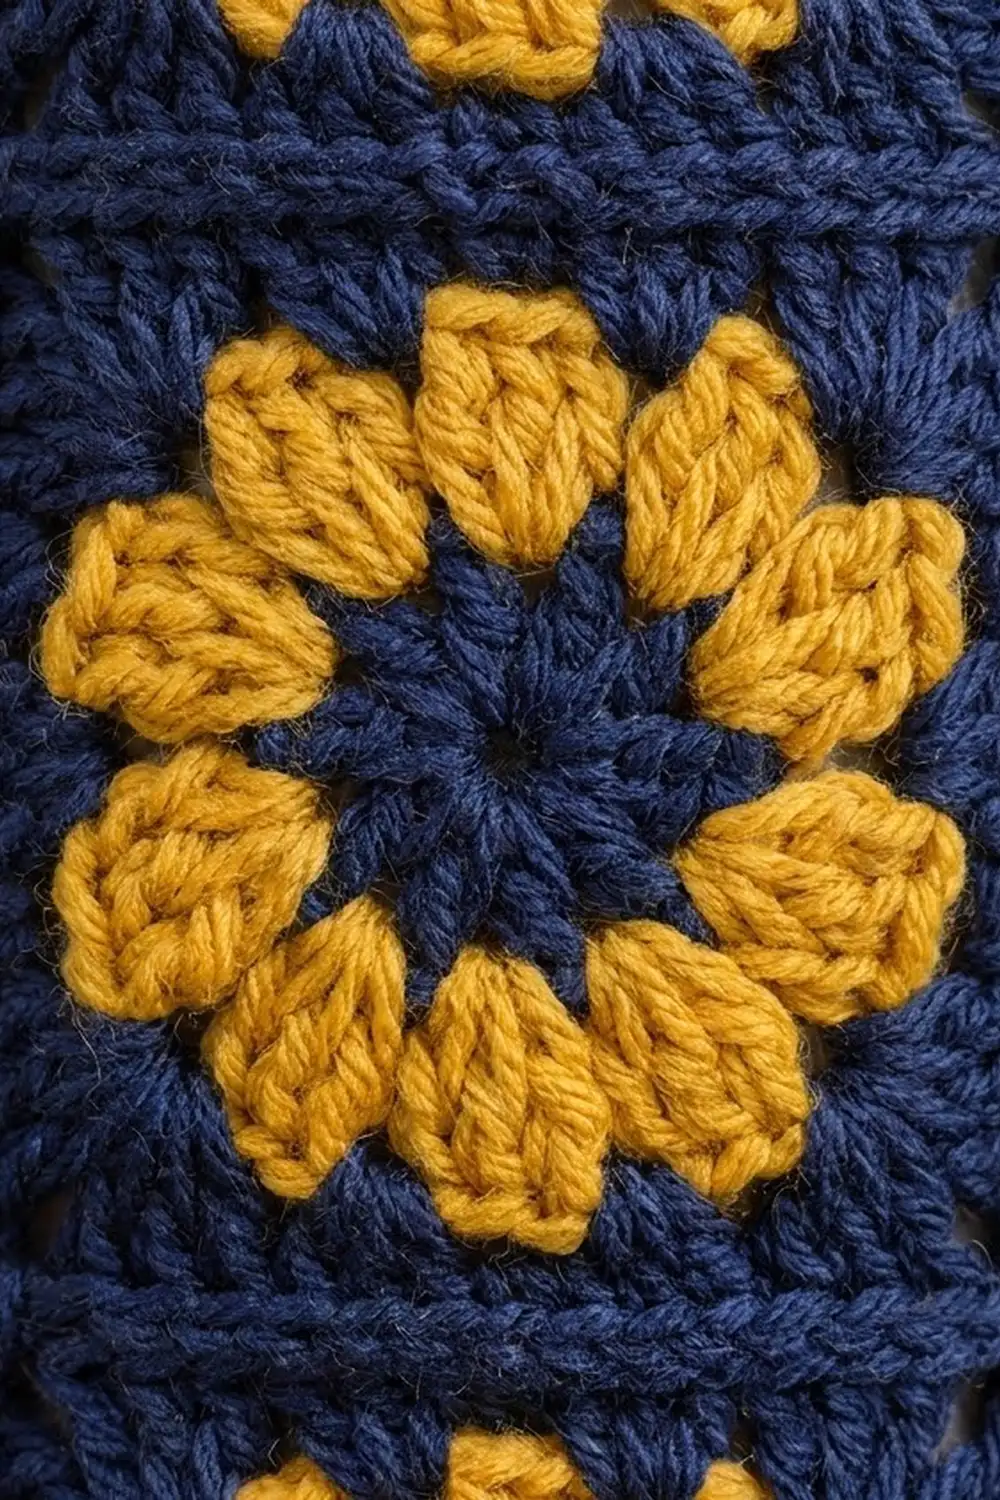
The design uses two strong colors. Each square has a navy center and a ring of eight mustard petals, then navy rounds that frame it into a square. The navy seams and bands tie everything together, so the flowers stand out clearly against the dark background.
This pattern uses US crochet terms. The finished holder measures about 8 in (20.3 cm) wide when flat, 16 in (40.6 cm) around, and 15 in (38.1 cm) tall without the handle. The strap adds a loop about 7 in (17.8 cm) long.
Here is how it goes together. You make 12 identical granny squares and join them into four columns of three. Then you join the columns side by side and close them into a tube. A single-crochet band is worked around the top edge, with a strap added to it. A second band is worked around the bottom edge and decreased to form the dispensing opening.
Finished Size and Construction
- Finished size: 8 in (20.3 cm) wide flat × 15 in (38.1 cm) tall; 16 in (40.6 cm) around
- Skill level: Easy-intermediate
- Terminology: US crochet terms
- Yarn weight: Worsted (#4), cotton or cotton blend
- Hook: 5.0 mm (H-8)
- Number of pieces: 12 squares, plus a strap worked onto the top band
- Layout: 4 squares around × 3 squares tall
- Square size: 4 in × 4 in (10.2 cm × 10.2 cm), 13 sts per side
- Size before border: 16 in (40.6 cm) around × 12 in (30.5 cm) tall
- Border depth: top band 1.5 in (3.8 cm); bottom band about 1.5 in (3.8 cm)
Materials
Use a smooth worsted-weight cotton or cotton blend. Cotton holds its shape when the tube is packed full, and it shows off the cluster petals well. Avoid very fuzzy yarns, because bags can snag on them.
- Navy: 160 g (about 275 m / 300 yd), for square centers, square frames, seams, bands, and strap
- Mustard yellow: 60 g (about 100 m / 110 yd), for the petals
These quantities include a margin of about 15%, so you won’t run short if your tension is a little loose.
Tools:
- 5.0 mm (H-8) crochet hook
- Tapestry needle
- 4 locking stitch markers
- Scissors
- Measuring tape
- Blocking mat and rust-proof pins
- Spray bottle
Abbreviations (US Terms)
- ch – chain
- sl st – slip stitch
- sc – single crochet
- hdc – half double crochet
- dc – double crochet
- sc2tog – single crochet 2 together
- st(s) – stitch(es)
- sp – space
- RS / WS – right side / wrong side
- BLO – back loop only
Special stitches:
- Beginning cluster (beg-cl): Ch 2. Yarn over, insert hook in the same st, pull up a loop, yarn over and pull through 2 loops. Repeat from * to * once more. Yarn over and pull through all 3 loops on the hook.
- 3-dc cluster (cl): Yarn over, insert hook in the st, pull up a loop, yarn over and pull through 2 loops. Repeat from * to * 2 more times (3 times in total). Yarn over and pull through all 4 loops on the hook.
Gauge and Checkpoints
Make one complete square before anything else, then measure it. Everything later depends on that square being 4 in (10.2 cm) with 13 sts per side.
Square checkpoints (lightly flattened, not stretched):
- After Round 1: 1.5 in (3.8 cm) across
- After Round 2: 2.75 in (7.0 cm) across
- After Round 3: 3.5 in (8.9 cm) square
- After Round 4: 4 in (10.2 cm) square
Single-crochet gauge for the bands: 13 sc = 4 in (10.2 cm), which is 3.25 sc per in. 4 sc rounds = 1 in (2.5 cm).
If the square is too big: go down to a 4.5 mm (7) hook. A square that is 4.25 in (10.8 cm) or more makes a tube 17 in (43.2 cm) around or larger, and it will look baggy.
If the square is too small: go up to a 5.5 mm (I-9) hook. A square of 3.75 in (9.5 cm) gives a 15 in (38.1 cm) tube. That still works, but the holder holds fewer bags.
Only change the hook size. Don’t add or remove stitches, because the 13-per-side count is what keeps the joining and band math correct.
Granny Square (Make 12)
Round 1 (navy): Make a magic ring. Ch 3 (counts as dc), work 15 dc into the ring. Sl st to the top of the beginning ch-3. Pull the ring closed. (16 dc) Fasten off.
Round 2 (mustard): Join mustard with a sl st in any dc. Work a beg-cl in the same st, ch 3, skip the next dc. Work a cl in the next dc, ch 3, skip the next dc. Repeat from * to * 6 more times. Sl st to the top of the beg-cl. (8 clusters, 8 ch-3 sps) Fasten off.
These eight clusters are the petals. Each petal sits on every other dc of Round 1, so the petals are evenly spaced around the navy center.
Round 3 (navy): Join navy with a sl st in any ch-3 sp.
- Ch 3 (counts as dc). In the same sp, work 2 dc, ch 2, 3 dc. This is the first corner.
- In the next ch-3 sp, work 3 hdc.
- In the next ch-3 sp, work (3 dc, ch 2, 3 dc) for a corner. In the next ch-3 sp, work 3 hdc. Repeat from * to * 2 more times.
- Sl st to the top of the beginning ch-3.
Don’t work into the tops of the clusters. They stay raised as petals.
Count: 9 sts between corners on each side (3 dc + 3 hdc + 3 dc). (36 sts total, plus 4 ch-2 corner sps)
The shorter hdc groups land on the middle of each side and the taller dc groups go into the corners. That is what turns the round flower into a flat square.
Round 4 (navy): Do not fasten off. Ch 1, sc in the same st and in each st to the first corner. Work 3 sc in each ch-2 corner sp. Sc in each st around. Sl st to the first sc.
Count: 36 sc worked one into each existing stitch + 12 corner sc added = 48 sc.
Per side: 13 sts, counting both corner sc (corner sc, 11 sc, corner sc). The 4 shared corners mean 4 × 13 − 4 = 48, so the counts agree.
Fasten off. Weave in all ends on the WS.
Measure the square against the checkpoint before you make the other 11.
Make All Pieces
Totals for 12 squares:
- Navy: Rounds 1, 3, and 4 on all 12 squares, about 96 g
- Mustard: Round 2 on all 12 squares, about 48 g
The rest of the navy goes to the seams, bands, and strap.
Layout (seen from outside, unrolled flat; the tube closes between column D and column A):
| A1 | B1 | C1 | D1 |   ← top row
| A2 | B2 | C2 | D2 |
| A3 | B3 | C3 | D3 |   ← bottom row
Lay all the squares RS up with the petals facing the same way so the seams match.
Joining
Method: Use a slip-stitch join in navy through the back loops only, worked on the WS. This leaves a low navy ridge on the RS, matching the seam lines in the finished holder.
Step 1, columns: Hold A1 and A2 RS together. Working through the BLO of both squares, sl st in each of the 13 sts along the edge, corner sc to corner sc. Continue straight on to join A2 to A3 the same way.
Each column seam is 3 × 13 = 39 sl sts. Make columns B, C, and D the same way.
Step 2, column to column: Hold column A and column B RS together. Sl st along the long edge, 13 sts per square, for 39 sl sts in total. Join C to B and D to C the same way.
Step 3, close the tube: Fold the panel so the RS is on the inside. Bring the free edge of column D to the free edge of column A. Join with 39 sl sts. Turn the tube RS out.
Stitch-to-stitch logic: Every seam pairs one stitch with one stitch. Corner sc meets corner sc, and nothing is skipped or added.
Tension: Keep the sl sts as loose as the sc in the squares. Tight seams pucker the tube and pull the squares out of shape. If you tend to sl st tightly, go up one hook size for joining.
Size checkpoint: Flatten the tube. It should measure 8 in (20.3 cm) wide and 12 in (30.5 cm) tall. The top edge should have 4 × 13 = 52 sts around.
Border: Top Band, Strap, and Bottom Band
Border gauge: 13 sc = 4 in (10.2 cm), and 4 rounds = 1 in (2.5 cm). This matches the square edge of 13 sts per 4 in, so the bands lie flat with no ruffling or pulling in.
Work all band rounds with the RS facing. Join each round with a sl st to the first sc, then ch 1. The ch 1 does not count as a stitch.
Top Band
Round 1: Join navy at the top of any seam. Sc in each st along the top edge of each square, 13 per square. Work the two corner sc that meet at each seam as two separate sts. (13 per square × 4 = 52 sc)
Rounds 2–6: Sc in each st around. (52 sc)
Checkpoint: The top band is 1.5 in (3.8 cm) deep and still 16 in (40.6 cm) around. Don’t fasten off.
Why the math works: 52 sc ÷ 3.25 sc per in = 16 in (40.6 cm), which is the tube’s circumference. The band matches the tube exactly.
Strap
Fold the tube flat so seams A/D and B/C sit at the two side folds. Place marker 1 on the 5 sts centered over the left fold. Place marker 2 on the 5 sts directly opposite, centered over the right fold. The two groups are 26 sts apart, half of 52.
Row 1: Working from the last band round, sc in the 5 sts at marker 1. Turn. (5 sc)
Rows 2–28: Ch 1, sc in each st across. Turn. (5 sc)
Checkpoint: The strap is 1.5 in (3.8 cm) wide and 7 in (17.8 cm) long.
Bring the strap across the top opening to marker 2, keeping it untwisted. Hold the last row against the 5 sts at marker 2. Sl st through both layers, 5 sts. Fasten off.
Strap edging (optional): Sl st loosely along each long edge of the strap, one sl st per row, 28 per side. This gives the strap the same neat finish as the band.
Bottom Band
Turn the tube upside down.
Round 1: Join navy at the bottom of any seam. Sc along the bottom edge, 13 per square. (52 sc)
Round 2: Sc in the next 11 sts, sc2tog. Repeat from * to * 3 more times. (48 sc)
Round 3: Sc in the next 4 sts, sc2tog. Repeat from * to * 7 more times. (40 sc)
Round 4: Sc in the next 3 sts, sc2tog. Repeat from * to * 7 more times. (32 sc)
Rounds 5–6: Sc in each st around. (32 sc)
Round 7: Sl st loosely in each st around. (32 sl sts) Fasten off.
Checkpoint: The opening is about 9.8 in (24.9 cm) around, or about 3 in (7.6 cm) across when round. The band is about 1.5 in (3.8 cm) deep.
Why the math works: Each decrease round starts from the previous total. Round 2 repeats 11 + 2 = 13 sts 4 times for 52. Round 3 repeats 4 + 2 = 6 sts 8 times for 48. Round 4 repeats 3 + 2 = 5 sts 8 times for 40. The decreases are spread evenly, so the bottom curves inward smoothly. The final 32 sts are wide enough for a hand to reach in but narrow enough to hold bags back.
Final Blocking
- Weave in all remaining ends on the WS, through the seam ridges where possible.
- Stuff the tube firmly with a rolled towel or a few plastic bags so it holds a cylinder shape.
- Mist the whole piece evenly with water until it is damp but not dripping.
- Ease each square into shape with your fingers so the corners meet neatly at the seams.
- Flatten each petal gently and pat the clusters so they sit evenly around the center.
- Shape the bottom opening into a round and smooth the sl st rim.
- Lay the strap flat and pin it straight at 7 in (17.8 cm).
- Let it dry completely, at least 24 hours, before removing the stuffing.
Final Quality-Control Checklist
- Every square measures 4 in (10.2 cm) with 13 sts per side.
- All 12 squares have the petals facing the same way.
- Each seam has 39 sl sts and lies flat.
- The tube is 8 in (20.3 cm) wide flat and 12 in (30.5 cm) tall before the bands.
- The top band has 52 sc and is 1.5 in (3.8 cm) deep.
- The strap is 5 sts wide, 28 rows long, and not twisted.
- The bottom band ends with 32 sts and a smooth rim.
- The total height is 15 in (38.1 cm), not counting the strap.
- All ends are secure and hidden.
Troubleshooting
The square curls or cups: Round 3 is too tight. Go up a hook size for that round only.
The square ruffles: Round 1 has too many dc. Count to 16 exactly.
The petals look flat: Make sure each cluster is worked into a single dc, with the ch-3 spaces left open between them.
There are gaps at the seams: Check that you joined corner sc to corner sc, and that each column seam has exactly 39 sts.
The top band flares: You probably worked an extra st at a seam. Recount to 52.
The strap leans: The two marker groups are not opposite each other. Recount 26 sts between them.
The bottom opening is too tight: Skip Round 4 and work Rounds 5–7 over 40 sts.
Care
Hand wash in cool water with mild soap, press out the water in a towel, and dry flat over a rolled towel to keep the shape. Avoid the dryer, because cotton can shrink and the squares can distort.
Final Notes
Everything in this pattern follows from one measurement chain:
- 1 square = 13 sts per side = 4 in (10.2 cm)
- 4 squares around = 52 sts = 16 in (40.6 cm) around, or 8 in (20.3 cm) wide flat
- 3 squares tall = 12 in (30.5 cm)
- Top band = 1.5 in (3.8 cm), bottom band = 1.5 in (3.8 cm), total height = 15 in (38.1 cm)
- Strap = 5 sts × 28 rows = 1.5 in × 7 in (3.8 cm × 17.8 cm)
If the first square measures correctly, the rest follows. Hang the finished holder on a hook, fill it from the top, and pull bags out from the bottom.
Happy crocheting!