

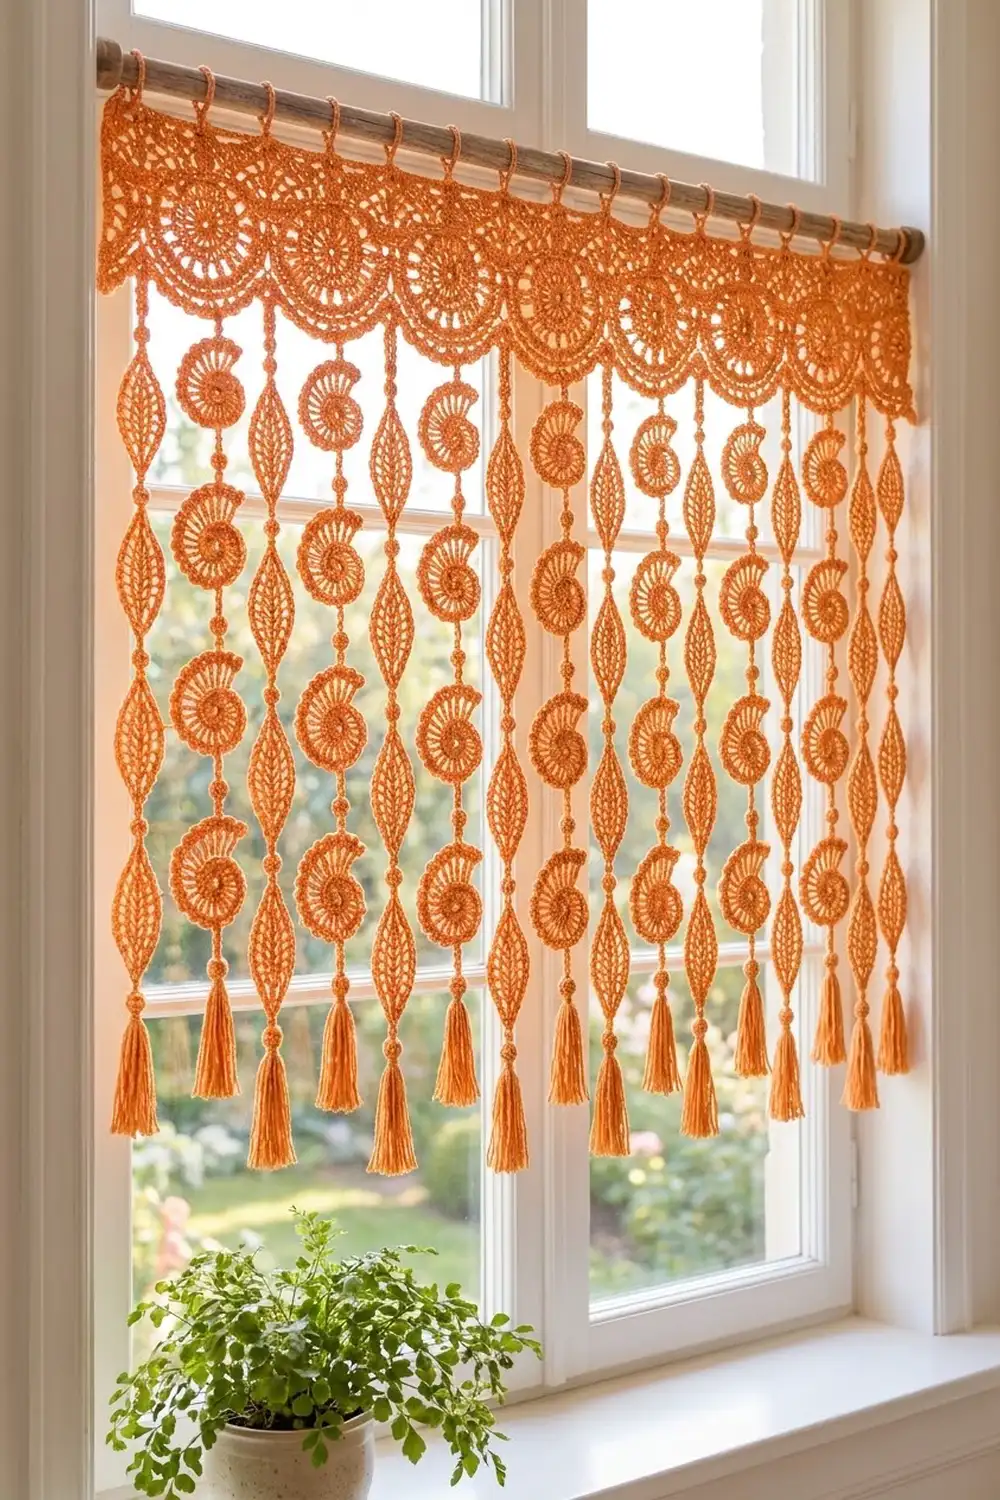
This curtain brings warm, sunlit color to a window. Spiral nautilus shells and lacy pointed leaves hang in alternating strands from a scalloped header. Small bead bobbles link the motifs, and each strand finishes with a full tassel.
Everything is worked in one tangerine orange cotton, so the stitch texture does the work: tight spirals, radiating spokes, eyelet veins and a ropey rim. It looks boho, but it is still neat and graphic. The pattern uses US crochet terms throughout.
The finished curtain measures 46.25 in wide × 35 in long (117.5 × 88.9 cm), not counting the hanging loops.
Construction overview: You crochet 35 shell motifs and 40 leaf motifs. Then you link them into 15 strands with beaded chain connectors and work a solid header with a fan-scallop edge. The strands are joined to the 15 scallop points, a two-row border adds the side edging and rod loops, and the tassels go on last.
Finished Size and Construction
- Finished size: 46.25 × 35 in (117.5 × 88.9 cm)
- Skill level: Intermediate
- Terminology: US
- Yarn weight: Worsted (#4) cotton
- Hook: 4.0 mm (G-6)
- Number of pieces: 1 header, 35 shells, 40 leaves, 15 tassels
- Layout: 15 strands, alternating Leaf / Shell, with leaf strands at both ends
- Piece size: shell 3.5 in (8.9 cm) across; leaf 2 × 4 in (5.1 × 10.2 cm)
- Size before border: header 45.25 × 4 in (114.9 × 10.2 cm) at the scallop points
- Border depth: 0.5 in (1.3 cm), not counting the loops
Materials
Use a smooth mercerized or combed cotton with good stitch definition. Cotton hangs straight and keeps spirals crisp. Acrylic tends to curl and stretch.
Yarn: Tangerine orange, worsted weight (about 190 m per 100 g). Buy 400 g (760 m). Approximate use:
- Shell motifs: 140 g (266 m)
- Leaf motifs: 100 g (190 m)
- Header and border: 45 g (86 m)
- Connectors and joining: 20 g (38 m)
- Tassels: 30 g (57 m)
That totals 335 g (637 m). The quantities include a margin of about 20% for gauge differences and tassel trimming.
Tools:
– 4.0 mm (G-6) crochet hook
– Tapestry needle
– At least 10 locking stitch markers
– Scissors
– A 3.5 in (8.9 cm) piece of cardboard for tassels
– Rust-proof pins, a blocking mat or towel, and a spray bottle
– Tape measure
– A curtain rod up to 0.75 in (1.9 cm) in diameter
Abbreviations (US Terms)
- ch – chain
- sl st – slip stitch
- sc – single crochet
- hdc – half double crochet
- dc – double crochet
- tr – treble crochet
- rev sc – reverse single crochet (crab stitch)
- sk – skip
- sp – space
- st(s) – stitch(es)
- RS – right side
Special stitch: Bead. Ch 3. Then repeat this 5 times, always working into the 3rd ch from the hook: yarn over, insert hook, yarn over and pull up a loop, yarn over and pull through 2 loops. Yarn over and pull through all 6 loops, then ch 1 tightly. The cluster folds into a small round ball in the middle of the cord.
Reverse sc: Work sc from left to right (right-handed), inserting the hook into the next stitch to the right. This makes a twisted, ropey edge.
Gauge and Checkpoints
Header gauge: 16 dc and 8 rows = 4 in (10.2 cm). That is 4 sts per inch, and each dc row is 0.5 in (1.3 cm) tall.
Make one shell and one leaf first. Check them against these numbers before you make the rest:
- Shell after Rnd 3: 1.5 in (3.8 cm) across
- Shell after Rnd 6: 3.5 in (8.9 cm) across
- Leaf after Rnd 1: 3.5 × 0.75 in (8.9 × 1.9 cm)
- Leaf after Rnd 3: 4 × 2 in (10.2 × 5.1 cm)
- Header Row 2: the first 48 dc measure 12 in (30.5 cm)
- Header after Row 6: 2.5 in (6.4 cm) deep
If your pieces are too big, go down 0.5 mm in hook size. If they are too small, go up 0.5 mm. Spacing matters here. A shell sits beside a leaf with only about 0.25 in (0.6 cm) between them, so oversized motifs will crowd each other.
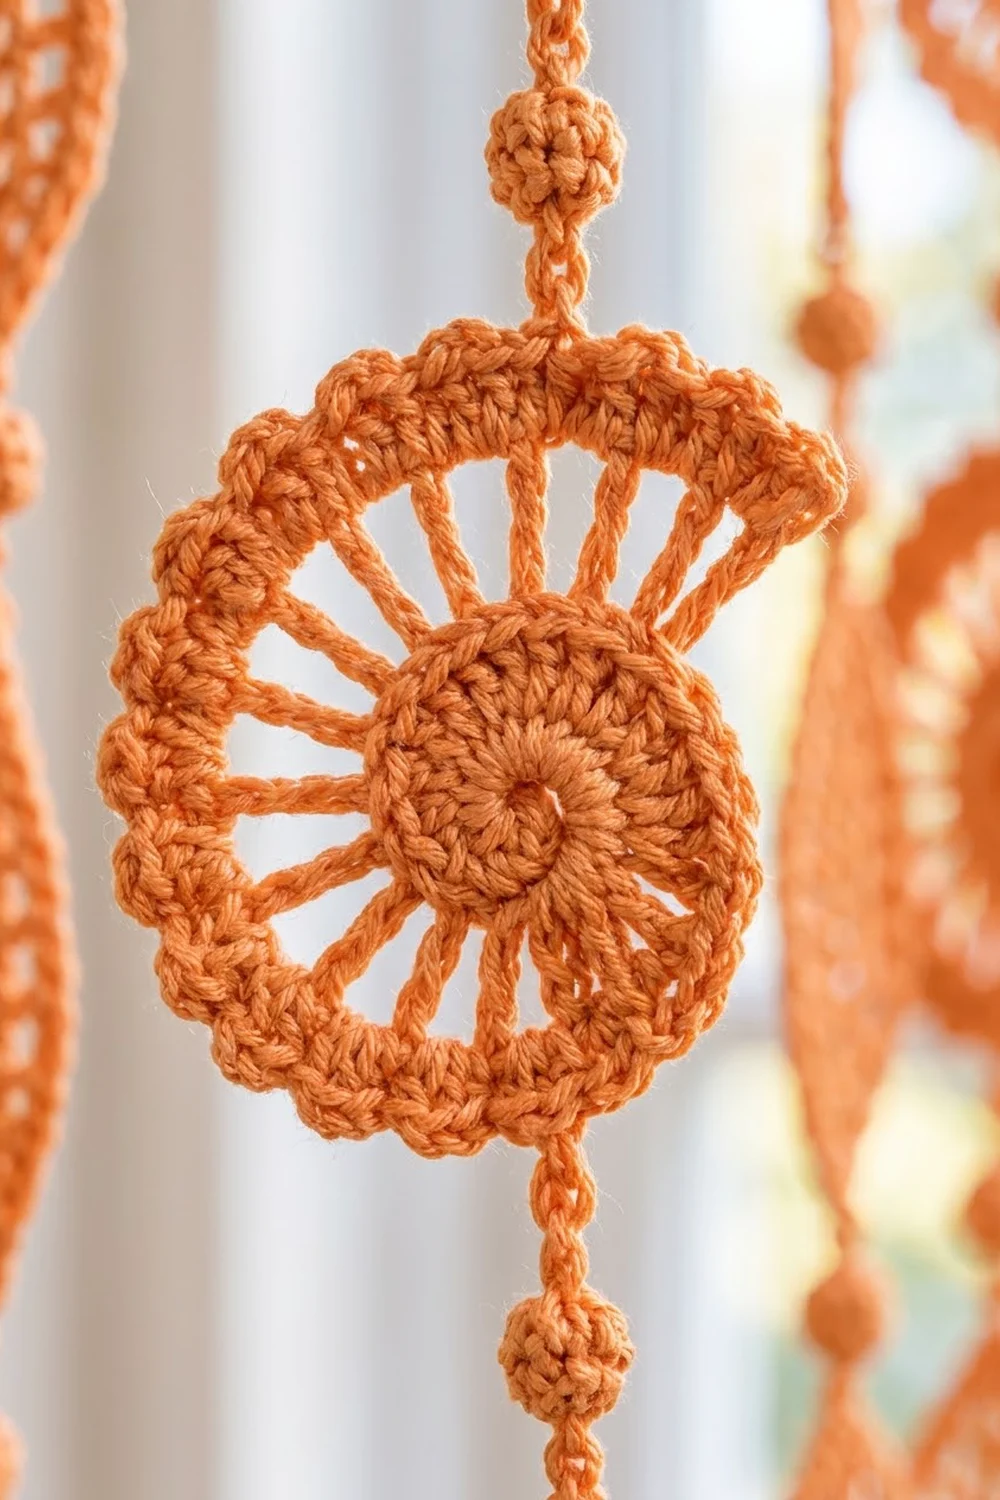
Shell (Nautilus) Motif
Make 35.
Rnd 1: Make a magic ring and work 6 sc into it. Do not join. Work in a spiral and mark the first st of each round. (6 sc)
Rnd 2: 2 sc in each st. (12 sc)
Rnd 3: Sc in next st, 2 sc in next st; repeat 6 times. (18 sc)
Rnd 4 (graduated spokes): Work into the 18 sts of Rnd 3:
– Sl st in next st, sc in next st, hdc in next st.
– (Dc, ch 1) in next st; repeat 5 times.
– (Tr, ch 2) in next st; repeat 10 times.
– Sl st in the first sl st of this round. This anchors the last ch-2, which becomes the shell’s lip.
(18 sts: 1 sl st, 1 sc, 1 hdc, 5 dc, 10 tr, plus 5 ch-1 sps and 10 ch-2 sps)
The stitches get taller as you go around. That height change is what creates the nautilus spiral.
Rnd 5 (rim):
– Ch 1, sc in the same sl st, sc in sc, sc in hdc.
– Sc in dc, 2 sc in ch-1 sp; repeat 5 times.
– Sc in tr, 3 sc in ch-2 sp; repeat 9 times.
– Sc in the 10th tr, 5 sc in the last (lip) ch-2 sp.
– Join with a sl st to the first sc.
(60 sc: 1 + 1 + 1 + 15 + 36 + 6)
Mark the attachment points:
– Top: the center sc of the 3 sc worked in the 6th ch-2 sp
– Bottom: the 2nd sc of the 2 sc worked in the 2nd ch-1 sp
These two points sit directly opposite each other, so the shell hangs level.
Rnd 6: Ch 1, rev sc in each st around. Join and fasten off. Move both markers up to the matching rev sc. (60 rev sc)
Leaf Motif
Make 40.
Rnd 1: Ch 15.
– Sc in the 2nd ch from the hook and in the next 12 ch (13 sc), then 3 sc in the last ch.
– Working along the opposite side of the foundation chain, sc in the next 12 ch, then 2 sc in the last ch (the same ch as your first sc).
– Join with a sl st to the first sc.
(30 sc)
Number the stitches from the first sc. The tip centers are st 15 and st 30. Each side has 14 sts between the tips: sts 1–14 and sts 16–29. The foundation chain forms the raised central spine.
Side sequence (worked over 14 sts): Sc, hdc, dc, ch 1, sk 1, dc, ch 1, sk 1, dc in next 2 sts, ch 1, sk 1, dc, ch 1, sk 1, dc, hdc, sc. (10 sts and 4 ch-1 eyelets per side)
Rnd 2:
– Ch 1. Starting in st 1, work the side sequence over sts 1–14.
– (Sc, ch 3, sc) in st 15.
– Work the side sequence over sts 16–29.
– (Sc, ch 3, sc) in st 30.
– Join.
(24 sts, 8 ch-1 sps, 2 ch-3 tip sps)
Rnd 3:
– Ch 1. Along each side, sc in each st and 2 sc in each ch-1 sp, for 18 sc per side.
– At each tip: sc in the sc, (2 sc, ch 2, 2 sc) in the ch-3 sp, sc in the next sc. That is 6 sc per tip.
– Join and fasten off.
(48 sc and 2 ch-2 tips)
The ch-2 at one tip is the Top attachment point. The ch-2 at the other tip is the Bottom.
Header
Row 1: Ch 182. Sc in the 2nd ch from the hook and in each ch across. (181 sc)
Rows 2–5: Ch 3 (counts as dc), turn, dc in each st across. (181 dc in each row)
Row 6: Ch 1, turn, sc in each st across. (181 sc)
Checkpoint: the header should now be 45.25 × 2.5 in (114.9 × 6.4 cm).
Row 7 (fans):
– Ch 1, turn, sc in the first st.
– Sk 5 sts, then in the next st work (tr, ch 1) 5 times and 1 more tr. Sk 5 sts, sc in the next st. Repeat 15 times.
(16 sc and 15 fans; each fan has 6 tr and 5 ch-1 sps)
Each repeat uses exactly 12 sts. The math is 1 + (15 × 12) = 181.
Row 8 (scallop edge):
– Ch 1, turn, sc in the first sc.
– Sc in tr, (2 sc in ch-1 sp, sc in tr) twice, (sc, ch 3, sc) in the center ch-1 sp, sc in tr, (2 sc in ch-1 sp, sc in tr) twice, sc in the next sc. Repeat 15 times.
– Fasten off.
(256 sc: 1 + 15 × 17, plus 15 ch-3 point loops)
Each ch-3 loop sits at the exact center of its fan. The loops are 12 sts apart, which equals 3 in (7.6 cm) between strands. Checkpoint: the header measures 4 in (10.2 cm) deep at the points.
Make All Pieces
- Shell strands (7): 5 shells each, 35 shells in total
- Leaf strands (8): 5 leaves each, 40 leaves in total
- Tassels: 15
- Connectors: a single connector is ch 3, Bead, ch 3, and measures 1.25 in (3.2 cm). A double connector is ch 3, Bead, ch 6, Bead, ch 3, and measures 2.5 in (6.4 cm).
Assemble each strand:
1. Join yarn at the Bottom point of motif 1.
2. Work a single connector and sl st into the Top point of motif 2. Fasten off.
3. Repeat down the strand until all 5 motifs are linked.
4. At the Bottom point of motif 5, work the bottom connector and fasten off. Leave an 8 in (20.3 cm) tail.
Leaf strands use single connectors at the top and bottom. Shell strands use double connectors at the top and bottom, which balances their shorter motifs:
- Leaf strand: 1.25 + (5 × 4) + (4 × 1.25) + 1.25 = 27.5 in (69.9 cm)
- Shell strand: 2.5 + (5 × 3.5) + (4 × 1.25) + 2.5 = 27.5 in (69.9 cm)
The extra top length also staggers the shells about 1 in (2.5 cm) below the leaves, so the motifs nest neatly side by side.
Layout grid (left to right, seen from the RS):
STRAND:  1  2  3  4  5  6  7  8  9  10 11 12 13 14 15
TYPE:    L  S  L  S  L  S  L  S  L  S  L  S  L  S  L
MOTIFS:  5  5  5  5  5  5  5  5  5  5  5  5  5  5  5
TASSEL:  T  T  T  T  T  T  T  T  T  T  T  T  T  T  T
Tassels: Wrap yarn 20 times around the 3.5 in (8.9 cm) card. Tie the loops at the top and cut them at the bottom. Wrap the neck 0.5 in (1.3 cm) below the tie, then trim the tassel to 3 in (7.6 cm).
Joining
Method: Each strand’s top connector is worked straight into a header point loop, so there is nothing to sew.
Stitch-to-stitch logic: The header has 15 ch-3 point loops, and there are 15 strands, so each strand takes exactly one loop. Strand 1 goes into the first loop from the right edge with the RS facing.
- Join yarn at the Top point of the strand’s first motif.
- Work the top connector: single for a leaf strand, double for a shell strand.
- Sl st into the matching ch-3 loop, then fasten off and weave in the end.
Tension: Keep your chains the same size as the chains in your motifs. Tight chains make a strand hang short. Loose chains let it droop.
Work from strand 8 outward, laying the curtain flat as you go.
Checkpoint: Every tassel neck should sit 27.5 in (69.9 cm) below its scallop point, within ±0.5 in (1.3 cm). The motifs should span 44 in (111.8 cm) from outer leaf edge to outer leaf edge.
Border
Border gauge: 4 sc per inch, the same as the header.
Row 1 (RS):
– Join at the bottom of the right side edge, at the end of Row 6.
– Work 10 sc up the side: 1 in each sc row-end and 2 in each dc row-end (1 + 8 + 1 = 10).
– Ch 1 for the corner.
– Sc in each of the 181 foundation ch loops across the top.
– Ch 1 for the corner.
– Work 10 sc down the left side.
(Side 10 / top 181 / side 10, plus 2 corner ch-1 sps)
Row 2 (rod loops):
– Ch 1, turn. Sc in each of the 10 side sts, then sc in the corner sp.
– Across the top: sc in the first st, ch 12, sl st in that same sc. Sc in the next 12 sts, ch 12, sl st in the last sc made; repeat 15 times.
– Sc in the corner sp and in each of the 10 side sts. Fasten off.
(Side 11 / top 181 with 16 loops / side 11)
Why the math works: The top edge carries 15 strand repeats of 12 sts plus 1 closing st, which is 181. That makes 181 ÷ 12 = 15 loop spacings with a loop at each end, so 16 loops. Every loop lands midway between two strands and shares the weight evenly. The side counts follow the row heights exactly: 2.5 in at 4 sc per inch is 10 sc. The border adds 0.5 in (1.3 cm) on each side and on top. The finished width is 45.25 + 1 = 46.25 in (117.5 cm), and the header grows to 4.5 in (11.4 cm) deep.
Final Blocking
- Weave in all ends securely, going back through at least 3 stitches.
- Lay the curtain face down on towels or blocking mats.
- Pin the header to 46.25 × 4.5 in (117.5 × 11.4 cm), with the 15 scallop points 3 in (7.6 cm) apart.
- Pin each shell into a round, open shape so the spokes fan out evenly.
- Pin each leaf to 4 × 2 in (10.2 × 5.1 cm) with sharp tips.
- Spray until damp, not soaked, and let it dry completely.
- Hang the curtain and clip clothespins to the tassel necks overnight to straighten the strands.
- Steam the tassels lightly and trim them to an even 3 in (7.6 cm).
Final Quality-Control Checklist
- Header is 181 sts wide with 15 fans and 15 point loops
- 16 rod loops, evenly spaced
- 7 shell strands and 8 leaf strands, alternating L/S/L, with leaves at both ends
- Each strand has 5 motifs and 6 beads (leaf) or 8 beads (shell)
- All tassel necks hang at the same level
- No shell is twisted; each spiral faces the RS
- All ends are woven in and none show from the front
- Finished size is 46.25 × 35 in (117.5 × 88.9 cm)
Troubleshooting
- The shell cups instead of lying flat. Rnd 5 is too tight. Rework it with a looser tension or a hook 0.5 mm larger.
- The leaf twists. The sts are uneven between the two sides. Count 18 sc per side in Rnd 3.
- The header ruffles at the fans. Your tr are too long. Shorten them by pulling each loop snug.
- A strand hangs short. The connector chains are tight. Redo that strand’s top connector.
- The fans don’t line up with the strands. Recount Row 7. Each repeat must skip exactly 5 sts on each side of the fan.
- The beads are flat. Pull the closing ch 1 firmly so the cluster balls up.
Care
Hand wash in cool water with mild soap, press out the water in a towel, and dry flat. Then rehang the curtain with clips on the tassels to straighten it.
Final Notes
Every number in this pattern comes from one chain of measurements. A gauge of 4 sts per inch makes each 12-st repeat 3 in (7.6 cm). Fifteen repeats plus one closing st gives 181 sts, or 45.25 in (114.9 cm). The border brings that to 46.25 in (117.5 cm).
Each strand drops 27.5 in (69.9 cm) to its tassel neck, and the tassel adds 3 in (7.6 cm). With the 4.5 in (11.4 cm) header, the curtain measures 35 in (88.9 cm) long. Check each stage as you go and the curtain will hang straight.
Happy crocheting!