

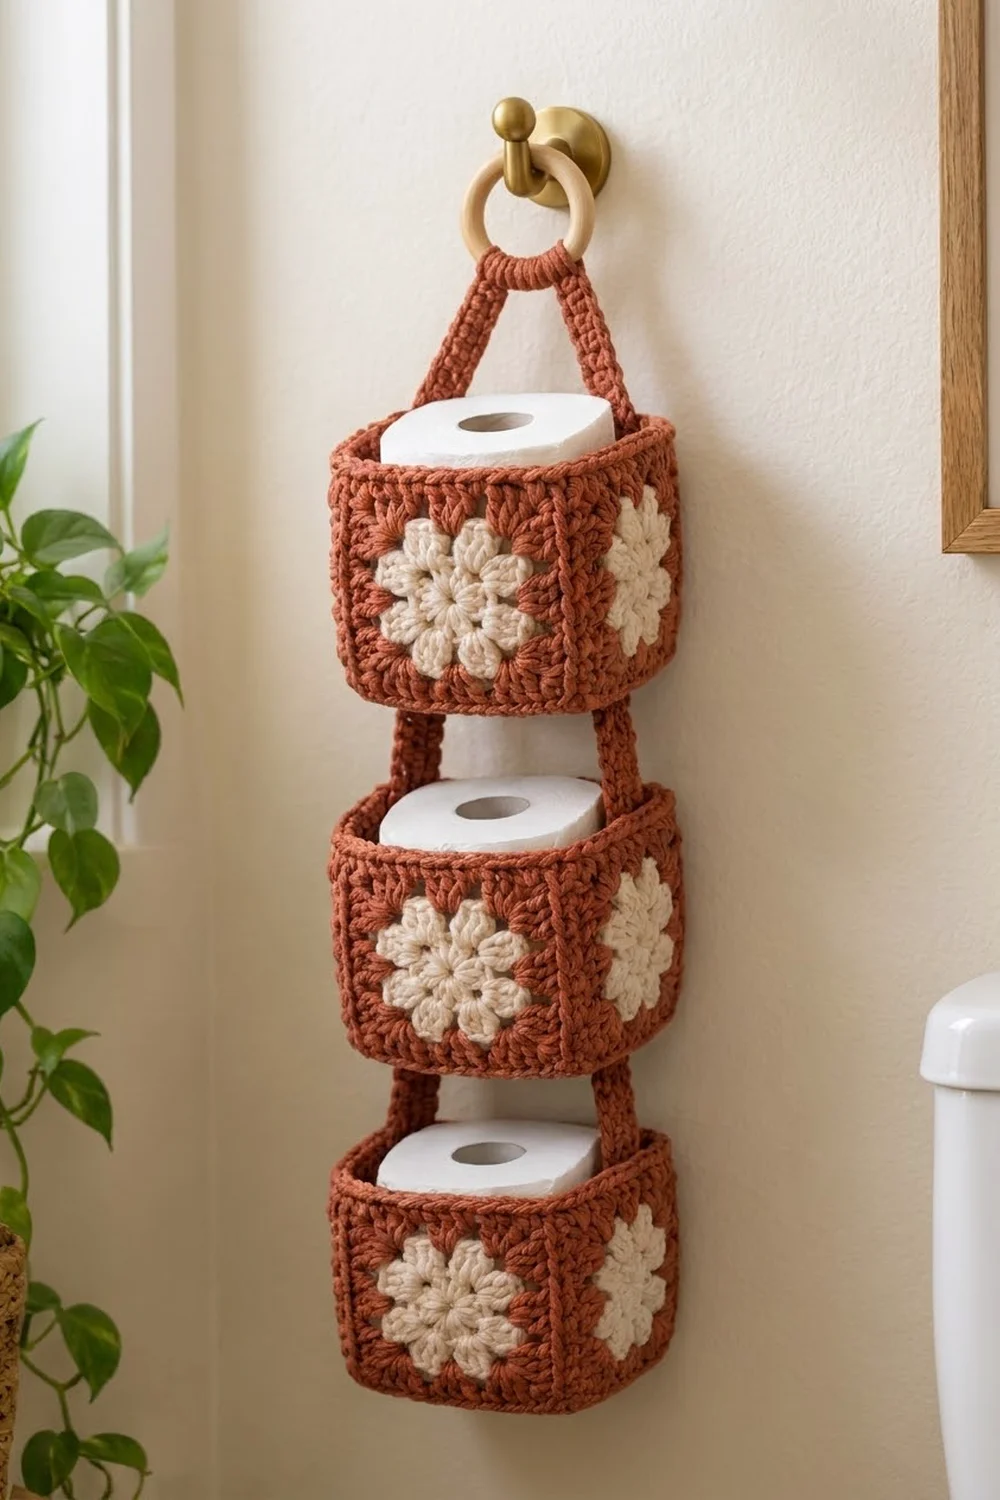
The Terracotta Bloom holder is a three-tier wall organizer built from small flower granny squares. Each tier is an open-top cube basket that holds one standard toilet roll. The three baskets hang one above the other from a single strap looped over a wooden ring.
Every square has a cream eight-petal flower inside a terracotta frame. The rust and cream give it a warm, slightly vintage boho look that suits neutral bathrooms, houseplants and woven baskets.
This pattern uses US crochet terms. Each basket is 5 in (12.7 cm) wide, 5 in (12.7 cm) deep and 5.5 in (14.0 cm) tall including the rim. The whole holder hangs about 26.5 in (67.3 cm) from the ring to the bottom of the lowest basket.
The construction is modular. You make 15 identical squares and seam five of them into each cube (one bottom, four sides). Then you add a two-round rim to each basket and sew on five flat straps that link the baskets and form the hanging loop.
Finished Size and Construction
- Finished size: three baskets, each 5 x 5 x 5.5 in (12.7 x 12.7 x 14.0 cm); total hanging length about 26.5 in (67.3 cm)
- Skill level: Easy+ / confident beginner
- Terminology: US crochet terms
- Yarn weight: worsted to light aran (weight 4), cotton or cotton blend
- Hook: 5.5 mm (I-9)
- Number of pieces: 15 granny squares + 5 straps
- Layout: each basket = 1 bottom square + 4 side squares, seamed into an open cube
- Piece size: 5 x 5 in (12.7 x 12.7 cm) per square
- Basket size before rim: 5 x 5 x 5 in (12.7 x 12.7 x 12.7 cm)
- Rim depth: 0.5 in (1.3 cm)
Materials
Choose a firm worsted or light aran cotton or cotton blend. Cotton holds the cube shape well and doesn’t stretch under the weight of the rolls. Avoid very soft, drapey acrylics, because the baskets will sag. The amounts below assume yarn of about 170 m per 100 g.
- Color A, terracotta / rust: 320 g, about 544 m
- Color B, cream: 60 g, about 102 m
These amounts include a margin of about 10–15% for gauge differences and swatching.
Tools:
- 5.5 mm (I-9) crochet hook
- Wooden ring, 3 in (7.6 cm) diameter
- Yarn needle
- Stitch markers (at least 4)
- Scissors
- Rust-proof pins and a blocking mat
- Spray bottle
- Measuring tape
- Wall hook for hanging
Abbreviations (US Terms)
- ch – chain
- sl st – slip stitch
- sc – single crochet
- dc – double crochet
- dc2tog – double crochet 2 together
- sp – space
- st(s) – stitch(es)
- rev sc – reverse single crochet (crab stitch)
- RS / WS – right side / wrong side
- rep – repeat
3-dc cluster (cl): *Yarn over, insert hook in the given st, yarn over and pull up a loop, yarn over and pull through 2 loops; rep from * 2 more times in the same st (4 loops on hook). Yarn over and pull through all 4 loops.
Beginning cluster (beg cl): Ch 2, then dc2tog in the same st. Counts as the first cluster.
Reverse sc: Working from left to right (right-handed), insert hook in the next st to the right, pull up a loop, yarn over and pull through both loops.
Gauge and Checkpoints
Make one complete square and measure it before you make all 15. The size of the finished square matters more than a swatch here, because the basket has to fit a roll about 4.5 in (11.4 cm) wide.
Base gauge: 4 sc = 1 in (2.5 cm) on the final sc round.
Checkpoints for one square (measured flat, side to side):
- After Rnd 2 (flower): about 2.25 in (5.7 cm) across
- After Rnd 3: 3.5 in (8.9 cm)
- After Rnd 4: 4.25 in (10.8 cm)
- After Rnd 5: 4.75 in (12.1 cm)
- After Rnd 6: 5 in (12.7 cm)
If your square is too big by more than 0.3 in (0.8 cm), go down one hook size (5 mm / H-8). If it’s too small, go up one hook size (6 mm / J-10). Don’t go below 5 in (12.7 cm), or the roll won’t slide in easily.
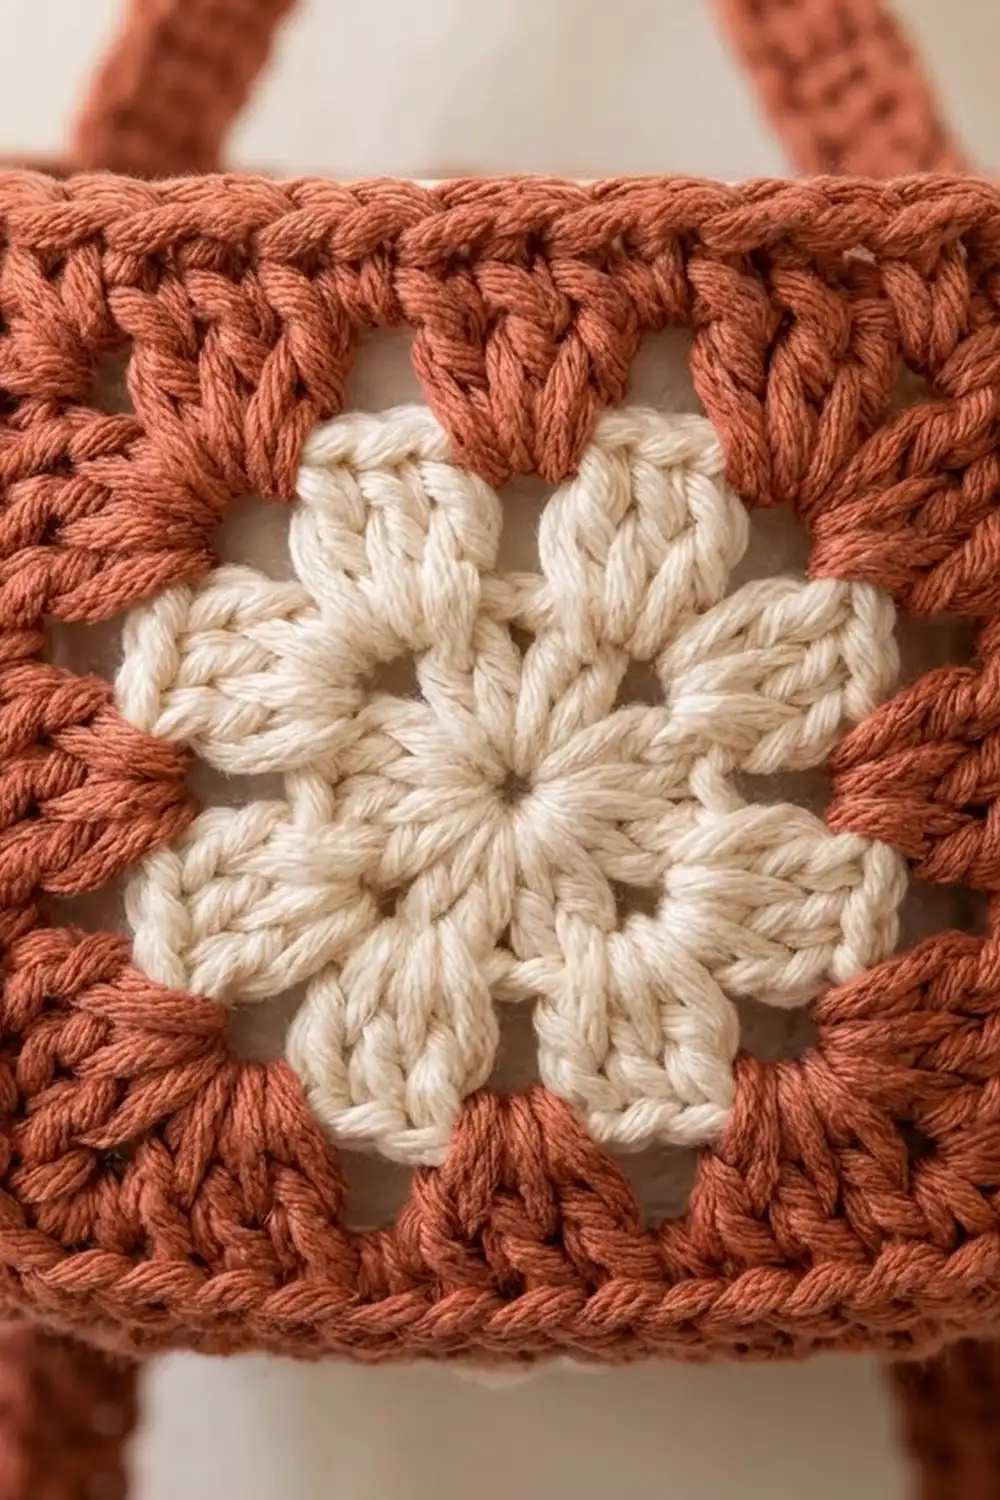
Flower Granny Square (make 15)
Rnd 1 (Color B): Make a magic ring. Ch 3 (counts as dc), 15 dc in ring. Join with sl st to top of ch-3. Pull the ring closed. (16 dc)
Rnd 2 (Color B): Beg cl in the same st as the join, ch 3, skip next dc. *Cl in next dc, ch 3, skip next dc; rep from * 6 more times. Join with sl st to top of beg cl. Fasten off. (8 clusters, 8 ch-3 sps)
The eight clusters form the cream petals.
Rnd 3 (Color A): Join Color A with sl st in any ch-3 sp. Ch 3 (counts as dc), (2 dc, ch 2, 3 dc) in the same sp for the first corner. 4 dc in next ch-3 sp. *(3 dc, ch 2, 3 dc) in next ch-3 sp, 4 dc in next ch-3 sp; rep from * 2 more times. Join with sl st to top of ch-3. (40 dc: 10 dc per side, 4 corner ch-2 sps)
This round turns the round flower into a square: every other space becomes a corner, and the spaces between fill the sides.
Rnd 4 (Color A): Sl st in next 2 dc and into the corner ch-2 sp. Ch 3 (counts as dc), (dc, ch 2, 2 dc) in same sp. Dc in each of next 10 dc. *(2 dc, ch 2, 2 dc) in corner sp, dc in each of next 10 dc; rep from * 2 more times. Join. (56 dc: 14 dc per side)
Rnd 5 (Color A): Sl st in next dc and into the corner ch-2 sp. Ch 3, (dc, ch 2, 2 dc) in same sp. Dc in each of next 14 dc. *(2 dc, ch 2, 2 dc) in corner sp, dc in each of next 14 dc; rep from * 2 more times. Join. (72 dc: 18 dc per side)
Rnd 6 (Color A): Ch 1. Sc in each dc around, and work 2 sc in each corner ch-2 sp. Join with sl st to first sc. Fasten off, leaving a 6 in (15.2 cm) tail. (72 sc worked 1-per-dc + 8 corner sc = 80 sc)
Stitch count per side: 20 sc = 1 corner sc + 18 sc + 1 corner sc. Each corner sp holds 2 sc, and each of them belongs to a different side, so 4 sides x 20 = 80 with nothing counted twice.
Weave in the cream tails now. Leave the terracotta tail for seaming.
Make All Pieces
Squares: 15 total (5 per basket). Each square uses Color B for Rnds 1–2 and Color A for Rnds 3–6.
Basket layout (one basket, shown flat before folding):
        [ S1 ]
[ S4 ]  [ B  ]  [ S2 ]
        [ S3 ]
B = bottom square; S1–S4 = side squares. Make this layout three times.
Straps (Color A): all straps are 5 sc wide.
- Hanger strap (make 1): Ch 6. Row 1: Sc in 2nd ch from hook and in each ch across. (5 sc) Row 2 and every following row: Ch 1, turn, sc in each sc across. (5 sc) Continue until the strap measures 20 in (50.8 cm). Fasten off.
- Connector straps (make 4): Work as for the hanger strap until each one measures 8 in (20.3 cm). Fasten off.
Strap width: 5 sc at 4 sc per in = 1.25 in (3.2 cm).
Joining
Method: sl st seam on the WS, through the back loops only.
Before joining, block all 15 squares lightly to 5 x 5 in (12.7 x 12.7 cm), using the same method as in Final Blocking. Flat, square pieces seam much more evenly.
Step 1, bottom seams: Hold the bottom square and S1 with RS together and edges lined up. Join Color A in the first corner sc of both pieces. Sl st through the back loops of each matching pair of sts across the edge, ending in the last corner sc. (20 sl sts) Rep for S2, S3 and S4 on the other 3 edges of the bottom square. (4 seams x 20 sl sts)
Step 2, side seams: Fold the four sides up. Hold S1 and S2 RS together along their shared vertical edge and seam from the bottom corner up to the top corner. (20 sl sts) Rep for S2/S3, S3/S4 and S4/S1. (4 seams x 20 sl sts)
Stitch-to-stitch logic: every edge has exactly 20 sts, so each seam matches stitch for stitch. Never skip a stitch or work two into one. If the counts don’t pair up exactly, recount Rnd 6.
Tension: keep the sl sts loose enough to match the sc fabric. Tight seams pull the cube corners inward and shrink the opening. If you need to, work the seams with a hook one size larger.
Checkpoint: turn the basket RS out. It should measure 5 in (12.7 cm) along every outer edge and stand up on its own. The top opening should measure 20 in (50.8 cm) around.
Repeat for all three baskets.
Border: Basket Rim
Each basket gets the same two-round rim around its open top.
Border gauge: 4 sc = 1 in (2.5 cm), the same as Rnd 6 of the squares.
Starting count: the opening is made up of the top edges of 4 squares, each 20 sts (corners included). 4 pieces x 20 sts = 80 sts. No stitches are added at the seams. The two corner sc that meet at each vertical seam are already part of each square’s 20.
Rnd 1: With RS facing, join Color A in the first st after any vertical seam. Ch 1, sc in each st around, working into both corner sc on either side of every seam. Join. (80 sc: 20 per side)
Rnd 2: Ch 1, don’t turn. Rev sc in each sc around. Join and fasten off. (80 rev sc: 20 per side)
Why the math works: 80 sts at 4 sts per in = 20 in (50.8 cm), which is exactly 4 x 5 in (12.7 cm). The rim matches the opening, so it neither flares nor gathers. The two rounds add 0.5 in (1.3 cm), bringing each basket to 5.5 in (14.0 cm) tall. The reverse sc gives the firm, rope-like top edge.
Attaching the Straps
Choose sides: on each basket, the straps go on two opposite side squares (S2 and S4). S1 and S3 face the front and back.
Hanger strap: Fold the 20 in (50.8 cm) strap in half over the wooden ring. Whipstitch the two layers together for 1 in (2.5 cm) just below the ring so the ring sits in a snug loop. Center one free end on the outside of the top basket’s S2 so it overlaps 2 in (5.1 cm) down from the top of the rim, and whipstitch all around the overlap. Rep with the other end on S4. The hanger rises about 7 in (17.8 cm) above the top rim.
Connector straps: Each gap between baskets uses 2 connectors. Sew the top 2 in (5.1 cm) of a connector to the lower part of the upper basket’s S2, ending at the bottom seam. Leave 1.5 in (3.8 cm) free as the gap. Sew the remaining 4.5 in (11.4 cm) to the lower basket’s S2, starting at the top of the rim. Check: 2 + 1.5 + 4.5 = 8 in (20.3 cm). Rep on S4, then rep for the second gap.
Total length: 7 in hanger + 3 x 5.5 in baskets + 2 x 1.5 in gaps = 26.5 in (67.3 cm).
Final Blocking
- Weave in all remaining ends along the seams, where they’re hidden.
- Lightly mist each basket with water until damp but not wet.
- Fill each basket firmly with a folded towel or a box about 5 in (12.7 cm) wide to square up the sides.
- Pinch each vertical corner and bottom edge into a crisp line.
- Lay the straps flat and pin them straight on the blocking mat.
- Let everything dry completely, for at least 12 hours, before hanging.
Final Quality-Control Checklist
- All 15 squares measure 5 in (12.7 cm), with 20 sts per side.
- Every square has all 80 sts in Rnd 6.
- Each seam has exactly 20 sl sts and lies flat.
- Each rim has 80 sts and lies flat without ruffling.
- All three baskets measure 5 x 5 x 5.5 in (12.7 x 12.7 x 14.0 cm).
- S1 and S3 face front and back; the straps sit on S2 and S4.
- Both connectors in each gap have 1.5 in (3.8 cm) free, so the baskets hang level.
- The ring loop is sewn securely and the holder hangs straight.
- All ends are woven in and trimmed.
Troubleshooting
Square is cupping: your dc rounds are too tight. Work the corner ch-2 more loosely or go up a hook size.
Square is ruffling: you may have added extra stitches. Recount: 40, 56, 72, then 80.
Roll doesn’t fit: your squares are smaller than 5 in (12.7 cm). Remake them with a larger hook, or add one more sc round to every square (88 sts, 22 per side) and use 88 sts for the rim.
Basket leans forward: the connector straps aren’t even. Unpick one and match the 1.5 in (3.8 cm) gap exactly.
Rim flares: there are too many stitches or the rev sc is loose. Recount to 80 and work the rev sc slightly tighter.
Seams look bulky: work through the back loops only and keep the sl sts relaxed.
Care
Hand wash in cool water with mild soap, press the water out with a towel, and dry flat, reshaped over a box. Don’t tumble dry.
Final Notes
The whole design follows one measurement chain. A 2.25 in (5.7 cm) flower grows into a 5 in (12.7 cm) square with 20 sts per side. Five squares seam stitch for stitch into a 5 x 5 x 5 in (12.7 x 12.7 x 12.7 cm) cube. Its 80-st opening takes an 80-st rim that adds 0.5 in (1.3 cm). Three 5.5 in (14.0 cm) baskets, two 1.5 in (3.8 cm) gaps and a 7 in (17.8 cm) hanger make a holder about 26.5 in (67.3 cm) long. Check each step as you go, and the finished holder will hang square and level.
Happy crocheting!