

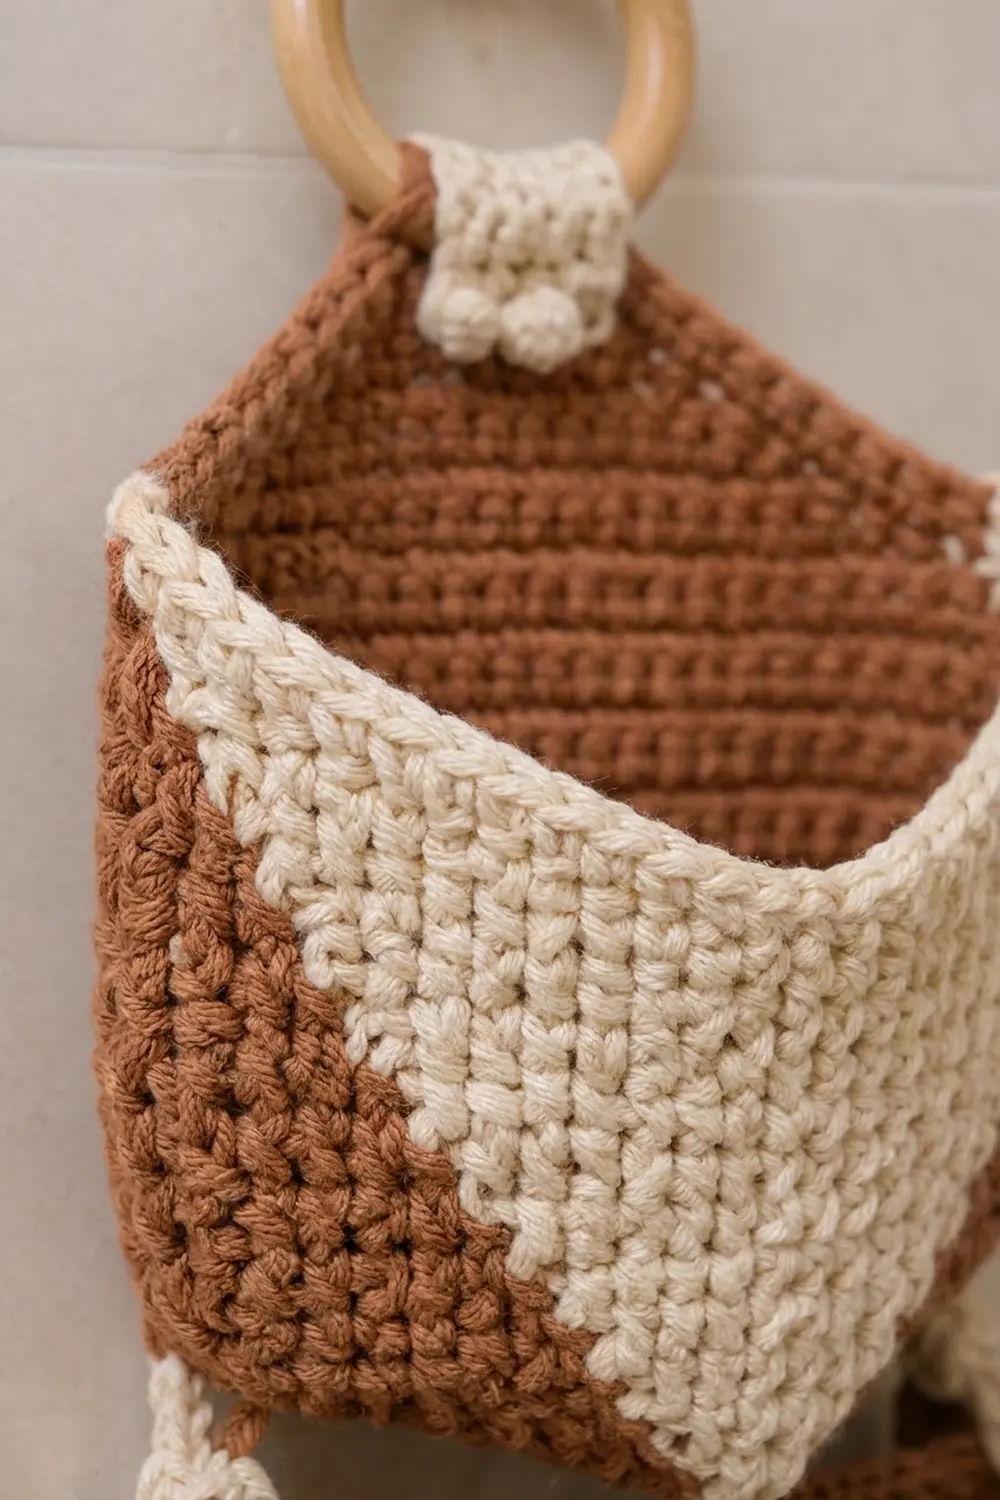
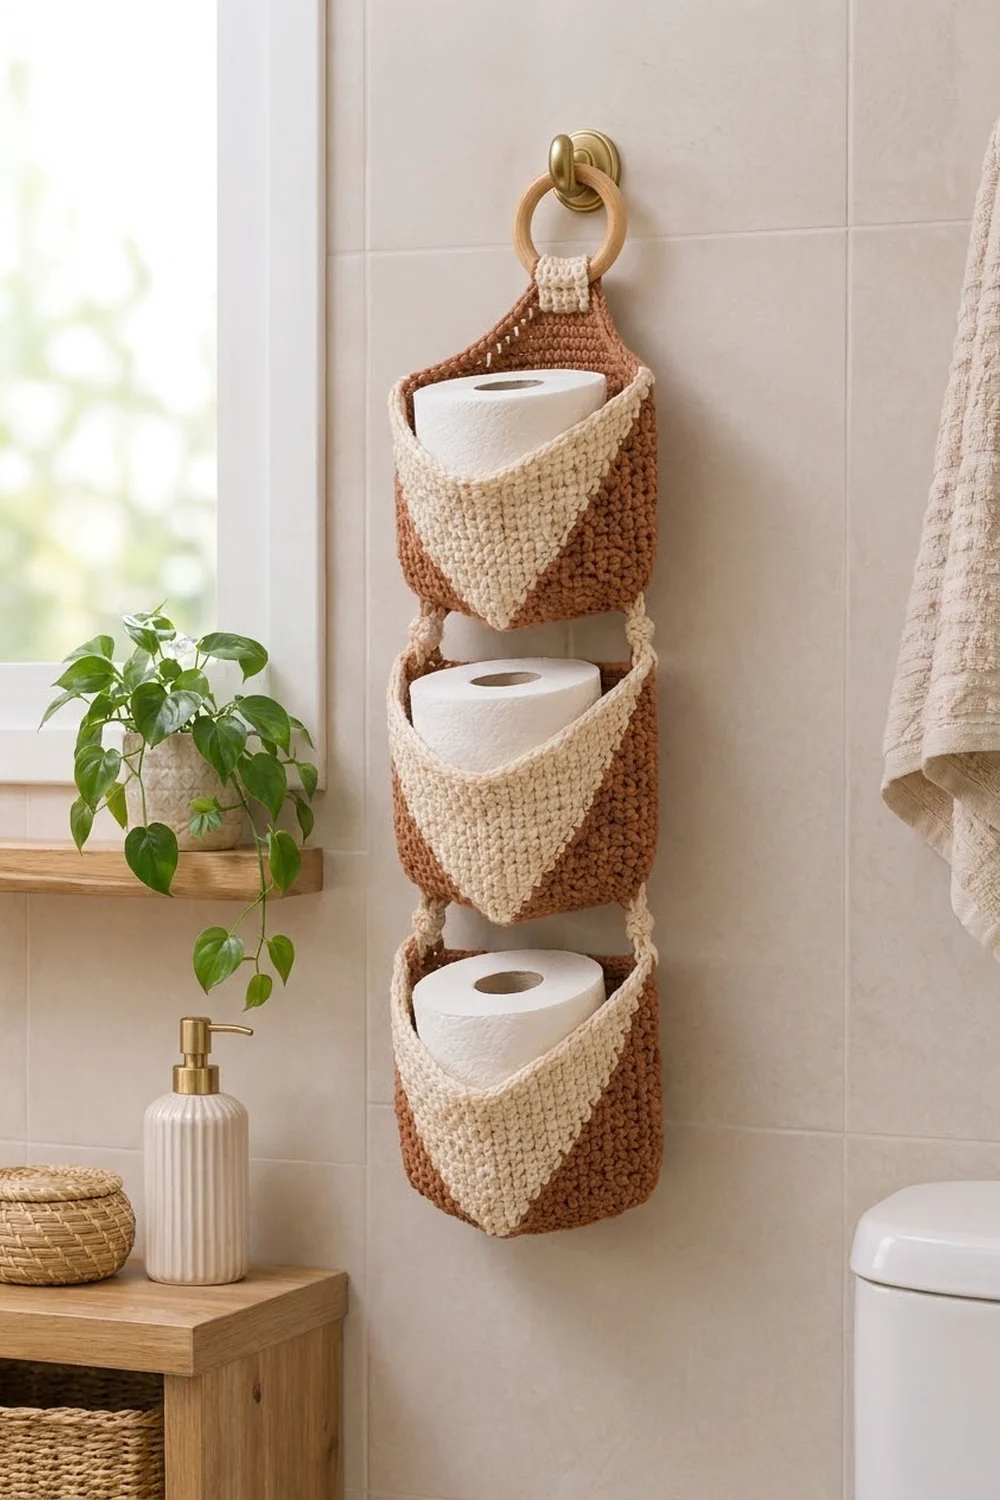
The Terracotta Chevron Holder is a vertical organizer with three pockets that keeps spare toilet rolls off the floor and within reach. Each pocket is a sturdy round basket with a cream inverted V on the front, rust-brown side panels, and a clean cream rim.
The palette is two colors only: rust brown and cream. With the natural wooden ring at the top, the piece suits warm, minimal bathrooms. The dense tapestry single crochet gives a woven look and keeps each pocket’s shape, even when it’s empty.
This pattern uses US crochet terms. Each pocket measures 4.9 in (12.4 cm) in diameter and 4.5 in (11.4 cm) tall. The finished holder measures about 19.5 in (49.5 cm) from the top of the tab fold to the base of the lowest pocket, not counting the ring.
Construction is simple. You crochet a flat circular base, then work the walls in joined rounds and carry both colors to form the V. A two-round cream rim finishes each pocket. A tapered tab is worked onto the top pocket and wrapped around a ring. Four small connector straps then join the pockets into a column.
Finished Size and Construction
- Pocket size: 4.9 in (12.4 cm) diameter × 4.5 in (11.4 cm) tall
- Pocket pressed flat: 7.7 in (19.6 cm) wide
- Overall length: about 19.5 in (49.5 cm), not counting the ring
- Skill level: Intermediate (tapestry color changes)
- Terminology: US
- Yarn weight: Worsted (#4) cotton
- Hook: 5.0 mm (US H-8)
- Number of pieces: 3 pockets, 1 hanging tab (worked onto Pocket 1), 4 connectors
- Layout: 1 column × 3 pockets
- Pocket height before rim: 4 in (10.2 cm)
- Rim (border) depth: 0.5 in (1.3 cm)
Materials
Use a smooth worsted-weight cotton or cotton blend. Cotton holds its shape in a damp bathroom and shows tapestry stitches clearly. Avoid fuzzy or very splitty yarns, because the carried strand will be harder to hide.
- Color A, rust brown: 100 g (about 170 m)
- Color B, cream: 50 g (about 85 m)
Tools:
– 5.0 mm (US H-8) crochet hook
– Wooden or metal ring, 2.75 in (7.0 cm) diameter
– 4 locking stitch markers
– Tapestry needle
– Scissors
– Measuring tape
– Spray bottle and pins for blocking
These quantities include a margin of about 25% for swatching, carried strands, and weaving in ends.
Abbreviations (US Terms)
- ch: chain
- sl st: slip stitch
- sc: single crochet
- sc2tog: single crochet 2 together
- BLO: back loop only
- st(s): stitch(es)
- rnd(s): round(s)
- RS / WS: right side / wrong side
Special stitch: bobble. Yarn over, insert hook in the stitch, yarn over and pull up a loop, yarn over and draw through 2 loops. Repeat 3 more times in the same stitch (5 loops on hook). Yarn over and draw through all 5 loops.
Tapestry color change: Work the last stitch in the old color until 2 loops remain on the hook. Finish it by drawing the new color through. Carry the unused color along the top of the round and work over it so it stays hidden inside the stitches.
Gauge and Checkpoints
Gauge: 14 sc and 16 rnds = 4 in (10.2 cm) in tapestry sc, worked in rounds.
Make one full pocket base before you commit to the whole project. That base is your gauge swatch.
Checkpoints:
– After base Rnd 9 (54 sts): 4.9 in (12.4 cm) diameter, lying flat
– After wall Rnd 8: walls are 2 in (5.1 cm) tall, measured from the base fold
– After wall Rnd 16: walls are 4 in (10.2 cm) tall; the V is 4.9 in (12.4 cm) wide at the top
– After the rim: pocket is 4.5 in (11.4 cm) tall
If your base is larger than 4.9 in (12.4 cm), go down to a 4.5 mm hook. If it is smaller than 4.75 in (12.1 cm), go up to a 5.5 mm hook. Check again after the new base. A base that is too small will not fit a standard roll.
Pocket (Make 3)
Base
Work the base with Color A. Join each round with a sl st to the first sc. Ch 1 at the start of each round; this ch does not count as a stitch.
Rnd 1: Make a magic ring and work 6 sc into it. (6 sts)
Rnd 2: 2 sc in each st around. (12 sts)
Rnd 3: [Sc in next st, 2 sc in next st] 6 times. (18 sts)
Rnd 4: [Sc in next 2 sts, 2 sc in next st] 6 times. (24 sts)
Rnd 5: [Sc in next 3 sts, 2 sc in next st] 6 times. (30 sts)
Rnd 6: [Sc in next 4 sts, 2 sc in next st] 6 times. (36 sts)
Rnd 7: [Sc in next 5 sts, 2 sc in next st] 6 times. (42 sts)
Rnd 8: [Sc in next 6 sts, 2 sc in next st] 6 times. (48 sts)
Rnd 9: [Sc in next 7 sts, 2 sc in next st] 6 times. (54 sts)
Check the 4.9 in (12.4 cm) diameter now.
Place a marker in the first st of the next round. Stitches 1–27 form the front and stitches 28–54 form the back. Stitch 14 is the center front.
Walls
Join Color B and carry it through every wall round. Each round has 54 sts. Every round starts at st 1, with ch 1 and the first sc in the same st as the join. Join with a sl st in Color A.
Wall Rnd 1 (BLO): A 13, B 1, A 40. (54 sts)
Working in the back loops makes a crisp fold at the base edge. Work all following rounds through both loops.
Wall Rnd 2: A 12, B 3, A 39. (54 sts)
Wall Rnd 3: Repeat Wall Rnd 2.
Wall Rnd 4: A 11, B 5, A 38. (54 sts)
Wall Rnd 5: Repeat Wall Rnd 4.
Wall Rnd 6: A 10, B 7, A 37. (54 sts)
Wall Rnd 7: Repeat Wall Rnd 6.
Wall Rnd 8: A 9, B 9, A 36. (54 sts)
Wall Rnd 9: Repeat Wall Rnd 8.
Wall Rnd 10: A 8, B 11, A 35. (54 sts)
Wall Rnd 11: Repeat Wall Rnd 10.
Wall Rnd 12: A 7, B 13, A 34. (54 sts)
Wall Rnd 13: Repeat Wall Rnd 12.
Wall Rnd 14: A 6, B 15, A 33. (54 sts)
Wall Rnd 15: Repeat Wall Rnd 14.
Wall Rnd 16: A 5, B 17, A 32. (54 sts)
The V grows by one cream stitch on each side every other round. It stays centered on st 14, rising from a single-stitch point to 17 sts at the top. Five brown stitches stay on each side of the V across the front, so the brown side triangles reach the rim, just as in the finished piece.
Cut Color A, leaving a 4 in (10.2 cm) tail to weave in. Continue with Color B for the rim (see Border).
Hanging Tab (Pocket 1 Only)
Finish the rim on all three pockets first. Choose one pocket to be Pocket 1, the top pocket.
With the back facing you, join Color A in the BLO of rim Rnd 18, st 34. The tab is worked in rows into sts 34–48: the 15 center-back stitches, centered on st 41. Ch 1 and turn at the end of every row.
Row 1: Sc in BLO of sts 34–48. (15 sts)
Row 2: Sc2tog, sc in next 11 sts, sc2tog. (13 sts)
Row 3: Sc2tog, sc in next 9 sts, sc2tog. (11 sts)
Row 4: Sc2tog, sc in next 7 sts, sc2tog. (9 sts)
Row 5: Sc2tog, sc in next 5 sts, sc2tog. (7 sts)
Row 6: Sc2tog, sc in next 3 sts, sc2tog. (5 sts)
Rows 7–18: Sc in each st across. (5 sts)
Row 1 measures 4.3 in (10.9 cm) wide. The strap is 1.4 in (3.6 cm) wide. Rows 1–6 are 1.5 in (3.8 cm) tall.
Fasten off, leaving a 12 in (30.5 cm) tail. Pass Rows 13–18 through the ring from front to back and fold them down behind Rows 7–12. Whipstitch Row 18 to the WS of Row 7. The visible strap is 6 rows, or 1.5 in (3.8 cm). The tab rises 3 in (7.6 cm) above the rim.
Connectors (Make 4)
Use Color B. Ch 4.
Row 1: Sc in 2nd ch from hook and in next 2 ch. (3 sts)
Rows 2–5: Ch 1, turn, sc in each st across. (3 sts)
Row 6: Ch 1, turn, sc in next st, bobble in next st, sc in next st. (3 sts)
Rows 7–12: Ch 1, turn, sc in each st across. (3 sts)
Fasten off, leaving a 10 in (25.4 cm) tail. Each connector is 0.9 in (2.3 cm) wide and 3 in (7.6 cm) long. The bobble pops out on the side facing away from you during Row 6; that side is the RS.
Make All Pieces
Totals for the full project:
- Color A + Color B pockets: 3 (base and walls in A, V and rim in B)
- Color A hanging tab: 1, worked onto Pocket 1
- Color B connectors: 4
Layout grid (front view):
        [ Ring ]
        [ Tab  ]
  [    Pocket 1    ]
   C1            C2
  [    Pocket 2    ]
   C3            C4
  [    Pocket 3    ]
C1–C4 are connectors. Each one sits on a side fold of the pockets.
Joining
Each connector bridges the bottom of an upper pocket and the rim of the pocket below.
Placement: Flatten each pocket so that st 14 (center front) faces you. The side folds fall at sts 54/1 and sts 27/28.
– Left connectors (C1, C3) cover sts 53, 54, and 1.
– Right connectors (C2, C4) cover sts 26, 27, and 28.
These are the same stitches on every pocket, so the connectors line up vertically.
Upper end: Lay Rows 10–12 of the connector, RS out, against the outside of the upper pocket. Cover wall Rnds 1–3 over the 3 placement sts. Whipstitch all 4 edges, one connector stitch to one pocket stitch. This overlap is 0.75 in (1.9 cm).
Lower end: Tuck Rows 1–3 inside the lower pocket, over rim Rnds 17–18 and wall Rnd 16 at the same 3 placement sts. Whipstitch them in place. This overlap is also 0.75 in (1.9 cm).
Tension: Sew firmly but don’t pucker the pocket wall. Keep each connector straight and unstretched. The bobbles should face forward.
Size checkpoint: The visible gap between pockets is 3 − 0.75 − 0.75 = 1.5 in (3.8 cm). From the rim of Pocket 1 to the base of Pocket 3, the length is (3 × 4.5) + (2 × 1.5) = 16.5 in (41.9 cm).
Border (Rim)
The rim is worked on each pocket directly after Wall Rnd 16. Use Color B only and stop carrying Color A.
Border gauge: 14 sc × 16 rnds = 4 in (10.2 cm), the same as the walls. Two rounds equal 0.5 in (1.3 cm).
Rnd 17: Ch 1, sc in each st around, and join. That’s 27 sts across the front plus 27 sts across the back. (54 sts)
Rnd 18: Ch 1, sc in each st around, and join. Again, 27 sts across the front plus 27 across the back. (54 sts)
Fasten off and weave in the ends.
Why the math works: The base ends at 54 sts, and the walls and rim keep exactly 54 sts with no increases. The pocket therefore rises straight, without flaring or cupping. Because 54 = 2 × 27, the front and back halves are equal. The 17-st V sits centered at the top with 5 brown sts on each side (5 + 17 + 5 = 27). The 15-st tab is centered on the back, leaving 6 sts on each side (6 + 15 + 6 = 27). The rim adds 0.5 in (1.3 cm) to the 4 in (10.2 cm) wall, for a pocket height of 4.5 in (11.4 cm).
Final Blocking
- Weave in all ends inside the pockets, working through the backs of same-colored stitches.
- Mist each pocket evenly with water until it is damp but not soaked.
- Slip a toilet roll or a rolled towel into each pocket so the walls stand round at 4.9 in (12.4 cm) across.
- Push the base flat from the inside and pinch the base fold (Wall Rnd 1) to sharpen it.
- Smooth the V so its diagonal edges run straight. Ease any color jogs into line.
- Lay the holder flat. Pin the connectors straight and the tab centered.
- Let everything dry completely, about 24 hours, before hanging.
Final Quality-Control Checklist
- Each pocket has 54 sts in every wall and rim round.
- Each V is centered on st 14 and is 17 sts wide at Wall Rnd 16.
- No brown shows through the cream (or cream through the brown) from carried strands.
- The rim is 2 cream rounds, 0.5 in (1.3 cm) deep, all the way around.
- The tab rows count 15, 13, 11, 9, 7, 5, then 5 sts for Rows 7–18.
- The strap is sewn securely around the ring.
- All 4 connectors sit at the side folds, line up vertically, and have bobbles facing forward.
- Each gap between pockets is 1.5 in (3.8 cm).
- Overall length is about 19.5 in (49.5 cm), not counting the ring.
Troubleshooting
Base ruffles: Your tension is too loose or you have extra increases. Recount each round and drop a hook size if needed.
Base cups upward: You have too few stitches or are working too tightly. Check that Rnd 9 has 54 sts.
Walls flare outward: You probably added stitches at the round joins. Make sure the first sc goes in the same st as the join and that you don’t work into the sl st.
V leans to one side: Joined rounds can drift slightly. Recount the brown stitches before the V on each round against the chart of counts, and block it straight.
Carried yarn peeks through: Keep the carried strand snug on top of the stitches. Tug it gently every few stitches.
Pockets twist when hanging: The connectors are probably off their placement sts. Re-sew them at sts 53, 54, 1 and sts 26, 27, 28.
Tab stretches: Sew the strap fold through both layers along all edges, not just at the end.
Care
Hand wash in cool water with mild soap, then press out the water in a towel. Reshape around a roll and dry flat. Don’t tumble dry.
Final Notes
The measurement chain is short and easy to check. A 54-st base measures 4.9 in (12.4 cm). Sixteen straight wall rounds add 4 in (10.2 cm), and a two-round rim adds 0.5 in (1.3 cm), for a pocket height of 4.5 in (11.4 cm). Three pockets plus two 1.5 in (3.8 cm) gaps make 16.5 in (41.9 cm). The 3 in (7.6 cm) tab brings the total to 19.5 in (49.5 cm). If your gauge matches on the first base, everything else follows.
Happy crocheting!