

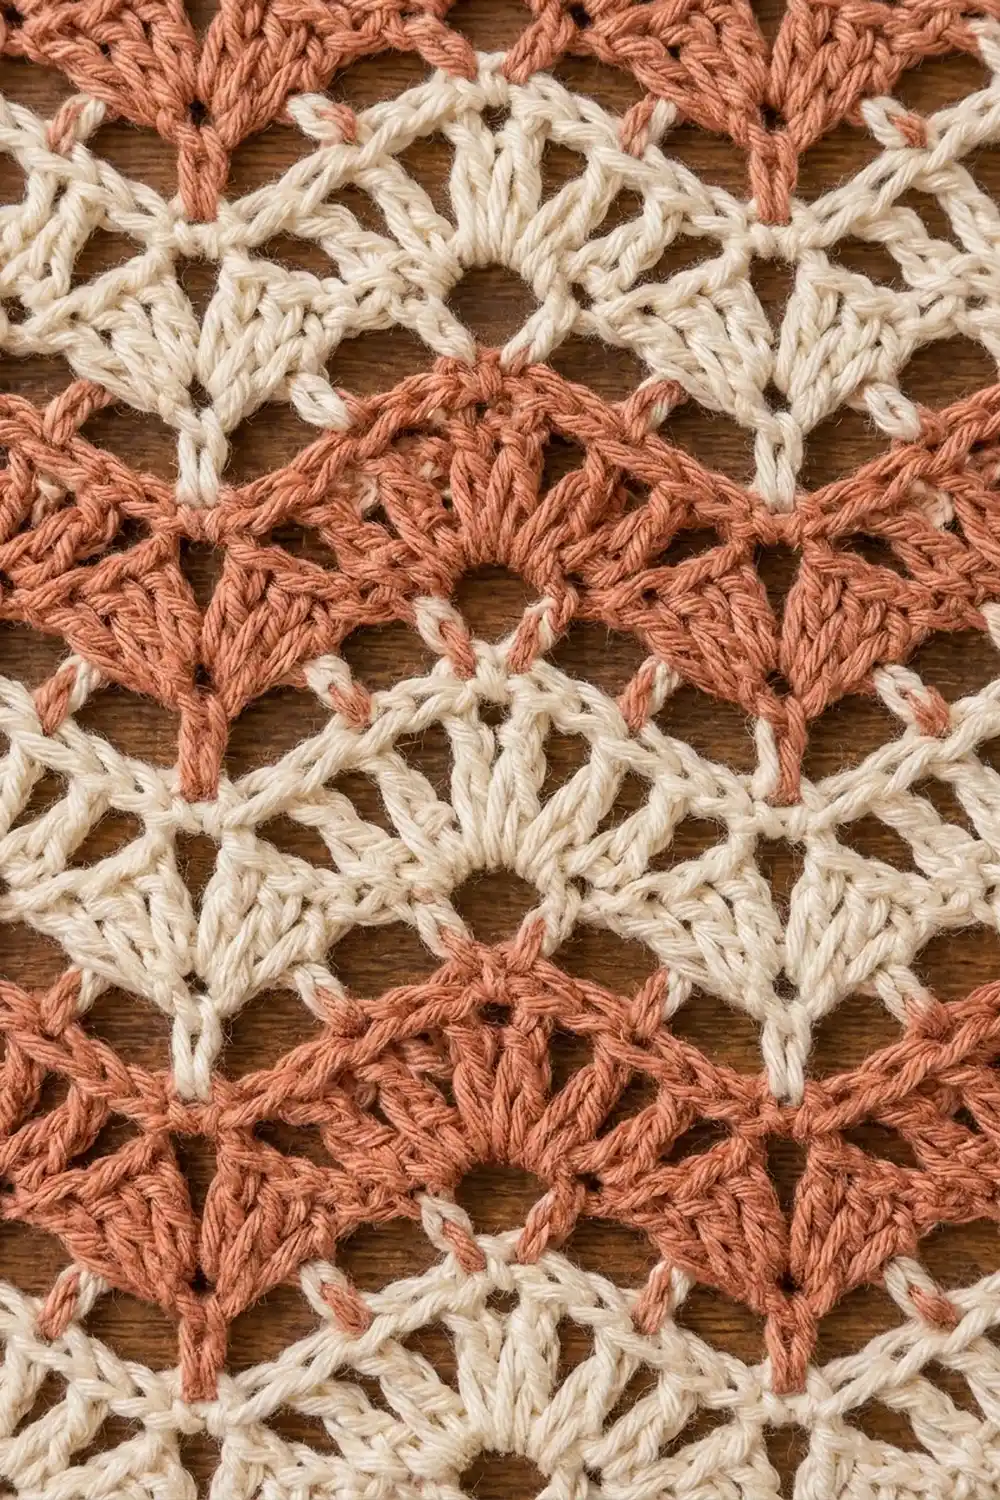
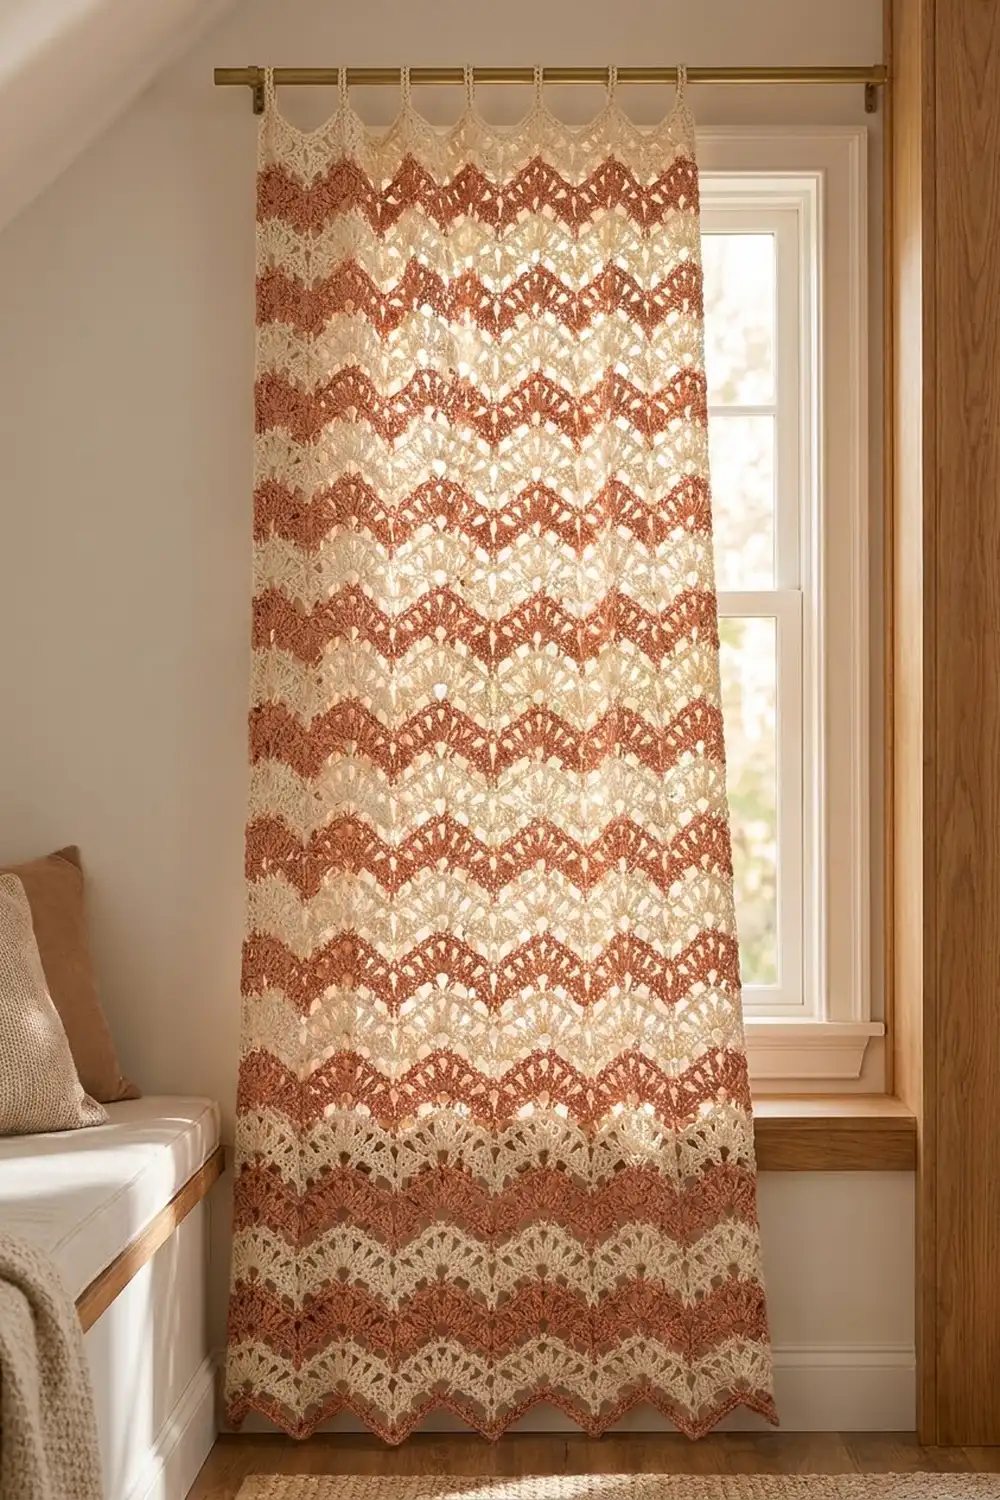
The Terracotta Tide curtain panel is a tall lace ripple worked in two soft, earthy colors. Narrow terracotta bands sit between wider cream bands, and the open lace rows let daylight through without losing the bold zigzag.
The style is relaxed boho with a clean, structured outline. The bottom edge keeps its natural chevron points. The top finishes in a flat cream band with six chain loops that slide onto a standard curtain rod.
This pattern uses US crochet terms. One finished panel measures 25.75 in wide x 73.5 in long (65.4 cm x 186.7 cm), plus hanging loops of about 2 in (5.1 cm). The photo shows two panels hung as a pair. Each panel is a separate, identical piece, so make a second one if you want the full pair.
Construction is simple. You work the panel bottom-up in rows: a single crochet foundation, then a 6-row stripe repeated 24 times, a leveling row, and a loop row. A two-row side border finishes the long edges.
Finished Size and Construction
- Finished size: 25.75 in x 73.5 in (65.4 cm x 186.7 cm), plus 2 in (5.1 cm) loops
- Skill level: Easy-intermediate
- Terminology: US
- Yarn weight: Worsted (#4), cotton or cotton blend
- Hook: 5 mm (H-8)
- Number of pieces: 1 panel (make 2 for a pair)
- Layout: Single piece worked in rows, bottom-up
- Piece size before border: 24.75 in x 73.5 in (62.9 cm x 186.7 cm)
- Border depth: 0.5 in (1.3 cm) on each long side
Materials
Choose a smooth worsted cotton or cotton-blend yarn with good stitch definition. Cotton drapes well and holds up to sunlight and washing better than most acrylics. Quantities assume about 200 yd per 100 g (183 m per 100 g).
For one panel:
- Color A, Cream: 700 g, about 1,400 yd (1,280 m)
- Color B, Terracotta: 325 g, about 650 yd (594 m)
Double these amounts for a pair. Quantities include a margin of about 10% for swatching and minor tension differences.
Tools:
- 5 mm (H-8) crochet hook
- Tapestry needle
- Stitch markers
- Measuring tape
- Rust-proof pins and a large blocking surface (foam mats or a bed with a clean sheet)
Abbreviations (US Terms)
- ch – chain
- sl st – slip stitch
- sc – single crochet
- hdc – half double crochet
- dc – double crochet
- tr – treble crochet
- sk – skip
- st(s) – stitch(es)
- sp – space
- rep – repeat
- RS / WS – right side / wrong side
Special stitches:
- dc2tog: [Yo, insert hook in next st, pull up a loop, yo, draw through 2 loops] twice, yo, draw through all 3 loops.
- dc3tog: [Yo, insert hook in next st, pull up a loop, yo, draw through 2 loops] 3 times, yo, draw through all 4 loops.
Important counting rule: Every ch-1 space counts as 1 stitch. On every row after Row 3, work 1 stitch into each dc and each ch-1 sp unless told otherwise.
Gauge and Checkpoints
Gauge: 16 sts = 4 in (10.2 cm) in pattern, measured straight across. One 14-st repeat = 3.5 in (8.9 cm) from peak to peak. One dc or lace row = 0.5 in (1.3 cm) tall. One sc row = 0.25 in (0.6 cm) tall.
Test swatch first: Ch 30. Work Row 1 (29 sc), then Rows 2–7 with 2 repeats instead of 7. On Rows 2–3, work the bracketed * repeat 1 time instead of 6. At the end, the swatch should measure 7.25 in (18.4 cm) wide and 3.25 in (8.3 cm) tall.
Checkpoints on the panel:
- After Row 7 (first stripe): 24.75 in (62.9 cm) wide, 3.25 in (8.3 cm) tall at the side edge
- After Row 61 (10 stripes): 30.25 in (76.8 cm) tall
- After Row 145 (24 stripes): 72.25 in (183.5 cm) tall
- After Row 148: 73.5 in (186.7 cm) tall
If your swatch is too big, go down 0.5 mm in hook size. If it is too small, go up 0.5 mm. Width matters more than length. You can adjust length by adding or removing whole stripes, at 3 in (7.6 cm) each.
Panel Pattern
Foundation
With B, ch 100.
Row 1 (RS): Sc in 2nd ch from hook and in each ch across. Turn. (99 sc)
Stripe Rows
Row 2 (Ripple Row, B): Ch 2, dc in next st (counts as dc2tog). Dc in next 5 sts, 3 dc in next st (peak), dc in next 5 sts. *Dc3tog over next 3 sts, dc in next 5 sts, 3 dc in next st, dc in next 5 sts; rep from * 5 more times. Dc2tog over last 2 sts. Turn. (99 sts: 7 peaks, 6 full valleys, 2 half-valleys)
This row shows the repeat clearly: each 14-st repeat uses 14 sts and makes 14 sts. The 3-dc peak adds 2 stitches and the dc3tog valley removes 2, so the count stays at 99.
Row 3 (Lace Row, B): Ch 2, dc in next st (counts as dc2tog). [Ch 1, sk next st, dc in next st] twice, ch 1, sk next st, (dc, ch 1, dc) in next st (peak; this is the center dc of the 3-dc group). Ch 1, sk next st, [dc in next st, ch 1, sk next st] twice. *Dc3tog over next 3 sts, [ch 1, sk next st, dc in next st] twice, ch 1, sk next st, (dc, ch 1, dc) in next st, ch 1, sk next st, [dc in next st, ch 1, sk next st] twice; rep from * 5 more times. Dc2tog over last 2 sts. Turn. (99 sts, counting each ch-1 sp)
Each side of a peak is 5 sts (dc and ch-1 sps alternating). The peak is 3 sts and the valley is 1 st. That makes 14 per repeat, so the count stays at 99 again.
Change to A on the final yarn over of Row 3. Carry B loosely up the side edge; the border will hide it.
Row 4 (Ripple Row, A): Work as Row 2, working into each dc and ch-1 sp. The 3-dc peak goes into the ch-1 sp at the center of each (dc, ch 1, dc) peak. Each dc3tog is centered over the dc3tog below. (99 sts)
Row 5 (Lace Row, A): Work as Row 3. (99 sts)
Row 6 (Ripple Row, A): Work as Row 4. (99 sts)
Row 7 (Lace Row, A): Work as Row 3. Change to B on the final yarn over. (99 sts)
Rows 2–7 make one stripe repeat: 2 terracotta rows and 4 cream rows, 3 in (7.6 cm) tall. Each color band has an even number of rows, so color changes always happen at the same side edge.
Rows 8–145: Rep Rows 2–7 a total of 23 more times, for 24 stripes. End after a cream Lace Row (Row 145). Do not change to B. (99 sts)
Edge tip: Work the last st of each row into the dc that follows the beginning ch-2, not into the ch-2 itself.
Top Band
Continue with A.
Row 146 (Leveling Row): Ch 4 (counts as tr), tr in next st. *Dc in next 2 sts, hdc in next 2 sts, sc in next 3 sts, hdc in next 2 sts, dc in next 2 sts, tr in next 3 sts; rep from * 6 more times, working only 2 tr on the final rep. Turn. (99 sts)
The 3 sc land on the peak center and the 3 tr fill each valley, so the top edge comes out straight. Count: 2 + (7 x 14) − 1 = 99.
Row 147: Ch 1, sc in each st across, working the last sc into the top of the ch-4. Turn. (99 sc)
Row 148 (Loop Row): Ch 1, sc in first st. *Sc in next st, ch 16, sl st in top of the sc just made (loop made), sc in next 18 sts; rep from * 4 more times. Sc in next st, ch 16, sl st in top of the sc just made, sc in last 2 sts. Fasten off. (99 sc, 6 loops)
The loops sit on sts 2, 21, 40, 59, 78, and 97, with 18 sc between each pair. They mirror each other from both ends. Loops do not count as stitches.
Loop reinforcement: Join A at the base of the first loop. Work 22 sc around the ch-16 loop, sl st at the base, and fasten off. Repeat on all 6 loops.
Border
The border goes on the two long sides only. The bottom keeps its chevron points, and the top is already finished by Rows 146–148.
Border gauge: 4 sc = 1 in (2.5 cm). Row-end heights set the count: 1 sc per sc row end (0.25 in), 2 sc per dc or lace row end (0.5 in), and 3 sc per tr row end (0.75 in).
Side Border Row 1: With RS facing, join A at the top corner of one long side. Work sc evenly down the side: 1 sc in the end of Row 148, 1 in Row 147, 3 in Row 146, 2 in each end of Rows 145–2, and 1 in Row 1. Turn. (294 sc)
Count check: 1 + 1 + 3 + (144 x 2) + 1 = 294 sc.
Side Border Row 2: Ch 1, sc in each sc across. Fasten off. (294 sc)
Repeat both border rows on the other long side.
Why the math works: 294 sc at 4 sc per inch = 73.5 in (186.7 cm). That matches the panel length exactly, so the edge won’t ruffle or pull in. The two sc rows add 0.5 in (1.3 cm) per side. The panel goes from 24.75 in (62.9 cm) to 25.75 in (65.4 cm) wide.
Final Blocking
- Weave in all ends along the side borders and inside same-color stitches.
- Soak the panel in cool water with a little wool wash or mild soap for 15 minutes.
- Press out the water gently. Roll the panel in towels to remove more moisture. Do not wring.
- Lay it flat on your blocking surface, RS up.
- Pin the side edges straight to 73.5 in (186.7 cm), then pin the width to 25.75 in (65.4 cm).
- Pin each bottom chevron point and each top loop so they are evenly spaced.
- Open the lace rows lightly with your fingers. Do not stretch the length, because cotton drops a little when it hangs.
- Let it dry fully, then unpin.
Final Quality-Control Checklist
- Every row has 99 sts (Rows 1–148)
- 24 stripes, with terracotta at the bottom and cream at the top
- Peaks and valleys line up vertically all the way up
- Top edge is straight, with 6 evenly spaced loops
- Each side border has 294 sc and lies flat
- Panel measures 25.75 in x 73.5 in (65.4 cm x 186.7 cm)
- Carried yarn is hidden under the border
- All ends are woven in securely
Troubleshooting
Chevrons drift sideways: A peak or valley was worked one stitch off. Check that each 3-dc peak goes into the center ch-1 sp.
Stitch count grows or shrinks: Usually a missed ch-1 sp or a dc2tog worked into the turning ch-2. Count each row until the rhythm feels natural.
Side edges wave: Your border is over- or under-filled. Count row ends against the 294-sc formula.
Top edge dips at the valleys: Make sure you used tr over the valleys and sc only at the peaks in Row 146.
Panel too short: Add whole stripes before Row 146, at 3 in (7.6 cm) each, and add 12 sc to each border row per added stripe.
Loops too tight for your rod: Rework Row 148 with ch 20 loops and 26 sc around each.
Care
Hand wash or machine wash on a cool gentle cycle in a mesh bag, then dry flat and reshape. Sunlight can fade terracotta over time, so rotate the panels now and then.
Final Notes
The measurement chain is short and reliable. A swatch at 16 sts = 4 in (10.2 cm) gives a 99-st panel 24.75 in (62.9 cm) wide. Each 6-row stripe adds 3 in (7.6 cm), and 24 stripes plus the foundation and top band reach 73.5 in (186.7 cm). The side border of 294 sc matches that length exactly and brings the width to 25.75 in (65.4 cm). If each checkpoint matches, your panel will hang straight and even.
Happy crocheting!