

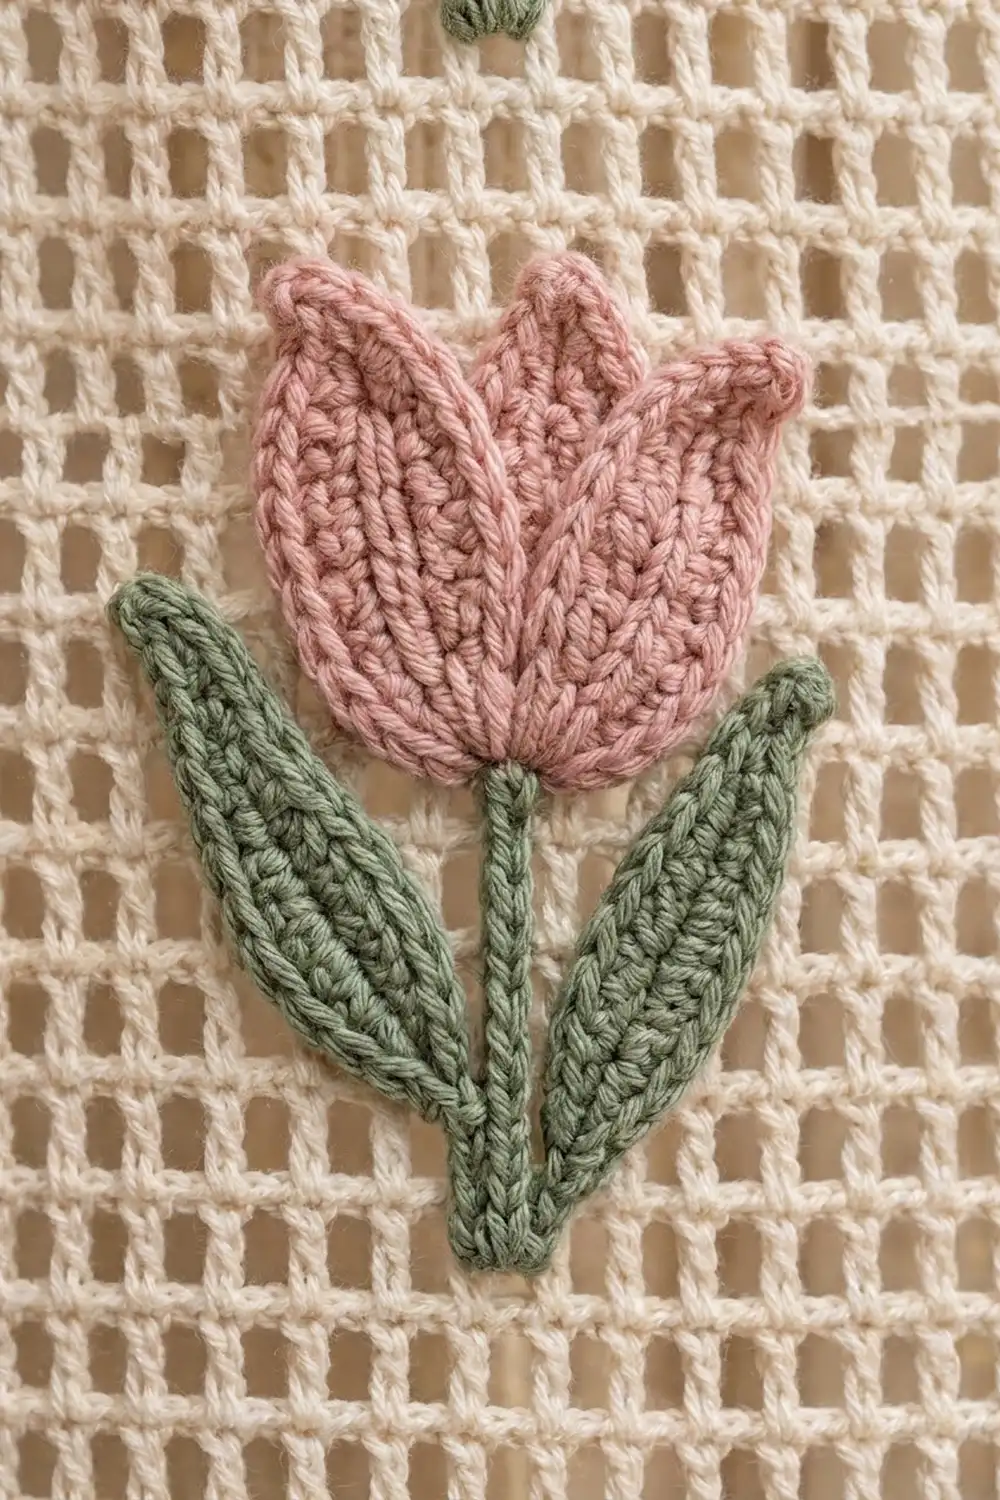
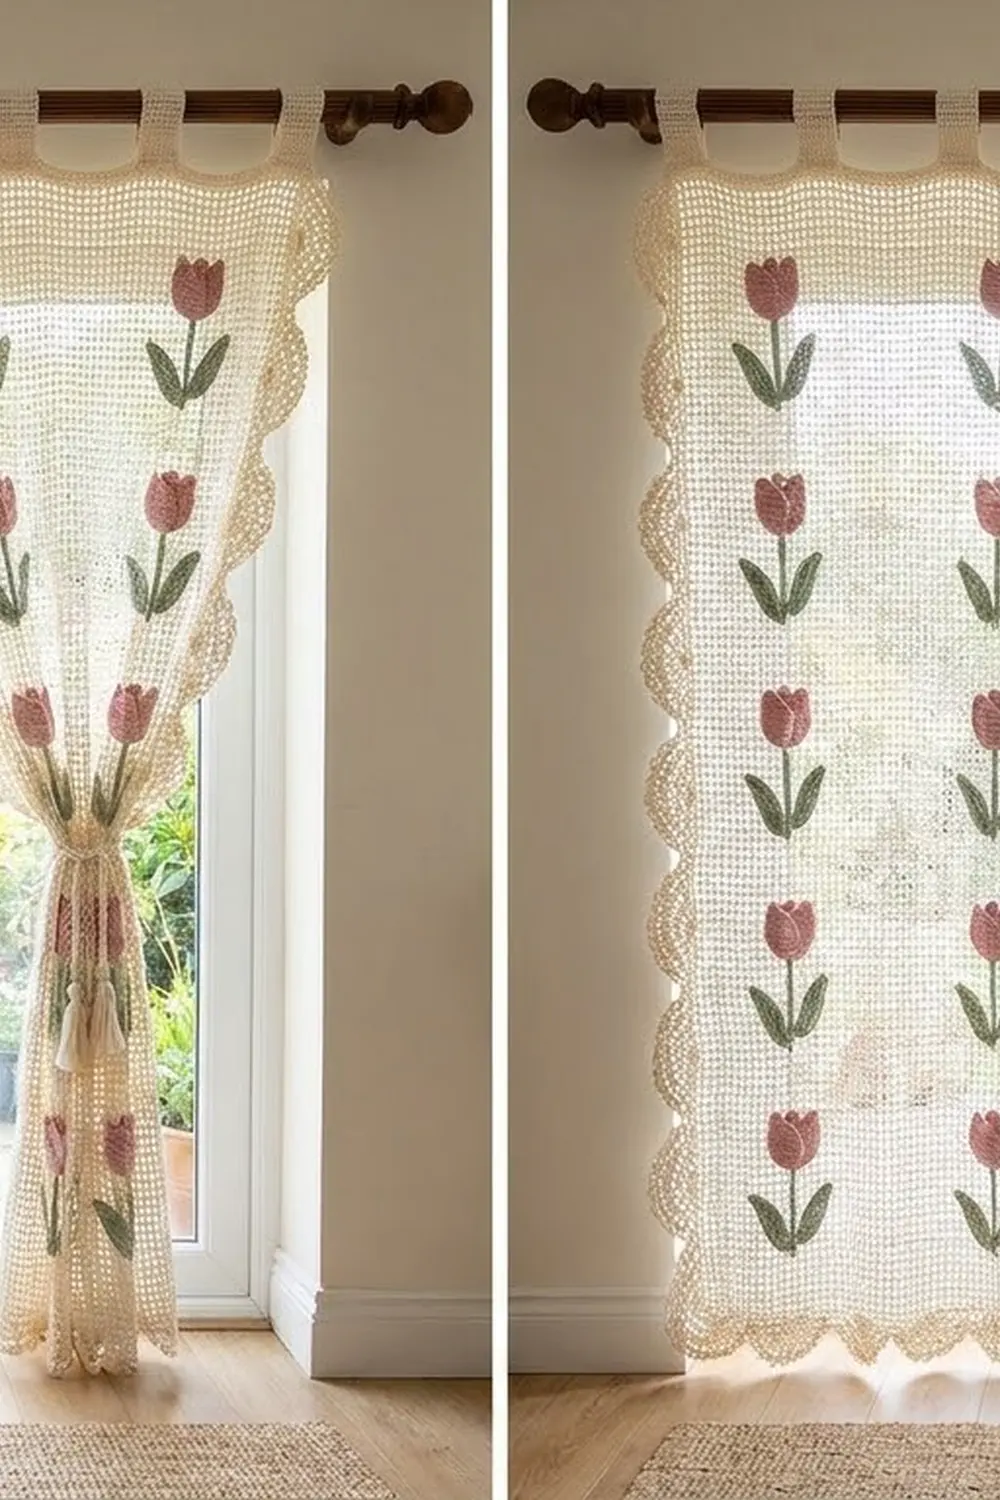
These curtains are light and airy, with a cottage feel. Each panel is open cream filet mesh with two neat columns of dusty-pink tulips on sage-green stems. Wide scallops run down both long sides and across the bottom, and simple tabs at the top slide over your curtain rod.
The palette is soft and natural: cream for the mesh, dusty pink for the blooms and sage green for the stems and leaves. Light passes through the mesh, and the tulips read clearly from across the room.
This pattern uses US crochet terms. One finished panel measures about 34 in (86.4 cm) wide and 74 in (188.0 cm) long, not counting the tabs. With the tabs it measures about 77 in (195.6 cm). The instructions make one panel. Make two for a matching pair.
You crochet the mesh body in rows. Then you add a two-round border, the tabs, 14 tulip appliqués and a corded tieback. Every stage has a measurement checkpoint, so you can catch sizing problems early.
Finished Size and Construction
- Finished size (one panel): 34 in x 74 in (86.4 cm x 188.0 cm), or 77 in (195.6 cm) including tabs
- Skill level: Intermediate
- Terminology: US
- Yarn weight: Worsted (#4) cotton
- Hooks: 5.0 mm (H-8) for mesh and border, 4.0 mm (G-6) for appliqués
- Number of pieces: 1 mesh body + 14 tulips + 1 tieback per panel. Make 2 panels.
- Layout: 40 meshes wide x 91 rows tall
- Body size before border: 32 in x 72.8 in (81.3 cm x 184.9 cm)
- Border depth: 1 in (2.5 cm) on the sides and bottom, 0.25 in (0.6 cm) at the top
Materials
Use a smooth, mercerized or combed worsted cotton of about 170 m per 100 g. Cotton keeps the mesh crisp, holds up to washing and doesn’t stretch much as it hangs.
Amounts for a pair of panels:
- Cream: 1000 g (1700 m)
- Dusty pink: 100 g (170 m)
- Sage green: 100 g (170 m)
These amounts include a margin of about 15% for swatching, sewing tails and small differences in tension.
Tools:
– 5.0 mm (H-8) and 4.0 mm (G-6) crochet hooks
– Tapestry needle
– Stitch markers
– Rust-proof pins
– Measuring tape
– Spray bottle
– Blocking mats, or a clean sheet spread over a carpet
– A 5 in (12.7 cm) piece of card for the tassels
Abbreviations (US Terms)
- ch – chain
- sl st – slip stitch
- sc – single crochet
- hdc – half double crochet
- dc – double crochet
- tr – treble crochet
- sk – skip
- sp – space
- st(s) – stitch(es)
- rnd – round
- beg – beginning
- RS / WS – right side / wrong side
Mesh: one dc plus ch 2. Each mesh is 3 sts wide.
Shell: 9 dc in the same st or sp.
Gauge and Checkpoints
Mesh gauge (5.0 mm hook): 10 meshes x 10 rows = 8 in (20.3 cm), so one mesh is 0.8 in (2.0 cm) square.
Border gauge: 15 sc = 4 in (10.2 cm).
Appliqué gauge (4.0 mm hook): 20 sc x 22 rows = 4 in (10.2 cm).
Test before you start the full panel. Make a mesh swatch: ch 35, then work Rows 1–2 below for 10 meshes and 10 rows in total. Also make one complete tulip.
The swatch should measure 8 in (20.3 cm) square. The bloom should measure about 2.5 in (6.4 cm) wide and 3 in (7.6 cm) tall.
If your swatch comes out too big, go down 0.5 mm in hook size. If it comes out too small, go up 0.5 mm. Even a small error grows over 91 rows: being off by 0.05 in (0.1 cm) per row changes the length by about 4.5 in (11.4 cm).
Checkpoints:
– After Row 10: 32 in (81.3 cm) wide and 8 in (20.3 cm) tall
– After Row 46: about 36.8 in (93.5 cm) tall
– After Row 91: 72.8 in (184.9 cm) tall
– After the border: 34 in (86.4 cm) wide
Mesh Body
With cream and the 5.0 mm hook, ch 125. The formula is (3 x 40 meshes) + 5.
Row 1 (RS): Dc in 8th ch from hook. The 7 skipped ch count as the first dc, a ch-2 sp and 2 skipped ch. Ch 2, sk 2 ch, dc in next ch. Repeat from * 38 more times.
You now have 41 dc and 40 ch-2 sps (121 sts), which makes 40 meshes.
Row 2: Ch 5 and turn. The ch 5 counts as a dc and ch 2. Dc in next dc. Ch 2, dc in next dc. Repeat from * 37 more times. Ch 2, then dc in the 5th of the beg 7 skipped ch, which is the top corner of the first mesh.
You now have 41 dc and 40 ch-2 sps.
Row 3: Ch 5 and turn. Dc in next dc. Ch 2, dc in next dc. Repeat from * 37 more times. Ch 2, then dc in the 3rd ch of the turning ch-5.
You now have 41 dc and 40 ch-2 sps.
Rows 4–91: Repeat Row 3. Each row keeps 41 dc and 40 ch-2 sps.
Keep every dc stacked directly above the dc below it, and keep the squares upright. Don’t fasten off yet.
Border
The border has 15 sc per 4 in (10.2 cm), which is 3 sc per 0.8 in (2.0 cm). That matches the mesh exactly in both directions:
- Across the top and bottom: 3 sts per mesh
- Along the sides: 3 sc per row end
Because the rates match, the edges lie flat with no ruffling or cupping.
Rnd 1 (cream): Ch 1 and turn so the RS is facing. You are at the top-right corner.
- Top: Sc in each dc and work 2 sc in each ch-2 sp, for 121 sc. Ch 2 for the corner.
- Left side: Work 3 sc in each row end, for 91 x 3 = 273 sc. Ch 2.
- Bottom: Work into the foundation ch. Sc in each ch at the base of a dc and work 2 sc in each ch-2 sp, for 121 sc. Ch 2.
- Right side: Work 273 sc as on the left side. Ch 2.
- Join to the first sc and fasten off.
In this round the corner ch-2 sps are not counted in the side totals. The round has 788 sc plus 4 corner ch-2 sps.
Rnd 2 (scallops on the sides and bottom): With the RS facing, join cream in the top-left corner ch-2 sp.
- Sc in the top-left corner sp.
- Left side: Sc in first sc. Sk 3, shell in next sc, sk 3, sc in next sc. Repeat from * 33 more times, for 34 scallops in total.
- Shell in the bottom-left corner sp.
- Bottom: Sc in first sc. Sk 3, shell in next sc, sk 3, sc in next sc. Repeat from * 14 more times, for 15 scallops.
- Shell in the bottom-right corner sp.
- Right side: Work 34 scallops as on the left side.
- Sc in the top-right corner sp and fasten off.
Why the math works: Each scallop uses 8 sts and ends with a sc. A side therefore needs 1 + (8 x the number of scallops) sts:
- Long sides: 1 + 8 x 34 = 273
- Bottom: 1 + 8 x 15 = 121
There are no leftover sts. Each scallop is about 2.1 in (5.3 cm) wide. Including the corner shells, the round has 85 shells and 88 sc.
The sc round adds 0.25 in (0.6 cm) and the shells add 0.75 in (1.9 cm), for a 1 in (2.5 cm) border. That gives a width of 32 + 1 + 1 = 34 in (86.4 cm).
Tabs
Work the tabs into the 121 top sc of Rnd 1, starting at the top-right corner with the RS facing. They go in this order (see the check after Row 24):
| Tab | Top sts |
|---|---|
| 1 | 1–9 |
| 2 | 29–37 |
| 3 | 57–65 (centered on st 61) |
| 4 | 85–93 |
| 5 | 113–121 |
Row 1: Join cream in the first st of the tab. Ch 1, then sc in the same st and the next 8 sts, for 9 sc.
Rows 2–24: Ch 1 and turn. Sc in each st across, for 9 sc.
Fasten off, leaving a 12 in (30.5 cm) tail. Skip the next 19 top sts and start the next tab.
Check: 5 tabs x 9 sts + 4 gaps x 19 sts = 121.
Each tab measures 2.4 in x 6 in (6.1 cm x 15.2 cm). Fold each one toward the WS and sew Row 24 behind the top edge. This leaves a 3 in (7.6 cm) loop that fits a rod up to 1.25 in (3.2 cm) across.
Tulip Appliqués (make 14 per panel)
Use the 4.0 mm hook for all appliqué pieces.
Bloom (dusty pink): Ch 6.
Row 1: Sc in 2nd ch from hook and each ch across, for 5 sc.
Row 2: Ch 1 and turn. Work 2 sc in the first st, sc to the last st, then 2 sc in the last st, for 7 sc.
Row 3: Repeat Row 2, for 9 sc.
Row 4: Repeat Row 2, for 11 sc.
Rows 5–12: Ch 1 and turn. Sc across, for 11 sc in each row.
Row 13 (petal points): Ch 1 and turn. Work these into sts 1 to 11, in order:
| St | Work | Shapes |
|---|---|---|
| 1 | sl st | edge |
| 2 | hdc | rise |
| 3 | (dc, ch 2, dc) | left petal tip |
| 4 | hdc | slope |
| 5 | sc | left valley |
| 6 | (dc, tr, ch 2, tr, dc) | center petal tip, the tallest |
| 7 | sc | right valley |
| 8 | hdc | slope |
| 9 | (dc, ch 2, dc) | right petal tip |
| 10 | hdc | slope |
| 11 | sl st | edge |
This gives 16 sts and 3 tip ch-2 sps.
Edging rnd: Ch 1 and work around the whole bloom:
- Top: Sc in each of the 16 sts and work (sc, ch 1, sc) in each tip sp, for 22 sc.
- Sides: Work 1 sc in each row end, for 13 sc per side.
- Bottom: 5 sc.
Join with a sl st. The round has 53 sc and 3 ch-1 tips. The bloom measures about 2.5 in x 3 in (6.4 cm x 7.6 cm).
Stem (sage): Ch 21. Sc in 2nd ch from hook and each ch across, for 20 sc. It measures 4 in (10.2 cm).
Leaf (sage, make 2 per tulip): Ch 14.
- First side: Sl st in 2nd ch from hook. Sc in next ch, hdc in next 2 ch, dc in next 5 ch, hdc in next 2 ch, sc in next ch, then work 3 sc in the last ch to round the base.
- Second side: Work into the opposite side of the foundation ch. Sc in next ch, hdc in next 2, dc in next 5, hdc in next 2, sc in next 1, sl st in next 1.
- Tip: Ch 2 and sl st in the first sl st.
The leaf has 27 sts plus a ch-2 tip. It is widest in the middle, comes to a point at the tip and measures about 3 in (7.6 cm) long.
Placement and Sewing
Lay the panel flat with the RS up and use pins to mark the layout.
Columns: Center one column on the 13th dc from the right edge and the other on the 13th dc from the left edge. Each column is 9.6 in (24.4 cm) in from its side of the body, and the columns are 12.8 in (32.5 cm) apart.
Rows: Place the stem bases on Rows 4, 16, 28, 40, 52, 64 and 76. That is a 12-row repeat of 9.6 in (24.4 cm), starting 2.4 in (6.1 cm) above the bottom of the body.
Each tulip:
1. Pin the stem straight up the column line.
2. Place each leaf base against the stem 1 in (2.5 cm) above the stem base. Angle the leaf so its tip sits 1.5 in (3.8 cm) out from the stem.
3. Place the bloom so it overlaps the top of the stem by 0.5 in (1.3 cm).
Each tulip stands 6.5 in (16.5 cm) tall. The top tulip ends near Row 84, which leaves 5.6 in (14.2 cm) of plain mesh below the tabs.
Sew each piece on with matching yarn, in this order: stem, then leaves, then bloom. Whipstitch through the outer loops of the appliqué and around the mesh bars. Weave the tails into the back of the appliqués so the WS stays tidy where it shows through the window.
Tieback (make 1 per panel)
With cream and the 5.0 mm hook, ch 91.
- Row 1: Sc in 2nd ch from hook and each ch across, for 90 sc.
- Row 2: Ch 1 and turn. Sl st in each st across.
The cord measures 24 in (61.0 cm).
To make the tassel, wrap cream 30 times around the 5 in (12.7 cm) card. Tie the loops at the top, wrap the neck, cut the bottom loops and trim.
Wrap the cord around the gathered panel, knot the ends together and sew the tassel to the knot.
Final Blocking
- Weave in all ends securely.
- Soak the panel in cool water for 10 minutes. Press the water out gently without wringing.
- Roll the panel in towels to remove extra water.
- Lay it flat and pin it out to 34 in x 74 in (86.4 cm x 188.0 cm).
- Line up the mesh squares with a measuring tape so the columns of dc run straight.
- Pin the tip of every scallop, spacing them evenly.
- Smooth the appliqués flat and shape the petal and leaf tips with your fingers.
- Let the panel dry completely before you unpin it.
Final Quality-Control Checklist
- [ ] Every row has 41 dc and 40 spaces.
- [ ] The body measures 32 in x 72.8 in (81.3 cm x 184.9 cm).
- [ ] Rnd 1 has 121 sc on the top and bottom and 273 sc on each side.
- [ ] There are 34 scallops on each side, 15 on the bottom and 2 corner shells.
- [ ] Five tabs are evenly spaced, each folded to a 3 in (7.6 cm) loop.
- [ ] Fourteen tulips are lined up in straight columns and evenly spaced.
- [ ] The second panel matches the first within 0.5 in (1.3 cm).
Troubleshooting
The mesh leans or skews: Check that you dc into the turning ch at the end of each row. Block it square.
The sides ruffle: You’re working too many sc per row end, or too loosely. Work exactly 3 per row end.
The sides pull in: Go up 0.5 mm in hook size for Rnd 1 only.
Scallops won’t fit the side: Recount Rnd 1. Each side must be 273 sts, and the bottom must be 121.
The bloom petal tips curl: Steam them lightly and pin them flat while they dry.
The panels hang at different lengths: Compare the row counts. Block the shorter panel slightly longer.
Care
Hand wash in cool water with a mild detergent and dry flat. Don’t hang the panels to dry while wet, because the weight of the water will stretch the mesh.
Final Notes
Here is the measurement chain:
- Each mesh is 0.8 in (2.0 cm).
- 40 meshes by 91 rows gives a body of 32 in x 72.8 in (81.3 cm x 184.9 cm).
- A 1 in (2.5 cm) scalloped border brings the width to 34 in (86.4 cm) and the length to about 74 in (188.0 cm).
- Tabs that fold to 3 in (7.6 cm) bring the total height to 77 in (195.6 cm).
If your swatch matches the gauge, every count in this pattern will come out right. Happy crocheting!