

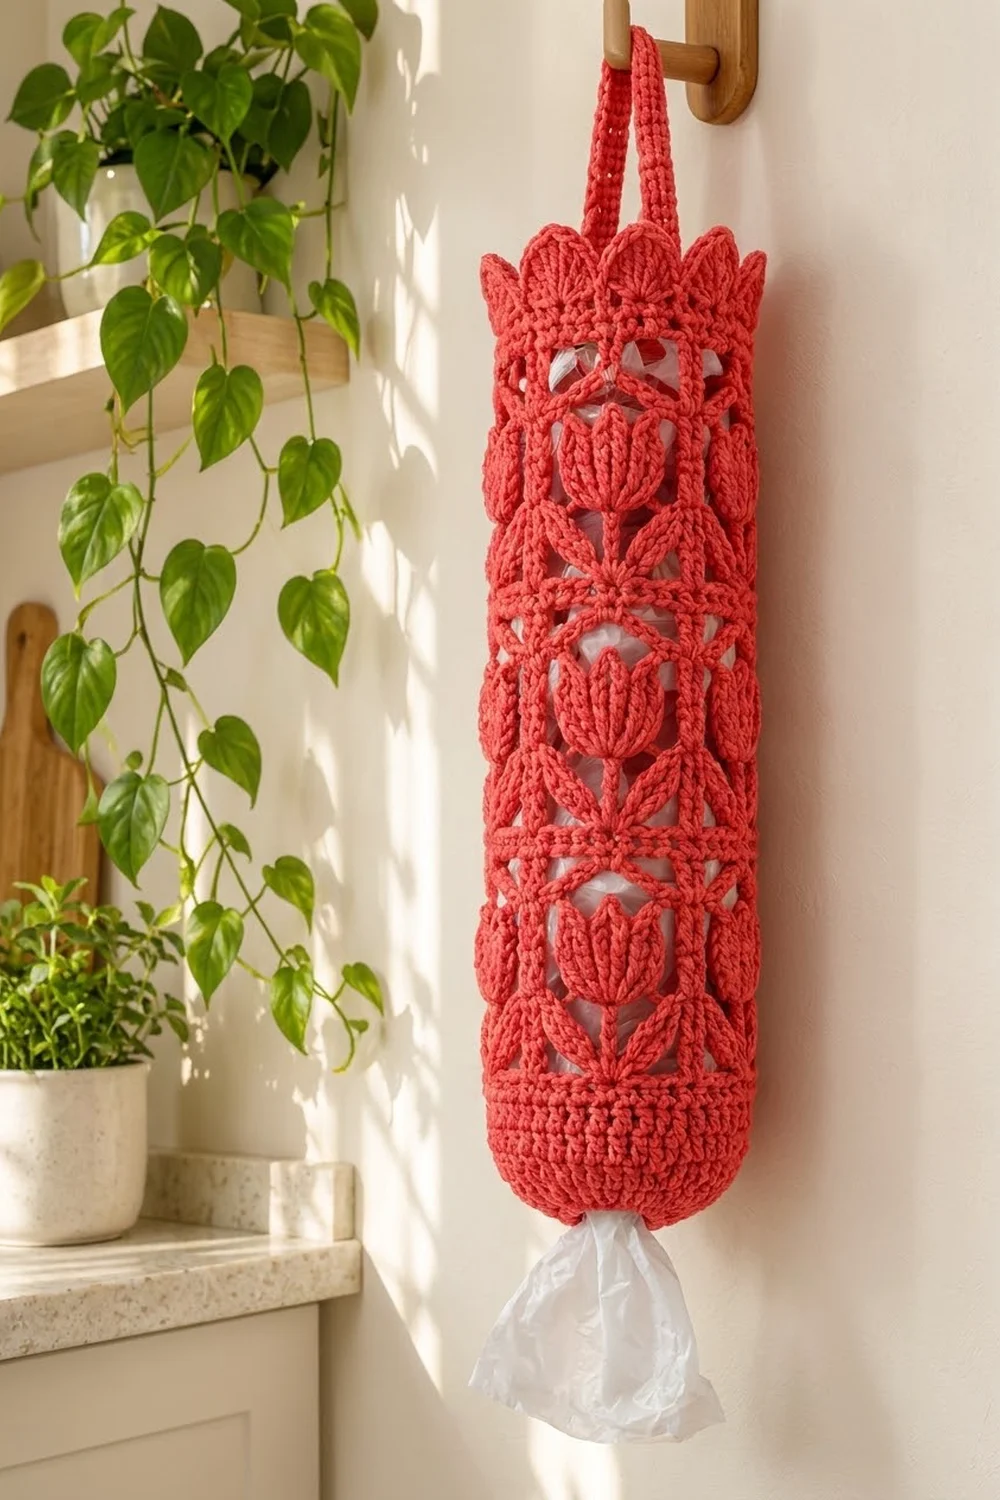
This tulip lattice bag holder turns a pile of loose grocery bags into a tidy piece of kitchen decor. It is one long tube, worked in the round in a single coral red cotton, with rows of openwork tulips framed by straight vertical and horizontal bars.
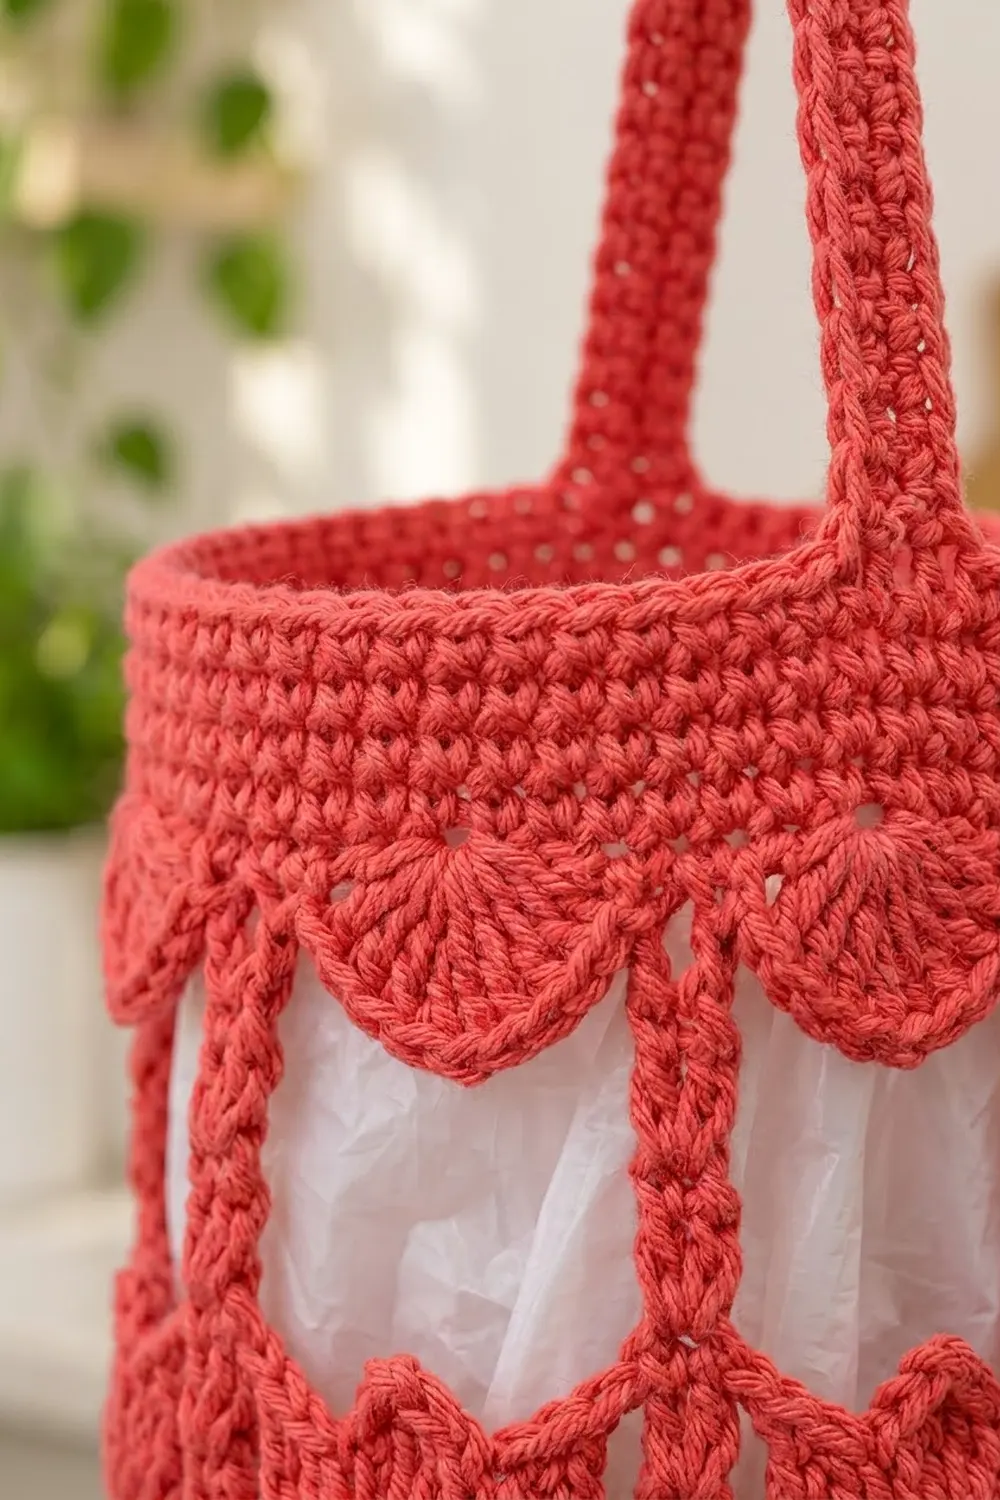
Each tulip has a three-petal head, a straight stem, and two pairs of pointed leaves that fan out toward the frame. The bottom is a solid, gently domed base with a small opening for pulling bags out. The top finishes with a band of petal scallops and a hanging strap.
The pattern uses US crochet terms. The finished holder measures 16 in (40.6 cm) around, 8 in (20.3 cm) wide when flattened, and 18.75 in (47.6 cm) long from the base to the scallop tips. The strap adds a loop about 3.5 in (8.9 cm) tall.
You start at the bag opening and work outward to form the base. Then you build four tiers of tulips, add a top bar and the scalloped trim, and finish with a strap worked straight off the top edge. There are no separate parts to sew together.
Finished Size and Construction
- Finished size: 16 in (40.6 cm) circumference, 8 in (20.3 cm) flat width, 18.75 in (47.6 cm) long, plus a 3.5 in (8.9 cm) strap loop
- Skill level: Intermediate
- Terminology: US crochet terms
- Yarn weight: Worsted (#4) cotton
- Hook: 5.0 mm (H-8)
- Number of pieces: 1 (worked in one continuous piece)
- Layout: 4 tulip panels around × 4 tulip tiers high
- Panel size: 16 stitches, 4 in (10.2 cm) wide × 3.75 in (9.5 cm) tall per tier
- Size before top trim: 16 in (40.6 cm) around × 17.5 in (44.5 cm) long
- Top trim depth: 1.25 in (3.2 cm)
Materials
Choose a smooth worsted-weight cotton or cotton blend. Cotton holds the lattice shape, does not stretch much under the weight of bags, and washes well. Avoid fuzzy or splitty yarns, because the tulips and clusters need clear stitch definition.
- Coral Red: 180 g, about 306 m (based on 85 m per 50 g)
This amount includes a margin of roughly 20% for your gauge test and small differences in tension.
Tools:
- 5.0 mm (H-8) crochet hook
- Tapestry needle
- Stitch marker
- Measuring tape
- Rust-proof pins
- A rolled towel or tube about 5 in (12.7 cm) across, for blocking
- Spray bottle
Abbreviations (US Terms)
- ch – chain
- sl st – slip stitch
- sc – single crochet
- dc – double crochet
- tr – treble crochet
- inc – 2 sc in the same stitch
- sk – skip
- sp – space
- st(s) – stitch(es)
- FLO / BLO – front loop only / back loop only
- Rnd – round
Special stitches:
- Leaf (4-tr cluster): *Yo twice, insert hook in indicated st, yo and pull up a loop, [yo, pull through 2 loops] twice; repeat from * 3 more times in the same st (5 loops on hook), yo and pull through all 5 loops.
- Petal (3-tr cluster): Work as for Leaf, but repeat from * only 2 more times (4 loops on hook), yo and pull through all 4 loops.
- Shell: (2 dc, 2 tr, ch 1, 2 tr, 2 dc) in the same st.
In every round, a Leaf or Petal counts as 1 stitch. In the panel counts below, each chain counts as 1 stitch position.
Gauge and Checkpoints
Gauge: 16 sc and 17 sc rounds = 4 in (10.2 cm). 16 dc and 8 dc rounds = 4 in (10.2 cm). One tr round is about 0.75 in (1.9 cm) tall.
Test before you commit. Work the base through Rnd 13, then one full tulip tier. That is your test piece. If it measures correctly, keep going.
Checkpoints:
- After Rnd 7: base disc about 4.5 in (11.4 cm) across, slightly cupped
- After Rnd 13: 16 in (40.6 cm) around; base about 2 in (5.1 cm) tall when flattened
- After Tier 1 (Rnd 19): 5.75 in (14.6 cm) long
- After Tier 2 (Rnd 25): 9.5 in (24.1 cm) long
- After Tier 4 (Rnd 37): 17 in (43.2 cm) long
- After Rnd 38: 17.5 in (44.5 cm) long
If your piece is too big: go down to a 4.5 mm hook. If it is too small: go up to a 5.5 mm hook. Being 0.5 in (1.3 cm) off in circumference is fine. Any more and the holder will be baggy, or too tight for a full load of bags.
Base
The base starts at the bag opening and grows outward.
Foundation: Ch 12, sl st in first ch to form a ring.
Rnd 1: Ch 1, work 16 sc into the ring, sl st to first sc. (16 sc) The opening is about 1 in (2.5 cm) across.
Rnd 2: Ch 1, *sc in next st, inc; repeat from * 8 times, sl st to first sc. (24 sc)
Rnd 3: Ch 1, *sc in next 2 sts, inc; repeat from * 8 times, join. (32 sc)
Rnd 4: Ch 1, *sc in next 3 sts, inc; repeat from * 8 times, join. (40 sc)
Rnd 5: Ch 1, *sc in next 4 sts, inc; repeat from * 8 times, join. (48 sc)
Rnd 6: Ch 1, *sc in next 5 sts, inc; repeat from * 8 times, join. (56 sc)
Rnd 7: Ch 1, *sc in next 6 sts, inc; repeat from * 8 times, join. (64 sc)
The disc will cup slightly. This is intended, because it creates the domed bottom.
Rnds 8–13: Ch 1, sc in each st around, join. (64 sc)
Place a marker in the joining st. This is position 1 of Panel 1 for every round that follows.
Tulip Tiers
The body has 4 panels around. Each panel is 16 positions wide. Position 1 is the vertical bar, position 9 is the stem, and the rest of the panel mirrors around the stem. Every round totals 64 positions (4 × 16).
Work into the chains themselves, not around the chain spaces. This keeps every position stacked and the bars straight.
Each tier is 6 rounds (A–F). Work Tier 1 as Rnds 14–19, Tier 2 as Rnds 20–25, Tier 3 as Rnds 26–31, and Tier 4 as Rnds 32–37.
Rnd A (horizontal bar): Ch 3 (counts as dc), dc in each st and ch around, sl st to top of ch-3. (64 dc)
Rnd B (lower leaves): Ch 4 (counts as tr). *Ch 5, sk next 5 sts, Leaf in next st, ch 1, sk 1, tr in next st (stem), ch 1, sk 1, Leaf in next st, ch 5, sk 5**, tr in next st (bar); repeat from * around, ending last repeat at **, sl st to top of ch-4. (Per panel: 1 tr + 5 ch + Leaf + 1 ch + 1 tr + 1 ch + Leaf + 5 ch = 16; 64 total)
Rnd C (upper leaves): Ch 4 (counts as tr). *Ch 3, Leaf in 4th ch of ch-5, ch 3, tr in stem tr, ch 3, Leaf in 2nd ch of next ch-5, ch 3**, tr in bar tr; repeat from * around, ending at **, join. (Per panel: 1 + 3 + 1 + 3 + 1 + 3 + 1 + 3 = 16; 64 total)
The upper leaves sit two positions farther out than the lower ones, so each pair fans outward in a V.
Rnd D (tulip base): Ch 3 (counts as dc). *Ch 5, dc in 2nd and 3rd ch of next ch-3, dc in stem tr, dc in 1st and 2nd ch of next ch-3, ch 5**, dc in bar tr; repeat from * around, ending at **, join. (Per panel: 1 + 5 + 5 dc + 5 = 16; 64 total)
Rnd E (petals): Ch 4 (counts as tr). *Ch 5, Petal in 1st dc of 5-dc group, ch 1, sk 1 dc, Petal in 3rd dc, ch 1, sk 1 dc, Petal in 5th dc, ch 5**, tr in bar dc; repeat from * around, ending at **, join. (Per panel: 1 + 5 + 3 Petals + 2 ch + 5 = 16; 64 total)
Rnd F (tulip top): Ch 3 (counts as dc). *Ch 6, sc in ch-1 sp, sc in center Petal, sc in next ch-1 sp, ch 6**, dc in bar tr; repeat from * around, ending at **, join. (Per panel: 1 + 6 + 3 sc + 6 = 16; 64 total)
The two outer petals stay free under the ch-6 spans, which gives the tulip its open, pointed head.
Tier height: 3 dc-height rounds × 0.5 in (1.3 cm) + 3 tr rounds × 0.75 in (1.9 cm) = 3.75 in (9.5 cm).
After Rnd 37, work one more Rnd A as Rnd 38 to close the last tier. (64 dc)
Top Trim (Border)
Border gauge: One scallop repeat is 8 sts and 2 in (5.1 cm) wide. The scallops stand about 1 in (2.5 cm) tall.
Rnd 39: Ch 1, sc in each st around, join. (64 sc; 32 sc per flattened side)
Rnd 40 (FLO): Working in front loops only, ch 1, *sc in next st, sk 3, Shell in next st, sk 3; repeat from * 8 times, sl st to first sc. (8 sc + 8 Shells; 72 sts + 8 ch-1 sps; 4 scallops per flattened side) Fasten off.
Why the math works: 64 divides by 16 for the panels and by 8 for the scallops, so each panel carries exactly 2 scallops. The round starts at position 1, so the sc of each repeat lands over a bar (positions 1, 17, 33, 49) or a stem (9, 25, 41, 57), with the Shells in between. Working in FLO leaves the back loops of Rnd 39 free for the strap.
Strap
You work the strap into the free back loops of Rnd 39 at the back of the holder. With Panel 1 facing you, the back half is sts 33–64.
Row 1: Join yarn in the free back loop of st 43, ch 1, sc in back loops of sts 43–46. (4 sc)
Rows 2–34: Ch 1, turn, sc in each st across. (4 sc)
The strap is now 8 in (20.3 cm) long and 1 in (2.5 cm) wide. Without twisting it, bring Row 34 down behind the scallops and hold it against the free back loops of sts 51–54. Sl st through each strap st and its matching back loop (4 sl st). Fasten off.
The two legs sit 4 sts, or 1 in (2.5 cm), apart and are centered at the back. The loop rises about 3.5 in (8.9 cm) above the scallops.
Final Blocking
- Weave in all ends along the vertical bars, where they hide best.
- Soak the holder in cool water for 10 minutes, then gently press out the water in a towel. Do not wring.
- Slide the holder over a rolled towel or tube about 5 in (12.7 cm) across.
- Line up the vertical bars so they run straight from base to top.
- Pat each tulip into shape: open the outer petals and point the leaves outward.
- Pin each scallop open so the tips point up.
- Check the length: 18.75 in (47.6 cm) from base to scallop tips.
- Let it dry completely before you take it off the form.
Final Quality-Control Checklist
- Circumference is 16 in (40.6 cm), within 0.5 in (1.3 cm)
- Every round holds 64 positions and no tulip has shifted sideways
- All 16 tulips (4 around × 4 high) have three petals and two leaf pairs
- Vertical bars run in straight lines, not spirals
- Base opening is round and about 1 in (2.5 cm) across
- 8 scallops are evenly spaced, 4 per flattened side
- Strap is untwisted and firmly attached at both legs
- All ends are secured and hidden
Troubleshooting
Bars drift sideways: You are working into the chain spaces instead of the chains. Work into each chain so every position stacks.
Tulips look flat: Your clusters are too loose. Pull each loop up to the same height and close the cluster firmly.
Tiers are too short: Your tr stitches are compact. Make sure you yarn over twice for every tr and every cluster leg.
Base ruffles: Your sc is loose. Go down half a hook size for Rnds 1–13 only.
Base pulls in too much: Your sc is tight. Go up half a hook size for Rnds 1–13 only.
Scallops curl inward: Pin them open when blocking, and check that Rnd 40 was worked in FLO.
Strap stretches: Add a row of sl st along each long edge of the strap.
Care
Hand wash, or machine wash on a cool, gentle cycle, then lay flat to dry and reshape the tulips while damp. Do not tumble dry, because cotton can shrink and distort the lattice.
Final Notes
The measurement chain is simple: 16 sts per panel × 4 panels = 64 sts = 16 in (40.6 cm) around. The base adds 2 in (5.1 cm), four tiers at 3.75 in (9.5 cm) each add 15 in (38.1 cm), the top bar adds 0.5 in (1.3 cm), and the trim adds 1.25 in (3.2 cm). That makes 18.75 in (47.6 cm) in total. Check your gauge on the first tier and the rest will follow.
Happy crocheting!