

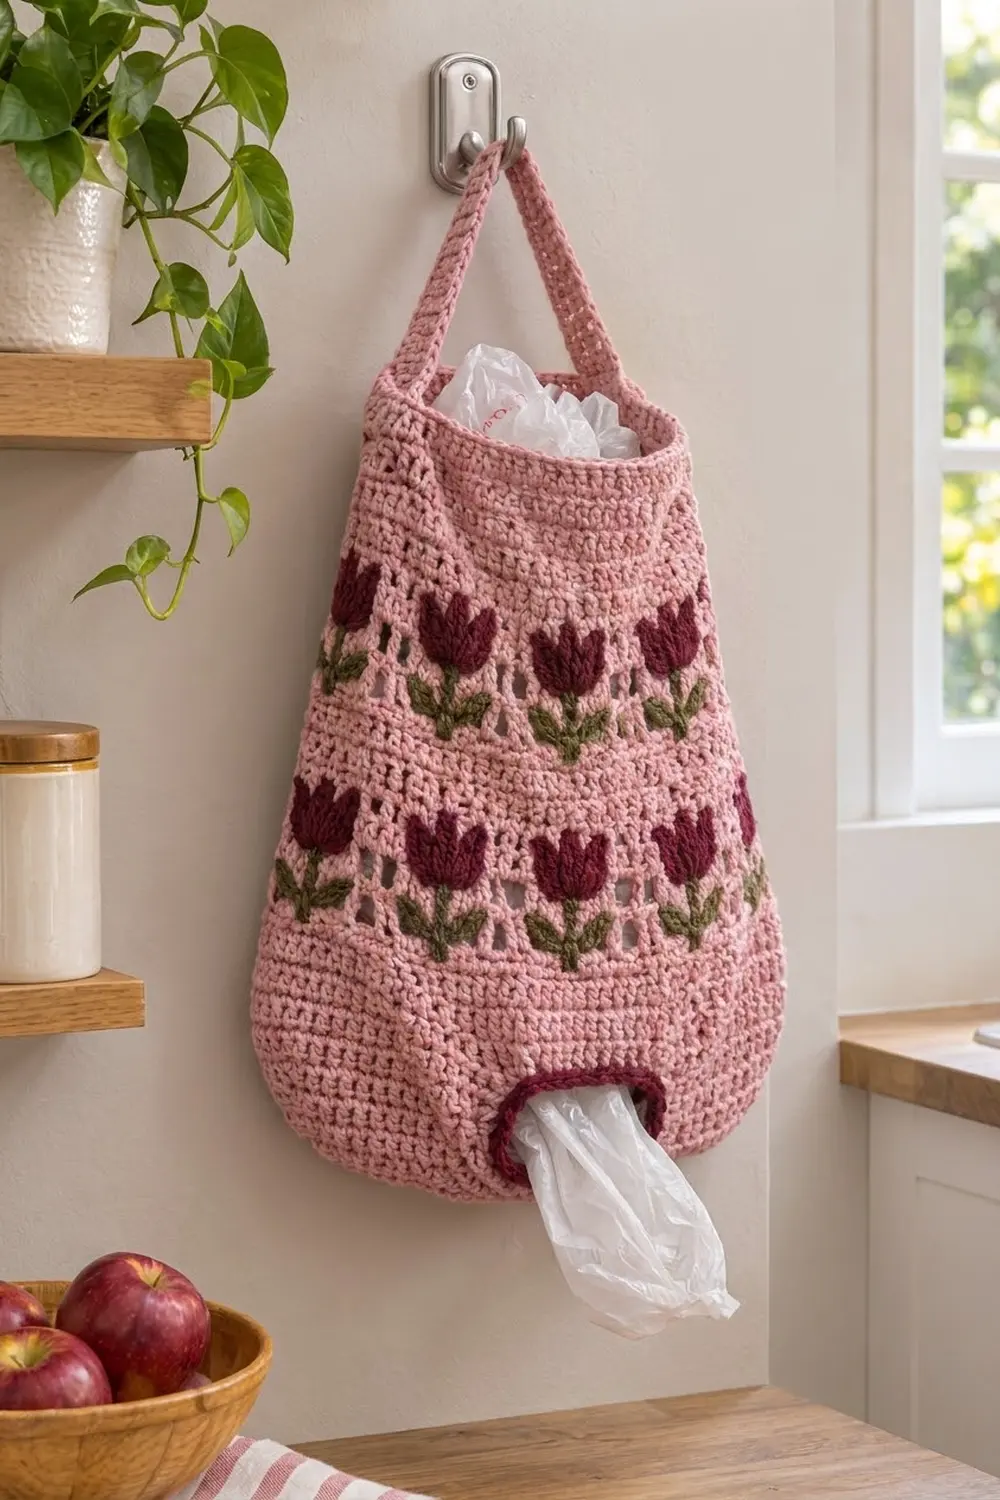
This bag holder keeps the plastic-bag pile in your kitchen under control and looks good while it does it. A tapered dusty-rose body hangs from a single strap. You stuff bags in at the top and pull them out one at a time through a burgundy-trimmed opening near the bottom.
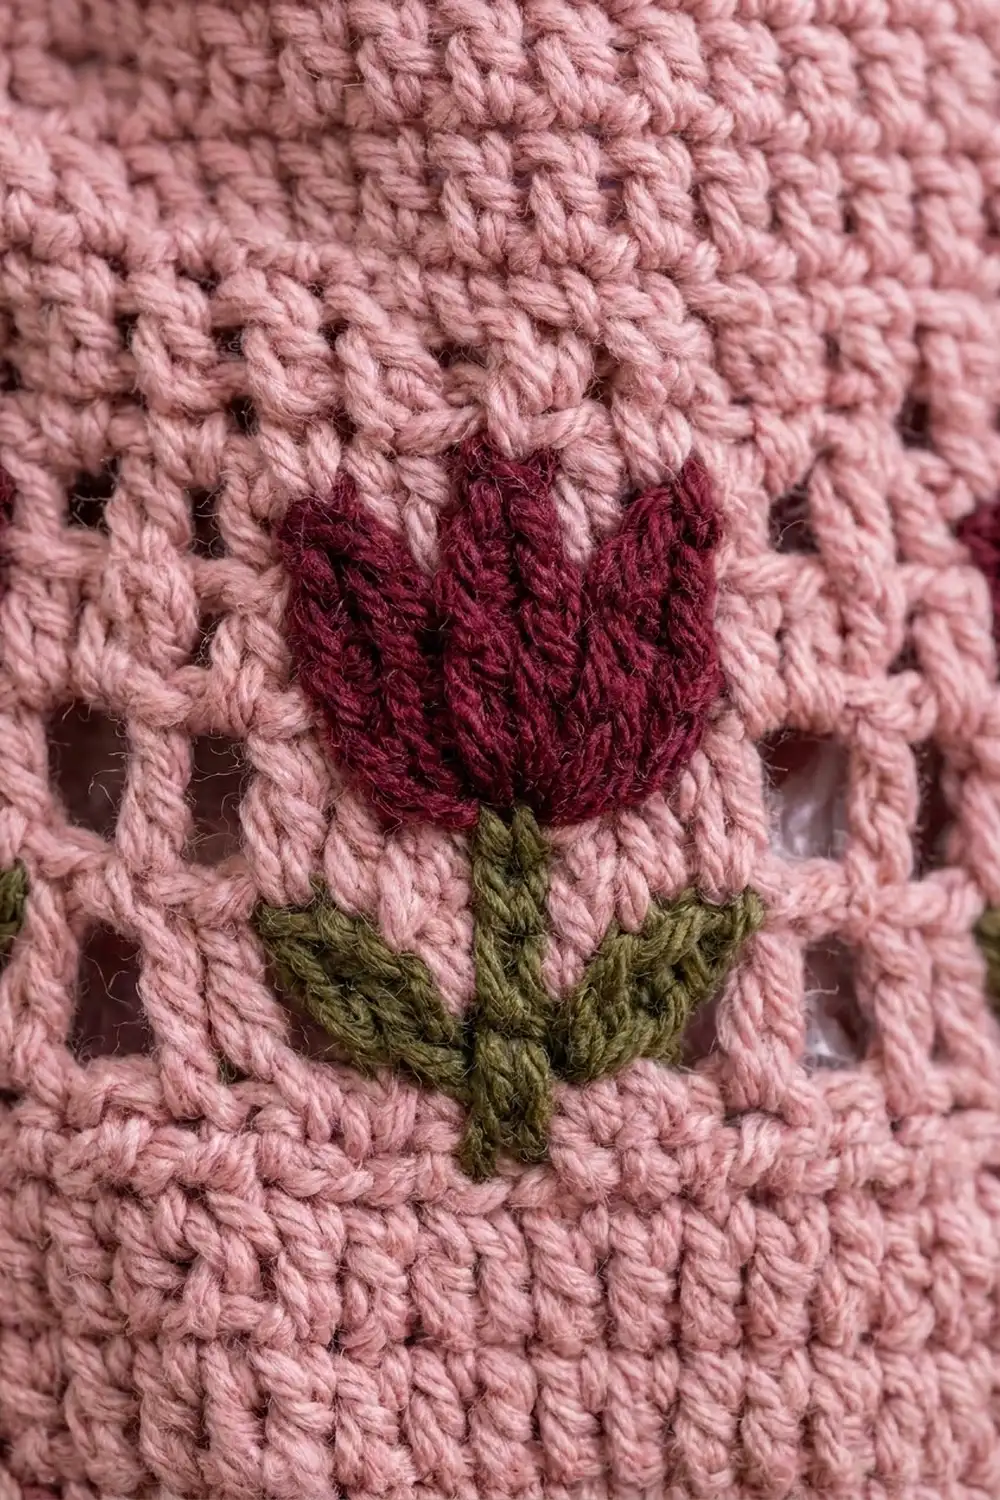
The design uses three colors. Dusty rose is the main fabric, deep burgundy is used for the tulip heads and the opening trim, and olive green is used for the stems and leaves. Two bands of tulips sit between open mesh rows, which gives the bag a light cottage-garden look.
The pattern uses US crochet terms. The finished bag measures about 12.5 in (31.8 cm) wide at the base and 10 in (25.4 cm) wide at the top when flattened. The body is about 11 in (27.9 cm) tall, and a 14 in (35.6 cm) strap is added on top.
You start with an oval base. The body is then worked upward in joined rounds, with the dispenser opening built in, two decrease rounds for the taper, and mesh rounds for texture. Next you work the strap from the top edge and join it to the opposite side. The tulips are embroidered on at the end, and the edges are trimmed.
Finished Size and Construction
- Finished size: 12.5 in (31.8 cm) wide at the base, 10 in (25.4 cm) wide at the top, 11 in (27.9 cm) tall body
- Skill level: Intermediate
- Terminology: US
- Yarn weight: Worsted (#4)
- Hook: 5.0 mm (H-8)
- Number of pieces: 1 (base, body and strap are worked as one continuous piece)
- Layout: Single piece; no joining layout
- Base size: 10.75 in x 3 in (27.3 cm x 7.6 cm)
- Size before border: Top edge 10 in (25.4 cm) flat; opening 3.5 in (8.9 cm) wide
- Border depth: About 0.25 in (0.6 cm) on the top edges and strap; 2 rounds of trim on the opening
Materials
Use a worsted-weight cotton or cotton blend. Cotton holds its shape when the bag is full, and it doesn’t stretch as much as acrylic. Smooth yarn shows the mesh rows and the embroidery best.
- Dusty rose (MC): 250 g / 450 m
- Burgundy (CC1): 20 g / 36 m
- Olive green (CC2): 15 g / 27 m
Tools:
– 5.0 mm (H-8) crochet hook
– Tapestry needle
– 4 locking stitch markers
– Scissors
– Measuring tape
– Pins and a spray bottle for blocking
These quantities include a margin of about 15% for your gauge swatch and any small differences in tension.
Abbreviations (US Terms)
- ch – chain
- sl st – slip stitch
- sc – single crochet
- dc – double crochet
- sc2tog – single crochet 2 together
- BLO – back loop only
- sp – space
- st(s) – stitch(es)
- rnd – round
- inc – 2 sc in the same st
Special stitch – lazy daisy (embroidery): Bring the needle up at the base of the leaf. Insert it back into the same hole, leaving a small loop on the surface. Bring the needle up at the tip of the leaf, inside the loop, and then go down just outside the loop to tack it in place.
Gauge and Checkpoints
Gauge: 16 sc x 18 rnds = 4 in (10.2 cm) in sc worked in the round.
The base is your test piece. Work it first and measure it before you commit to the body.
- After Rnd 1: about 8.5 in (21.6 cm) long
- After Rnd 6: 10.75 in x 3 in (27.3 cm x 7.6 cm), with a total of 100 sts
- After Rnd 16: about 2.25 in (5.7 cm) of body above the base, and 12.5 in (31.8 cm) wide when flattened
- After Rnd 30: about 6 in (15.2 cm) of body, and 10 in (25.4 cm) wide when flattened
- After Rnd 51: about 11 in (27.9 cm) of body
If your base comes out larger than this, go down to a 4.5 mm hook. If it comes out smaller, go up to a 5.5 mm hook. Change the hook rather than the stitch counts, because the tulip spacing depends on those counts.
Base
Work in joined rnds. Do not turn. Ch 1 at the start of each rnd does not count as a stitch. Join each rnd with a sl st to the first sc.
With MC, ch 35.
Rnd 1: 3 sc in the 2nd ch from the hook, sc in the next 32 ch, 3 sc in the last ch. Rotate the work and sc in the remaining loop of the next 32 ch. Join. (70 sts: 3 end + 32 side + 3 end + 32 side)
Rnd 2: Ch 1, [inc in each of the next 3 sts, sc in the next 32] twice. Join. (76 sts)
Rnd 3: Ch 1, [(sc in the next st, inc) 3 times, sc in the next 32] twice. Join. (82 sts)
Rnd 4: Ch 1, [(sc in the next 2 sts, inc) 3 times, sc in the next 32] twice. Join. (88 sts)
Rnd 5: Ch 1, [(sc in the next 3 sts, inc) 3 times, sc in the next 32] twice. Join. (94 sts)
Rnd 6: Ch 1, [(sc in the next 4 sts, inc) 3 times, sc in the next 32] twice. Join. (100 sts: 18 end + 32 side + 18 end + 32 side)
Each rnd adds 6 sts, which keeps the base flat. Check it against the Rnd 6 checkpoint now.
Body
Rnd 7 (turning round): Ch 1, sc in BLO of each st around. Join. (100 sts)
This rnd forms the crisp fold where the base turns up into the sides.
Rnds 8–9: Ch 1, sc in each st around. Join. (100 sts)
Rnd 10 (opening): Ch 1, sc in the next 27 sts, ch 14, skip the next 14 sts, sc in the next 59 sts. Join. (86 sc + 14 ch = 100 sts)
The 14 skipped sts are centered on the first 32-st long side: 9 sts, then 14 skipped, then 9 sts. That side becomes the front of the bag.
Rnd 11: Ch 1, sc in the next 27 sts, sc in each of the 14 ch, sc in the next 59 sts. Join. (100 sts)
Rnds 12–16: Ch 1, sc in each st around. Join. (100 sts)
Rnd 17 (mesh): Ch 4 (counts as dc + ch 1), skip the next st, dc in the next st, ch 1, skip the next st; rep from * around. Join with a sl st to the 3rd ch of the beginning ch-4. (50 dc + 50 ch-1 sps = 100 sts)*
Rnd 18 (decrease): Ch 1, treating each dc and each ch-1 sp as one st, [sc in the next 8, sc2tog] 10 times. Join. (90 sts)
Rnds 19–26 (Tulip Band 1): Ch 1, sc in each st around. Join. (90 sts, 8 rnds)
Rnd 27 (mesh): Work as Rnd 17. (45 dc + 45 ch-1 sps = 90 sts)
Rnd 28: Ch 1, sc in each dc and each ch-1 sp around. Join. (90 sts)
Rnd 29 (mesh): Work as Rnd 17. (45 dc + 45 ch-1 sps = 90 sts)
Rnd 30 (decrease): Ch 1, treating each dc and each ch-1 sp as one st, [sc in the next 7, sc2tog] 10 times. Join. (80 sts)
Rnds 31–38 (Tulip Band 2): Ch 1, sc in each st around. Join. (80 sts, 8 rnds)
Rnd 39 (mesh): Work as Rnd 17. (40 dc + 40 ch-1 sps = 80 sts)
Rnd 40: Ch 1, sc in each dc and each ch-1 sp around. Join. (80 sts)
Rnds 41–51: Ch 1, sc in each st around. Join. (80 sts)
Fasten off. The body should now measure about 11 in (27.9 cm) tall.
Strap
Flatten the bag so the opening is centered on the front. Place a marker at each side fold, then mark 6 sts centered on each fold. The top edge now divides into 6 side sts + 34 front sts + 6 side sts + 34 back sts = 80 sts.
Row 1: Join MC in the first marked st on the right side. Ch 1, sc in the same st and in the next 5 sts. (6 sts)
Rows 2–63: Ch 1, turn, sc in each st across. (6 sts)
The strap should measure 14 in (35.6 cm). Lay it over the top of the bag without twisting it. Then sl st the 6 sts of Row 63 to the 6 marked sts on the left side, one to one. Fasten off.
Tulip Embroidery
Cut lengths of CC1 and CC2 and use them doubled in the tapestry needle. Number the rnds of each band 1–8 from the bottom.
Placement: Band 1 has 90 sts, so space its tulips 9 sts apart (10 tulips). Band 2 has 80 sts, so space its tulips 8 sts apart (10 tulips). Center one tulip in each band directly above the middle of the opening, then count outward from there.
Stem (CC2): Backstitch straight up one st column from the bottom of band rnd 2 to the top of band rnd 4. That is about 0.75 in (1.9 cm).
Leaves (CC2): Work one lazy daisy on each side of the stem at band rnd 3. Angle each leaf up and outward so it spans about 1.5 sts.
Head (CC1): Satin-stitch the head over 3 sts. Bring the side strands from the top of rnd 4 to the top of rnd 6. Bring the center strands from the top of rnd 4 to the top of rnd 7. Add one short slanted stitch at each outer top corner to sharpen the three petal points. Leave band rnd 8 plain.
Each head is about 0.75 in (1.9 cm) wide. Weave in all ends on the inside.
Border
Border gauge: 4 sc = 1 in (2.5 cm) along every edge, the same as the body gauge.
Top Edge and Strap (MC)
The joined strap divides the top into two closed edge loops: one for the front and one for the back.
Rnd 1 (each loop): Join at one strap base. Sc in each of the 34 top-edge sts, then work up the strap. Work 1 sc in each of 8 row ends and skip the 9th, 7 times, for 56 sc. Join. (34 + 56 = 90 sts)
Rnd 2: Sl st loosely in each sc. Fasten off. (90 sts)
Repeat both rnds on the second loop.
Why the math works: The strap is 63 rows at 18 rows per 4 in, which is 14 in (35.6 cm). At 4 sc per inch, 14 in needs 56 sc, and working 8 sc for every 9 row ends gives exactly 56. The top edge already holds its own 34 sts, so you add nothing extra there, and the edge stays flat with no ruffling.
Opening Trim (CC1)
Rnd 1: Join CC1 at one corner of the opening. Work 14 sc into the free tops of the skipped Rnd 9 sts, 2 sc in the side gap, 14 sc into the underside of the Rnd 10 chains, and 2 sc in the other side gap. Join. (32 sts)
Rnd 2: Sl st in each sc around. Fasten off. (32 sts)
The 14 + 14 sts match the 14 skipped sts and the 14 chains exactly. The 2 sc at each end round the corners into an oval about 3.5 in x 1.5 in (8.9 cm x 3.8 cm).
Final Blocking
- Lightly mist the whole bag with water.
- Stuff it with a towel to shape the taper.
- Flatten the base into a smooth oval, 10.75 in x 3 in (27.3 cm x 7.6 cm).
- Check the widths: 12.5 in (31.8 cm) at the bottom and 10 in (25.4 cm) at the top.
- Pin the opening into an even oval.
- Hang the strap straight and let it dry.
- Steam the tulip heads lightly so the satin stitches lie flat.
- Let everything dry completely before you hang the bag up.
Final Quality-Control Checklist
- Base Rnd 6 = 100 sts, and the base lies flat
- Rnd 18 = 90 sts and Rnd 30 = 80 sts
- Every mesh rnd has evenly spaced windows
- The opening is centered on the front, and the trim = 32 sts
- The strap has 63 rows, is untwisted, and is attached at the side folds
- 10 tulips in each band, with one centered over the opening
- Each border loop = 90 sts
- All ends are woven in on the inside
Troubleshooting
The base cups: Your tension is tight. Go up a hook size for the base, or check that you have 6 increases per rnd.
The base ruffles: Your tension is loose. Go down a hook size.
The opening sits off-center: The round start drifted. Recount from the Rnd 6 structure and reposition the chain on Rnd 10.
The mesh looks stretched: Keep each ch-1 snug and match its height to the dc.
The strap twists: Lay it flat before joining, and check that the Row 1 and Row 63 edges face the same way.
The embroidery puckers: Loosen your stitches and use shorter lengths of yarn.
Care
Hand wash in cool water and lay flat to dry. If the bag stretches out of shape, reshape it while it’s damp.
Final Notes
Here is the measurement chain:
- A 100-st base gives 12.5 in (31.8 cm) of flattened width.
- Two 10-st decrease rnds taper the body to 90 sts and then 80 sts, ending at 10 in (25.4 cm).
- 41 sc rnds and 4 mesh rnds build 11 in (27.9 cm) of height.
- The 63-row strap matches 56 border sc for a flat 14 in (35.6 cm) edge.
- A 14-st opening becomes a neat 32-st burgundy oval.
If your base checkpoint matches, everything after it will fall into place. Happy crocheting!