

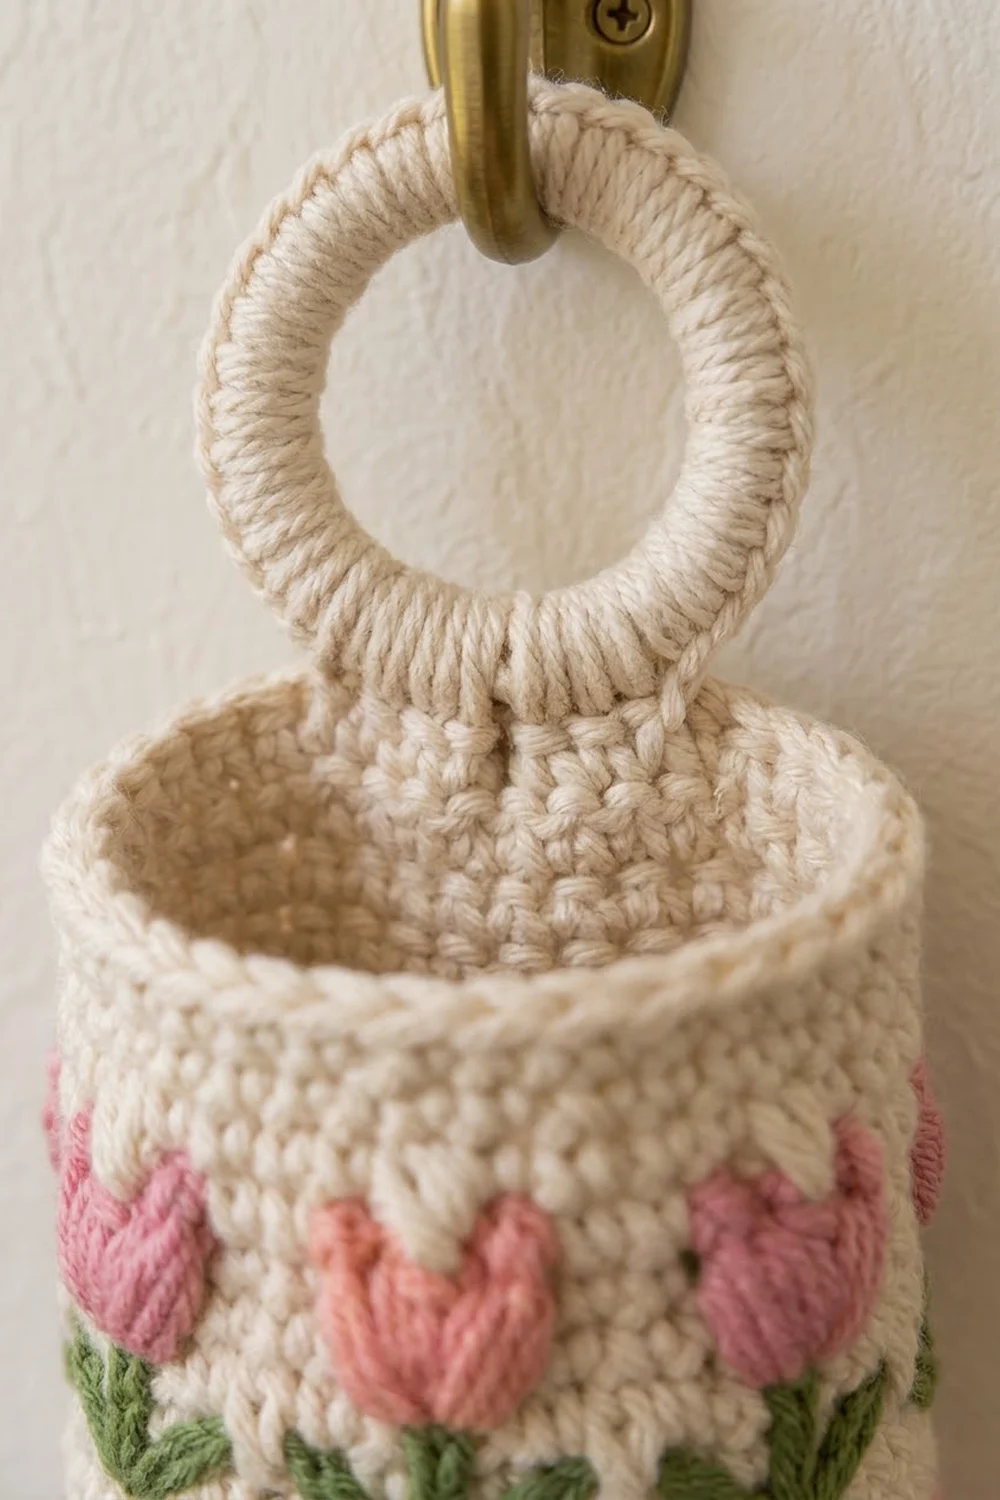
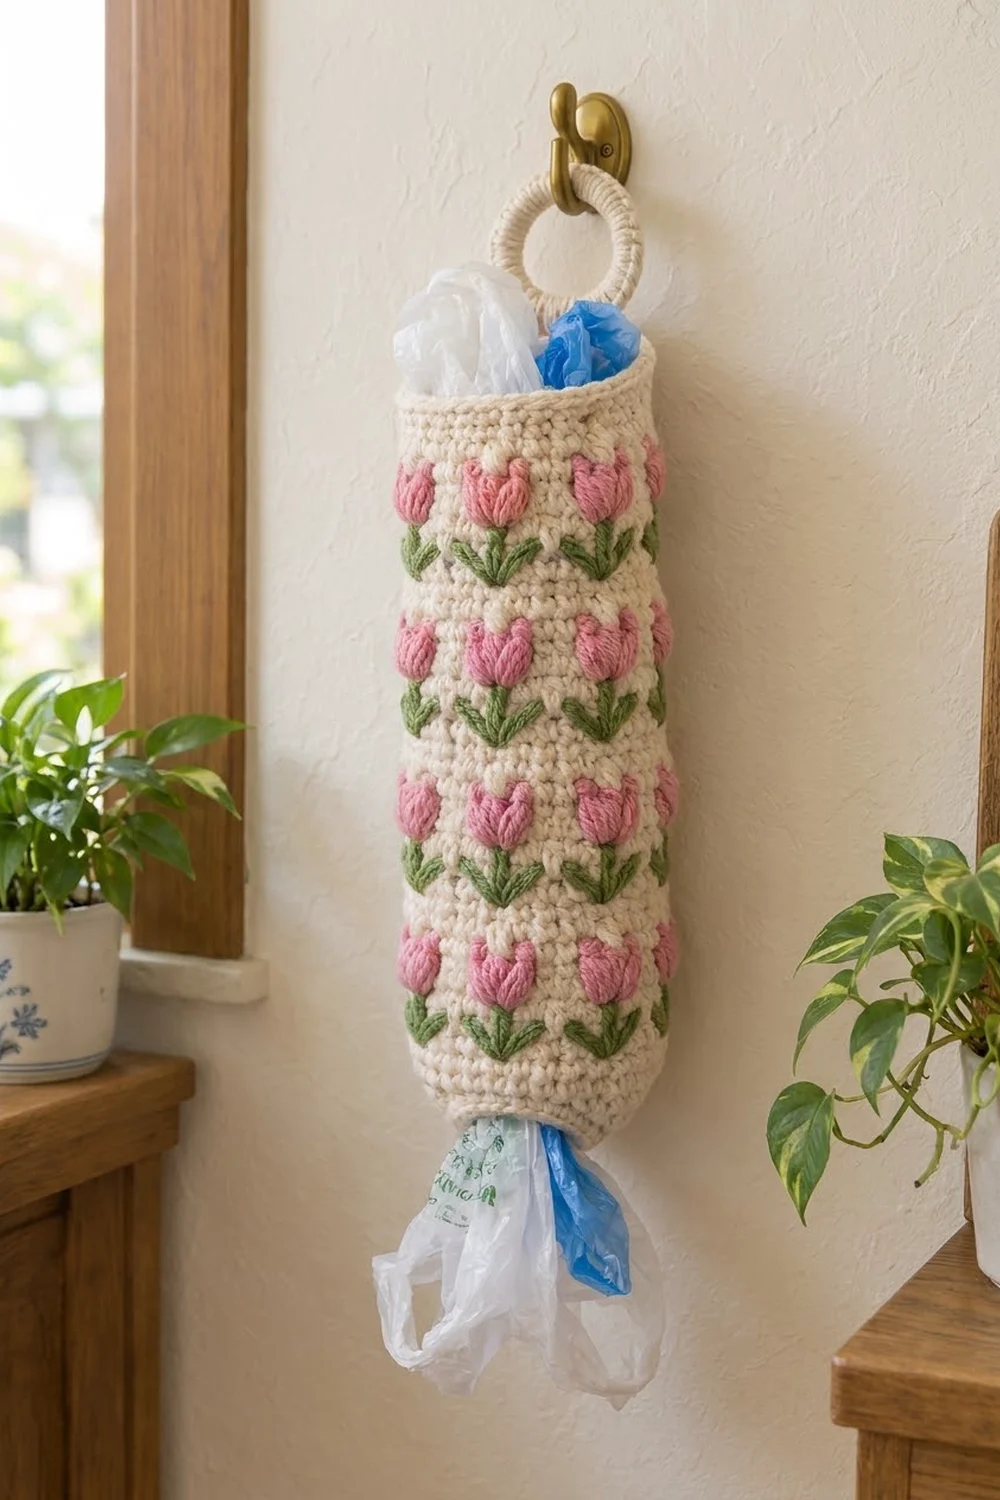
This grocery bag holder is a soft cream tube covered in neat rows of pink tulips. Each tulip has a plump three-petal head, a straight green stem, and two small leaves that open into a V. A covered ring at the top hangs it from any wall hook. You push plastic bags in at the top and pull them out one at a time from the narrower opening at the bottom.
The palette is simple: a warm cream body, medium pink tulip heads, and moss-green stems and leaves. The style is cottage-kitchen and practical. The tight single crochet fabric holds its shape, and the raised embroidered tulips give it a hand-stitched, folk-art finish. For a second holder, swap the pink for purple and keep everything else the same.
This pattern uses US crochet terms. The finished holder measures 6 in (15.2 cm) wide laid flat and 16 in (40.6 cm) tall without the hanger. With the ring hanger, it hangs 19.5 in (49.5 cm) long.
Construction is straightforward. You work the tube from the bottom up in joined rounds of single crochet, with two increase rounds above a narrow bottom band. A crab stitch round finishes the top rim. Next you add the tulips: green stems in surface slip stitch, green leaves in lazy daisy stitch, and pink petals in padded lazy daisy stitch. Last, you cover a ring in single crochet, work a short tab from it, and sew the tab inside the back of the rim.
Finished Size and Construction
- Finished size: 6 in (15.2 cm) wide flat x 16 in (40.6 cm) tall; 19.5 in (49.5 cm) including the hanger
- Skill level: Easy+ (basic rounds plus simple embroidery)
- Terminology: US
- Yarn weight: Worsted (#4)
- Hook: 5.0 mm (H-8)
- Number of pieces: 1 holder (tube body with an attached ring hanger)
- Layout: Single tube, 6 tulip columns around x 5 tulip rows up (30 tulips)
- Piece size: circumference 12 in (30.5 cm); bottom opening 4.3 in (10.9 cm) flat
- Size before border: 6 in (15.2 cm) x 15.75 in (40.0 cm)
- Border depth: 0.25 in (0.6 cm) crab stitch at the top rim, plus a slip stitch finish on the bottom edge
Materials
Choose a worsted cotton or cotton blend. Cotton makes a firm tube that won’t stretch out when it’s full of bags, and its smooth stitches show the embroidery clearly. Avoid fuzzy acrylic, which blurs the tulip outlines.
- Cream (main color): 200 g / 360 m
- Pink (tulip heads): 25 g / 45 m
- Green (stems and leaves): 20 g / 36 m
These quantities assume about 180 m per 100 g. They include a margin of roughly 25 percent for testing and embroidery tails.
Tools:
- 5.0 mm (H-8) crochet hook
- 1 wooden or metal ring, 2.5 in (6.4 cm) outer diameter
- Tapestry needle with a large eye
- 7 locking stitch markers
- Scissors and measuring tape
- Blocking pins and a rolled towel
Abbreviations (US Terms)
- ch – chain
- sl st – slip stitch
- sc – single crochet
- fsc – foundation single crochet
- rev sc – reverse single crochet (crab stitch)
- st(s) – stitch(es)
- rnd(s) – round(s)
- M1–M9 – motif rounds 1 to 9 within one tulip row
Reverse single crochet (rev sc): Work from left to right. Insert the hook into the next st to the right, yarn over and pull up a loop, then yarn over and pull through both loops. This makes a twisted, rope-like edge.
Surface slip stitch: Hold the working yarn inside the tube. Insert the hook from front to back, pull up a loop, then insert the hook at the next point above, pull up a loop and draw it through the loop on the hook.
Padded lazy daisy: Bring the needle up at the base point, form a loop, and go back down in the same hole. Come up at the tip point inside the loop and go down just outside it to anchor it. Fill the center of the loop with 2 straight stitches from base to tip.
Gauge and Checkpoints
Gauge: 14 sc and 16 rnds = 4 in (10.2 cm) in joined rounds.
Use the first 16 rounds as your test piece. Measuring part of the real tube is more reliable than measuring a flat swatch, because sc in the round often works up tighter than sc in rows.
Checkpoints (measure flat, without stretching):
- After Rnd 3: 4.3 in (10.9 cm) wide, 0.75 in (1.9 cm) tall
- After Rnd 5: 6 in (15.2 cm) wide, 1.25 in (3.2 cm) tall
- After Rnd 16: 4 in (10.2 cm) tall
- After Rnd 38: 9.5 in (24.1 cm) tall
- After Rnd 60: 15 in (38.1 cm) tall
- After Rnd 63: 15.75 in (40.0 cm) tall
If the tube is too big: If it’s wider than 6.25 in (15.9 cm), switch to a 4.5 mm (US 7) hook. If it’s too small: If it’s narrower than 5.75 in (14.6 cm), switch to a 5.5 mm (I-9) hook. If only the height is off, change the number of plain gap rounds and keep the five tulip rows evenly spaced.
Body
Join every round with a sl st to the first sc. The ch-1 at the start of a round does not count as a stitch. Keep the joins stacked; this seam line becomes the back of the holder.
Rnd 1: With cream, work 30 fsc. Join with a sl st to the first fsc without twisting. (30 sts)
Rnds 2–3: Ch 1, sc in each st around, join. (30 sts)
Rnd 4 (increase): Ch 1, [sc in next 4 sts, 2 sc in next st] 6 times, join. (24 sts worked once + 6 sts worked twice = 36 sts)
Rnd 5 (increase): Ch 1, [sc in next 5 sts, 2 sc in next st] 6 times, join. (30 sts worked once + 6 sts worked twice = 42 sts)
Rnds 6–7: Ch 1, sc in each st around, join. (42 sts)
Mark the tulip columns: Count the 42 sts of Rnd 7 starting from the join. Each tulip column is a 7-st repeat, 2 in (5.1 cm) wide. Place markers in sts 4, 11, 18, 25, 32 and 39; these are the column centers. The seam falls between sts 42 and 1, in the plain gap between two tulips, so it stays hidden. Use the seventh marker to track rounds.
Rnds 8–63: Ch 1, sc in each st around, join. (42 sts every round)
Move the column markers up as you go. Joined sc rounds lean slightly, so if your columns drift, re-mark the centers at each tulip row.
Tulip row positions:
- Tulip Row 1: Rnds 8–16
- Tulip Row 2: Rnds 19–27
- Tulip Row 3: Rnds 30–38
- Tulip Row 4: Rnds 41–49
- Tulip Row 5: Rnds 52–60
Each tulip row is 9 rnds, or 2.25 in (5.7 cm) tall, and is followed by 2 plain rnds. That makes a vertical repeat of 11 rnds, or 2.75 in (7.0 cm). Rnds 1–7 form a plain base 1.75 in (4.4 cm) tall, and Rnds 61–63 form the plain top band.
Don’t fasten off after Rnd 63. Go straight into the top border.
Tulip Embroidery
Each tulip sits within one 7-st repeat. Number the sts in the repeat 1 to 7, so st 4 is the column center. Within a tulip row, M1 is the lowest round and M9 is the highest. The stem fills M1–M5, 1.25 in (3.2 cm) tall, and the head fills M6–M9, 1 in (2.5 cm) tall. The head spans sts 2–6, about 1.4 in (3.6 cm) wide. Sts 7 and 1 stay plain cream between tulips.
Embroider all 30 stems and leaves first, then all 30 heads. Keep one hand inside the tube so you don’t catch the back wall.
Stem (green, single strand): Insert the hook just below st 4 of M1 and pull up a loop from inside. Work 1 surface sl st through the center of st 4 in each of M1 through M5. (5 surface sl sts) Pull the tail inside and fasten off.
Leaves (green, single strand): For the left leaf, the base is next to the stem at the top of M2 and the tip is at the top of st 2 in M4. Work 1 lazy daisy and fill it with 1 straight stitch. For the right leaf, work the same way with the tip at the top of st 6 in M4. The two leaves make an open V.
Head (pink, doubled strand): All three petals start at the same base point: the top of st 4 in M5, at the tip of the stem.
- Center petal: Padded lazy daisy from the base to the top of st 4 in M9.
- Left petal: Padded lazy daisy from the base to the top of st 2 in M8, curving slightly inward.
- Right petal: Padded lazy daisy from the base to the top of st 6 in M8.
The center petal stands one round taller than the side petals, which gives the head its cupped tulip shape. Keep the doubled strand untwisted so the petals stay plump. Weave each tail through the inside of the fabric for at least 1.5 in (3.8 cm).
Ring Hanger
Cover the ring: Join cream to the ring with a sl st. Work 36 sc over the ring, then join. (36 sts) Push the sts together so none of the ring shows. If your ring needs 2–3 more sc to cover it, add them; the tab only uses 6 sts.
Tab, Row 1: Ch 1, sc in the same st and in the next 5 sts, turn. (6 sts)
Rows 2–6: Ch 1, sc in each st across, turn. (6 sts)
The tab is 1.7 in (4.3 cm) wide and 1.5 in (3.8 cm) long. Fasten off, leaving a 20 in (50.8 cm) tail.
Attach: Center the tab over the back seam so it covers sts 40–42 and 1–3. Slide Rows 4–6 inside the tube so they overlap Rnds 61–63, which is 0.75 in (1.9 cm). Whipstitch all four sides of the overlap to the inside wall. Rows 1–3 stay exposed above the rim.
Wrap the neck: Cut a 24 in (61.0 cm) length of cream. Wrap it tightly 8 times around Row 1, right under the ring, to cinch it into a neat neck. Secure the end and bury it under the wraps.
Border
Border gauge: Rev sc is worked 1 per st at the body gauge of 14 sts per 4 in (10.2 cm). It adds about 0.25 in (0.6 cm) of height.
Top Rnd 64 (trim): Continuing from Rnd 63, ch 1, then rev sc in each st around, working from left to right. Join. (42 sts worked 1-per-existing-stitch + 0 extra = 42 sts) Fasten off.
Bottom edge (trim): Join cream at the seam on the foundation edge of Rnd 1. Sl st loosely in each st around, then join. (30 sts worked 1-per-existing-stitch + 0 extra = 30 sts) Fasten off.
Why the math works: Both edges are closed tubes, so there are no sides or corners to turn. Rev sc and sl st lie flat when worked 1 per st at the body gauge, so no increases are needed. The top stays at 42 sts, 12 in (30.5 cm) around, and the bottom stays at 30 sts, 8.6 in (21.8 cm) around. The 15.75 in (40.0 cm) body plus the 0.25 in (0.6 cm) border equals 16 in (40.6 cm).
Final Blocking
- Soak the holder in cool water for 10 minutes.
- Gently press out the water without wringing. Roll it in a towel to remove more moisture.
- Stuff a rolled towel inside so the tube keeps a smooth cylinder shape.
- Lay it flat and shape it to 6 in (15.2 cm) wide and 16 in (40.6 cm) tall. Ease the bottom band to 4.3 in (10.9 cm).
- Straighten the tulip columns so they run from base to rim.
- Puff each pink petal gently with a fingertip.
- Let it dry completely, then remove the towel.
Final Quality-Control Checklist
- Rnd 1 has 30 sts, and Rnds 5–63 have 42 sts each.
- It measures 6 in (15.2 cm) flat and 16 in (40.6 cm) tall.
- There are 6 columns x 5 rows = 30 evenly spaced tulips.
- Each stem has 5 surface sl sts and 2 leaves.
- Each head has 3 padded petals, with the center petal one round taller.
- The seam is at the back, between two tulip columns.
- The tab is centered over the seam and can’t be seen from the front.
- All tails are woven in on the inside.
Troubleshooting
Columns spiral: Re-mark the column centers at each tulip row instead of counting from the bottom.
The seam shows as a diagonal line: Always join into the first sc, not into the ch-1.
Petals look flat: Use a doubled strand, add both fill stitches and don’t pull them tight.
The embroidery catches the back wall: Keep a hand or a rolled towel inside the tube.
Bags fall out of the bottom: Redo Rnd 1 with a hook one size smaller, or work the bottom sl st round more firmly.
The hanger tilts forward: Recenter the tab over the seam and stitch down all four sides.
Care
Hand wash in cool water with mild soap. Reshape it and dry it flat with a towel inside, and don’t tumble dry.
Final Notes
Here’s how the measurements build. Rnd 1 sets a 30-st bottom opening, 8.6 in (21.8 cm) around. Two increase rounds bring the tube to 42 sts, which is 12 in (30.5 cm) around and 6 in (15.2 cm) flat. Six 7-st repeats set the six tulip columns. Five tulip rows on an 11-round repeat fit within 63 rounds, 15.75 in (40.0 cm) tall. The crab stitch rim adds 0.25 in (0.6 cm), for a finished height of 16 in (40.6 cm). The ring and tab bring the hanging length to 19.5 in (49.5 cm). If your gauge matches at Rnd 16, the rest of the numbers will follow.
Happy crocheting!