

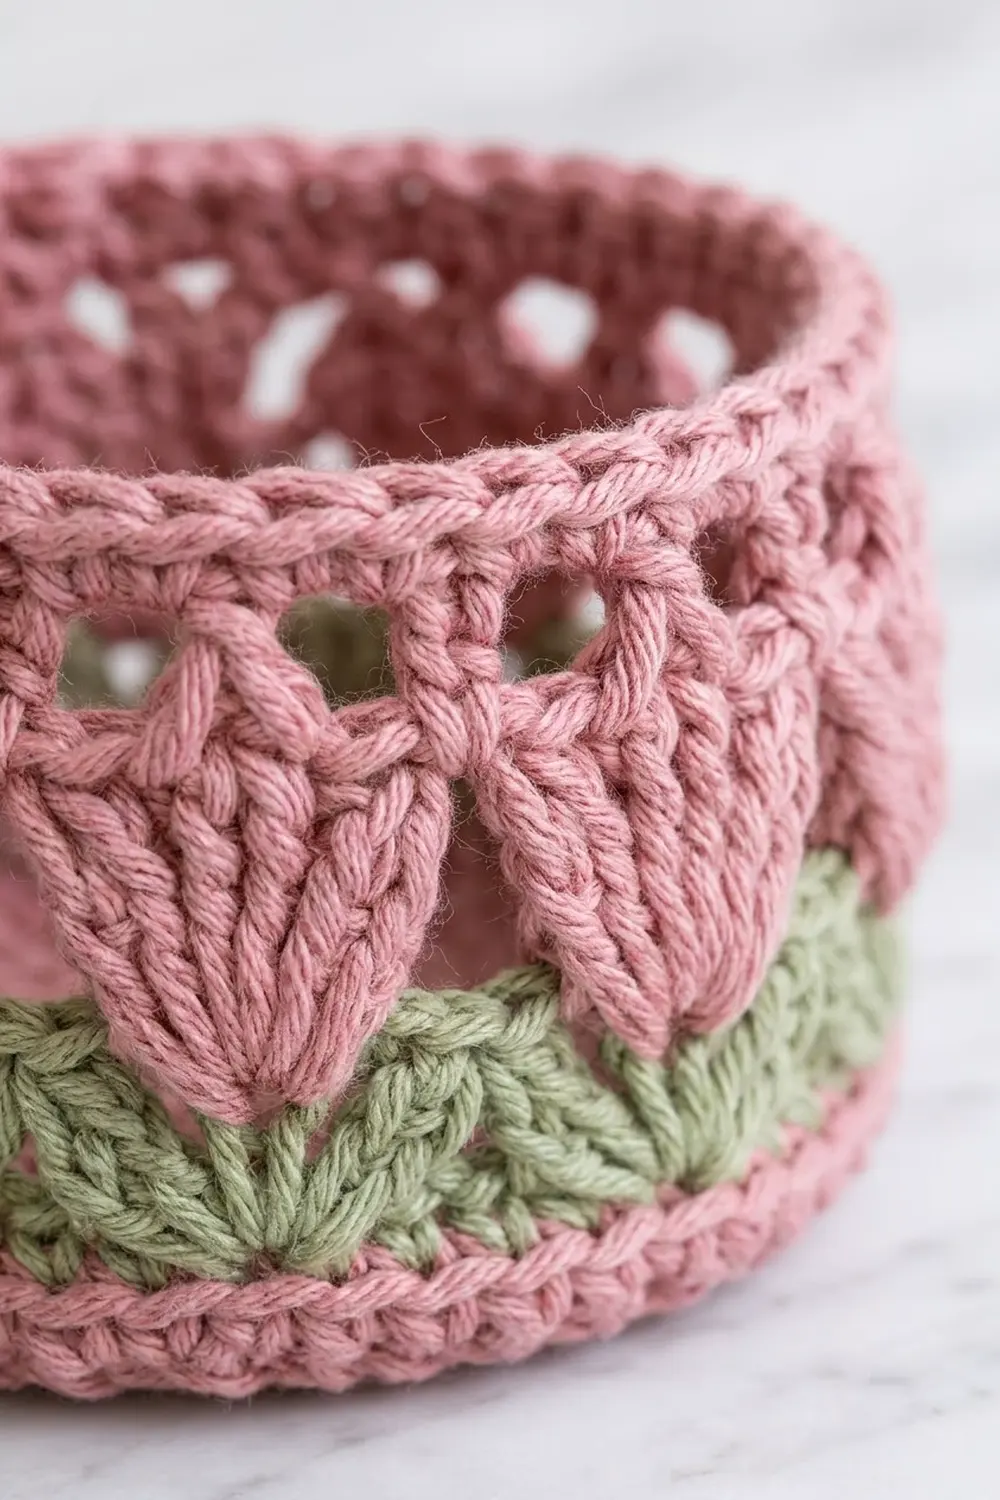
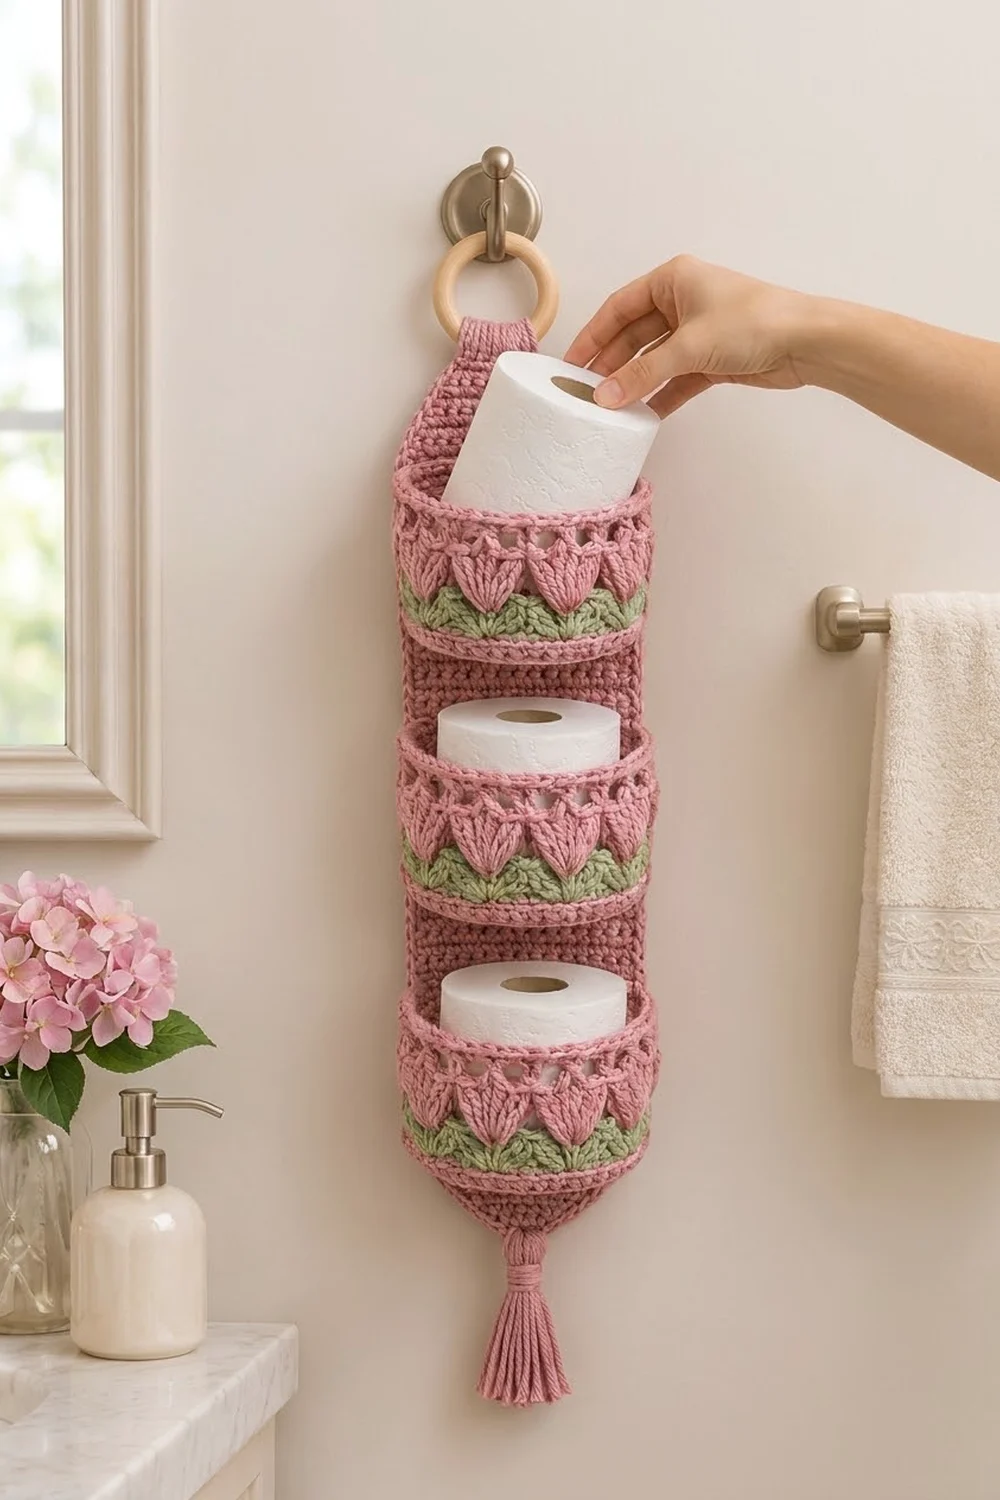
This hanging holder keeps three spare rolls in small round baskets stacked down a long back panel. Each basket has a band of plump pink tulips on sage-green leaves, an eyelet round above them, and a firm corded rim. A wooden ring at the top hangs it from a hook, and a pink tassel finishes the bottom point.
Dusty rose is used for the panel, bases, tulips, and rims, with sage green for the leaf band. The look is soft and cottage-style, and it suits white or marble bathrooms.
The pattern uses US crochet terms. The finished panel is 5.5 in (14.0 cm) wide and 28 in (71.1 cm) long, not counting the ring tab. Each basket is 5.75 in (14.6 cm) wide, sticks out 5 in (12.7 cm) from the panel, and stands 3 in (7.6 cm) tall.
You crochet three oval bases, three tulip walls, and one back panel with tapered ends. Each wall is joined to its base stitch for stitch. The panel then gets a two-round border, and the baskets are sewn onto it at marked rows.
Finished Size and Construction
- Finished size: panel 5.5 x 28 in (14.0 x 71.1 cm); baskets 5.75 x 5 x 3 in (14.6 x 12.7 x 7.6 cm)
- Skill level: Intermediate
- Terminology: US
- Yarn weight: Medium / worsted (#4) cotton
- Hook: 4.5 mm (US 7)
- Number of pieces: 7 crocheted pieces (3 bases, 3 walls, 1 panel), plus a tassel and a wooden ring
- Layout: 3 baskets in one vertical column
- Base size: 5.75 x 5 in (14.6 x 12.7 cm), 72 sts around
- Panel body before border: 5 x 24 in (12.7 x 61.0 cm)
- Border depth: 0.25 in (0.6 cm) per side
Materials
Use a smooth, firm worsted cotton or cotton blend. Cotton holds the basket shape and handles bathroom humidity.
- Color A, dusty rose: 320 g (about 545 m)
- Color B, sage green: 50 g (about 85 m)
These amounts assume about 170 m per 100 g and include a margin of about 15%.
Tools:
- 4.5 mm (US 7) hook
- Wooden ring, 3 in (7.6 cm) across
- 6 stitch markers
- Tapestry needle and scissors
- Card 4 in (10.2 cm) tall, for the tassel
- Tape measure, blocking mat, and rust-proof pins
Abbreviations (US Terms)
- ch – chain
- sl st – slip stitch
- sc – single crochet
- hdc – half double crochet
- dc – double crochet
- sc2tog – single crochet 2 together
- rev sc – reverse single crochet (crab stitch)
- inc – 2 sc in the same stitch
- st(s) – stitch(es)
- sp – space
Tulip cluster (TC): (Yarn over, insert hook in the stitch, pull up a loop 0.75 in / 1.9 cm tall) 4 times, giving 9 loops on the hook. Yarn over and pull through all 9 loops, then ch 1 to lock. The locking chain is not a stitch, and each TC counts as 1 st.
Gauge and Checkpoints
Gauge: 16 sc and 18 rows = 4 in (10.2 cm).
Make one base and one wall first. Together they test every stitch in the pattern and confirm that 72 sts measure 18 in (45.7 cm) around.
Checkpoints:
- Base, Rnd 7 (48 sts): about 3.75 x 3 in (9.5 x 7.6 cm)
- Base, Rnd 11 (72 sts): 5.75 x 5 in (14.6 x 12.7 cm), lying flat
- Wall, Rnd 3: 9 in (22.9 cm) across when flattened
- Finished wall: 3 in (7.6 cm) tall
- Panel, Row 108: 5 x 24 in (12.7 x 61.0 cm)
If your pieces are too big, use a hook 0.5 mm smaller. If they are too small, use one 0.5 mm larger. Never change the stitch counts, because the base and wall must match 72 to 72.
Oval Base (Make 3, Color A)
Each round has two curved ends and two straight sides of 3 sts. Each end gains 3 sts per round, so the total grows by 6.
Ch 6.
Rnd 1: 3 sc in 2nd ch from hook, sc in next 3 ch, 3 sc in last ch. Working along the underside of the chain, sc in next 3 ch. Join to the first sc. (12 sts)
From here, work in a continuous spiral and move a marker up each round.
Rnd 2: [Inc in each of next 3 sts, sc in next 3] twice. (18 sts)
Rnd 3: [(Sc 1, inc) 3 times, sc in next 3] twice. (24 sts)
Rnd 4: [(Sc 2, inc) 3 times, sc in next 3] twice. (30 sts)
Rnd 5: [(Sc 3, inc) 3 times, sc in next 3] twice. (36 sts)
Rnd 6: [(Sc 4, inc) 3 times, sc in next 3] twice. (42 sts)
Rnd 7: [(Sc 5, inc) 3 times, sc in next 3] twice. (48 sts)
Rnd 8: [(Sc 6, inc) 3 times, sc in next 3] twice. (54 sts)
Rnd 9: [(Sc 7, inc) 3 times, sc in next 3] twice. (60 sts)
Rnd 10: [(Sc 8, inc) 3 times, sc in next 3] twice. (66 sts)
Rnd 11: [(Sc 9, inc) 3 times, sc in next 3] twice. (72 sts)
Sl st in the next st and fasten off.
Check: Each end has 3n sts in Rnd n, plus two sides of 3 sts. That gives 6n + 6 sts per round, so Rnd 11 has 72.
Tulip Wall (Make 3)
The wall is worked in joined rounds without turning. Change color on the last yarn-over of the join.
With A, ch 72 and join into a ring without twisting.
Rnd 1 (A): Ch 1, sc in each ch. Join. (72 sts)
Rnd 2 (A): Ch 1, sc in each st. Join, changing to B. (72 sts)
Rnd 3 (B): Ch 1, sc in each st. Join. (72 sts)
Rnd 4 (B, leaves): Ch 1, dc in next st, hdc in next, sc in next 2, hdc in next, dc in next; repeat from * 11 more times. Join, changing to A. (72 sts: 12 repeats of 6)*
The paired dc where repeats meet form 12 leaf points. The 2 sc in the middle of each repeat form the valleys.
Rnd 5 (A, tulips): Ch 1, sc in next 2, dc in next, TC in next, dc in next, sc in next; repeat from * 11 more times. Join. (72 sts: 12 TC)*
Each TC lands in a valley, so it rises between two leaf points.
Rnd 6 (A): Ch 1, sc in each st, working into the top of each TC and not its locking ch. Join. (72 sts)
Rnd 7 (A, eyelets): Ch 4 (counts as dc + ch 1), skip next st, dc in next st, ch 1, skip next st; repeat from * around. Join to the 3rd ch. (36 dc + 36 ch-1 sps = 72 sts)*
Rnd 8 (A): Ch 1, sc in each dc and each ch-1 sp. Join. (36 + 36 = 72 sts)
Rnd 9 (A, rim): Ch 1, rev sc in each st. Join and fasten off. (72 sts)
The wall should be 3 in (7.6 cm) tall.
Make All Pieces
- Color A only: 3 bases, 1 panel, 1 tassel
- Colors A and B: 3 walls (B is used only in Rnds 3–4)
Layout from top to bottom:
[ ring + tab      ]
[ top taper       ]
[ BASKET 1 - Row 81 ]
[ BASKET 2 - Row 45 ]
[ BASKET 3 - Row 9  ]
[ bottom taper    ]
[ tassel          ]
Back Panel (Make 1, Color A)
Ch 21.
Row 1: Sc in 2nd ch from hook and in each ch across. Turn. (20 sts)
Rows 2–108: Ch 1, sc across. Turn. (20 sts)
The panel body should measure 5 x 24 in (12.7 x 61.0 cm). Mark the left edge of these rows:
- Row 9: 2 in (5.1 cm) up
- Row 45: 10 in (25.4 cm) up
- Row 81: 18 in (45.7 cm) up
Top taper:
Rows 1–7: Ch 1, sc2tog, sc across to the last 2 sts, sc2tog. Turn. The counts are 18, 16, 14, 12, 10, 8, and 6 sts. This section is about 1.5 in (3.8 cm) tall.
Tab Rows 8–21: Ch 1, sc across. Turn. (6 sts)
The tab is about 3 in (7.6 cm) long. Fasten off and leave a 12 in (30.5 cm) tail.
Bottom taper: Join A at a corner of the foundation edge.
Row 1: Ch 1, sc in each of the 20 foundation loops. Turn. (20 sts)
Rows 2–9: Ch 1, sc2tog, sc across to the last 2 sts, sc2tog. Turn. The counts are 18 down to 4 sts. This section is about 2 in (5.1 cm) tall. Fasten off.
The tapered panel is 2 + 24 + 1.5 = 27.5 in (69.9 cm) long, not counting the tab.
Joining
Wall to base: Place the wall’s foundation edge on Rnd 11 of the base, wrong sides together. With A, sc through both layers, working 1 sc into each wall foundation ch and its matching base st, for 72 sts.
This is an exact 1-to-1 join, so don’t skip or add stitches. Line up a leaf point with the middle of one straight side of the base. Keep the tension relaxed, because a tight join makes the basket cup inward.
Checkpoint: The basket bottom should measure 5.75 x 5 in (14.6 x 12.7 cm).
Baskets to panel: Do this after the border and blocking. On one long side of a basket, mark the center 18 sts, a curve of 4.5 in (11.4 cm). Center that curve on the panel with the base seam along a marked row.
With A, whipstitch:
- The base seam to the marked row.
- Both ends of the marked section, straight up the wall.
- The rim to the panel 3 in (7.6 cm) higher, which is 13–14 rows above the marked row.
Border
Border gauge: Work 1 sc in each row end, which gives 4.5 sts per inch. This matches the row gauge of 18 rows = 4 in (10.2 cm), so the edges lie flat.
Join A at the top right corner of the tab.
Rnd 1:
- Tab top: 3 sc in the first st, sc in next 4, 3 sc in the last st. That is 6 sts worked once, plus 4 extra, for 10 sts.
- Left side: 1 sc per row end down the tab (14), top taper (7), body (108), and bottom taper (9), for 138 sts.
- Bottom point: 3 sc in the first st, sc in next 2, 3 sc in the last st. That is 4 sts plus 4 extra, for 8 sts.
- Right side: 9 + 108 + 7 + 14 row ends, for 138 sts.
Join. (10 + 138 + 8 + 138 = 294 sts)
Rnd 2: Ch 1, rev sc in each st. Join and fasten off. (294 sts)
Why the math works: The long sides add no extra stitches, so 138 row ends give 138 sts. The only additions are 2 extra sts at each of the 4 corners. The border is 0.25 in (0.6 cm) deep on each side. That makes the width 5 + 0.5 = 5.5 in (14.0 cm) and the length 27.5 + 0.5 = 28 in (71.1 cm).
Final Blocking
- Wet the panel and the baskets, then roll them in a towel to press out the water.
- Pin the panel to 5.5 x 28 in (14.0 x 71.1 cm), keeping the sides straight and the tab centered.
- Fill each basket with a toilet roll wrapped in a plastic bag so the wall dries smooth and 3 in (7.6 cm) tall.
- Pinch each TC so the tulips stand evenly.
- Let everything dry for 24 hours.
- Sew on the baskets.
- Fold the tab through the ring and sew it to the back of the panel.
- Tassel: Wrap A 30 times around the 4 in (10.2 cm) card. Tie the top and cut the bottom. Wrap the bundle 0.5 in (1.3 cm) below the tie, then sew the tassel to the bottom point.
Final Quality-Control Checklist
- [ ] Each base has 72 sts and measures 5.75 x 5 in (14.6 x 12.7 cm).
- [ ] Each wall has 12 tulips between 12 leaf points.
- [ ] The eyelet round has 36 even spaces.
- [ ] Border Rnd 1 has 294 sts, with 138 on each long side.
- [ ] The panel measures 5.5 in (14.0 cm) wide.
- [ ] The baskets sit on Rows 9, 45, and 81, 8 in (20.3 cm) apart, level and centered.
- [ ] The ring tab is sewn securely and all tails are woven in.
Troubleshooting
- Base ruffles: Your tension is loose or you added an extra increase. Recount, or go down a hook size.
- Base cups: Your gauge is tight. Go up a hook size.
- Wall and base don’t match: Both must have exactly 72 sts. Recount both pieces.
- Tulips lean: Pull up all 4 loops of each TC to the same height.
- Tulips aren’t centered between leaves: Start Rnd 5 right at the join.
- Panel edge waves: Work exactly 1 sc per row end.
- Basket tips forward: Sew the rim to the panel more firmly.
Care
Hand wash in cool water. Lay flat to dry and reshape each basket over a roll.
Final Notes
The measurements build on each other:
- A gauge of 16 sc = 4 in (10.2 cm) gives a 72-st base that is 18 in (45.7 cm) around.
- A 72-st wall joins to that base stitch for stitch.
- The 20-st panel is 5 in (12.7 cm) wide, and 108 rows make it 24 in (61.0 cm) long.
- The tapers bring the length to 27.5 in (69.9 cm).
- The 0.25 in (0.6 cm) border makes the panel 5.5 x 28 in (14.0 x 71.1 cm).
- Placing the baskets 36 rows apart spaces them 8 in (20.3 cm) apart, so each roll lifts out easily.
Check your gauge first and the rest will fit.
Happy crocheting!