

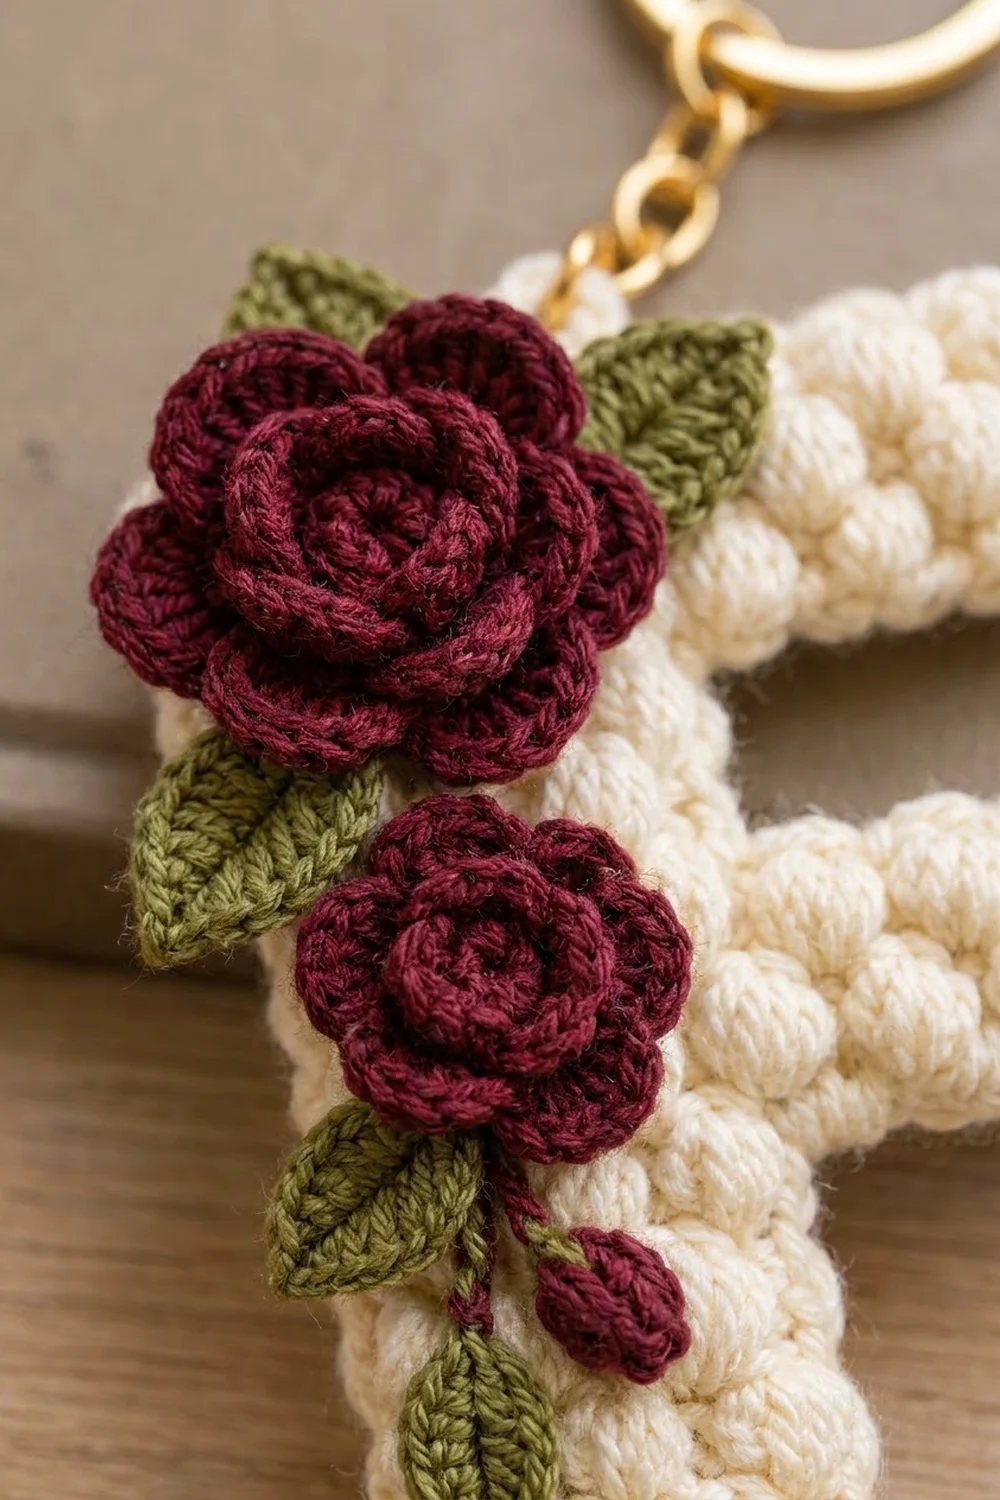
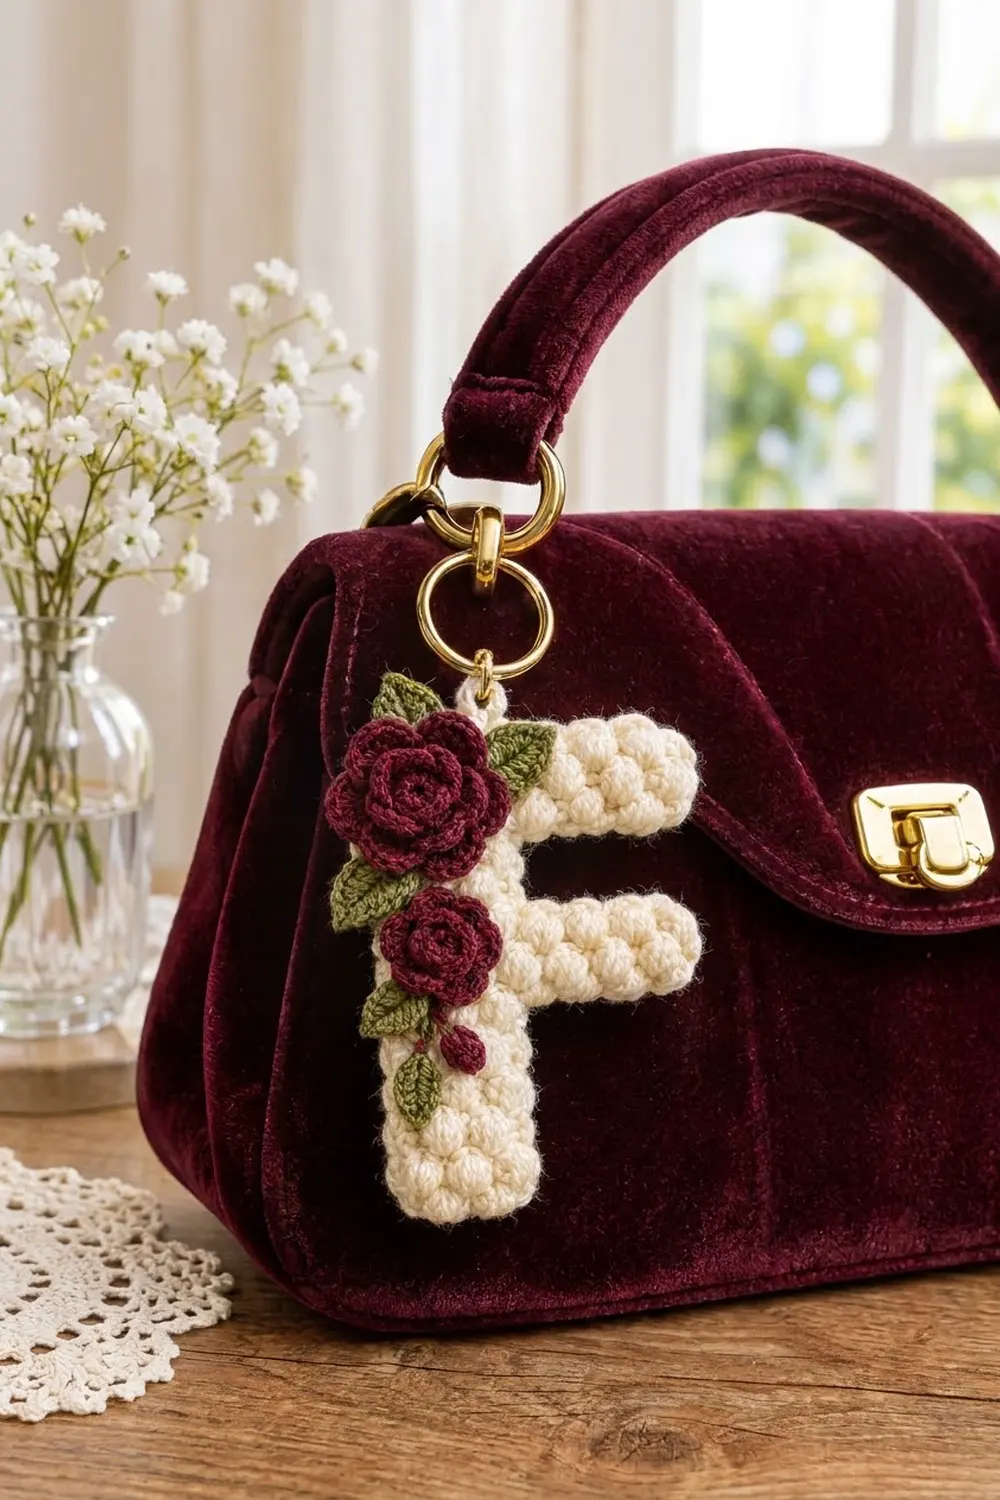
This keychain is a puffy capital letter F with a small cluster of crocheted roses sewn onto the stem. The letter is cream with a staggered puff stitch texture. The flowers are a deep burgundy, with olive green leaves and one tiny rosebud. A gold ring at the top lets you clip it onto a bag handle, keys, or a zipper pull.
The look is soft and vintage, like a monogram on a velvet handbag. The cream body sets off the burgundy roses, and the puffs give the letter a cushioned, quilted surface.
This pattern uses US crochet terms. The finished letter measures 3.25 in (8.3 cm) wide x 4.75 in (12.1 cm) tall, not counting the hanging loop and ring.
The letter is crocheted flat as one piece, in rows from the bottom of the stem up. You add the two crossbars with foundation chains as you go, so nothing needs to be sewn together. A single crochet border round smooths the outline. Then you make two rolled roses, one bud, and four leaves in lighter yarn and sew them onto the stem.
Finished Size and Construction
- Finished size: 3.25 in (8.3 cm) wide x 4.75 in (12.1 cm) tall
- Skill level: Easy-Intermediate
- Terminology: US crochet terms
- Yarn weight: Worsted (#4) for the letter; DK (#3) for the appliqués
- Hooks: 4.0 mm (G-6) for the letter; 3.0 mm for the appliqués
- Number of pieces: 1 letter, plus 2 roses, 1 bud, and 4 leaves sewn on as appliqués
- Layout: One letter F, with the appliqués stacked down the upper left of the stem
- Piece size before border: 2.75 in (7.0 cm) x 4.25 in (10.8 cm)
- Border depth: 0.25 in (0.6 cm) on every edge
- Large rose: about 1.5 in (3.8 cm) across; small rose: about 1 in (2.5 cm) across
Materials
For the letter, use a smooth cotton or cotton-blend worsted yarn. It shows off the puffs and keeps its shape on a keychain that gets handled a lot. For the appliqués, use DK cotton so the petals stay small and crisp.
- Cream, worsted (#4): 12 g, about 24 m
- Burgundy, DK (#3): 5 g, about 12 m
- Olive green, DK (#3): 3 g, about 7 m
These quantities include a margin of about 25%.
Tools:
– 4.0 mm (G-6) crochet hook
– 3.0 mm crochet hook
– Tapestry needle
– Gold split ring or swivel clasp with ring, about 1 in (2.5 cm)
– Stitch marker
– Scissors
– Rustproof pins and a blocking mat
– Spray bottle with water
Abbreviations (US Terms)
- ch – chain
- sl st – slip stitch
- sc – single crochet
- sc2tog – single crochet 2 together
- hdc – half double crochet
- dc – double crochet
- st(s) – stitch(es)
- RS / WS – right side / wrong side
- yo – yarn over
Special stitch – Puff stitch (puff): (Yo, insert hook in st, yo, pull up a loop to hdc height) 3 times, yo, pull through all 7 loops on hook. Each puff counts as 1 st. Don’t work a closing chain.
Puff row A (RS): Ch 1, sc in first st, *puff in next st, sc in next st; repeat from * across.
Puff row B (RS): Ch 1, sc in first 2 sts, *puff in next st, sc in next st; repeat from * to last st, sc in last st.
Every row in this pattern has an odd stitch count. Row A puts puffs on the even-numbered stitches. Row B puts them on the odd-numbered stitches, starting with the 3rd. Because of this, the puffs shift position from one RS row to the next.
Gauge and Checkpoints
Gauge: 4 sts and 4 rows = 1 in (2.5 cm) in puff pattern (a puff row followed by an sc row), using worsted yarn and the 4.0 mm hook.
The letter is a single piece, so it works as its own test swatch. Lay it flat without stretching and measure at each checkpoint:
- After Row 5: 1.25 in (3.2 cm) wide x 1.25 in (3.2 cm) tall
- After Row 8: 2.25 in (5.7 cm) wide at the middle bar; 2 in (5.1 cm) tall
- After Row 13: 3.25 in (8.3 cm) tall
- After Row 17: 2.75 in (7.0 cm) wide at the top bar; 4.25 in (10.8 cm) tall
- After the border: 3.25 in (8.3 cm) x 4.75 in (12.1 cm)
Too big? Change to a 3.75 mm hook and start over. Too small? Change to a 4.5 mm hook. If only the height is off, adjust the puffs: pull up shorter loops to make rows shorter, or taller loops to make them taller.
Letter Body
Use cream yarn and the 4.0 mm hook. Row 1 is a WS row. After that, even-numbered rows are RS puff rows and odd-numbered rows are WS sc rows. With the RS facing you, the crossbars point right.
Foundation: Ch 6.
Row 1 (WS): Sc in 2nd ch from hook and in each ch across, turn. (5 sts)
Row 2 (RS): Puff row A. (5 sts: 3 sc, 2 puffs)
Row 3 (WS): Ch 1, sc in each st across, turn. (5 sts)
Row 4 (RS): Puff row B. (5 sts: 4 sc, 1 puff)
Row 5 (WS): Ch 1, sc in each st across. Don’t turn. Ch 5, then turn. (5 sts plus ch-5)
Checkpoint: 1.25 in (3.2 cm) x 1.25 in (3.2 cm).
Middle Bar
Row 6 (RS): Sc in 2nd ch from hook, puff in next ch, sc in next ch, puff in next ch (4 sts on the chain). Continue across the stem: sc in next st, puff in next st, sc in next st, puff in next st, sc in last st. Turn. This is the same as working sc, (puff, sc) 4 times. (9 sts: 5 sc, 4 puffs)
Row 7 (WS): Ch 1, sc in each st across, turn. (9 sts)
Row 8 (RS): Puff row B. (9 sts: 6 sc, 3 puffs)
Checkpoint: 2.25 in (5.7 cm) wide x 2 in (5.1 cm) tall.
Upper Stem
Row 9 (WS): Ch 1, sc in first 5 sts, turn. Leave the last 4 sts unworked. (5 sts)
Row 10 (RS): Puff row A. (5 sts)
Row 11 (WS): Ch 1, sc across, turn. (5 sts)
Row 12 (RS): Puff row B. (5 sts)
Row 13 (WS): Ch 1, sc across. Don’t turn. Ch 7, then turn. (5 sts plus ch-7)
Checkpoint: 3.25 in (8.3 cm) tall.
Top Bar
Row 14 (RS): Sc in 2nd ch from hook. Then work (puff, sc) 5 times across the remaining 5 ch and the 5 stem sts. Turn. (11 sts: 6 sc, 5 puffs)
Row 15 (WS): Ch 1, sc across, turn. (11 sts)
Row 16 (RS): Puff row B. (11 sts: 7 sc, 4 puffs)
Row 17 (WS): Ch 1, sc across. Don’t fasten off. (11 sts)
Checkpoint: 2.75 in (7.0 cm) x 4.25 in (10.8 cm).
Rolled Roses, Bud, and Leaves
Use DK yarn and the 3.0 mm hook. On each piece, leave a 10 in (25.4 cm) tail for sewing.
Large Rose (make 1, burgundy)
Foundation: Ch 26.
Row 1: Sc in 2nd ch from hook and in each ch across, turn. (25 sts)
Row 2: Ch 1, sl st in first st.
– 5 hdc in next st, sl st in next st; repeat from * 3 more times.
– 5 dc in next st, sl st in next st; repeat from * 3 more times.
– *7 dc in next st, sl st in next st; repeat from * 3 more times.
(12 petals; 81 sts)
Stitch check: Row 2 uses 1 + (12 x 2) = 25 sts from Row 1. Its total count is 1 + (4 x 6) + (4 x 6) + (4 x 8) = 81 sts.
Fasten off. Starting from the small hdc end, roll the strip into a spiral and keep the base flat. Sew back and forth through every layer at the base until the rose holds firm. It should measure about 1.5 in (3.8 cm) across.
Small Rose (make 1, burgundy)
Foundation: Ch 16.
Row 1: Sc in 2nd ch from hook and in each ch across, turn. (15 sts)
Row 2: Ch 1, sl st in first st.
– 5 hdc in next st, sl st in next st; repeat from * 2 more times.
– 5 dc in next st, sl st in next st; repeat from * 3 more times.
(7 petals; 1 + (3 x 6) + (4 x 6) = 43 sts)
Roll it up and secure the base the same way as the large rose. It should measure about 1 in (2.5 cm) across.
Bud (make 1, burgundy)
Ch 4. (Yo, insert hook in 4th ch from hook, yo, pull up a loop) 4 times, yo, pull through all 9 loops. Ch 1 to close, then fasten off. Use the tail to shape the base into a teardrop about 0.375 in (1.0 cm) long.
Leaves (make 4, olive green)
Foundation: Ch 7.
Round:
1. Sl st in 2nd ch from hook, sc in next ch, hdc in next ch, dc in next ch, hdc in next ch, sc in last ch. (6 sts)
2. Ch 2 for the tip.
3. Work into the free loops on the other side of the chain: sc in first ch, hdc in next, dc in next, hdc in next, sc in next, sl st in last. (6 sts)
4. Join with a sl st to the first sl st.
(12 sts plus ch-2 tip)
Each leaf is about 1 in (2.5 cm) long.
Border
Continue straight from Row 17 with cream yarn and the 4.0 mm hook.
Border gauge: Work 1 sc in each stitch and 1 sc in each row-end. The fabric has 4 sts and 4 rows per inch, so every edge gets the same number of sc per inch and lies flat. One round adds 0.25 in (0.6 cm) to each side.
Rnd 1 (RS): Ch 1 and turn so the RS faces you.
- Top edge: 3 sc in first st (top right corner), sc in next 9 sts, 3 sc in last st (top left corner). (15 sts)
- Left edge: Sc in the row-ends of Rows 16 through 2. (15 sts)
- Bottom edge: Working into the foundation chain, 3 sc in first ch (corner), sc in next 3 ch, 3 sc in last ch (corner). (9 sts)
- Lower stem, right side: Sc in the row-ends of Rows 2, 3, and 4. Sc2tog over the Row 5 row-end and the first free loop of the middle-bar chain (inner corner). (4 sts)
- Under the middle bar: Sc in next 2 ch, 3 sc in last ch (corner). (5 sts)
- End of the middle bar: Sc in the Row 7 row-end, then 3 sc in the end st of Row 8 (corner). (4 sts)
- Top of the middle bar: Sc in next 2 unworked sts. Sc2tog over the last unworked st and the Row 9 row-end (inner corner). (3 sts)
- Upper stem, right side: Sc in the row-ends of Rows 10, 11, and 12. Sc2tog over the Row 13 row-end and the first free loop of the top-bar chain (inner corner). (4 sts)
- Under the top bar: Sc in next 4 ch, 3 sc in last ch (corner). (7 sts)
- End of the top bar: Sc in the row-ends of Rows 15 and 16. Join with a sl st to the first sc. (2 sts)
Total: 15 + 15 + 9 + 4 + 5 + 4 + 3 + 4 + 7 + 2 = 68 sts
Rnd 2: Sl st in each st around until you reach the center sc of the top left corner. In that st, work (sl st, ch 10, sl st) to make the hanging loop. Then sl st in each remaining st and fasten off. (68 sl sts plus ch-10 loop)
Why the math works:
– The outline has 57 edge positions: 30 stitches along the horizontal edges and 27 row-ends along the vertical edges.
– Row-ends at corners aren’t counted separately, because the corner stitches already cover them.
– There are 7 outer corners. Each gets 3 sc instead of 1, which adds 14 sts.
– There are 3 inner corners. Each uses an sc2tog, which removes 3 sts in total.
– 57 + 14 − 3 = 68.
The 3-sc groups let the outer corners turn without pulling, and the sc2tog keeps the inner corners from rippling.
Final Blocking
- Weave in all cream ends along the WS of the border.
- Spray the letter until it’s evenly damp. Don’t soak it.
- With the RS up, pin it to 3.25 in (8.3 cm) x 4.75 in (12.1 cm), with a pin at each outer corner.
- Straighten the bars with your fingertips, but don’t press the puffs flat.
- Let it dry completely.
- Pin the roses and bud in place:
- Large rose at the top of the stem, overlapping the top left corner slightly.
- Small rose below it, level with the middle bar.
- Bud below the small rose.
- Tuck in the leaves: one to the right of the large rose, one to its left, one at the lower left of the small rose, and one below the bud.
- Sew the leaves on first, then the roses and bud, using small stitches through each base.
- Slide the hanging loop onto the split ring.
Final Quality-Control Checklist
- The letter measures 3.25 in (8.3 cm) x 4.75 in (12.1 cm).
- The stem is 5 sts wide the whole way up.
- Before the border, the middle bar is 9 sts and the top bar is 11 sts.
- Border Rnd 1 has exactly 68 sts.
- The puffs change position on every RS row.
- All 7 outer corners are square, and all 3 inner corners lie flat.
- The roses are sewn on firmly.
- The hanging loop and ring are secure.
Troubleshooting
- Uneven puffs: Pull every loop up to the same height before you yo and pull through.
- Wavy edges: Make sure you work only 1 sc per row-end.
- Puckered inner corners: Use an sc2tog at each inner corner, not 2 separate sc.
- Loose rose: Roll it tighter and add more stitches through the base.
- Sagging bars: Block again and pin the bars straight.
- Curling leaves: Steam lightly and pin flat to dry.
Care
Spot clean with mild soap and cool water. Press into shape and let it dry flat.
Final Notes
Here’s how the measurements build up:
– The 5-st stem is 1.25 in (3.2 cm) wide.
– The middle bar widens the letter to 2.25 in (5.7 cm), and the top bar widens it to 2.75 in (7.0 cm).
– Seventeen rows give a height of 4.25 in (10.8 cm).
– The 68-st border adds 0.25 in (0.6 cm) on every side, so the finished letter is 3.25 in (8.3 cm) x 4.75 in (12.1 cm).
Happy crocheting!