

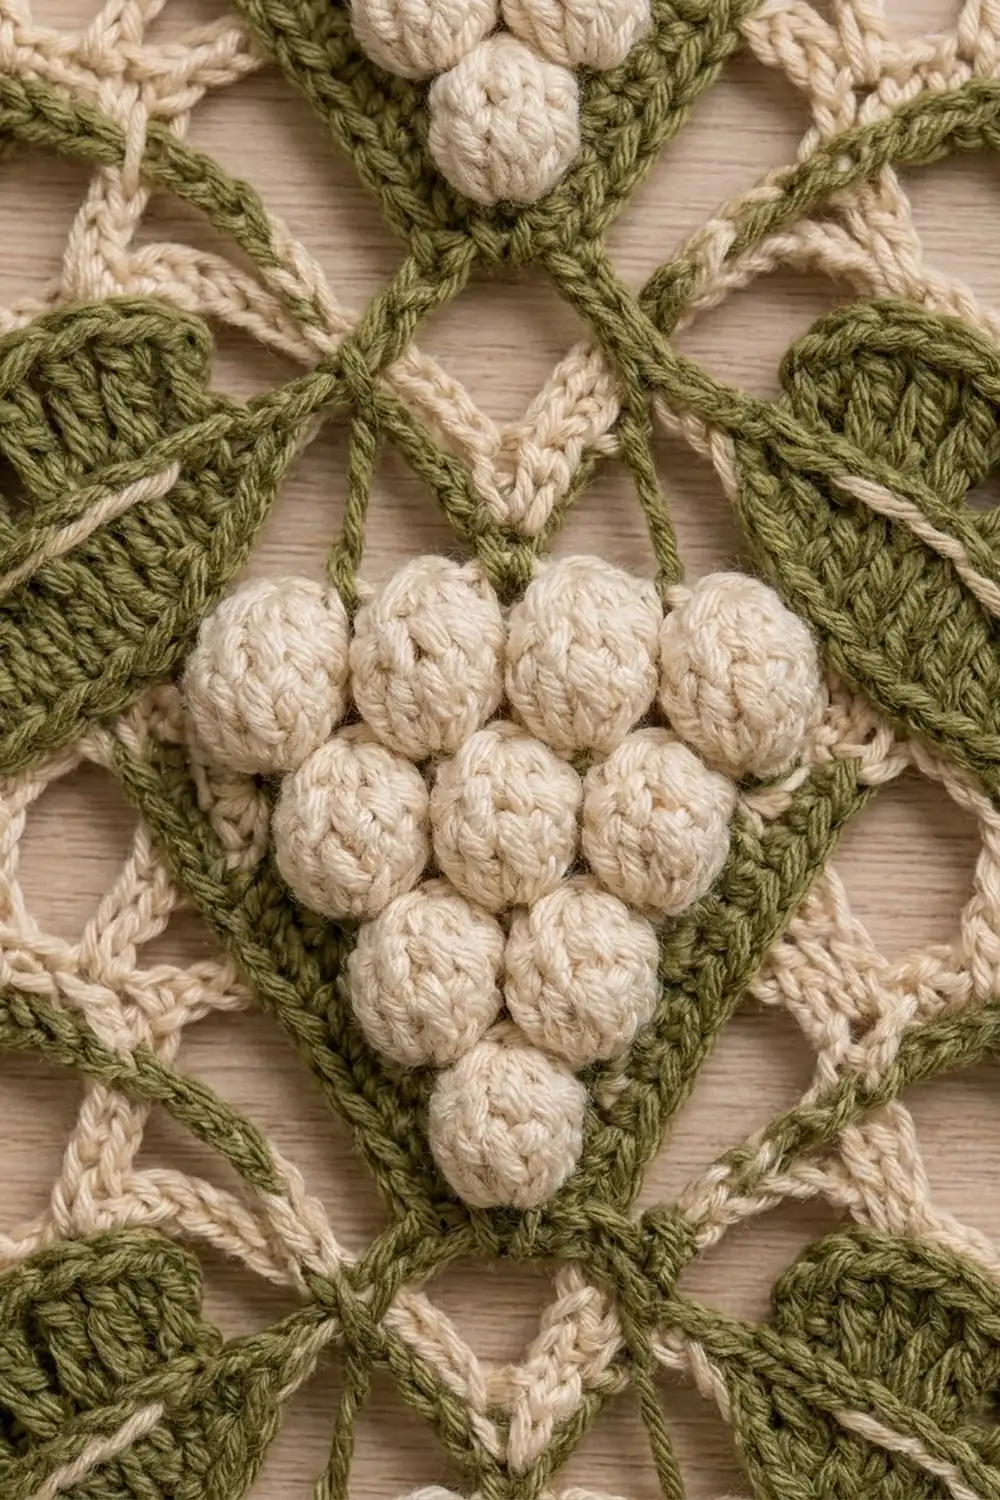
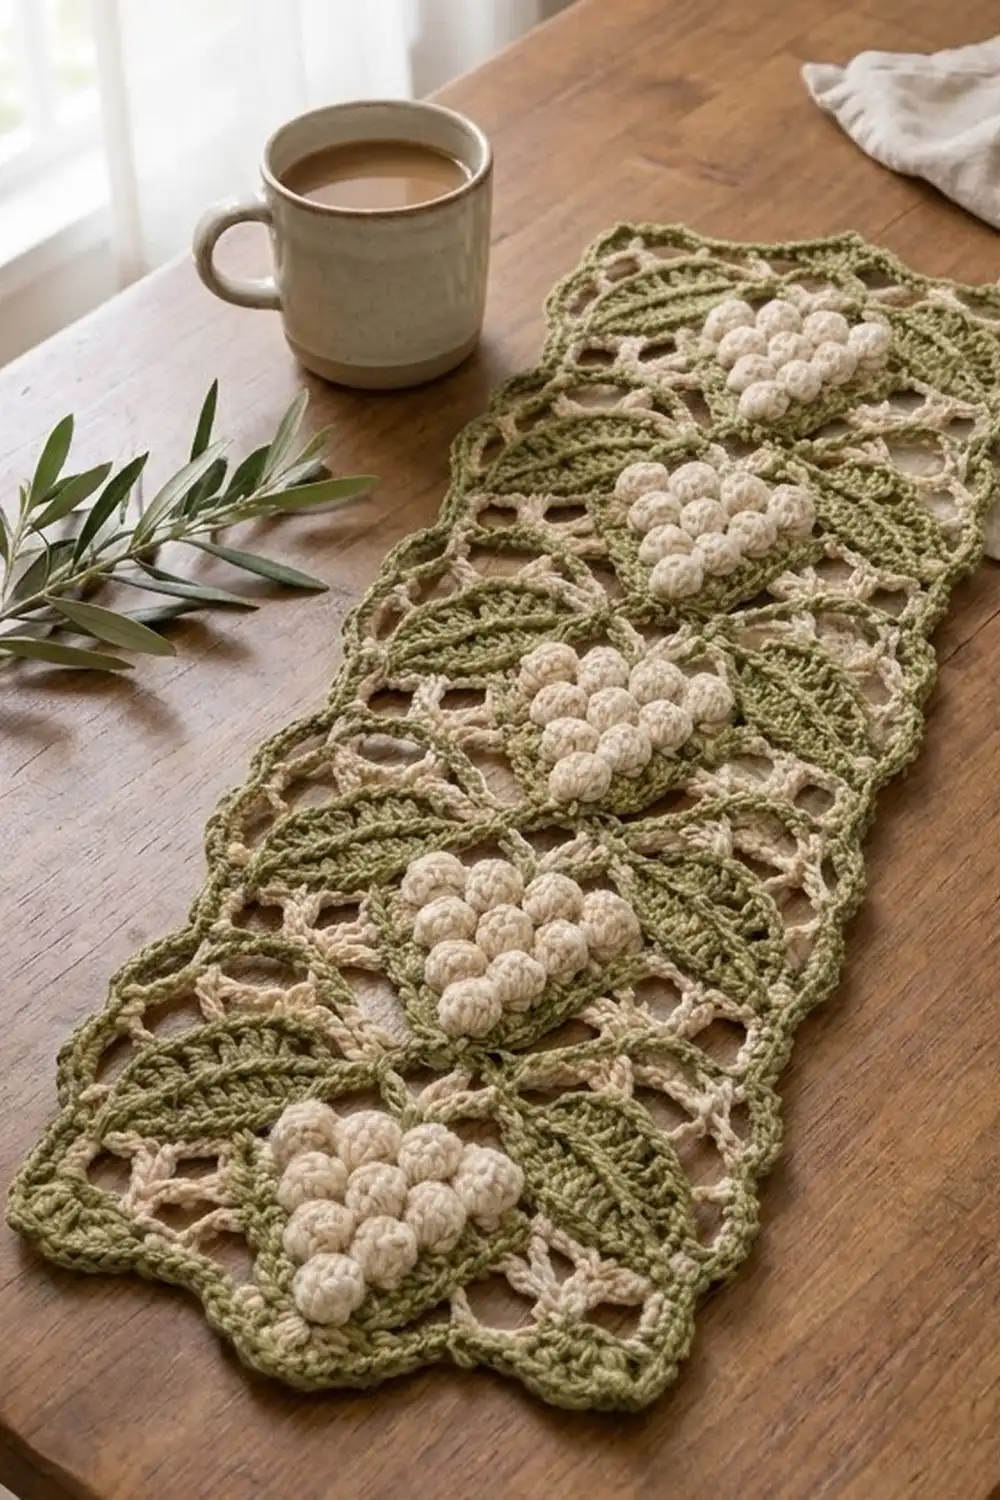
The Vineyard Grape Lace Panel is a slim, decorative strip. Ivory bobble grape clusters sit on a sand-colored filet mesh, framed by olive leaves and vines. It looks like vintage lace but is worked with simple stitches, and the finished piece lies flat. You can use it on a dresser top or shelf, or frame it as a textile display.
Three colors make it work. Sand is used for the airy background, ivory for the raised grape clusters, and olive for the vines, leaves and edging. Each cluster is a neat triangle of ten bobbles, so the grapes look round and full against the open mesh behind them.
The finished panel measures 7 in x 17 in (17.8 cm x 43.2 cm) after blocking. This pattern uses US crochet terms throughout.
The panel is worked in rows of filet mesh, with solid triangles built in where the grapes will sit. Olive vines are added with surface slip stitch. Next you make the grape clusters and leaves as small appliqués and sew them on. A two-round olive border finishes the panel.
Finished Size and Construction
- Finished size: 7 in x 17 in (17.8 cm x 43.2 cm)
- Skill level: Intermediate
- Terminology: US terms
- Yarn weight: DK / light worsted (#3), cotton or cotton blend
- Hook: 3.5 mm (E-4)
- Number of pieces: 1 base panel, plus 4 grape cluster appliqués and 8 leaf appliqués sewn on
- Layout: 4 grape repeats stacked vertically down the center
- Base panel size (before border): 6 in x 16 in (15.2 cm x 40.6 cm)
- Repeat height: 10 rows = 4 in (10.2 cm)
- Border depth: about 0.5 in (1.3 cm) on every side
Materials
Use a smooth, mercerized or matte cotton DK yarn. Cotton gives crisp mesh squares and well-defined bobbles. It also blocks flat and holds its shape on a surface.
- Sand (background mesh): 45 g / about 99 m
- Olive (vines, leaves, border): 30 g / about 66 m
- Ivory (grape clusters): 15 g / about 33 m
All quantities include a margin of roughly 20% for swatching and tails.
Tools:
– 3.5 mm (E-4) crochet hook
– Tapestry needle
– Stitch markers (4–6)
– Rust-proof pins and a blocking mat
– Spray bottle
– Measuring tape and scissors
Abbreviations (US Terms)
- ch – chain
- sl st – slip stitch
- sc – single crochet
- hdc – half double crochet
- dc – double crochet
- tr – treble crochet
- sk – skip
- sp – space
- st(s) – stitch(es)
- sc2tog – single crochet 2 together
- sc3tog – single crochet 3 together
- RS / WS – right side / wrong side
Special stitches:
- Bobble (5-dc bobble): *Yarn over, insert hook in st, yarn over and pull up a loop, yarn over and draw through 2 loops; repeat from * 4 more times in the same st (6 loops on hook). Yarn over and draw through all 6 loops.
- Picot: Ch 3, sl st in 3rd ch from hook.
- Surface sl st: Hold the yarn on the WS. Insert the hook from the RS through the fabric, pull up a loop, and draw it through the loop on the hook.
Filet terms:
– Mesh square (open): Ch 1, sk next st, dc in next st.
– Block (solid): Dc in next ch-1 sp (or st), dc in next dc.
Every square uses 2 sts. Each row is 1 edge dc + 15 squares x 2 = 31 sts.
Gauge and Checkpoints
Gauge: 10 squares (21 sts) and 10 rows of filet mesh = 4 in x 4 in (10.2 cm x 10.2 cm), in Sand with a 3.5 mm hook.
Work Rows 1–10 of the panel first, then stop and measure. This is your test piece. It should measure 6 in wide x 4 in tall (15.2 cm x 10.2 cm).
Checkpoints:
– After Row 10: 6 in x 4 in (15.2 cm x 10.2 cm)
– After Row 20: 6 in x 8 in (15.2 cm x 20.3 cm)
– After Row 40: 6 in x 16 in (15.2 cm x 40.6 cm)
– Each grape cluster: about 2 in x 2 in (5.1 cm x 5.1 cm)
– Each leaf: about 2 in (5.1 cm) long and 1 in (2.5 cm) wide
– After the border: 7 in x 17 in (17.8 cm x 43.2 cm)
If your piece is too big: go down to a 3.25 mm hook, or tighten the ch-1 in the mesh squares.
If your piece is too small: go up to a 3.75 mm hook.
Change hooks to fix gauge rather than changing stitch counts. The border and the appliqué placement depend on exactly 31 sts and 40 rows.
Base Panel (Sand)
Number the squares 1–15 from right to left on RS rows. Square 8 is the center. The turning ch-4 counts as dc + ch-1, and the turning ch-3 counts as dc. Work the last dc of each row into the 3rd ch of the turning chain.
Foundation: Ch 33.
Row 1 (RS, solid base row): Dc in 4th ch from hook and in each ch across. Turn. (31 sts: 15 blocks)
The 3 skipped chs count as the first dc, plus 30 dc.
Row 2 (mesh): Ch 4, sk next st, dc in next st. Ch 1, sk next st, dc in next st; repeat from * 13 more times. Turn. (31 sts: 15 squares)
Row 3: Ch 4, sk ch-1 sp, dc in next dc. [Ch 1, sk ch-1 sp, dc in next dc] 6 times. Dc in ch-1 sp, dc in next dc (block). [Ch 1, sk ch-1 sp, dc in next dc] 7 times. Turn. (31 sts: 7 mesh, 1 block, 7 mesh)
Row 4: Work 6 mesh squares. Work 3 blocks (squares 7–9): for the first block, dc in ch-1 sp, dc in next dc; then dc in next 4 sts. Work 6 mesh squares. Turn. (31 sts: 6 mesh, 3 blocks, 6 mesh)
Rows 5–7: Work 5 mesh squares, 5 blocks (squares 6–10), and 5 mesh squares. Turn. (31 sts each row)
Rows 3–7 form a solid triangle pointing down, about 2 in (5.1 cm) wide at the top and 2 in (5.1 cm) tall. This is the base for the grape cluster.
Rows 8–10: Work 15 mesh squares. Over a block, work ch 1, sk next dc, dc in next dc. (31 sts each row)
Checkpoint: 6 in x 4 in (15.2 cm x 10.2 cm).
Row 11: Work as Row 2.
Rows 12–20: Work as Rows 2–10. (2nd triangle on Rows 13–17)
Row 21: Work as Row 2.
Rows 22–30: Work as Rows 2–10. (3rd triangle on Rows 23–27)
Row 31: Work as Row 2.
Rows 32–39: Work as Rows 2–9. (4th triangle on Rows 33–37)
Row 40 (solid top row): Ch 3, dc in each dc and each ch-1 sp across. (31 sts) Fasten off.
Checkpoint: 6 in x 16 in (15.2 cm x 40.6 cm). Every row is 31 sts, and the panel has 4 solid triangles evenly spaced up the center.
Surface Vines (Olive)
Work all vines with RS facing, keeping the tension loose so the fabric does not pucker.
Center stem: Start at the bottom of Row 1 in the middle of square 8. Work surface sl st straight up the center of the square 8 column, 2 sl sts per row, to the top of Row 40. (80 sl sts) Fasten off.
Branches (2 per repeat, 8 total): Start at the top outer corner of each triangle (the top of Row 7 at the outer edge of square 6). Work surface sl st diagonally up and outward through the mesh, moving 1 square per row over the next 3 rows, to square 3. Work 2 sl sts per square. (6 sl sts per branch) Mirror this on the right, from square 10 to square 13.
Branch rows for each repeat:
– Repeat 1: Rows 8–10
– Repeat 2: Rows 18–20
– Repeat 3: Rows 28–30
– Repeat 4: Rows 38–40
Total branch sl sts: 8 branches x 6 = 48.
Grape Cluster (Ivory, make 4)
The bobbles are worked on WS rows so they pop to the RS. Row 1 is the wide top of the cluster.
Foundation: Ch 10.
Row 1 (RS): Sc in 2nd ch from hook and in each ch across. Turn. (9 sc)
Row 2 (WS): Ch 1, sc in first st. Bobble in next st, sc in next st; repeat from * 3 more times. Turn. (9 sts: 4 bobbles + 5 sc)
Row 3: Ch 1, sc2tog, sc in next 5 sts, sc2tog. Turn. (7 sc)
Row 4: Ch 1, sc in first st, [bobble, sc] 3 times. Turn. (7 sts: 3 bobbles)
Row 5: Ch 1, sc2tog, sc in next 3 sts, sc2tog. Turn. (5 sc)
Row 6: Ch 1, sc in first st, [bobble, sc] twice. Turn. (5 sts: 2 bobbles)
Row 7: Ch 1, sc2tog, sc in next st, sc2tog. Turn. (3 sc)
Row 8: Ch 1, sc, bobble, sc. Turn. (3 sts: 1 bobble)
Row 9: Ch 1, sc3tog. (1 st) Fasten off, leaving a 12 in (30.5 cm) tail.
The cluster has 10 bobbles in rows of 4-3-2-1 and measures about 2 in x 2 in (5.1 cm x 5.1 cm). Push each bobble outward from the WS with a fingertip.
Leaf (Olive, make 8)
Foundation: Ch 11.
Side 1: Working in the back bumps, start in the 2nd ch from hook: sc, hdc, dc in next 2 ch, tr in next 2 ch, dc in next 2 ch, hdc in next ch. (9 sts)
Tip: Work (sc, ch 2, sc) in the last ch.
Side 2: Rotate and work along the opposite side of the foundation: hdc, dc in next 2 ch, tr in next 2 ch, dc in next 2 ch, hdc in next ch, sc in next ch. (9 sts)
Base: Sl st in the skipped ch at the base. Fasten off, leaving a 10 in (25.4 cm) tail.
Each leaf has 20 sts plus a ch-2 tip and measures about 2 in x 1 in (5.1 cm x 2.5 cm).
Assembly of Appliqués
- Pin a grape cluster onto each solid triangle, wide end up and point down. The bobble rows should line up with Rows 3–7 of each repeat.
- Whipstitch around the outer edge of the cluster with the Ivory tail, catching only the dc posts of the triangle.
- Pin 2 leaves per repeat. Place the base of each leaf at the top corner of the triangle and lay the leaf along an olive branch, tip pointing outward and up.
- Sew down the center of each leaf with the Olive tail. This forms a center vein and leaves the edges slightly raised.
Border (Olive)
Border gauge: 2 sc per dc row-end and 1 sc per top or bottom st. This gives about 5 sc per inch (2.5 cm) on every side. A dc row is 0.4 in (1.0 cm) tall, and 2 sc span 0.4 in (1.0 cm), so the sides lie flat.
Rnd 1: With RS facing, join Olive in the last st of Row 40.
- Ch 1, 3 sc in the same st (corner).
- Sc in the next 29 sts, then 3 sc in the last st (corner).
- Working along the row-ends, 2 sc in each of the 40 row-ends. (80 sc)
- Working into the foundation chain, 3 sc in the first ch (corner), sc in the next 29 ch, and 3 sc in the last ch (corner).
- 2 sc in each of the 40 row-ends. (80 sc)
- Sl st in the first sc.
Rnd 1 total: 29 + 29 + 80 + 80 + (4 x 3) = 230 sc
Counts between corner centers for Rnd 2:
– Top and bottom sides: 1 + 29 + 1 = 31 sts each
– Long sides: 1 + 80 + 1 = 82 sts each
– Plus 4 corner center sts
Check: 31 + 31 + 82 + 82 + 4 = 230.
Rnd 2: Sl st into the next sc (the corner center).
- Ch 1, (sc, ch 2, sc) in the corner sc.
- Top side (scallops): Sc in next st, sk 2, 5 dc in next st, sk 2, sc in next st; repeat from * 4 more times. This uses 1 + (5 x 6) = 31 sts and makes 5 scallops.
- (Sc, ch 2, sc) in the corner sc.
- Long side (picots): Sc in next st, sc in next 4 sts, picot; repeat from * 19 more times, then sc in next st. This uses 1 + 80 + 1 = 82 sts and makes 20 picots.
- (Sc, ch 2, sc) in the corner sc.
- Bottom side: Work as for the top side.
- (Sc, ch 2, sc) in the corner sc.
- Second long side: Work as for the first long side.
- Sl st in the first sc. Fasten off.
Why the math works:
– The scallop repeat is 6 sts, and 31 = 1 + (5 x 6), so each short end begins and ends with an sc.
– The picot repeat is 4 sts, and 82 = 1 + (20 x 4) + 1, so the picots are evenly spaced along each long side.
– No stitches are added or lost, so the border lies flat and adds about 0.5 in (1.3 cm) on each side.
– Width: 6 + 0.5 + 0.5 = 7 in (17.8 cm).
– Length: 16 + 0.5 + 0.5 = 17 in (43.2 cm).
Final Blocking
- Weave in all ends along same-color stitches. Do not weave Ivory through the mesh.
- Soak the panel in cool water for 10 minutes, then press out the water in a towel. Do not wring.
- Lay it RS up on a blocking mat and pin it to 7 in x 17 in (17.8 cm x 43.2 cm).
- Pin the corners first, then the center of each side, then work outward.
- Pin the peak of each scallop and each picot.
- Open each mesh square with your fingertips so the squares look square.
- Shape each leaf and lift each bobble from below. Do not flatten the grapes.
- Leave it to dry completely, about 24 hours.
Final Quality-Control Checklist
- [ ] Base panel measures 6 in x 16 in (15.2 cm x 40.6 cm) before the border
- [ ] Every row has 31 sts, and Rows 1 and 40 are solid
- [ ] 4 solid triangles are centered, on Rows 3–7, 13–17, 23–27 and 33–37
- [ ] The center stem is unbroken, and there are 8 branches, 2 per repeat
- [ ] Each cluster has 10 bobbles (4-3-2-1), all raised on the RS
- [ ] There are 8 leaves, sewn tip-outward along the branches
- [ ] Border Rnd 1 has 230 sc
- [ ] There are 5 scallops on each short end and 20 picots on each long side
- [ ] Final size is 7 in x 17 in (17.8 cm x 43.2 cm)
Troubleshooting
Mesh squares look tall and narrow: Your ch-1 is too tight. Loosen it slightly, or use a larger hook for the ch-1 only.
The panel slants: You missed the last dc into the turning chain. Count 31 sts on every row.
Bobbles sink to the back: Make sure the bobbles are on WS rows (even rows). Push them through to the RS before sewing.
The vines pucker the mesh: Your surface slip stitches are too tight. Unravel and redo them with a hook one size larger.
Long sides ripple: You have too many sc per row-end. Keep it to exactly 2.
Long sides cup inward: You have too few sc per row-end, or your sc is tight. Check for 80 sc per side.
Scallops crowd at the corners: Recount the 31 sts on each short side between the corner centers.
Care
Hand wash in cool water with mild soap and dry flat. Re-pin the edges if they need it. Steam lightly from above, without pressing on the bobbles.
Final Notes
The measurement chain is simple:
1. 10 squares and 10 rows = 4 in (10.2 cm)
2. 15 squares x 40 rows = 6 in x 16 in (15.2 cm x 40.6 cm)
3. A 0.5 in (1.3 cm) border on each side brings it to 7 in x 17 in (17.8 cm x 43.2 cm)
If your test repeat matches gauge, everything after it fits: the grape clusters fit their triangles, the branches meet the leaves, and the border lies flat.
Happy crocheting!