

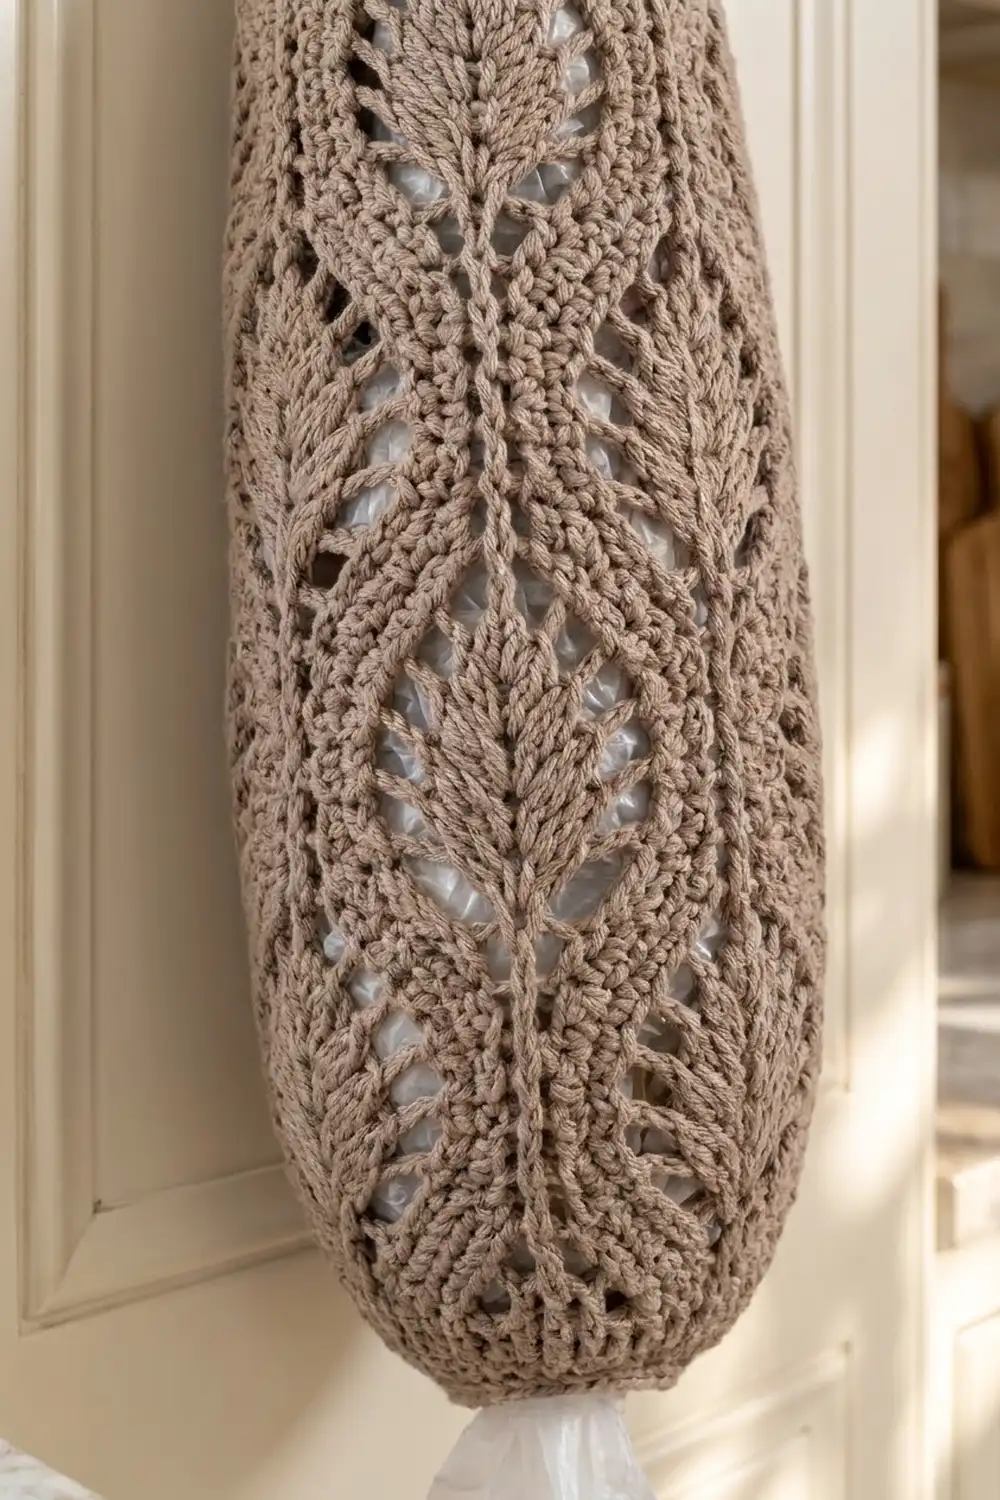
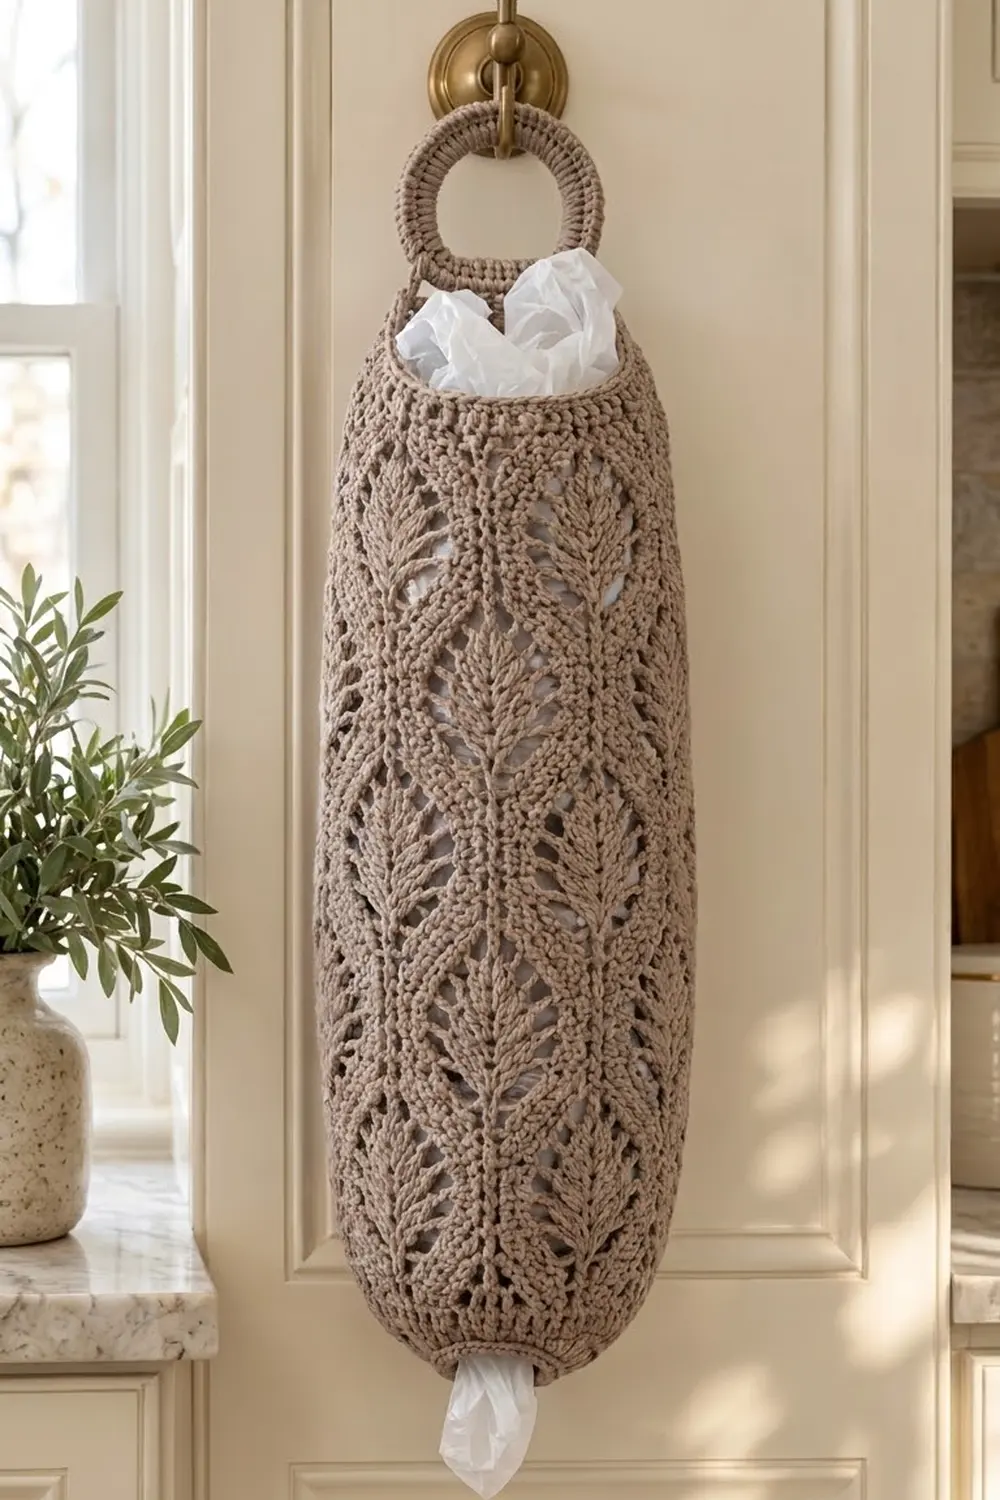
The Willow Leaf Bag Holder is a tall, slim tube made in one piece. Six columns of solid leaves run down its length. Each leaf sits in a light mesh lattice and is split by a raised center vein. You stuff plastic grocery bags in at the top and pull them out one at a time through the small, gathered opening at the bottom.
This sample uses a single warm taupe, a soft mushroom-gray that suits cream cabinets, stone counters and wood boards. With only one color, the lace carries the design. The raised ribs and veins catch the light, and the mesh lets a little of the bag show through.
The pattern uses US crochet terms. The finished body measures about 8 in (20.3 cm) wide laid flat, 16 in (40.6 cm) around and 18.5 in (47.0 cm) long. With the strap and hanging ring, the overall length is about 22.8 in (57.9 cm).
Construction is simple. You chain a ring and work the body from the top down in joined rounds: one foundation round, four repeats of the 8-round leaf pattern, then a quick single crochet taper to a small cuff. Next you add a border to the bottom opening and the top edge, and work a short strap and ring straight off the top rim. There is no sewing and there are no separate parts.
Finished Size and Construction
- Finished size: 8 in (20.3 cm) wide flat, 16 in (40.6 cm) around, 18.5 in (47.0 cm) body length
- Overall length with hanger: about 22.8 in (57.9 cm)
- Skill level: Intermediate
- Terminology: US crochet terms
- Yarn weight: Light worsted / DK (#3)
- Hook: 4.0 mm (US G-6)
- Number of pieces: 1, worked in one continuous piece
- Layout: Vertical tube, 6 leaf columns around, 4 leaves tall
- Piece size: one leaf repeat is 12 sts wide by 8 rounds tall, about 2.7 in (6.9 cm) by 4 in (10.2 cm)
- Size before border: 16 in (40.6 cm) around by 17.7 in (45.0 cm) long
- Border depth: 0.6 in (1.5 cm) at the top rim, 0.2 in (0.5 cm) at the bottom opening
- Bottom opening: about 1.75 in (4.4 cm) across
- Hanging ring: about 2.7 in (6.9 cm) outer diameter
Materials
Choose a smooth cotton or cotton blend. Cotton keeps the leaf shapes crisp, holds up in the kitchen and doesn’t stretch much when the holder is full of bags. Avoid fuzzy or very splitty yarn, because a halo hides the ch-1 mesh.
- Taupe (mushroom/greige): 150 g, about 345 m (377 yd) of light worsted / DK cotton
Tools:
- 4.0 mm (US G-6) crochet hook
- 3 stitch markers
- Tapestry needle
- Scissors
- Tape measure
- Spray bottle and rust-proof pins
- A rolled bath towel or a 2-liter bottle for blocking
- Optional: a 2.5 in (6.4 cm) plastic ring for a stiffer hanger
The yarn amount includes a margin of about 15 to 20 percent for the gauge check and small differences in tension.
Abbreviations (US Terms)
- ch – chain
- sl st – slip stitch
- sc – single crochet
- dc – double crochet
- sk – skip
- sp – space
- st(s) – stitch(es)
- rnd(s) – round(s)
- sc2tog – single crochet 2 together
- rev sc – reverse single crochet (crab stitch)
Special stitches
- FPdc (front post double crochet): Yarn over and insert the hook from front to back to front around the post of the stitch below. Yarn over and pull up a loop, then (yarn over and pull through 2 loops) twice.
- Mesh st: “ch 1, sk next st.” This counts as 1 st in every stitch count. When the next round works a dc into a ch-1 sp, treat the space the same as a stitch.
Gauge and Checkpoints
Gauge in the leaf pattern: 18 sts and 8 rnds = 4 in (10.2 cm).
Gauge in sc: 18 sts and 20 rnds = 4 in (10.2 cm).
Treat the first leaf repeat as your test piece. Work Rnds 1 through 9, then lay the tube flat and measure before you go on.
- After Rnd 1: 16 in (40.6 cm) around, 8 in (20.3 cm) wide flat.
- After Rnd 9: 4.5 in (11.4 cm) from the foundation chain.
- After Rnd 33: 16.5 in (41.9 cm) from the foundation chain.
- After Rnd 40: 17.7 in (45.0 cm) from the foundation chain.
If your tube is wider than 8 in (20.3 cm) flat, go down a hook size. If it is narrower, go up a hook size. If the width is right but your leaves are taller than 4 in (10.2 cm), you may be pulling up long loops on the dc, so snug them a little. Don’t change the stitch count: the 72 sts must divide into 6 repeats of 12.
Pattern
Notes
- Work in joined rnds with the right side always facing. Do not turn.
- Each body rnd begins with ch 2, which does not count as a st. Join each rnd with a sl st to the first st, not to the ch-2.
- Every body rnd has 72 sts until the taper. Each ch-1 counts as 1 st.
- The leaf repeat is 12 sts: 1 rib st, 5 left sts, 1 vein st and 5 right sts. The rib and vein are always FPdc, worked around the FPdc (or dc) directly below.
- Place a marker after every second repeat (every 24 sts) to catch errors early.
Part 1: Foundation
Ch 72. Without twisting the chain, sl st to the first ch to form a ring. Place a marker at the join. This is center back.
Rnd 1: Ch 2, dc in each ch around, join. (72 dc)
Part 2: Leaf Lace Body
Each rnd below gives one 12-st repeat. Work the bracketed repeat 6 times around, then join.
Rnd 2 (Leaf Rnd A): Ch 2, [FPdc (rib), ch 1 sk 1, dc, ch 1 sk 1, dc, ch 1 sk 1, FPdc (vein), ch 1 sk 1, dc, ch 1 sk 1, dc, ch 1 sk 1] 6 times, join. Per repeat: 1 + 5 + 1 + 5 = 12. (72 sts)
Rnd 3 (Leaf Rnd B): Ch 2, [FPdc, dc, ch 1 sk 1, dc, ch 1 sk 1, dc, FPdc, dc, ch 1 sk 1, dc, ch 1 sk 1, dc] 6 times, join. Per repeat: rib 1, left mesh 4, leaf 3, right mesh 4 = 12. (72 sts)
Read Rnd 3 carefully. The left mesh is “dc, ch 1, dc, ch 1” (4 sts), the leaf is “dc, FPdc, dc” (3 sts) and the right mesh is “ch 1, dc, ch 1, dc” (4 sts).
Rnd 4 (Leaf Rnd C): Ch 2, [FPdc, ch 1 sk 1, dc, ch 1 sk 1, 2 dc, FPdc, 2 dc, ch 1 sk 1, dc, ch 1 sk 1] 6 times, join. Per repeat: rib 1, left mesh 3, leaf 5, right mesh 3 = 12. (72 sts)
Rnd 5 (Leaf Rnd D): Ch 2, [FPdc, dc, ch 1 sk 1, 3 dc, FPdc, 3 dc, ch 1 sk 1, dc] 6 times, join. Per repeat: rib 1, left mesh 2, leaf 7, right mesh 2 = 12. (72 sts)
Rnd 6 (Leaf Rnd E): Ch 2, [FPdc, ch 1 sk 1, 4 dc, FPdc, 4 dc, ch 1 sk 1] 6 times, join. Per repeat: rib 1, left mesh 1, leaf 9, right mesh 1 = 12. This is the widest point of the leaf. (72 sts)
Rnd 7 (Leaf Rnd F): Work as Rnd 5. The outer leaf sts of Rnd 6 become mesh again, so the leaf narrows to 7. (72 sts)
Rnd 8 (Leaf Rnd G): Work as Rnd 4. The leaf narrows to 5. (72 sts)
Rnd 9 (Leaf Rnd H): Work as Rnd 3. The leaf narrows to 3 and ends in a point. (72 sts)
Checkpoint: one full leaf is done in each column. The tube should measure 4.5 in (11.4 cm) from the foundation chain.
Rnds 10–33: Repeat Rnds 2–9 three more times. (4 leaves per column, 72 sts each rnd)
The mesh sts switch between dc and ch-1 from one rnd to the next, which makes the offset diamond lattice around each leaf. The narrow tip on Rnd 9 runs straight into the single vein st of the next Rnd 2, so the leaves look stacked on one continuous stem.
Part 3: Bottom Taper and Cuff
Rnd 34 (conversion): Ch 1 (does not count), sc in each st and each ch-1 sp around, join. (72 worked 1 per existing st + 0 added = 72 sc)
Rnd 35: Ch 1, [sc 4, sc2tog] 12 times, join. (60 sts)
Rnd 36: Ch 1, [sc 3, sc2tog] 12 times, join. (48 sts)
Rnd 37: Ch 1, [sc 2, sc2tog] 12 times, join. (36 sts)
Rnd 38: Ch 1, [sc 1, sc2tog] 12 times, join. (24 sts)
Rnds 39–40: Ch 1, sc in each st around, join. (24 sts)
Don’t fasten off. The bottom border continues from here.
Checkpoint: the bottom should curve in to a rounded end with a cuff about 5.3 in (13.5 cm) around. Because the taper curves inward, it adds less height than its round count suggests. The total length from the foundation chain should be 17.7 in (45.0 cm).
Border
Border gauge: 18 sc = 4 in (10.2 cm), the same width as the body pattern. That is why every border rnd uses exactly one st per existing st or chain.
Bottom Opening Edge
Rnd 41: Ch 1, rev sc in each st around, join. (24 sts: 12 across the front and 12 across the back when laid flat)
Fasten off and weave in the end. The crab stitch gives a firm, corded edge that won’t stretch out as you pull bags through.
Top Rim
Turn the tube so the foundation chain is at the top. Join yarn in the free loop of the foundation chain at the center back marker.
Rim Rnd 1: Ch 1, sc in each free loop of the foundation ch around, join. (72 sc: 36 across the front, 36 across the back)
Rim Rnds 2–3: Ch 1, sc in each st around, join. (72 sc: 36 front, 36 back)
Fasten off.
Why the math works: the foundation had 72 ch, so Rim Rnd 1 has 72 sc. At 18 sc per 4 in (10.2 cm), 72 sc measure 16 in (40.6 cm), which matches the body exactly. The rim won’t ruffle or pull in. Three sc rnds at 20 rnds per 4 in (10.2 cm) add 0.6 in (1.5 cm).
Hanging Strap and Ring
The strap is centered over the round joins at center back.
Strap Row 1: With the right side facing, join yarn in the 3rd st before the join (st 70 of Rim Rnd 3). Ch 1, sc in sts 70, 71 and 72 and in sts 1, 2 and 3, turn. (6 sc)
Strap Rows 2–8: Ch 1, sc in each st across, turn. (6 sc)
The strap measures about 1.6 in (4.1 cm).
Ring: At the end of Row 8, ch 28 and sl st to the first sc of Row 8 to form a loop.
Ring Rnd: Work 42 sc into the loop (1.5 sc per ch), working around the chain rather than into it and packing the sts tightly. Sl st to the last sc of Row 8. Fasten off and weave in.
For a stiffer ring, hold a 2.5 in (6.4 cm) plastic ring against the chain loop and work the 42 sc around both. The finished ring is about 2.7 in (6.9 cm) across with an opening of about 1.75 in (4.4 cm).
Final Blocking
- Weave in all ends on the inside of the tube, running them through the solid leaf sts so they stay hidden.
- Slide the holder over a rolled towel or a 2-liter bottle so the tube is evenly round.
- Spray until damp but not dripping.
- Straighten each leaf column. The ribs should run in vertical lines with no spiral.
- Gently open the mesh with your fingertips so each ch-1 sp shows clearly.
- Check the width: 8 in (20.3 cm) pressed flat and 16 in (40.6 cm) around.
- Pin the top rim and strap flat. Let the ring dry lying flat so it stays round.
- Let everything dry completely before you remove the form.
Final Quality-Control Checklist
- 72 sts in every body rnd (Rnds 1–34).
- 6 leaf columns, each 4 leaves tall.
- All ribs and veins line up vertically from top to bottom.
- Taper counts: 60, 48, 36, 24.
- Bottom opening about 1.75 in (4.4 cm) across, with a crab-stitch edge.
- Top rim 72 sc, 0.6 in (1.5 cm) deep.
- Strap 6 sts wide and centered over the joins.
- Ring firm and fits over your wall hook.
- Body 18.5 in (47.0 cm) long and 8 in (20.3 cm) wide flat.
Troubleshooting
The leaves lean or spiral. Your joins are drifting. Always join to the first st, not the ch-2, and work the first FPdc around the rib directly below.
The stitch count is off within a repeat. Count each ch-1 sp as a st. Most errors come from skipping a ch-1 sp or working two sts into one.
The mesh looks closed up. Your ch-1s are too tight. Loosen your chains, or block more firmly over the form.
The top rim flares. Your sc gauge is looser than your lace gauge. Work the rim with a 3.75 mm (US F-5) hook.
Bags won’t pull out. The cuff is too tight. Rework Rnds 39–41 with looser tension.
The ring sags. Use the optional plastic ring, or add a rnd of sl sts around the outer edge.
Care
Hand wash, or machine wash cool in a laundry bag. Reshape over a bottle and dry flat, and skip the dryer to keep the leaves crisp.
Final Notes
The measurements build in a simple chain. The 72-st foundation gives 16 in (40.6 cm) around. Each of the four leaf repeats adds 4 in (10.2 cm), bringing the body to 16.5 in (41.9 cm). The taper and cuff take it to 17.7 in (45.0 cm), and the border finishes it at 18.5 in (47.0 cm). The 1.6 in (4.1 cm) strap and 2.7 in (6.9 cm) ring bring the overall length to about 22.8 in (57.9 cm).
Check those numbers as you go, and your Willow Leaf holder will hang straight, hold a big stack of bags and look lovely on the kitchen wall.
Happy crocheting!