

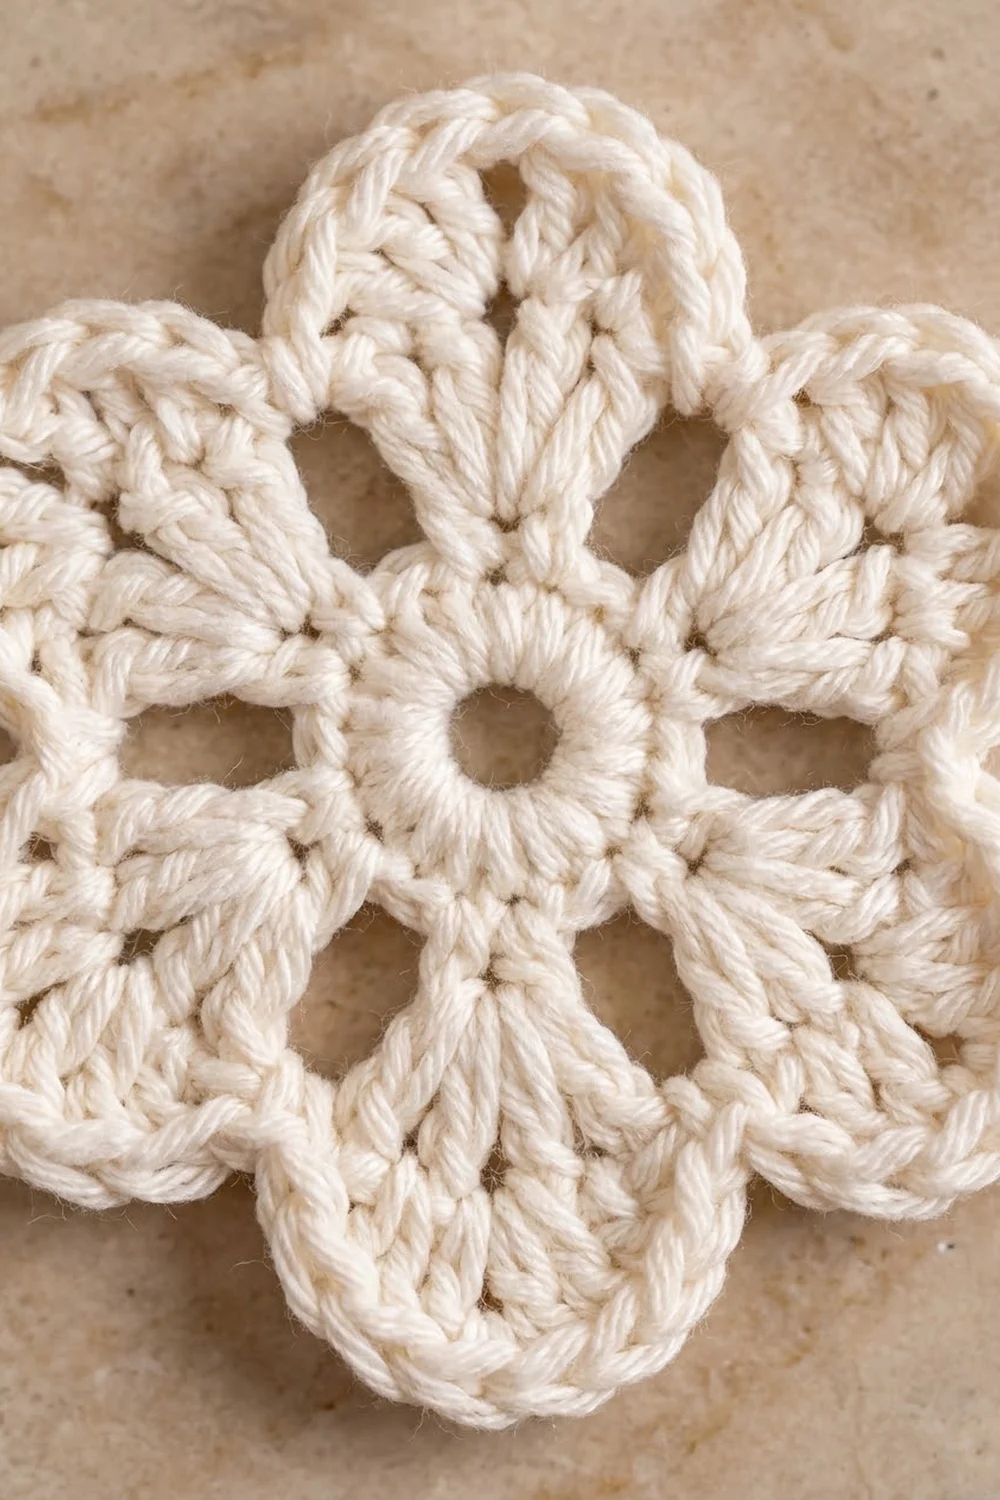
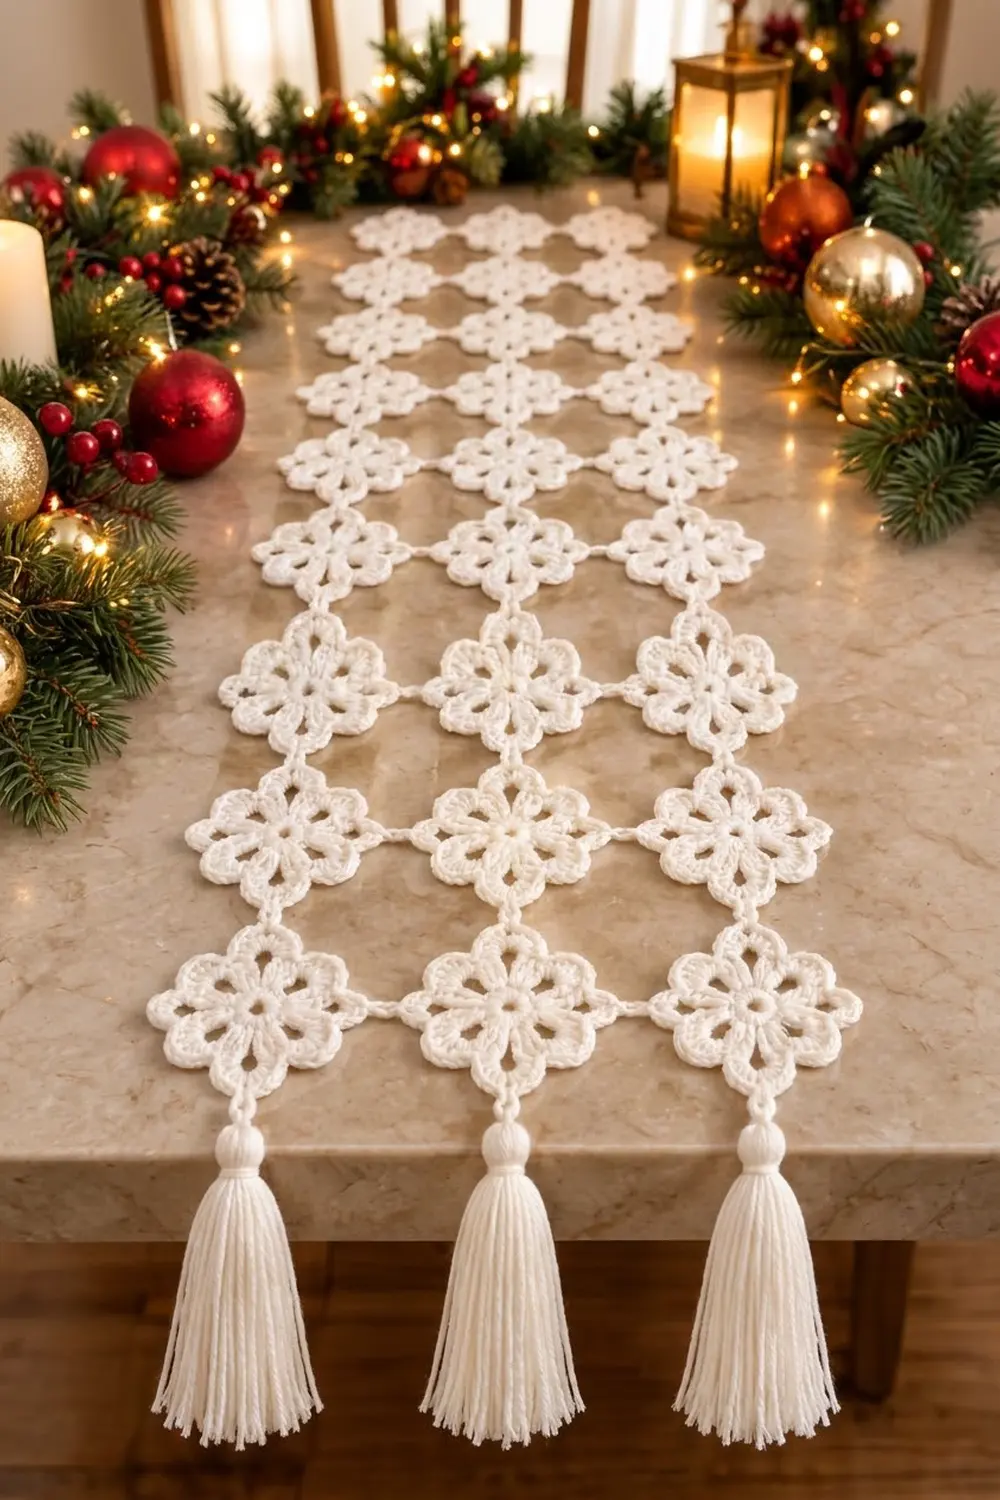
The Winter Blossom Lace Table Runner is a soft, airy runner made from small six-petal flowers joined into an open lattice. It’s worked in a single shade of creamy white, so the stitch texture does the work: rounded dc petals, a small open center in each flower, and fine chain bars linking the motifs. The petal edges form the outer scalloped edge.
The runner is 3 motifs wide and 12 motifs long, for 36 identical flowers in total. Each short end gets three plump tassels, one under each column, with a rounded wrapped head. The layout works well on a holiday table, but in plain white it also suits everyday use.
All instructions use US crochet terms. The finished runner measures about 10 in (25.4 cm) wide and 41.1 in (104.4 cm) long without tassels, or 49.1 in (124.7 cm) long with the 4 in (10.2 cm) tassels on both ends.
Each flower takes three rounds. The first motif is worked on its own. Every later motif is joined to its neighbors while you work its last round (join-as-you-go), using short doubled-chain bridges at the petal tips. No border round is added. Tassels go on last.
Finished Size and Construction
- Finished size: 10 in x 41.1 in (25.4 cm x 104.4 cm), not counting tassels
- Length with tassels: 49.1 in (124.7 cm)
- Skill level: Easy to intermediate
- Terminology: US
- Yarn weight: DK (#3 light) cotton
- Hook: 3.5 mm (E-4)
- Number of pieces: 36 flower motifs and 6 tassels
- Layout: 3 motifs wide x 12 motifs long
- Piece size: 3 in (7.6 cm) tip to tip across, 2.6 in (6.6 cm) tall from top petal tips to bottom petal tips
- Size before border: 10 in x 41.1 in (25.4 cm x 104.4 cm)
- Border depth: 0 in (0 cm). The petals are the edge, and no border round is worked.
Materials
Use a smooth, mercerized or combed DK cotton. It gives clear stitch definition, crisp petals and tassels that hang straight. Acrylic will also work, but it blocks less sharply and the lattice can droop.
- Cream white DK cotton: 200 g (about 460 m), which is two 100 g / 230 m balls
- Motifs: about 3.5 g (8 m) each, so 126 g (288 m) for all 36
- Tassels: about 4.5 g (10 m) each, so 27 g (60 m) for all 6
- 3.5 mm (E-4) crochet hook
- Tapestry needle
- Sharp scissors
- Stiff card 4.5 in (11.4 cm) wide, for wrapping tassels
- Rust-proof pins and a blocking mat
- Spray bottle
- Soft tape measure
The quantities above already include a margin of about 25% for gauge swatches, joining tails and tassel trimming.
Abbreviations (US Terms)
- ch – chain
- sl st – slip stitch
- sc – single crochet
- hdc – half double crochet
- dc – double crochet
- sk – skip
- sp – space
- st(s) – stitch(es)
- RS – right side
Special stitch: Join Bridge (JB-n). You work this at a petal tip, right after the middle dc of the petal. Ch n, sl st into the middle dc (tip) of the matching petal on the finished neighbor motif, ch n, then sl st into the top of the middle dc you just made. The result is a neat doubled-chain bar between the two tips. This pattern uses JB-3 for side-to-side joins and JB-5 for top-to-bottom joins.
Gauge and Checkpoints
Make one complete motif before starting the runner, then block it lightly. Gauge in plain chains is 6 ch = 1 in (2.5 cm).
Checkpoints for the test motif:
- After Round 1: 1.25 in (3.2 cm) across
- After Round 2: 2 in (5.1 cm) across
- After Round 3: 3 in (7.6 cm) from tip to tip of two opposite petals, and 2.6 in (6.6 cm) tall when two petal tips point left and right
If your motif is too big, go down to a 3.25 mm (D-3) hook. If it’s too small, go up to a 3.75 mm (F-5) hook. Check the size again before you go on. A difference of 0.25 in (0.6 cm) per motif adds up to 3 in (7.6 cm) over the full 12-motif length.
Flower Motif (Make 36)
Petal numbering matters for the joins. Hold the motif RS up while you work Round 3 (right-handed crocheters work counterclockwise), and call the petals P1 to P6 in the order you make them:
- P1 points right
- P2 points upper right
- P3 points upper left
- P4 points left
- P5 points lower left
- P6 points lower right
Left-handed crocheters work clockwise, so mirror these directions.
Round 1: Make a magic ring. Ch 3 (counts as dc), 17 dc in the ring. Pull the ring snug but leave a small open center about 0.25 in (0.6 cm) wide. Join with sl st to the top of the beginning ch-3. (18 dc)
Round 2: Ch 1, sc in the same st. Ch 5, sk 2 sts, sc in the next st. Repeat from * to * 4 more times. Ch 5, sk the last 2 sts and join with sl st to the first sc. (6 sc and 6 ch-5 sps, for 36 sts in total: 6 sc + 30 ch)
Round 3 (petals): Sl st into the first ch-5 sp. Work (sc, hdc, 5 dc, hdc, sc) into each ch-5 sp, then join with sl st to the first sc. (6 petals of 9 sts each = 54 sts)
The 3rd dc of each group of 5 is the petal tip. All joins attach there. On the first motif, fasten off and weave in the ends.
Joining as You Go
Work the runner one row at a time from the top end, going left to right in each row. Number the columns A, B and C, and the rows 1 to 12.
Joining logic:
- Joining to the motif on the left: When you reach the middle dc of the new motif’s P4, work JB-3 into the tip of the left neighbor’s P1.
- Joining to the motif above: When you reach the middle dc of the new motif’s P2, work JB-5 into the tip of the upper neighbor’s P6. At the middle dc of P3, work JB-5 into the tip of the upper neighbor’s P5.
Work the rest of each petal as normal after the bridge. The stitch count of Round 3 stays at 54. The bridge chains are extra and are not counted as motif stitches.
Layout grid (every square is one motif, and the joins are shown between them):
Row 1:   A1 -- B1 -- C1
         ||    ||    ||
Row 2:   A2 -- B2 -- C2
         ||    ||    ||
 ...    (repeat to Row 12)
Row 12:  A12 - B12 - C12
-- = one JB-3 (P1 to P4), || = two JB-5 bridges (P6 to P2 and P5 to P3)
What to join on each motif:
- A1: none
- B1, C1: one JB-3
- A2 to A12: two JB-5
- B2 to B12 and C2 to C12: one JB-3 and two JB-5
This gives 2 x 12 = 24 horizontal bridges and 3 x 11 x 2 = 66 vertical bridges.
Bridge spacing: A JB-3 is 0.5 in (1.3 cm) long, so motif centers sit 3.5 in (8.9 cm) apart across the runner. A JB-5 is 0.9 in (2.3 cm) long. The tips of P2/P3 and P5/P6 sit 1.3 in (3.3 cm) above and below the motif’s center, so motif centers are also 1.3 + 0.9 + 1.3 = 3.5 in (8.9 cm) apart along the runner. That spacing gives the even, square lattice.
Tension: Keep the bridge chains the same size as your normal chains. If the chains are tight, the lattice puckers. If they’re loose, the motifs twist out of line. Keep each new motif flat on the table while you make a join.
Size checkpoints:
- After Row 1: 3 x 3 in + 2 x 0.5 in = 10 in (25.4 cm) wide
- After Row 3: 2 x 3.5 in + 2.6 in = 9.6 in (24.4 cm) long
- After Row 6: 5 x 3.5 in + 2.6 in = 20.1 in (51.1 cm) long
- After Row 12: 11 x 3.5 in + 2.6 in = 41.1 in (104.4 cm) long
Border (Edge Finish and Tassels)
The runner has no separate border round. The free petals form the edge, so the “border gauge” is simply the motif gauge, 3 in (7.6 cm) per motif plus 0.5 in (1.3 cm) per horizontal bridge. Here is what each edge should show:
- Each long side: 12 free P4 tips (column A) or 12 free P1 tips (column C), one per motif, spaced 3.5 in (8.9 cm) apart
- Top short end: 3 motifs x 2 free tips (P2 and P3) = 6 free tips
- Bottom short end: 3 motifs x 2 free tips (P5 and P6) = 6 free tips
Why the math works: Every motif on the edge adds exactly one free tip per long side, and each end motif adds exactly two free tips per short end. No stitches are added at the seams, so the edge pattern repeats evenly with nothing to fudge at the corners. Corner motifs (A1, C1, A12, C12) count once on the side and once on the end, using different petals each time, so nothing is counted twice.
Tassels (make 6):
- Wrap yarn 40 times around the 4.5 in (11.4 cm) card.
- Slide a 12 in (30.5 cm) tie strand under the wraps at the top edge and knot it tightly. Leave both tie ends long.
- Cut through the wraps along the bottom edge.
- To form the rounded head, wrap a separate 18 in (45.7 cm) strand tightly 8 times around the bundle, 0.6 in (1.5 cm) below the top. Knot it, then use the needle to bury the ends inside the tassel.
- Steam the tassel lightly and trim it so it measures 4 in (10.2 cm) from the top of the head to the cut ends.
Attaching the tassels: At the bottom end, find the sc in the valley between P5 and P6 on A12, B12 and C12. That spot is the lowest point at the center of each motif. Thread both tie ends through that sc, pull the tassel head snug against the motif, knot securely and hide the ends inside the head. Repeat at the top end, using the valley sc between P2 and P3 on A1, B1 and C1.
Final Blocking
- Weave in all remaining ends, following the lines of the stitches.
- Soak the runner in cool water for 10 minutes, then press the water out gently. Don’t wring it.
- Roll it in a towel to remove the extra moisture.
- Lay it flat on the blocking mat. Pin the four corner motifs first, so the runner measures 10 in x 41.1 in (25.4 cm x 104.4 cm).
- Pin every bridge straight, then pin each free petal tip on the outer edges.
- Open each flower’s center with a fingertip.
- Leave the tassels hanging free over the edge of the mat. Comb them straight with your fingers.
- Leave it all to dry completely, usually 24 hours.
Final Quality-Control Checklist
- Every motif has 54 sts in Round 3 and 6 even petals
- All 36 motifs are 3 in (7.6 cm) across, within 0.125 in (0.3 cm)
- There are 24 JB-3 bridges and 66 JB-5 bridges, none of them twisted
- The width is 10 in (25.4 cm) along the whole length
- The length is 41.1 in (104.4 cm) without tassels
- Each long side has 12 free tips and each short end has 6 free tips
- All 6 tassels are 4 in (10.2 cm) long with matching heads
- No ends are visible on the RS
Troubleshooting
- Petals cup upward: Round 2 chains are too short or too tight. Try ch 6 arcs, or use a larger hook for Round 2 only.
- Petals ruffle: Round 2 chains are too loose. Tighten your chains or drop to a smaller hook.
- The center hole closed up: You pulled the magic ring too tight. Re-block and open the center with a pin.
- The lattice leans to one side: You joined a bridge to the wrong petal. Check the P-numbers and redo that join.
- The runner is narrower at one end: Your tension on the bridges changed partway through. Re-block to the 10 in (25.4 cm) width, or redo the tight bridges.
- Tassels splay out: The head wrap is loose. Rewrap it more tightly and steam the tassel.
Care
Hand wash in cool water with a mild detergent, then lay flat and pin back to size to dry. Don’t tumble dry, because the bridges will stretch and the tassels will tangle.
Final Notes
The measurements build on each other:
- Rounds 1 to 3 give a 3 in (7.6 cm) motif with 54 sts.
- JB-3 and JB-5 bridges set the motif centers 3.5 in (8.9 cm) apart in both directions.
- Three columns make the runner 10 in (25.4 cm) wide, and twelve rows make it 41.1 in (104.4 cm) long.
- Tassels of 4 in (10.2 cm) at each end bring the total length to 49.1 in (124.7 cm).
Check your test motif, keep the bridge chains even and block carefully, and the lattice will lie flat with every flower in line.
Happy crocheting!