

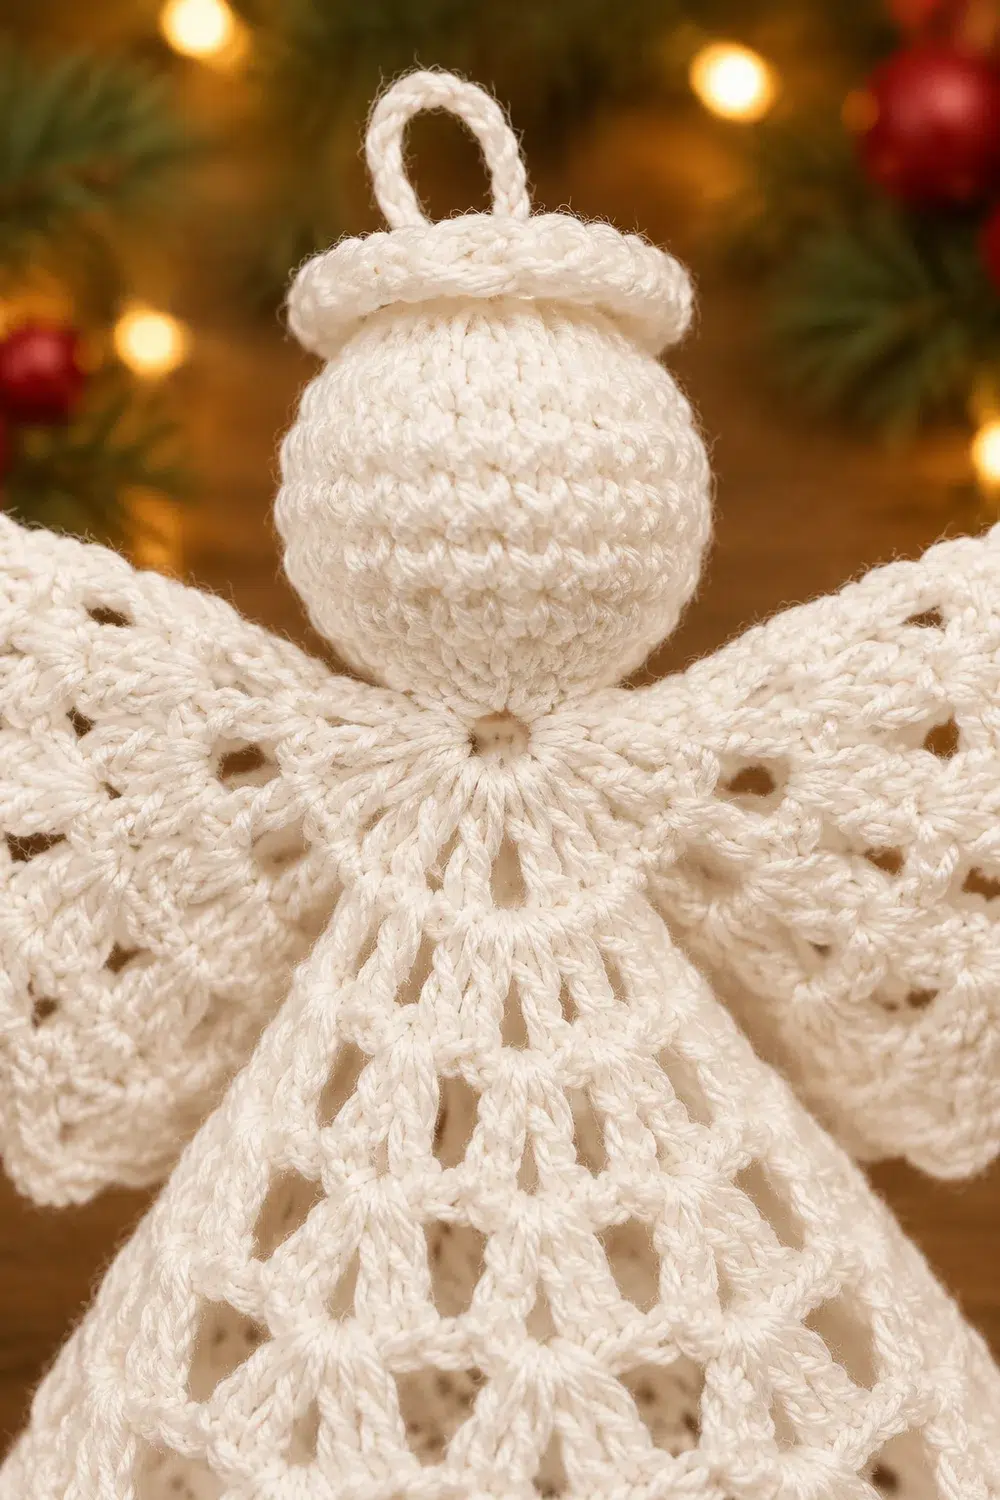
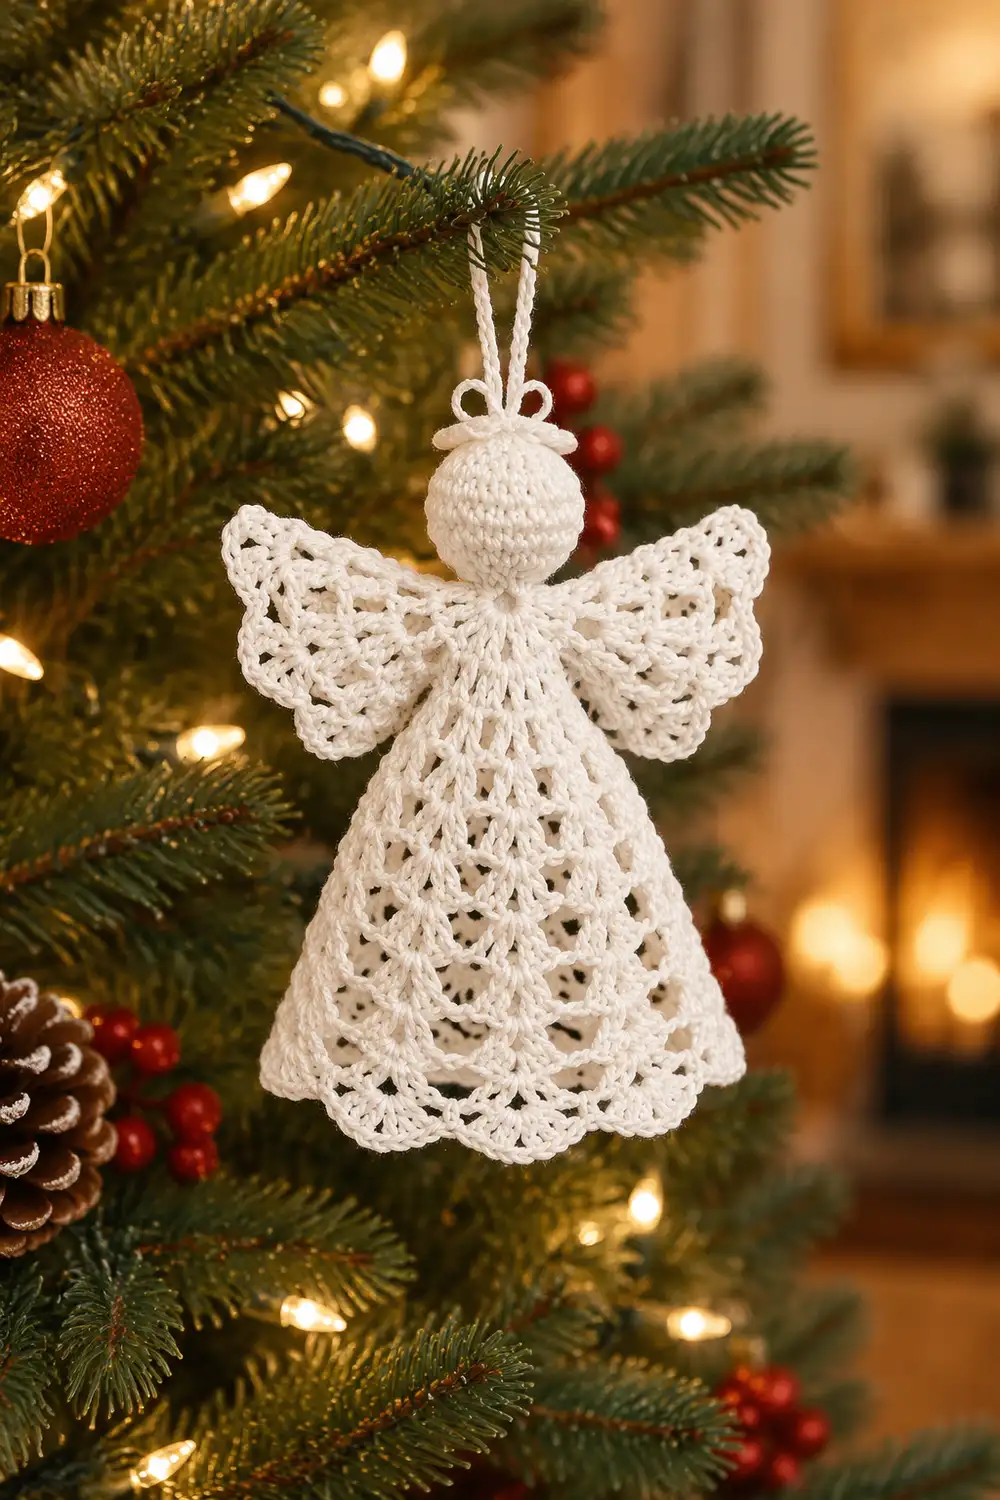
This little angel is a classic Christmas heirloom. She has a smooth, rounded head with a hanging loop on top, a fitted lacy bodice, two wide shell-stitch wings stretched out to the sides, and an airy bell-shaped skirt that flares to a softly scalloped hem.
The whole ornament is worked in a single cream or off-white cotton. The single color keeps the focus on the stitch texture: dense sc on the head, open V-stitch mesh on the bodice, and stacked shells on the wings and skirt. After stiffening, she stands upright on her own, which makes her perfect for gift boxes, mantels, and tree branches.
The pattern uses US crochet terms. The finished angel measures about 4.5 in (11.4 cm) tall, not counting the hanging loop, with a wingspan of about 4.75 in (12.1 cm).
Construction is one continuous piece. You work the head top-down as a stuffed amigurumi ball, then increase straight out of the neck into the bodice and skirt in joined rounds. The wings are worked in rows directly onto the bodice, and a final scallop round finishes the hem. There is no sewing except for weaving in ends.
Finished Size and Construction
- Finished size: 4.5 in (11.4 cm) tall × 4.75 in (12.1 cm) wingspan
- Skill level: Intermediate (amigurumi basics plus lace shells)
- Terminology: US crochet terms
- Yarn weight: Super Fine (#1), fingering-weight mercerized cotton
- Hook: 2.25 mm (US B-1)
- Number of pieces: 1 (head, bodice, skirt, and wings are all worked as one piece)
- Layout: head on top, wings worked off the bodice sides, bell skirt below
- Piece size: 4.5 in × 4.75 in (11.4 cm × 12.1 cm)
- Size before border: about 4 1/8 in (10.5 cm) tall
- Border depth: 3/8 in (1.0 cm), one scallop round at the hem
Materials
Yarn advice: Choose a smooth, tightly plied mercerized cotton in fingering weight. Cotton holds stiffener well and shows stitch definition clearly. Avoid fuzzy or very soft acrylics, because the skirt may not hold its bell shape.
- Cream / off-white: 20 g (about 70 m)
Tools:
– 2.25 mm (US B-1) crochet hook
– Small amount of polyester fiberfill
– Stitch marker
– Tapestry needle
– Scissors
– Fabric stiffener, or a starch or glue-water mix
– Cardstock and tape (for a skirt cone form)
– Blocking foam and rust-proof pins
The quantity above includes a margin of about 50%. The angel itself uses roughly 13 g.
Abbreviations (US Terms)
- ch – chain
- sl st – slip stitch
- sc – single crochet
- dc – double crochet
- inc – 2 sc in the same stitch
- sc2tog – single crochet 2 together
- MR – magic ring
- st(s) – stitch(es)
- sp – space
Special stitches:
– V-st: (dc, ch 1, dc) in the same st or sp.
– Wide V-st: (dc, ch 2, dc) in the same sp.
– Shell: (2 dc, ch 1, 2 dc) in the same sp.
– Large shell: (2 dc, ch 2, 2 dc) in the same sp.
– Big shell: (3 dc, ch 2, 3 dc) in the same sp.
Gauge and Checkpoints
Gauge:
– 7 sc and 9 sc rounds = 1 in (2.5 cm)
– 4 dc rounds = 1 in (2.5 cm) in height
– One border scallop repeat (9 dc + 1 sc) = 0.75 in (1.9 cm) wide
Test first: Work the head through Round 4 before committing. The flat circle should measure about 1.1 in (2.8 cm) across. If it is larger, go down to a 2.0 mm hook. If it is smaller, go up to a 2.5 mm hook. Every later measurement depends on this gauge.
Checkpoints:
– Head: about 1.1 in (2.8 cm) wide and 1.25 in (3.2 cm) tall when stuffed
– After Round 13: circumference about 3.5 in (8.9 cm)
– After Round 15: bodice flat width about 1.75 in (4.4 cm); neck to bodice end about 7/8 in (2.2 cm)
– After Round 18: skirt flat width about 3 in (7.6 cm)
– After Round 23: skirt flat width about 4.25 in (10.8 cm); skirt height (Rounds 16–23) about 2 in (5.1 cm)
– After the border: hem flat width about 4.5 in (11.4 cm); total height 4.5 in (11.4 cm)
– Each wing: about 1.5 in (3.8 cm) long from the bodice
If a checkpoint runs more than 0.25 in (0.6 cm) too big, rip back and use a smaller hook. If it runs too small, use a larger hook. Lace relaxes slightly with stiffening, but it will not shrink.
Head
The head is worked top-down in a continuous spiral. Mark the first st of each round.
- Round 1: MR, 6 sc in ring. Pull tight. (6)
- Round 2: inc in each st. (12)
- Round 3: (sc, inc) 6 times. (18)
- Round 4: (2 sc, inc) 6 times. (24)
- Rounds 5–8: sc in each st. (24)
- Round 9: (2 sc, sc2tog) 6 times. (18)
- Round 10: (sc, sc2tog) 6 times. (12)
Stuff the head firmly and round it out with your fingers.
- Round 11: sc2tog 6 times. (6) Add a little more stuffing, then sl st in the next st.
Do not fasten off. The tight sc fabric gives the head its subtle texture and rounded dome. The 6 sts of Round 11 become the neck.
Bodice
From here, work in joined rounds. Do not turn.
- Round 12: ch 1, 2 sc in each st, join with sl st to the first sc. (12 sc)
- Round 13: ch 3 (counts as dc), dc in the same st, 2 dc in each remaining st, join to the top of ch-3. (24 dc)
This join marks the center back. Counting the ch-3 as dc 1, dc 7 and dc 19 are the side points. You will work the wings around these posts later.
- Round 14: ch 4 (counts as dc + ch 1), dc in the same st (first V-st). Skip the next dc, V-st in the next dc. Repeat from * 10 more times, skip the last dc, and join to the 3rd ch of ch-4. (12 V-sts)
- Round 15: sl st into the first ch-1 sp, ch 4 (counts as dc + ch 1), dc in the same sp, V-st in each remaining V-st sp, join. (12 V-sts)
These two V-stitch rounds create the fitted, open mesh bodice.
Skirt
The skirt widens gradually. The stitches grow by enlarging the shells and adding chains between them, which produces the A-line bell shape without ruffling.
- Round 16: sl st into the first ch-1 sp, ch 5 (counts as dc + ch 2), dc in the same sp, wide V-st in each remaining V-st sp, join to the 3rd ch of ch-5. (12 wide V-sts: 24 dc, 12 ch-2 sps)
- Round 17: sl st into the first ch-2 sp, ch 3 (counts as dc), (dc, ch 1, 2 dc) in the same sp, shell in each remaining ch-2 sp, join to the top of ch-3. (12 shells: 48 dc)
- Round 18: sl st in the next dc and into the ch-1 sp, ch 3, (dc, ch 1, 2 dc) in the same sp. Ch 1, shell in the next shell sp. Repeat from * 10 more times, ch 1, join. (12 shells, 12 ch-1 sps between: 48 dc)
- Round 19: sl st in the next dc and into the shell sp, ch 3, (dc, ch 2, 2 dc) in the same sp. Ch 1, large shell in the next shell sp. Repeat from * 10 more times, ch 1, join. (12 large shells: 48 dc, 12 ch-1 sps between)
- Round 20: Repeat Round 19, working each large shell into the ch-2 sp of the previous large shell. (12 large shells: 48 dc)
- Round 21: sl st in the next dc and into the ch-2 sp, ch 3, (2 dc, ch 2, 3 dc) in the same sp. Ch 1, big shell in the next ch-2 sp. Repeat from * 10 more times, ch 1, join. (12 big shells: 72 dc, 12 ch-1 sps between)
- Rounds 22–23: sl st in the next 2 dc and into the ch-2 sp, ch 3, (2 dc, ch 2, 3 dc) in the same sp. Ch 1, big shell in the next ch-2 sp. Repeat from * 10 more times, ch 1, join. (12 big shells: 72 dc each round)
Do not fasten off. Check that the skirt measures about 4.25 in (10.8 cm) wide when laid flat.
Wings
Each wing is a fan worked in turned rows, growing outward from one side post of Round 13. Work both wings with the back of the angel facing you.
Right wing: Join the yarn with a sl st around the post of dc 7 of Round 13.
- Row 1: ch 3 (counts as dc), 4 dc around the same post. (5 dc)
- Row 2: ch 3 (counts as dc), turn, dc in the first st, 2 dc in each of the next 3 dc, 2 dc in the top of the turning ch. (10 dc)
- Row 3: ch 4 (counts as dc + ch 1), turn. Dc in the next dc, ch 1. Repeat across, ending with dc in the top of the turning ch and no ch after it. (10 dc, 9 ch-1 sps)
- Row 4: turn, sl st into the first ch-1 sp, ch 3, (dc, ch 1, 2 dc) in the same sp. Skip the next ch-1 sp, shell in the next ch-1 sp. Repeat from * 3 more times. (5 shells, worked in sps 1, 3, 5, 7, and 9: 20 dc)
- Row 5: turn, sl st in the next dc and into the shell sp, ch 3, (dc, ch 1, 2 dc) in the same sp. Ch 1, shell in the next shell sp. Repeat from * 3 more times. (5 shells, 4 ch-1 sps: 20 dc)
- Row 6: turn, sl st in the next dc and into the shell sp, ch 3, 6 dc in the same sp. Sc in the next ch-1 sp, 7 dc in the next shell sp. Repeat from * 3 more times. (5 seven-dc scallops, 4 sc)
Fasten off.
Left wing: Join around the post of dc 19 of Round 13 and repeat Rows 1–6.
Each wing should extend about 1.5 in (3.8 cm), giving a 4.75 in (12.1 cm) wingspan across the 1.75 in (4.4 cm) bodice.
Border
The hem border is one scallop round, worked with the live loop from Round 23.
Border gauge: One repeat (9 dc + 1 sc) measures 0.75 in (1.9 cm). Twelve repeats × 0.75 in = 9 in (22.9 cm) around, which lies at 4.5 in (11.4 cm) wide when flattened.
- Round 24: sl st in the next 2 dc and into the ch-2 sp, ch 3 (counts as dc), 8 dc in the same sp. Sc in the next ch-1 sp, 9 dc in the next ch-2 sp. Repeat from * 10 more times, sc in the last ch-1 sp, and join to the top of ch-3. (12 scallops, 12 sc: 108 dc + 12 sc = 120 sts)
Counts per side: With the skirt flattened (the join at center back), each half holds 6 scallops and 6 sc. That makes 54 dc + 6 sc = 60 sts per side, and 2 sides × 60 = 120 sts.
Why the math works: Round 23 has exactly 12 ch-2 sps and 12 ch-1 sps. Every scallop uses one ch-2 sp and every sc uses one ch-1 sp, so nothing is skipped or doubled. Each Round 23 repeat spans 9 elements (6 dc, ch 2, ch 1), and each 9-dc scallop covers it with a gentle outward curve. That curve creates the scallop shape without ruffling.
Fasten off.
Hanging loop: Join the yarn at the center of the magic ring on top of the head. Ch 12, then sl st into the same spot. Fasten off. The loop stands about 0.5 in (1.3 cm) above the head.
Final Blocking
- Weave in all ends along the dc posts so they disappear in the lace.
- Roll cardstock into a cone about 4 in (10.2 cm) tall that fits snugly inside the skirt. Wrap it in plastic wrap.
- Soak the angel (not the head) in stiffener and squeeze out the excess. Dab a little stiffener onto the head and loop.
- Slide the skirt over the cone. Even out the shells so the columns run straight down, and spread the scallops evenly.
- Lay the wings horizontally against foam behind the cone. Pin each scallop point and open each shell space.
- Check the measurements: 4.5 in (11.4 cm) tall, 4.75 in (12.1 cm) wingspan, and a 4.5 in (11.4 cm) wide hem.
- Dry completely, for 24 hours or more, before removing the cone and pins.
Final Quality-Control Checklist
- The head is round and firm, with no stuffing showing through.
- The neck is centered and the head sits straight above the bodice.
- The bodice has 12 V-sts with open, even mesh holes.
- The skirt has 12 shell columns running vertically.
- The hem has 12 scallops, 6 per side.
- Both wings have 5 scallops and match in length, at 1.5 in (3.8 cm) each.
- The wings sit level and at the same height.
- The angel stands upright without tipping.
- The hanging loop is secure and centered.
- No ends are visible.
Troubleshooting
- The skirt ruffles: Your tension is loose. Go down a hook size, or work the ch-1 between shells more tightly.
- The skirt cups inward: Your chains are too tight. Loosen them, or go up a hook size for Rounds 18–24.
- The head looks lumpy: Add stuffing in small pieces and shape the head as you go. Avoid large clumps.
- The wings are uneven: Recount Row 3 (10 dc) and Row 4 (shells in alternate sps). Make sure both wings start on matching posts (dc 7 and dc 19).
- The wings droop: Apply more stiffener and pin them flat until they are fully dry.
- The angel tips over: Re-block on a straighter cone and even out the hem so all scallops touch the surface.
- Join seams look slanted: Always join to the top of the starting ch, then sl st to the next sp as written.
Care
Dust gently or spot-clean with a damp cloth. If washed, the angel will soften and need re-stiffening on its cone.
Final Notes
The measurement chain is simple. A 1.1 in (2.8 cm) head leads to a bodice circumference of 3.5 in (8.9 cm) after Round 13. The bodice reaches 1.75 in (4.4 cm) wide after Round 15. The skirt measures 3 in (7.6 cm) wide after Round 18 and 4.25 in (10.8 cm) after Round 23. The border brings the hem to 4.5 in (11.4 cm) and the total height to 4.5 in (11.4 cm). The two 1.5 in (3.8 cm) wings finish the 4.75 in (12.1 cm) wingspan.
Check the gauge on the head first, confirm each checkpoint, and your angel will come out the right size.
Happy crocheting!