

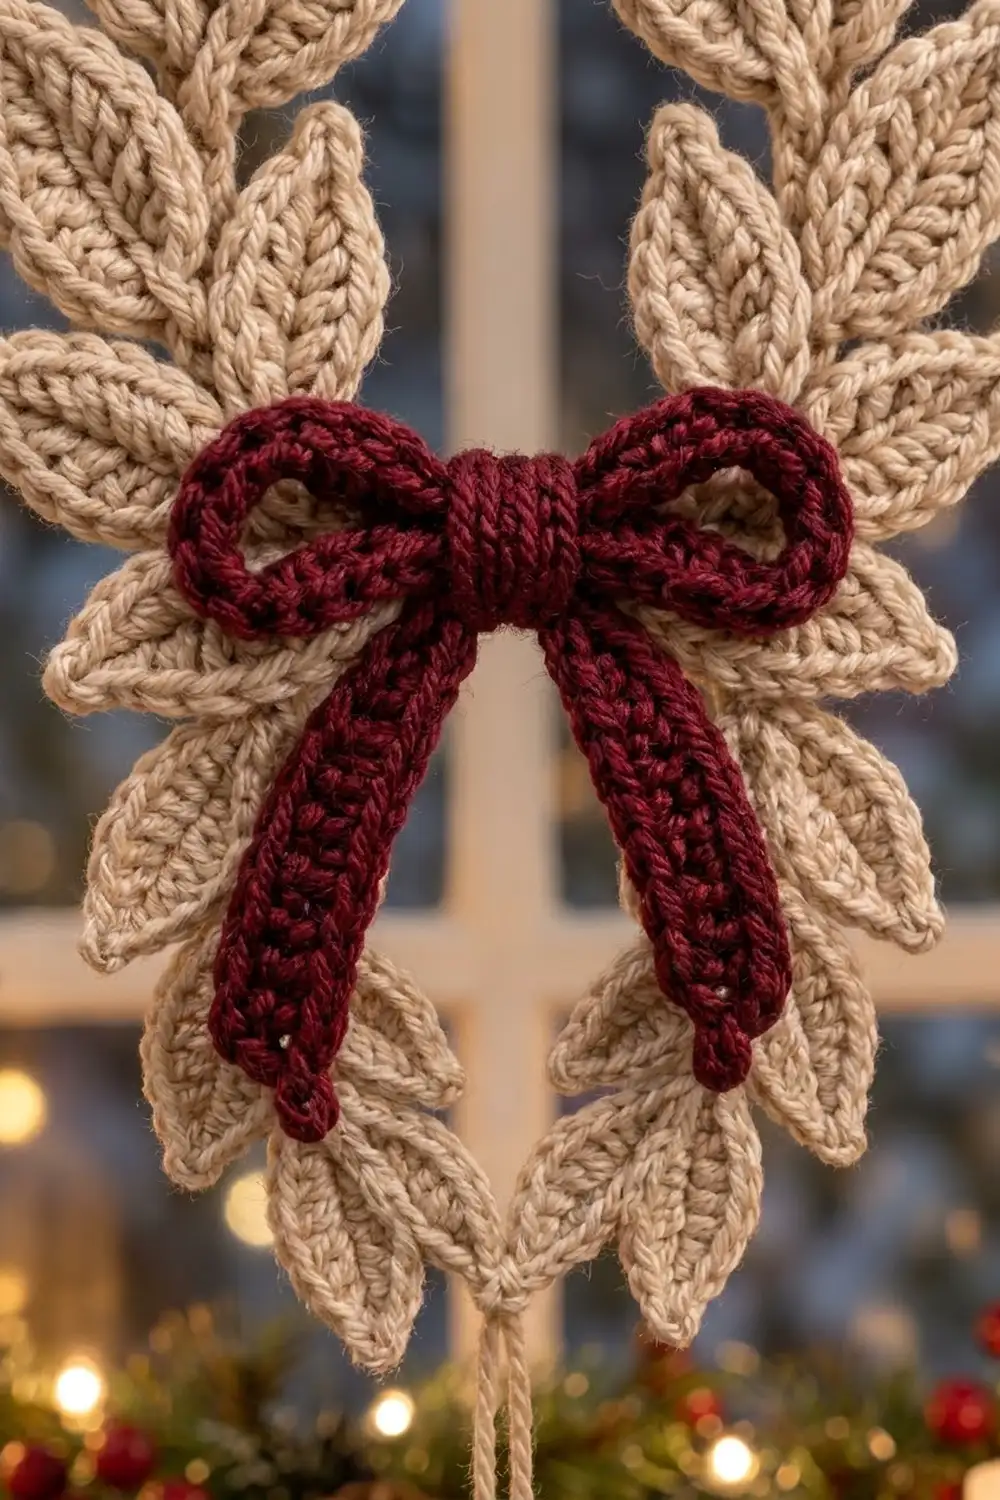
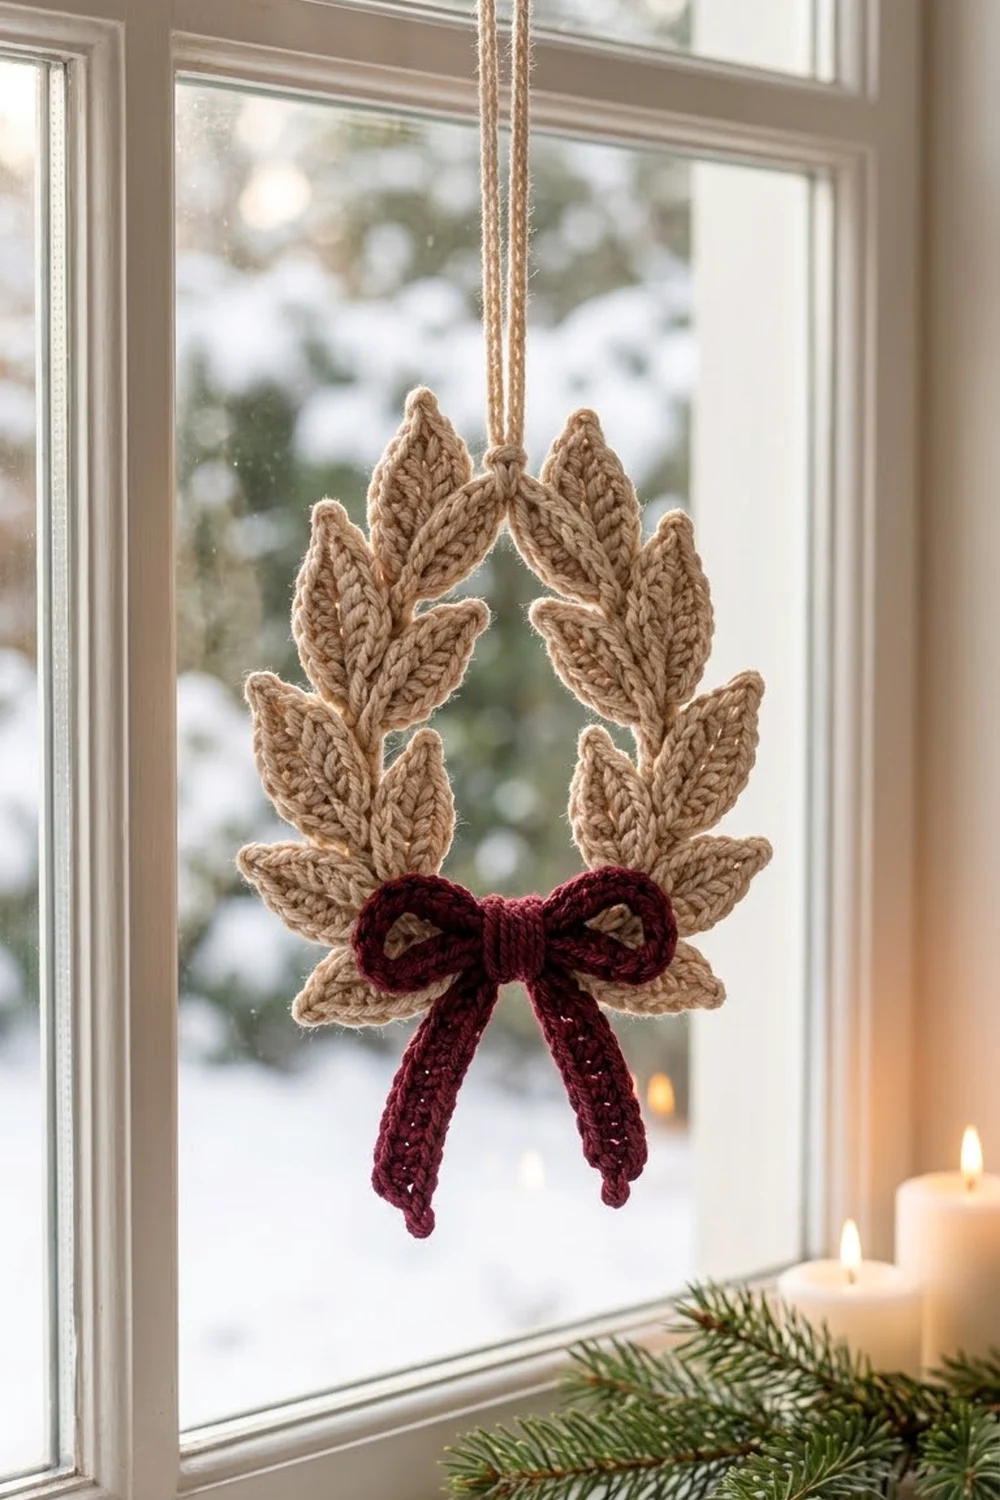
This Winter Laurel Wreath Ornament is a small hanging wreath made of fourteen pointed leaves in warm oatmeal beige. The leaves sit along two curved branches that meet at the top and the bottom. A deep burgundy bow covers the bottom join. A long beige chain loop lets the ornament hang from a tree branch, a window garland, or a gift.
The look is quiet and classic: textured cream leaves, one strong accent color, and no extra trims. The foundation chain gives each leaf a clear center line, and a back-loop border round gives it a neat ridged outline. The style suits rustic, Scandinavian, or traditional holiday decor.
This pattern uses US crochet terms. The finished ornament measures about 5 in (12.7 cm) wide and 6 in (15.2 cm) tall, not counting the hanging loop. The loop adds about 3 in (7.6 cm) above the top.
Construction is simple. You crochet 14 identical leaves, 2 beige stem cords, 1 beige hanging loop, and 2 burgundy bow strips. Then you sew the leaves onto the stems in pairs and join the two branches into a wreath shape. Last, you add the loop at the top and the bow over the bottom join.
Finished Size and Construction
- Finished size: 5 in (12.7 cm) wide x 6 in (15.2 cm) tall, plus a 3 in (7.6 cm) hanging loop
- Skill level: Easy to intermediate (simple stitches, careful sewing)
- Terminology: US crochet terms
- Yarn weight: DK (weight 3) cotton or cotton blend
- Hook: 3.25 mm (US D/3)
- Number of pieces: 19 (14 leaves, 2 stems, 1 hanging loop, 2 bow strips)
- Layout: two mirrored branches of 7 leaves each (1 tip leaf + 3 pairs), joined into a wreath
- Leaf size (finished): 2 in (5.1 cm) long x 1 in (2.5 cm) wide
- Leaf size before border: 1.75 in (4.4 cm) long x 0.75 in (1.9 cm) wide
- Border depth: 0.125 in (0.3 cm) on each edge of every leaf
Materials
Choose a smooth DK cotton, either mercerized or matte. Cotton holds the leaf points crisply and shows the stitch texture well. Avoid fuzzy yarns; they blur the center line and the ridged outline.
- Color A – Oatmeal beige: 25 g / 60 m (leaves, stems, hanging loop)
- Color B – Burgundy: 5 g / 12 m (bow)
Quantities include a margin of about 20% for the test leaf and sewing tails.
Tools:
- 3.25 mm (US D/3) crochet hook
- Tapestry needle
- Scissors
- Stitch markers
- Rust-proof pins
- Spray bottle and a foam blocking mat
- Ruler or tape measure
Abbreviations (US Terms)
- ch – chain
- sl st – slip stitch
- sc – single crochet
- hdc – half double crochet
- dc – double crochet
- st(s) – stitch(es)
- sp – space
- BLO – back loop only
- rnd – round
Special technique – working the underside of the chain: after you finish one side of the foundation chain, rotate the work so the unused bottom loops face up. Insert the hook under the single bottom loop of each chain. This keeps the original chain centered in the leaf and creates the visible center vein.
Gauge and Checkpoints
Gauge: 5 sc = 1 in (2.5 cm) in DK cotton with a 3.25 mm hook. Foundation chains also measure about 5 ch per 1 in (2.5 cm).
Always make one complete leaf before you make the rest. Measure at each stage:
- After the foundation chain (ch 10): about 2 in (5.1 cm) long, unstretched.
- After Rnd 1: 1.75 in (4.4 cm) long x 0.75 in (1.9 cm) wide.
- After Rnd 2 (border): 2 in (5.1 cm) long x 1 in (2.5 cm) wide.
- Stem cord: 25 sc = 5 in (12.7 cm).
If your leaf is too big: go down to a 3.0 mm hook. Also check that you are not pulling up tall loops on the hdc and dc.
If your leaf is too small: go up to a 3.5 mm (US E/4) hook.
A difference of 0.125 in (0.3 cm) per leaf is fine. A difference of 0.25 in (0.6 cm) or more will change the wreath shape, so adjust before continuing.
Leaf (Make 14 in Color A)
You work the leaf in rounds around both sides of a foundation chain with 9 working chains. Below, the chains are numbered from the hook. Chain 1 is the 2nd ch from the hook, and chain 9 is the last chain, next to the slip knot. Chain 1 becomes the pointed tip; chain 9 becomes the rounded base.
Foundation: Ch 10.
Rnd 1 (shaping round):
- Side A: sc in 2nd ch from hook (chain 1), hdc in next ch (chain 2), dc in next 5 ch (chains 3–7), hdc in next ch (chain 8). That is 8 sts on Side A.
- Base: 3 sc in last ch (chain 9). That is 3 sts.
- Rotate the work and continue along the underside of the foundation chain.
- Side B: hdc in next ch (chain 8), dc in next 5 ch (chains 7–3), hdc in next ch (chain 2), sc in next ch (chain 1). That is 8 sts on Side B.
- Tip: ch 2, sl st in first sc of the round.
Stitch count after Rnd 1: 19 sts (8 + 3 + 8) plus one ch-2 tip sp.
Tall dc stitches in the middle of each side and short sc stitches at each end give the leaf its pointed oval shape. The center chain stays as a slightly raised line down the middle of the leaf.
Checkpoint: 1.75 in (4.4 cm) long x 0.75 in (1.9 cm) wide.
Do not fasten off. Go straight to Rnd 2 in the Leaf Border section below, then come back here and make the next leaf.
Stem Cords (Make 2 in Color A)
Each stem is the backbone of one branch.
Foundation: Ch 26.
Row 1: sc in 2nd ch from hook and in each ch across. Fasten off, leaving a 6 in (15.2 cm) tail.
Stitch count: 25 sc.
Checkpoint: 5 in (12.7 cm) long.
Place a marker or pin on sc 1, sc 7, sc 13, and sc 19 of each stem. These are your leaf positions, spaced 6 sts apart, or 1.2 in (3.0 cm).
Hanging Loop (Make 1 in Color A)
Foundation: Ch 31.
Row 1: sl st in 2nd ch from hook and in each ch across. Fasten off, leaving an 8 in (20.3 cm) tail.
Stitch count: 30 sl sts.
Checkpoint: 6 in (15.2 cm) long. Folded in half, it makes a 3 in (7.6 cm) loop.
Bow (Color B)
The bow is made from two flat strips.
Bow loop strip: Ch 31. Row 1: sc in 2nd ch from hook and in each ch across. Fasten off. Count: 30 sc, 6 in (15.2 cm) long.
Bow tail strip: Ch 21. Row 1: sc in 2nd ch from hook and in each ch across. Fasten off. Count: 20 sc, 4 in (10.2 cm) long.
Assemble the bow:
- Lay the loop strip flat. Fold each end in to the center so the two ends overlap by about 0.5 in (1.3 cm). You now have two loops, each about 1.25 in (3.2 cm) wide.
- Fold the tail strip in half into a V shape. Place it behind the center of the loops.
- Wrap a 24 in (61.0 cm) length of Color B tightly around the center 8 to 10 times to form the knot. Secure it on the back and keep the tail for sewing the bow on.
Checkpoint: the bow is about 2.75 in (7.0 cm) wide x 3 in (7.6 cm) tall, with tails hanging about 2 in (5.1 cm) below the knot.
Make All Pieces
Before assembly, check that you have:
- Color A: 14 leaves, 2 stems, 1 hanging loop
- Color B: 1 assembled bow
Layout grid (front view, each branch has 7 leaves):
            [ hanging loop ]
                 knot
     L-tip  /             \  R-tip
   L1o  L1i                R1i  R1o
  L2o  L2i                  R2i  R2o
   L3o  L3i                R3i  R3o
          \    [ BOW ]    /
           stems meet here
- tip = single leaf at sc 1 (top end of stem), pointing up toward the knot
- 1, 2, 3 = leaf pairs at sc 7, sc 13, and sc 19
- o = outer leaf, pointing away from the wreath center
- i = inner leaf, pointing toward the wreath center
Joining
Method: whipstitch, using each leaf’s own sewing tail and a tapestry needle.
Stitch-to-stitch logic:
- Sew the base of each leaf (the 6 border sc around the base) to the stem over 2 sc: the marked sc and the sc below it. For a pair, sew both leaves to that same marked sc and the sc below it, one on each side of the stem.
- Sew the tip leaf at sc 1 so it continues the stem line straight up.
- For each pair, sew the outer leaf first at about 45 degrees outward, then the inner leaf at about 45 degrees inward. Each leaf in a pair slightly overlaps the base of the leaf above it.
- Tack each leaf to the leaf next to it at one point, about 0.5 in (1.3 cm) up from the base, so the leaves stay layered.
- Repeat for the second branch as a mirror image.
- Curve both stems outward. Lay the two tip leaves side by side at the top and sew the top ends of the stems together over 2 sts.
- Bring the bottom ends together. Overlap sc 20–25 of the two stems by 0.5 in (1.3 cm) and sew through both layers.
Tension advice: pull each sewing stitch just snug. Tight sewing puckers the stem and pulls leaves out of position. Loose sewing lets leaves flip forward.
Size checkpoint: before you add the bow and loop, the wreath should measure 5 in (12.7 cm) wide x 6 in (15.2 cm) tall.
Finishing the join: fold the hanging loop in half and sew both ends behind the top join. Wrap Color A 5 times around the base of the loop to make the small knot. Sew the bow over the bottom join, stitching through the wrapped center so the bow does not twist.
Leaf Border
The border is Rnd 2 of each leaf. It makes the ridged outline and brings the leaf to its final size. Work it right after Rnd 1, before any joining. It has its own section so the border math is in one place.
Border gauge: 5 sc = 1 in (2.5 cm), the same as the main gauge. Work in BLO everywhere except the tip sp.
Rnd 2 (border round): ch 1, then:
- Side A: sc BLO in each of the first 8 sts. Side A count: 8 sc.
- Base: 2 sc BLO in each of the next 3 sts. Base count: 6 sc.
- Side B: sc BLO in each of the next 8 sts. Side B count: 8 sc.
- Tip: (sc, ch 2, sc) in ch-2 sp. Tip count: 2 sc plus one ch-2 sp.
- Sl st in first sc to join. Fasten off, leaving a 10 in (25.4 cm) tail for sewing.
Stitch count after Rnd 2: 24 sc (8 + 6 + 8 + 2) plus one ch-2 sp. This is a trim round. The count is 19 sts worked once each, plus 3 extra sts at the base and 2 sc in the tip sp: 19 + 3 + 2 = 24.
Why the math works: the straight sides get 1 sc per existing st, so they stay flat and do not ruffle. The base turns 180 degrees, so its 3 sts get 2 sc each to lie flat around the curve. The ch-2 sp keeps the tip sharp instead of rounded. The border adds 0.125 in (0.3 cm) to each edge. The leaf grows from 1.75 in (4.4 cm) to 2 in (5.1 cm) long, and from 0.75 in (1.9 cm) to 1 in (2.5 cm) wide.
Final Blocking
- Lightly spray the finished ornament with water until it is damp, not soaked.
- Lay it face up on a blocking mat.
- Pin the outer edge of the wreath to 5 in (12.7 cm) wide x 6 in (15.2 cm) tall.
- Pin each leaf tip so the points are sharp and the leaves fan out evenly.
- Shape the two bow loops round with your fingers, and straighten the tails side by side.
- Pin the hanging loop straight up to 3 in (7.6 cm).
- Let it dry completely, usually 6 to 12 hours.
- Remove the pins and check the size once more.
Final Quality-Control Checklist
- All 14 leaves measure 2 in (5.1 cm) x 1 in (2.5 cm).
- Every leaf has 24 sc plus a ch-2 tip after the border.
- The center vein runs straight down each leaf.
- Each branch has 1 tip leaf and 3 pairs, mirrored left and right.
- The wreath measures 5 in (12.7 cm) x 6 in (15.2 cm).
- The top join is hidden under the loop knot.
- The bow fully covers the bottom join.
- The hanging loop is 3 in (7.6 cm) and sewn on securely.
- All tails are woven in on the back.
Troubleshooting
Leaves curl or cup: your dc stitches are too tight. Go up one hook size for Rnd 1, or block flat with more pins.
Leaf edges ripple: you added extra sts on the sides in Rnd 2. Count 8 sc on each side.
Leaf tip is rounded: you skipped the ch 2 at the tip in Rnd 1 or Rnd 2. Always keep the ch-2 sp.
Wreath looks lopsided: the leaf positions do not match. Re-check the markers at sc 1, 7, 13, and 19 on both stems.
Bow twists forward: sew through the wrapped center in two places, not one.
Ornament tilts when hanging: the loop is off-center. Re-sew both loop ends exactly at the top join.
Care
Spot clean with cool water and mild soap, then reshape and dry flat. Store flat in tissue paper so the leaves and bow keep their shape.
Final Notes
The whole ornament depends on one simple measurement chain. A gauge of 5 sc per 1 in (2.5 cm) gives a leaf of 1.75 in (4.4 cm) after Rnd 1 and 2 in (5.1 cm) after the border. Stems of 25 sc reach 5 in (12.7 cm), with leaves placed every 1.2 in (3.0 cm). Two mirrored branches make a wreath of 5 in (12.7 cm) x 6 in (15.2 cm). A 3 in (7.6 cm) loop and a 2.75 in (7.0 cm) burgundy bow finish it.
Check each stage against these numbers, and the wreath will come out the right size and shape. Make one for your own tree, or a few to tie onto gifts.
Happy crocheting!