

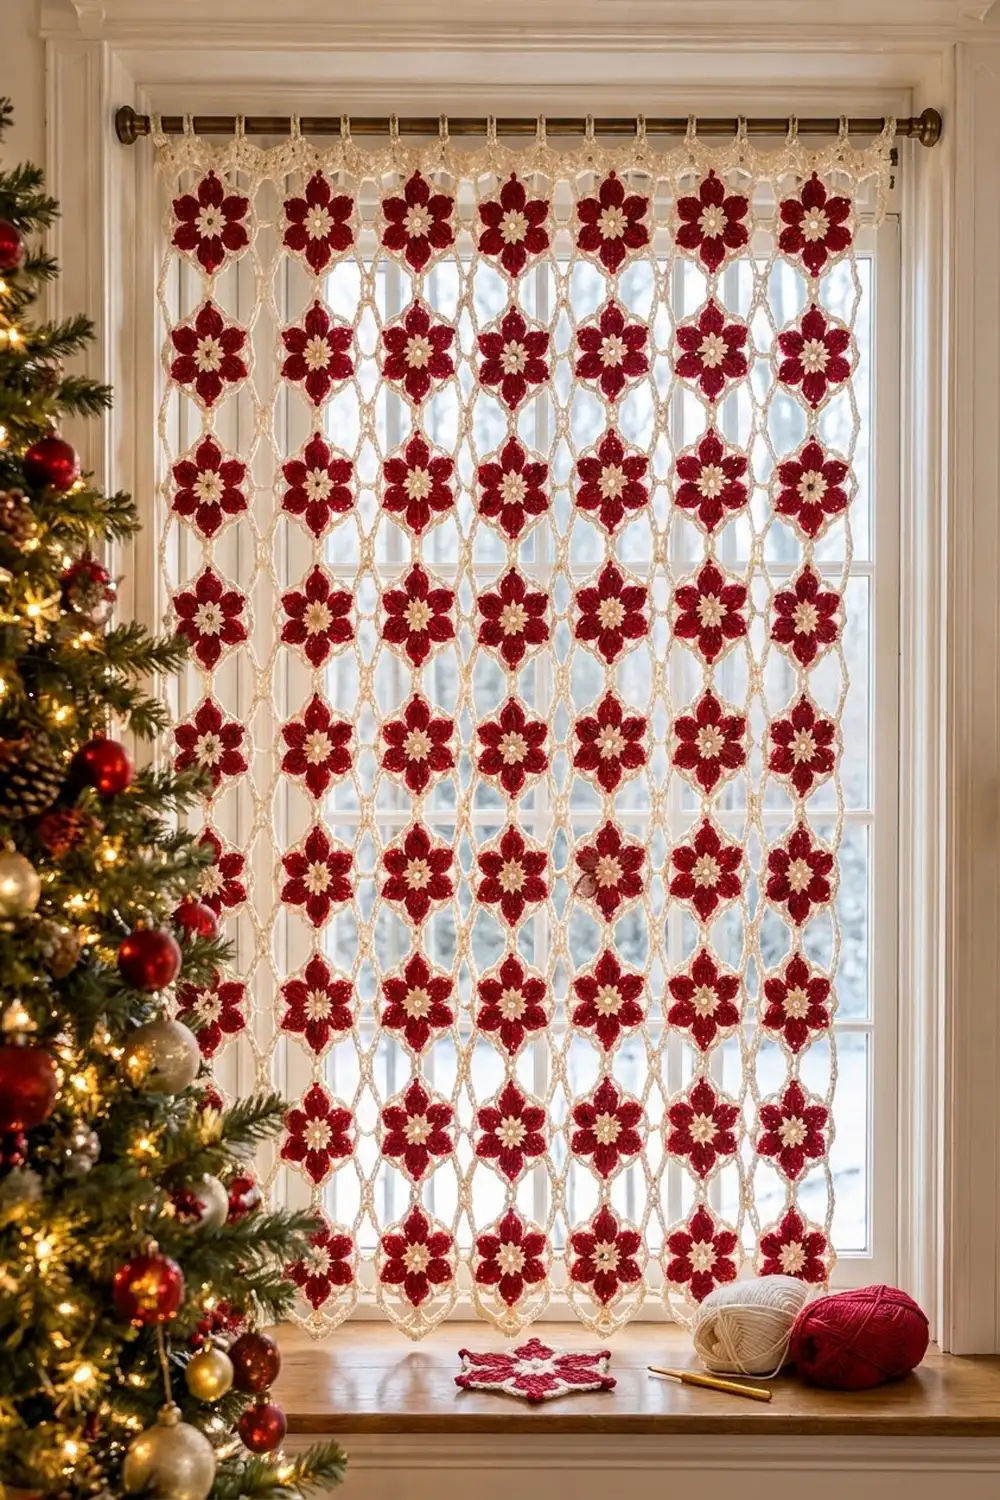
This lace curtain is built from 63 hexagon motifs. Each motif has a deep red poinsettia with six pointed petals, a small cream flower in the center, and an open cream frame. Once the motifs are joined, the spaces between them form a diamond lattice that lets winter light through. It suits a holiday door or window.
The palette is two colors: cranberry red for the petals and warm cream for the centers, frames, joins, and border. The style is traditional and cozy. Tall stitches give the petals texture, and chain spokes keep the frame light and airy.
The pattern uses US crochet terms. The finished curtain measures 37.4 in wide x 55 in tall (95.0 cm x 139.7 cm). The hanging loops add about 1.25 in (3.2 cm) above that.
You make 63 identical motifs in the round. Then you join them in a grid 7 motifs wide and 9 tall: side seams connect the motifs within each row, and tip joins connect the rows. Two border rounds follow the zigzag outline, and a row of hanging loops along the top slips onto curtain rings.
Finished Size and Construction
- Finished size: 37.4 in x 55 in (95.0 cm x 139.7 cm), plus 1.25 in (3.2 cm) loops
- Skill level: Intermediate
- Terminology: US crochet terms
- Yarn weight: DK (weight 3)
- Hook: 4.0 mm (G-6)
- Number of pieces: 63 hexagon motifs
- Layout: 7 across x 9 down, with points at the top and bottom
- Motif size: 6 in (15.2 cm) point to point, 5.2 in (13.2 cm) flat to flat, 3 in (7.6 cm) per side
- Size before border: 36.4 in x 54 in (92.5 cm x 137.2 cm)
- Border depth: 0.5 in (1.3 cm) on every edge
Materials
Yarn advice: Choose a smooth DK yarn with clear stitch definition. Mercerized cotton or a cotton blend hangs crisply and holds the petal points well. Acrylic is softer and lighter. Use the same yarn line for both colors so they match in thickness.
- Cranberry red: 320 g / approx. 736 m (about 4.5 g per motif)
- Cream: 350 g / approx. 805 m (about 3.5 g per motif, plus joining and border)
These amounts assume about 230 m per 100 g. They include a margin of at least 10% for the gauge motif, joining, and ends.
Tools:
- 4.0 mm (G-6) hook, plus 3.5 mm and 4.5 mm hooks for adjusting gauge
- Tapestry needle and scissors
- Rust-proof pins and blocking mats
- Spray bottle
- Measuring tape
- Stitch markers
- 15 curtain rings or clips
Abbreviations (US Terms)
- ch – chain
- sl st – slip stitch
- sc – single crochet
- hdc – half double crochet
- dc – double crochet
- tr – treble crochet (yo twice)
- dtr – double treble crochet (yo 3 times, insert hook, pull up a loop, [yo, pull through 2] 4 times)
- sc2tog / sc3tog – single crochet 2 / 3 together
- sp – space
- st(s) – stitch(es)
- RS / WS – right side / wrong side
Special technique – spoke: Ch 11, sl st into the gap between two petals, then sl st back up the 6 spoke chains to the frame. This leaves a doubled 6-ch bar running from the frame down to the gap, and the first 5 ch of the ch 11 form one frame segment.
Gauge and Checkpoints
Make one complete motif and block it before making the rest. Check these measurements:
- After Round 2: the cream center is 1.25 in (3.2 cm) across.
- After Round 5: the red flower is 5 in (12.7 cm) from tip to tip.
- After Round 7: the motif is 6 in (15.2 cm) point to point and 5.2 in (13.2 cm) flat to flat. Each side is 3 in (7.6 cm) and has 13 sc.
A difference of ±0.125 in (0.3 cm) per side is acceptable. Small errors add up, though: 0.25 in (0.6 cm) per motif becomes 1.75 in (4.4 cm) across 7 motifs.
Too big? Use a 3.5 mm hook. Too small? Use a 4.5 mm hook. If only the frame is off, keep the same hook and adjust your tension on Rounds 6–7.
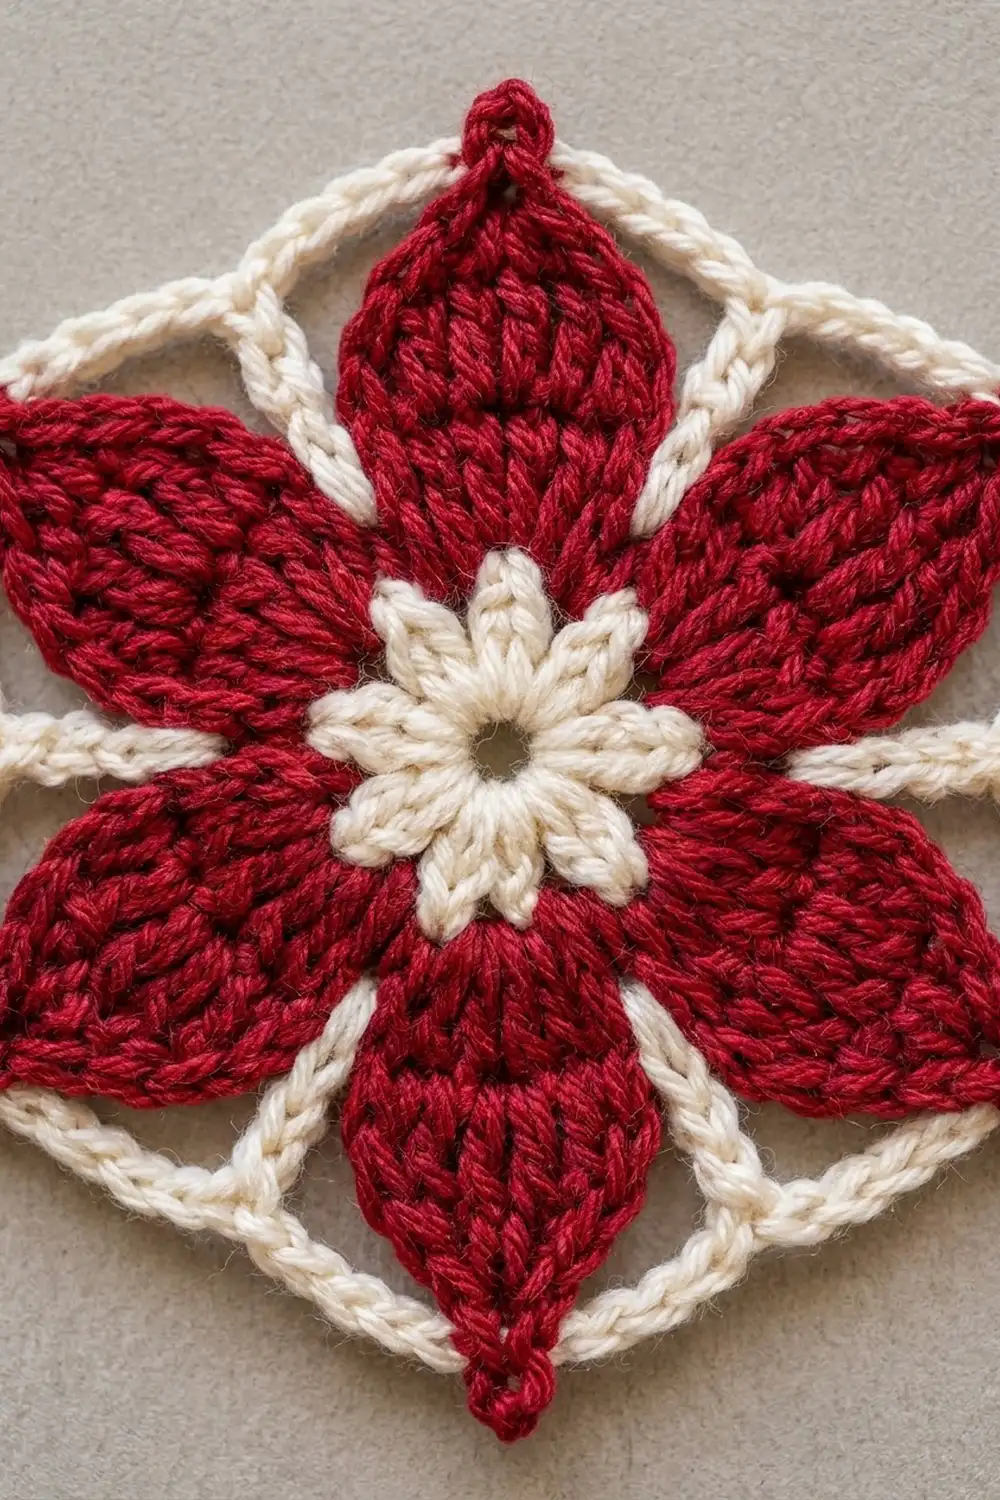
Poinsettia Hexagon Motif
Make 63 motifs. Work with the RS facing on every round and do not turn.
Round 1 (cream): Make a magic ring. Ch 1 and work 12 sc into the ring. Join with a sl st to the first sc. (12 sc)
Round 2 (cream): Ch 1, sc in next st, (hdc, dc, hdc) in next st; repeat from * 5 more times. Join. (24 sts: 6 sc + 6 mini petals) Fasten off. Pull the ring closed until only a tiny hole remains.
Round 3 (red): Join red with a sl st in any sc between two mini petals. Ch 9, skip the mini petal, sl st in next sc; repeat from * 5 more times. The last sl st goes into the joining st. (6 ch-9 loops) Each loop arches behind one mini petal.
Round 4 (red): In each ch-9 loop, work (sc, hdc, 2 dc, 2 tr, 2 dtr, ch 3, 2 dtr, 2 tr, 2 dc, hdc, sc). Join. (96 sts: 16 per petal, plus 6 ch-3 tips) The stitches fan out into a long pointed leaf, and the dtr give the ridged texture at the widest part of each petal.
Round 5 (red): Ch 1. Over each petal, work sc in each of the next 8 sts, then (sc, ch 3, sc) in the tip sp, then sc in each of the next 8 sts. Join. (108 sc: 18 per petal, plus 6 ch-3 tips) This round outlines the petals and sharpens the tips. Fasten off.
Round 6 (cream frame): Join cream in any tip ch-3 sp. Ch 1 and work (sc, ch 3, sc) in the same sp. Make a spoke, placing its sl st between the last sc of this petal and the first sc of the next. Ch 5, then work (sc, ch 3, sc) in the next tip sp; repeat from * 4 more times. Make one last spoke, ch 5, and join. (6 corners, 6 spokes, 12 ch-5 segments) The petal tips now sit at the six corners of the hexagon, and the spokes drop into the gaps between the petals.
Round 7 (cream): Sl st into the corner sp. Ch 1 and work (2 sc, ch 3, 2 sc) in the same sp. Work 4 sc over the next ch-5 segment, sc in the top of the spoke, and 4 sc over the next ch-5 segment. Then work (2 sc, ch 3, 2 sc) in the next corner sp; repeat from * 4 more times. Finish the last side with 4 sc, 1 sc, and 4 sc, then join. (78 sc + 6 corner ch-3 sps)
Per-side count: 2 + 4 + 1 + 4 + 2 = 13 sc between corner ch-3 sps, including the 2 sc of each corner group. 13 x 6 = 78. Fasten off and weave in the ends.
Make All Pieces
Make 63 motifs. All together they use about 284 g red and 221 g cream. Joining and the border take about 45 g more cream.
Every motif is the same, so in the grid below P stands for one poinsettia motif. Place each motif with a point at the top.
ROW 1: P P P P P P P
ROW 2: P P P P P P P
ROW 3: P P P P P P P
ROW 4: P P P P P P P
ROW 5: P P P P P P P
ROW 6: P P P P P P P
ROW 7: P P P P P P P
ROW 8: P P P P P P P
ROW 9: P P P P P P P
Block each motif to 6 in (15.2 cm) point to point before joining.
Joining
Method: Use cream yarn and slip stitch, working from the WS.
Side seams (within a row): Motifs next to each other in a row share a vertical side. Hold two motifs RS together with those sides lined up. Sl st through both corner ch-3 sps, then through each of the 13 matching sc pairs, then through both of the next corner sps. That makes 15 sl sts per seam, joined stitch to stitch with none added or skipped. There are 6 seams per row, or 54 in total.
Tip joins (between rows): Match the bottom corner sp of each upper motif to the top corner sp of the motif directly below it. Work 3 sl sts through both sps and fasten off securely. Seven columns with 8 gaps between rows makes 56 tip joins.
Each group of four motifs now frames an open diamond 3 in tall x 5.2 in wide (7.6 cm x 13.2 cm).
Tension: Keep your sl sts as loose as the sc you are working into. Tight seams cause puckering and make the curtain narrower. If your seams are tight, switch to a 4.5 mm hook for joining.
Size checkpoint: One joined row is 36.4 in (92.5 cm) wide. Three rows are 18 in (45.7 cm) tall, and all nine rows are 54 in (137.2 cm) tall.
Border
Border gauge: Keep the motif gauge of 13 sc per 3 in (7.6 cm) side. Each border round adds 0.25 in (0.6 cm).
The outer edge zigzags. Each free corner ch-3 sp along the edge is a point. Each place where two motifs meet along the edge is a valley. Between the four panel corners, the edges contain:
- Top and bottom (each): 14 sloped sides, 7 tip points, 6 valleys
- Left and right (each): 9 vertical sides, 16 sloped sides, 16 points, 8 valleys
- Panel corners: 4 points
Round 1: Join cream in the top-left corner sp. Work sc in each sc. At each point, work (sc, ch 3, sc) in the ch-3 sp. At each valley, sc2tog with one leg in each of the two joined sps.
- Top / Bottom: (14 x 13 = 182) + 14 + 6 = 202 sc + 7 ch-3 each
- Left / Right: ((9 + 16) x 13 = 325) + 32 + 8 = 365 sc + 16 ch-3 each
- Panel corners: 8 sc + 4 ch-3
- Total: 1,142 sc + 50 ch-3 sps
Round 2: Work sc in each sc. At each valley, work sc3tog centered on the Round 1 sc2tog. In each ch-3 sp, work (sc, ch 3, sc).
- Top / Bottom: (202 − 12) + 14 = 204 sc + 7 ch-3 each
- Left / Right: (365 − 16) + 32 = 381 sc + 16 ch-3 each
- Panel corners: 8 + 8 = 16 sc + 4 ch-3
- Total: (1,142 − 56) + 100 = 1,186 sc + 50 ch-3 sps
Row 3 – hanging loops (top edge only): Join cream in the top-left corner sp. Working left to right, sl st in each sc and make a loop at each of these spots:
- Each tip sp: ch 10, sl st in the same sp (7 loops).
- Each valley sc3tog: ch 24, sl st in the same st (6 loops).
- Each top panel corner: ch 24, sl st in the same sp (2 loops).
That makes 15 loops. The valleys and corners sit 1.5 in (3.8 cm) lower than the tips, so the longer loops bring all the loop tops to the same height.
Why the math works: Both border rounds place one stitch in every existing stitch, so each 3 in (7.6 cm) side keeps its 13-sc rhythm and stays flat. The only changes are 2 extra sc at each point, which turn the corner, and a decrease at each valley, which keeps it sharp. Every one of those changes is counted in the totals above.
Final Blocking
- Weave in all remaining ends along the seams.
- Lay the curtain RS up on blocking mats.
- Mist it evenly until damp.
- Pin the four outer corners to 37.4 in x 55 in (95.0 cm x 139.7 cm).
- Pin every petal tip and frame corner.
- Open each diamond to 3 in x 5.2 in (7.6 cm x 13.2 cm).
- Pin the loops so their tops form a level line.
- Let it dry for at least 24 hours before removing the pins.
Final Quality-Control Checklist
- 63 motifs, each 6 in (15.2 cm) point to point
- 13 sc on every motif side
- 54 smooth side seams with 15 sl sts each
- 56 secure tip joins
- Diamond openings even and fully open
- Border Round 2 totals 1,186 sc
- 15 level hanging loops
- Final size 37.4 in x 55 in (95.0 cm x 139.7 cm)
Troubleshooting
Petals cup: The ch-9 loops are too tight. Chain more loosely, or go up one hook size for Round 3 only.
Rounded tips: Make sure each Round 5 tip has (sc, ch 3, sc). Pin the tips sharply when blocking.
Frame bows inward: The spokes are too tight. Chain loosely, and place the sl st right in the gap between petals.
Frame ruffles: You have more than 4 sc over a ch-5 segment. Recount until each side has 13.
Curtain under 36.4 in (92.5 cm) wide: The seams are too tight. Redo them with a larger hook.
Wavy border: Make sure every valley has a decrease and every point gains only 2 sc.
Sags when hung: Use all 15 loops so the weight is spread evenly, and block again if needed.
Care
Hand wash in cool water with a mild detergent. Roll it in a towel to remove water, then dry it flat and re-pin the points if needed.
Final Notes
Each 3 in (7.6 cm) side has 13 sc. That makes a motif 6 in (15.2 cm) point to point and 5.2 in (13.2 cm) flat to flat. Seven motifs across measure 36.4 in (92.5 cm), and nine down measure 54 in (137.2 cm). A 0.5 in (1.3 cm) border brings the curtain to 37.4 in x 55 in (95.0 cm x 139.7 cm). If your first motif measures correctly, the rest of the curtain will come out right.
Happy crocheting!