

This is a light, airy holiday curtain made of small evergreen trees. Each tree has three sage-green tiers outlined in creamy white, with tiny ring picots at the corners that look like snow-tipped branches. A cream center line runs down every tree and carries on into the chain strands, so each column reads as one continuous garland.
The curtain uses just two colors: sage green and cream. The trees sit on 9 strands, and every other strand is set half a step lower. That gives a staggered, diagonal pattern that looks good against daylight or twinkle lights. The pattern uses US crochet terms throughout.
The finished curtain is about 40.2 in (102.1 cm) wide and 49.7 in (126.2 cm) long from the top of the header to the end of the longest strand. That length does not include the rod loops.
Here is the construction in short. First you crochet three green fan-shaped tiers per tree and edge each tier in cream. Next you work a lacy header band. Finally you crochet each cream strand downward from the header, stitching through every stacked tree as you go. This one pass locks the tiers together and creates the center spine.
Finished Size and Construction
- Finished size: 40.2 in (102.1 cm) wide × 49.7 in (126.2 cm) long
- Skill level: Intermediate (simple stitches, lots of repetition)
- Terminology: US
- Yarn weight: #4 worsted, cotton or cotton blend
- Hook: 4.0 mm (G-6)
- Number of pieces: 59 trees (177 tiers) plus 1 header; the 9 strands are worked directly onto the header
- Layout: 9 strands. Strands 1, 3, 5, 7 and 9 hold 7 trees each; strands 2, 4, 6 and 8 hold 6 trees each, set lower.
- Piece size (one tree): 4.2 in (10.7 cm) tall × 4.5 in (11.4 cm) wide from picot tip to picot tip
- Size before border: the longest strand hangs 47.9 in (121.7 cm) below the header
- Border (header) depth: 1.75 in (4.4 cm)
Materials
Choose a smooth, mercerized or matte cotton in worsted weight. Cotton gives crisp stitches and stays flat in a window. The quantities below assume about 180 m per 100 g.
- Sage green: 550 g, about 990 m (1,083 yd), used for all tiers
- Cream: 350 g, about 630 m (689 yd), used for edgings, strands and the header
Both amounts include a margin of roughly 15%, to cover your gauge check and any variation in gauge.
Tools:
– 4.0 mm (G-6) crochet hook
– Locking stitch markers (at least 20)
– Tapestry needle
– Scissors
– Rustproof pins and a blocking mat
– Spray bottle
– Measuring tape
Abbreviations (US Terms)
- ch: chain
- sl st: slip stitch
- sc: single crochet
- dc: double crochet
- st(s): stitch(es)
- sp: space
- RS: right side
- MR: magic ring
Special stitches:
– Ring picot: ch 5, sl st in the 5th ch from the hook.
– Surface sl st: hold the yarn behind the fabric. Insert the hook from front to back through all layers, pull up a loop, and draw it through the loop on your hook.
Gauge and Checkpoints
Make one Tier 3 before anything else. It is your gauge swatch.
- Dc gauge: 5 rows of dc = 2 in (5.1 cm), measured from the ring to the center of the bottom edge.
- Tier 3 after Row 5: 2 in (5.1 cm) tall, 3.5 in (8.9 cm) from corner to corner.
- Chain gauge: 9 ch = 2 in (5.1 cm), relaxed.
- Header gauge: 18 sc = 4 in (10.2 cm).
Checkpoints:
– Tier 1 after Row 3: 1.2 in (3.0 cm) tall × 2 in (5.1 cm) wide.
– Tier 2 after Row 4: 1.6 in (4.1 cm) tall × 2.75 in (7.0 cm) wide.
– After edging: each tier grows 0.2 in (0.5 cm) on every edge. Tier 1 becomes 1.4 in (3.6 cm) × 2.4 in (6.1 cm), Tier 2 becomes 1.8 in (4.6 cm) × 3.15 in (8.0 cm), and Tier 3 becomes 2.2 in (5.6 cm) × 3.9 in (9.9 cm).
– Assembled tree: 4.2 in (10.7 cm) tall.
If your pieces are off:
– If Tier 3 is bigger than 3.5 in (8.9 cm) wide, go down to a 3.5 mm hook.
– If it is smaller, go up to a 4.5 mm hook.
– Recheck before you make all 59 trees. A small error repeated 7 times down a strand adds up quickly.
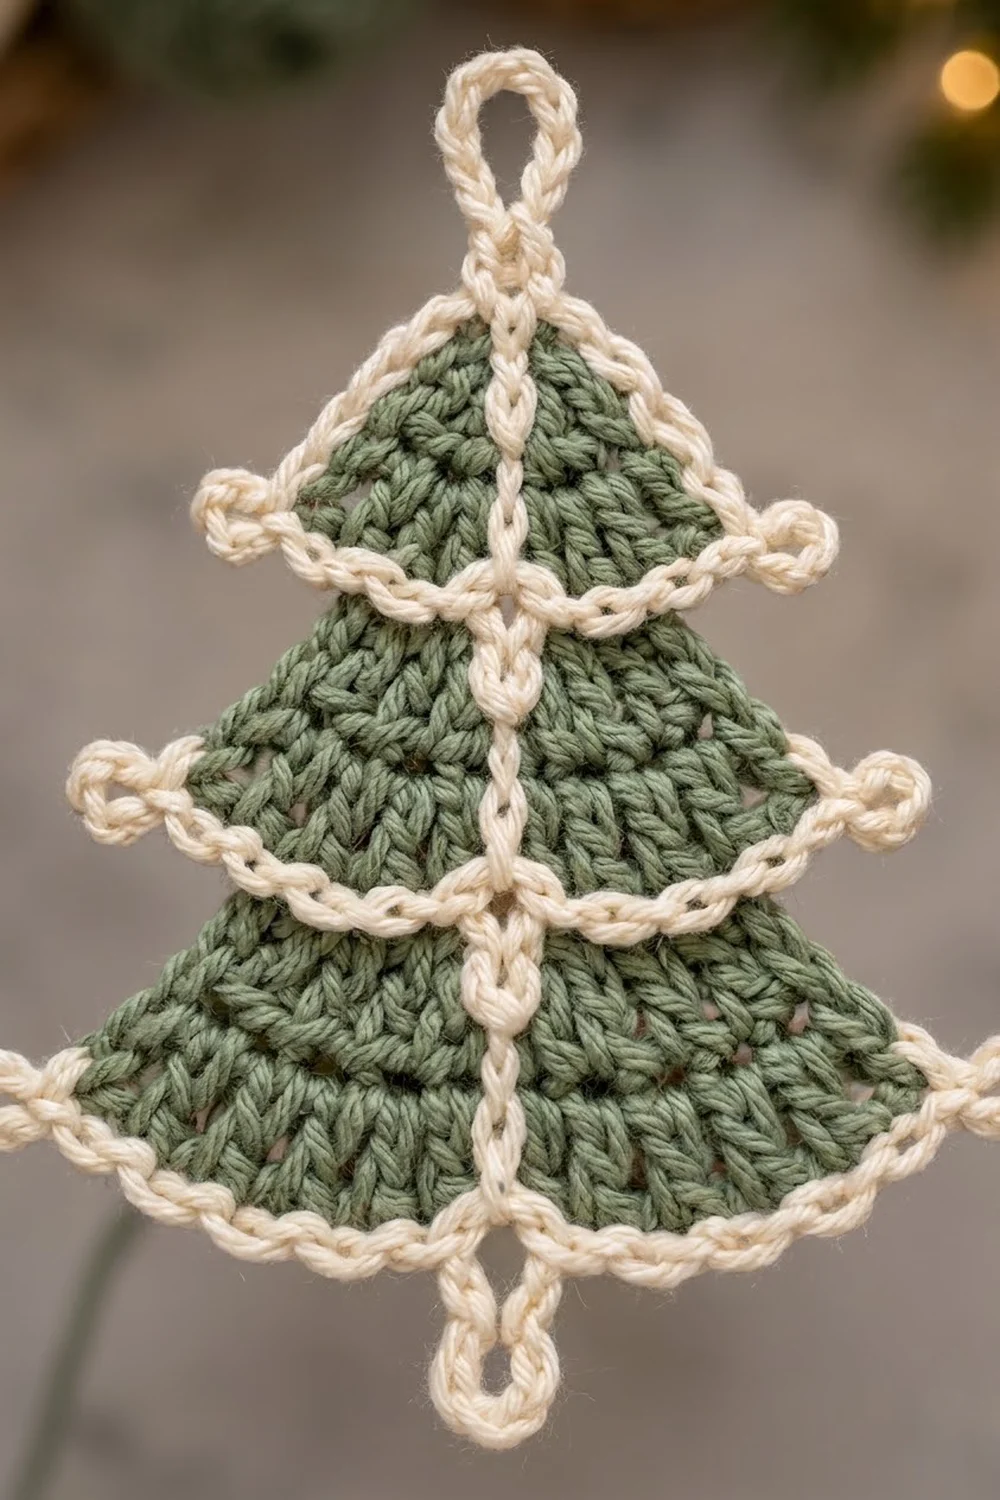
Tier Pattern (Make 3 Sizes)
Every tier is a 120-degree fan. It starts with 4 dc and gains 4 dc per row, so each row’s total equals 4 × the row number. Work in sage green.
Row 1: MR, ch 3 (counts as dc), 3 dc in ring. Pull the ring tight, then turn. (4 dc)
Row 2: Ch 3 (counts as dc throughout), dc in the same st, then work 2 dc in each st across, including the top of the turning ch. Turn. (8 dc)
Row 3: Ch 3, dc in the same st, dc in next st, 2 dc in next st, dc in next st; repeat from * 3 times. Turn. (12 dc)
Row 4: Ch 3, dc in the same st, dc in next 2 sts, 2 dc in next st, dc in next 2 sts; repeat from * 3 times. Turn. (16 dc)
Row 5: Ch 3, dc in the same st, dc in next 3 sts, 2 dc in next st, dc in next 3 sts; repeat from * 3 times. (20 dc)
Stop at a different row for each tier, then fasten off:
– Tier 1 (top): Rows 1–3, ending with 12 dc.
– Tier 2 (middle): Rows 1–4, ending with 16 dc.
– Tier 3 (bottom): Rows 1–5, ending with 20 dc.
Cream Edging (All Tiers)
In this round, R stands for the tier’s number of rows: 3 for Tier 1, 4 for Tier 2 and 5 for Tier 3. Hold the tier so the last row faces you as the RS.
Edging Round:
1. Join cream with a sl st in the MR at the tip. Ch 1, then sc in the same spot. (1 sc)
2. Work down the first side with 2 sc in each row-end. (2R sc)
3. Work a ring picot at the corner.
4. Sc in each dc across the last row. (4R sc)
5. Work a ring picot at the second corner.
6. Work up the second side with 2 sc in each row-end. (2R sc)
7. Sl st to the first sc and fasten off.
Total: 8R + 1 sc plus 2 picots.
– Tier 1: 1 + 6 + 12 + 6 = 25 sc
– Tier 2: 1 + 8 + 16 + 8 = 33 sc
– Tier 3: 1 + 10 + 20 + 10 = 41 sc
Stacking One Tree
- Lay Tier 3 flat with the RS up.
- Slide the tip of Tier 2 under Tier 3’s top region and pull it up until Tier 2’s lower edge overlaps Tier 3 by 0.6 in (1.5 cm). Wait, reverse that: each upper tier sits in front. Place Tier 2 on top of Tier 3, with the bottom edge of Tier 2 covering the top 0.6 in (1.5 cm) of Tier 3.
- Place Tier 1 on top of Tier 2 the same way, also overlapping by 0.6 in (1.5 cm).
- Line up the centers. On Tier 1, the center falls between bottom sc 6 and 7. On Tier 2, it falls between sc 8 and 9. On Tier 3, it falls between sc 10 and 11.
- Clip the stack together with one locking marker per overlap.
Check the height: 1.4 + 1.8 + 2.2 = 5.4 in, minus two overlaps of 0.6 in each, gives 4.2 in (10.7 cm). The center spine is added later, when you work the strands.
Make All Pieces
Green tiers:
– 59 of Tier 1
– 59 of Tier 2
– 59 of Tier 3
– That is 177 tiers in total, each edged in cream.
Stacked trees: make 59.
– Strands 1, 3, 5, 7 and 9 use 7 trees each, which is 35 trees.
– Strands 2, 4, 6 and 8 use 6 trees each, which is 24 trees.
Layout grid (T = tree, · = chain only; columns are strands 1 to 9, top to bottom):
ROW 1:  T · T · T · T · T
ROW 2:  · T · T · T · T ·
ROW 3:  T · T · T · T · T
ROW 4:  · T · T · T · T ·
ROW 5:  T · T · T · T · T
ROW 6:  · T · T · T · T ·
ROW 7:  T · T · T · T · T
ROW 8:  · T · T · T · T ·
ROW 9:  T · T · T · T · T
ROW 10: · T · T · T · T ·
ROW 11: T · T · T · T · T
ROW 12: · T · T · T · T ·
ROW 13: T · T · T · T · T
Joining (Strands)
Make the header first (see Border below). Each strand is worked downward from the header in a single strand of cream. As it goes, it creates the center spine of every tree it passes through.
Strand attachment points:
– Attach strands to the 3rd, 7th, 11th, 15th, 19th, 23rd, 27th, 31st and 35th sc of header Row 3.
– These sc sit over Row 1 stitches 11, 31, 51, 71, 91, 111, 131, 151 and 171, which are exactly 20 sc apart.
– That spacing equals 4.4 in (11.2 cm) between strands.
Lead chain: Join cream with a sl st in the attachment sc.
– Odd strands: ch 9, about 2 in (5.1 cm).
– Even strands: ch 24, about 5.35 in (13.6 cm). That is exactly 3.35 in (8.5 cm) longer, which is half of one tree repeat.
Tree pass:
1. Sl st into the top sc of Tier 1 on a stacked tree.
2. Work 13 surface sl sts straight down the center line, through every layer, to the center point of Tier 3’s bottom edge. That is about 3 sl sts per 1 in (2.5 cm) of the 4.2 in (10.7 cm) tree.
3. Finish with a sl st through the edging at the bottom center.
4. Remove the markers.
Connector: Ch 4, ch 6, sl st in the 6th ch from the hook (this makes the inline ring), then ch 4.
– That is 14 ch in total, about 2.5 in (6.4 cm) long.
– One tree plus one connector makes a repeat of 6.7 in (17.0 cm).
Strand sequence:
– Odd strands: lead, then (tree pass, connector) 6 times, then a final tree pass.
– Even strands: lead, then (tree pass, connector) 5 times, then a final tree pass.
Tail: Ch 4, ch 6, sl st in the 6th ch from the hook. Fasten off. The tail is about 1.5 in (3.8 cm).
Tension: Keep the chains relaxed and even. A tight chain pulls the trees closer and makes strands differ in length. Keep the surface slip stitches loose enough that the tiers lie flat and don’t pucker.
Size checkpoint: An odd strand measures 2 + (7 × 4.2) + (6 × 2.5) + 1.5 = 47.9 in (121.7 cm). An even strand ends 3.35 in (8.5 cm) shorter. That mirrors its lower start, so the stagger looks balanced at both the top and the bottom.
Border (Header)
The header is a cream band worked flat in rows. The foundation chain becomes the top edge, which carries the rod loops.
Header gauge: 18 sc = 4 in (10.2 cm).
Foundation: Ch 182.
Row 1: Sc in the 2nd ch from the hook and in each ch across. Turn.
– 181 sc: 9 strand sections × 20 sc = 180, plus 1 closing st for symmetry.
Row 2: Ch 1, sc in the first sc, ch 5, skip 4 sc, sc in next sc; repeat from * 36 times. Turn.
– 37 sc and 36 ch-5 sps. This works because 36 × 5 + 1 = 181.
Row 3: Ch 1, sc in the first sc, 7 dc in next ch-5 sp, sc in next sc; repeat from * 36 times. Fasten off.
– 36 shells (252 dc) and 37 sc.
Rod loops: Work across the opposite side of the foundation chain.
1. Join cream with a sl st in the first ch.
2. Ch 14, then sl st in the same ch.
3. Sl st in each of the next 20 ch, ch 14, sl st in the same ch; repeat from * 9 times.
– 10 loops. Each is about 3.1 in (7.9 cm) long and fits a rod up to 1 in (2.5 cm) across.
Why the math works:
– 181 = 36 × 5 + 1, so the mesh repeat closes evenly at both ends.
– Each strand section covers exactly 4 shells.
– The rod loops land on stitches 1, 21, 41 and so on up to 181. The strands land on stitches 11, 31 and so on up to 171, so every strand hangs exactly midway between two rod loops.
– Both outer margins are 10 sts, about 2.2 in (5.6 cm).
Width and spacing check:
– The header measures 181 ÷ 4.5 = 40.2 in (102.1 cm) wide and 1.75 in (4.4 cm) deep.
– Trees on neighboring strands never touch. Where their heights overlap, the wide base of one tree sits beside the narrow top of the next. Their half-widths add up to about 3.35 in (8.5 cm), which is less than the 4.4 in (11.2 cm) spacing.
Final Blocking
- Lightly mist the header. Pin it out to 40.2 in (102.1 cm) × 1.75 in (4.4 cm), pinning each shell into a neat arc.
- Lay each strand out straight below the header on the blocking surface or a clean floor sheet.
- Mist each tree. Smooth the tiers flat and pin the two ring picots on each tier outward.
- Check that each odd strand measures 47.9 in (121.7 cm), and adjust by gently easing the chains.
- Let everything dry completely, then unpin.
- Thread the rod through the 10 loops.
Final Quality-Control Checklist
- 59 trees, each with 3 tiers stacked in the correct size order
- Every tier edging has the correct count: 25, 33 or 41 sc, plus 2 picots
- Each spine runs straight down the tree’s center line
- Odd strands each have 7 trees and even strands each have 6
- Every connector has its inline ring
- Strands sit 4.4 in (11.2 cm) apart, midway between rod loops
- Odd strand length is 47.9 in (121.7 cm)
- All yarn ends are woven in securely, inside the cream edging
Troubleshooting
- Tiers ripple: you probably added extra increases. Recount each row; it should be 4 × the row number.
- Tiers cup: your rows are too tight. Go up a hook size, or loosen your dc.
- Edging flares: use 2 sc per row-end, not 3.
- Tree twists on the strand: the spine wandered off center. Rework it along the center points of each tier.
- Strands differ in length: your chain tension is uneven. Remeasure the leads and connectors against your chain gauge.
- Header curls: block it firmly, or rework Row 1 more loosely.
Care
Hand wash in cool water with mild soap. Roll the curtain in a towel to press out the water, then dry it flat, re-pinning the trees if needed.
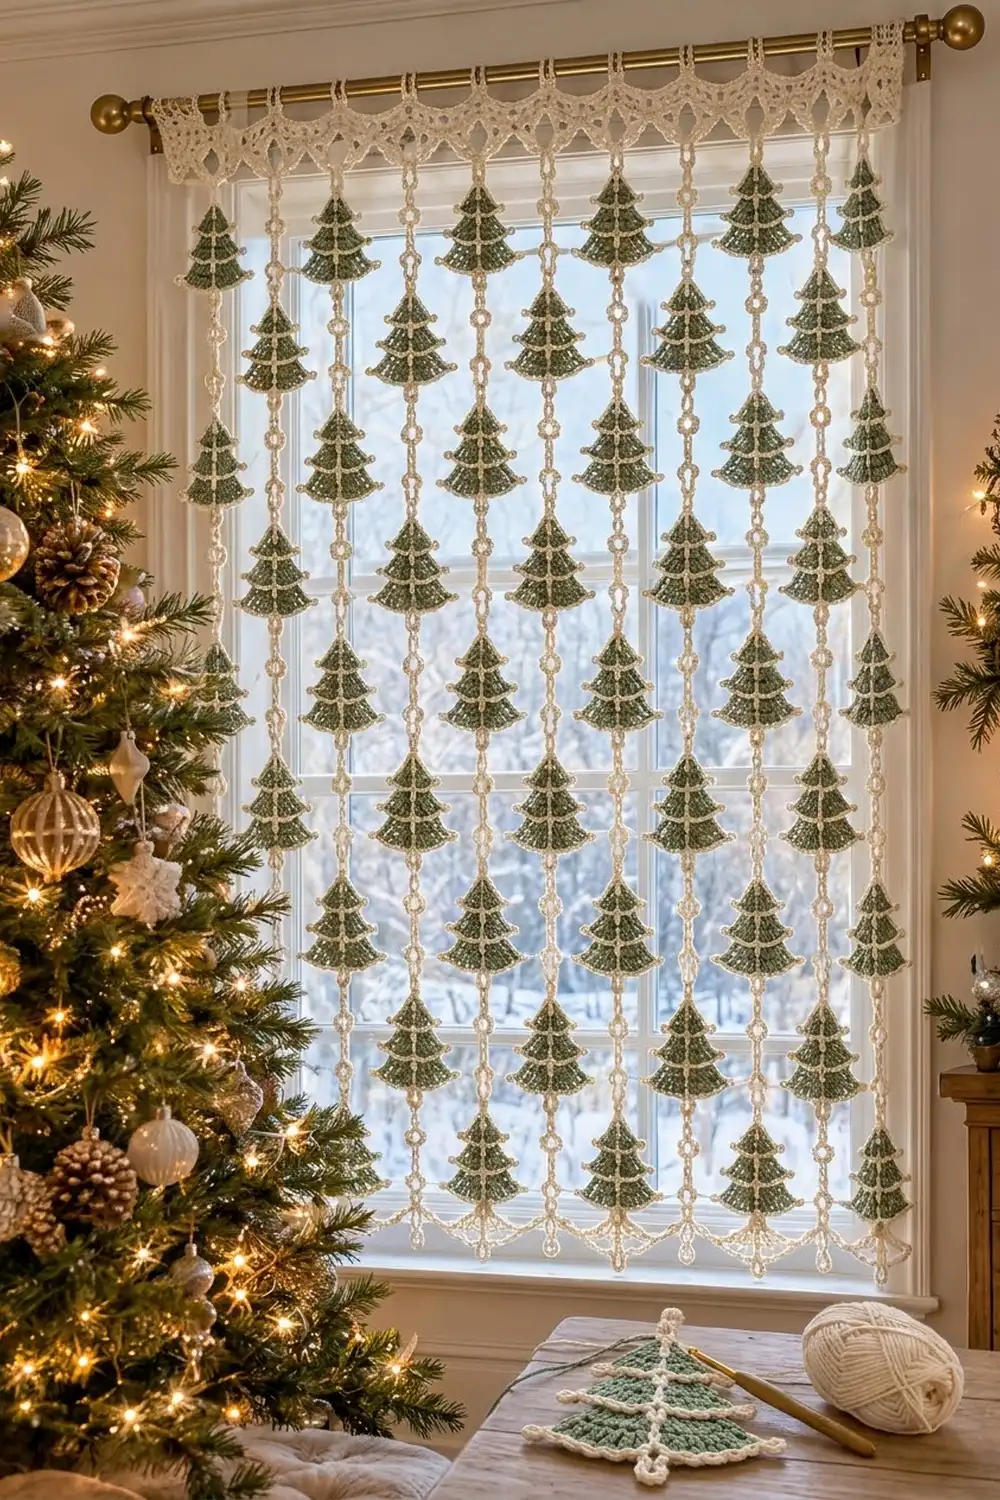
Final Notes
The measurement chain is simple. Five dc rows make 2 in (5.1 cm), which sets the size of the tiers. Three tiers with two 0.6 in (1.5 cm) overlaps make a 4.2 in (10.7 cm) tree. A tree plus a 2.5 in (6.4 cm) connector repeats every 6.7 in (17.0 cm), so seven trees give a 47.9 in (121.7 cm) strand. Nine strands set 20 sc apart fill a 181-sc header that is 40.2 in (102.1 cm) wide. Check each link in that chain and the whole curtain will hang straight and even.
Happy crocheting!