

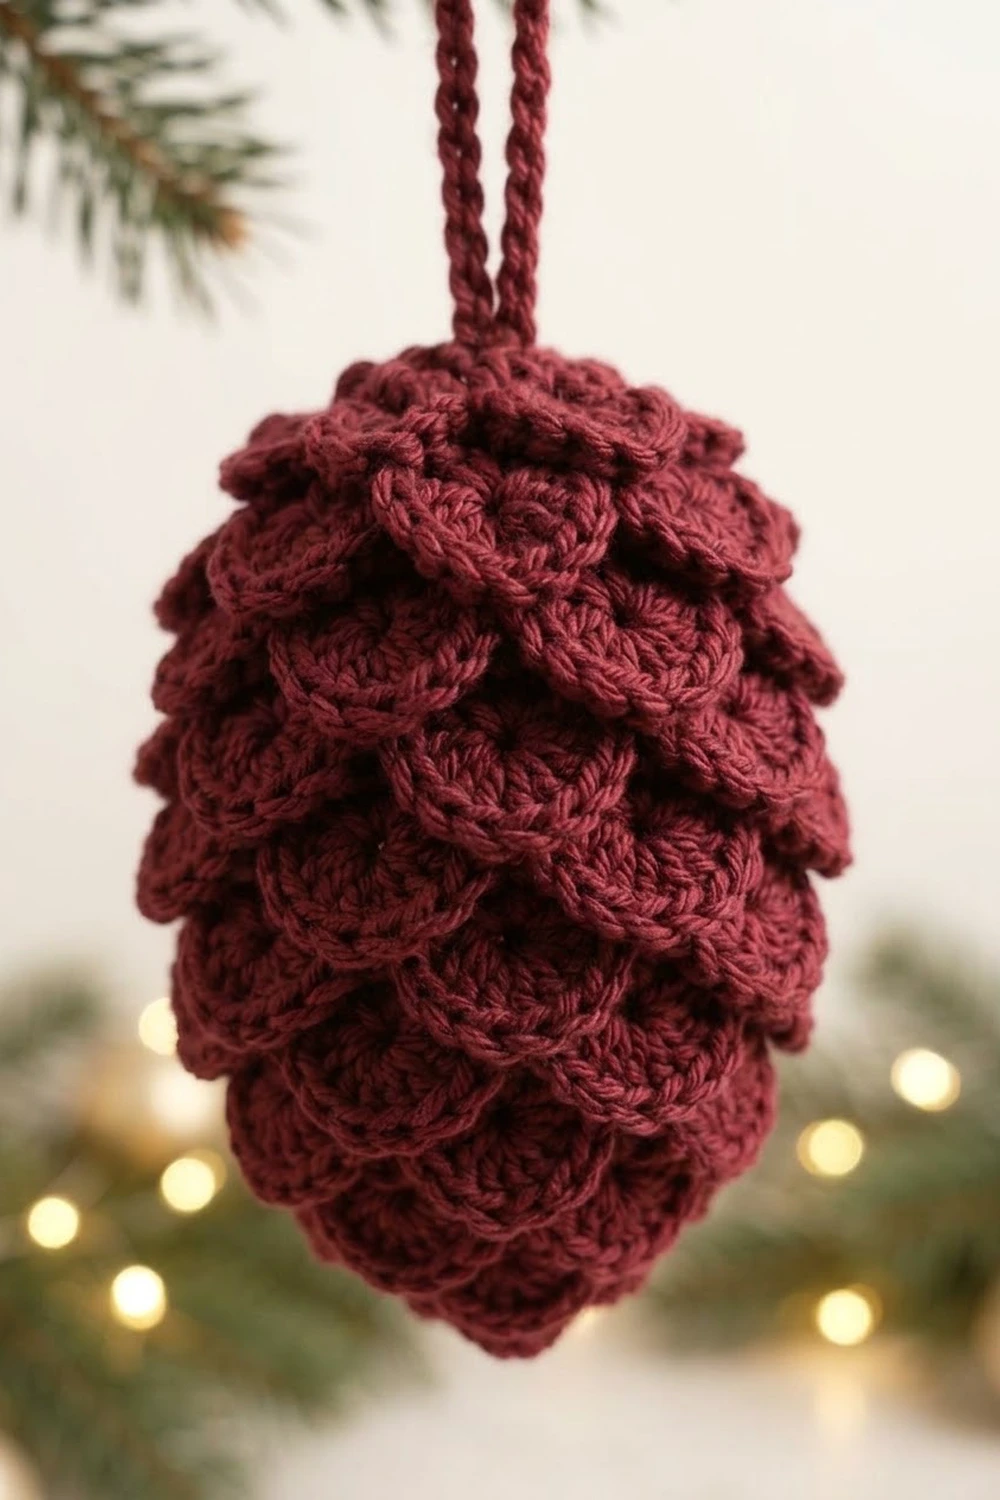
This pinecone ornament is a small, sculptural piece. It has a rounded oval body covered in overlapping shell-shaped scales, and each scale curves outward like a real pinecone. Two slender cords rise from the top and join to form a hanging loop.
The whole ornament is worked in one deep burgundy, wine red yarn. With a single color, the texture of the scales does all the work. It looks warm and classic on an evergreen branch, especially near string lights and metallic baubles.
The pattern uses US crochet terms throughout. The finished ornament is about 3.75 in (9.5 cm) tall and 2.6 in (6.6 cm) wide at its widest point, not counting the hanging loop.
Construction is simple. First you crochet a firm, stuffed oval body in joined rounds of single crochet. Every other round is worked in back loops only, which leaves rings of free front loops on the surface. Then you go back and work rows of 5-dc shells into those front loops to create the scales. A small six-petal crown finishes the top, and two slip-stitch cords form the hanger.
Finished Size and Construction
- Finished size: about 3.75 in (9.5 cm) tall × 2.6 in (6.6 cm) wide, excluding the loop
- Skill level: Intermediate (front-loop surface crochet, working around a stuffed piece)
- Terminology: US crochet terms
- Yarn weight: Medium / worsted (#4)
- Hook: 3.5 mm (E-4), sized down for a firm fabric
- Number of pieces: 1 ornament body worked in one piece, plus 2 hanging cords
- Layout: body in 21 joined rounds, 8 rows of scales, 1 crown edging, 2 cords
- Piece size (body only): 3.5 in (8.9 cm) tall × 2 in (5.1 cm) diameter at the widest round
- Size before border: 3.5 in (8.9 cm) tall × 2.6 in (6.6 cm) wide with scales
- Border depth: the crown adds about 0.25 in (0.6 cm) of height at the top
Materials
Yarn: Choose a smooth worsted-weight yarn in deep burgundy. Mercerized cotton or a cotton blend gives the crispest scales, and a firm acrylic also works well. Avoid fuzzy or very splitty yarns, because they hide the shell shapes.
- Burgundy / wine red: 25 g, about 50 m (55 yd)
This amount includes a comfortable margin over the roughly 31 m (34 yd) the ornament actually uses, so you can make a gauge test without running short.
Tools:
- 3.5 mm (E-4) crochet hook
- Polyester fiberfill, about 5 g
- 1 stitch marker
- Tapestry needle
- Scissors
- Optional: a few pins and a steam iron or garment steamer for blocking
Abbreviations (US Terms)
- ch – chain
- sl st – slip stitch
- sc – single crochet
- hdc – half double crochet
- dc – double crochet
- inc – 2 sc in the same stitch
- sc2tog – single crochet 2 together
- MR – magic ring
- BLO – back loop only
- FL – front loop
- st(s) – stitch(es)
- sk – skip
Special stitch: Scale Shell. Sk 1 FL, 5 dc in next FL, sk 1 FL, sl st in next FL. Each Scale Shell uses 4 free front loops.
Round notes: All body rounds are joined. Sl st to the first sc to join, then ch 1. The ch 1 does not count as a stitch. Place the marker in the first sc of each round.
Gauge and Checkpoints
Gauge: 5 sc and 6 rounds = 1 in (2.5 cm), worked in joined sc rounds.
Test one piece first. Work Rounds 1–11 of the body as your gauge test. This section is small, so it’s quick to frog and redo if needed.
Checkpoints:
- After Round 2, the flat disc measures about 0.75 in (1.9 cm) across.
- After Round 6, the piece measures 1 in (2.5 cm) tall.
- After Round 11, the circumference is 6.4 in (16.3 cm), which is a diameter of about 2 in (5.1 cm).
- After Round 12, the piece measures 2 in (5.1 cm) tall.
- After Round 18, the piece measures 3 in (7.6 cm) tall.
- After Round 21, the body measures 3.5 in (8.9 cm) tall.
If it’s too big: change to a 3.25 mm hook, or tighten your tension. A loose body lets stuffing show between stitches.
If it’s too small: change to a 3.75 mm hook. Keep the fabric firm, though. Scales need a solid base to stand out properly.
Body
Hold the work so the right side faces out. The magic ring end is the narrow tip of the pinecone. The last round closes the wide, rounded top.
Rnd 1: 6 sc in MR, join. (6)
Rnd 2: 2 sc in each st around, join. (12)
Rnd 3: (sc in next 2 sts, inc) × 4, join. (16)
Rnd 4 (BLO): sc in each st around, join. (16)
Rnd 5: (sc in next 3 sts, inc) × 4, join. (20)
Rnd 6 (BLO): sc in each st around, join. (20)
Rnd 7: (sc in next 4 sts, inc) × 4, join. (24)
Rnd 8 (BLO): sc in each st around, join. (24)
Rnd 9: (sc in next 5 sts, inc) × 4, join. (28)
Rnd 10 (BLO): sc in each st around, join. (28)
Rnd 11: (sc in next 6 sts, inc) × 4, join. (32)
Rnd 12 (BLO): sc in each st around, join. (32)
Rnd 13: sc in each st around, working through both loops, join. (32)
Rnd 14 (BLO): sc in each st around, join. (32)
Rnd 15: sc in each st around, working through both loops, join. (32)
Rnd 16 (BLO): (sc in next 6 sts, sc2tog) × 4, join. (28)
Rnd 17: (sc in next 5 sts, sc2tog) × 4, join. (24)
Rnd 18 (BLO): (sc in next 4 sts, sc2tog) × 4, join. (20)
Stuff the body firmly now. Push fiberfill well into the narrow tip, and shape the piece into a smooth oval.
Rnd 19: (sc in next 3 sts, sc2tog) × 4, join. (16)
Rnd 20: (sc in next 2 sts, sc2tog) × 4, join. (12)
Rnd 21 (BLO): sc2tog × 6, join. (6)
Top up the stuffing. Fasten off and leave a 6 in (15.2 cm) tail. Weave the tail through the front loops of the 6 sts, pull it closed, and secure it.
Why this shaping works: the body grows by 4 sts every other round, from 12 to 32. That gives a gradual, tapered tip. It holds at 32 for four rounds, then decreases by 4 every round. Losing stitches faster at the top creates the rounded dome.
Free front-loop rings: each BLO round leaves the front loops of the round below it free. Your scale foundations are therefore:
| Scale Row | Front loops of | Free loops |
|---|---|---|
| 1 | Rnd 3 | 16 |
| 2 | Rnd 5 | 20 |
| 3 | Rnd 7 | 24 |
| 4 | Rnd 9 | 28 |
| 5 | Rnd 11 | 32 |
| 6 | Rnd 13 | 32 |
| 7 | Rnd 15 | 32 |
| 8 | Rnd 17 | 24 |
| Crown | Rnd 20 | 12 |
Every scale-row count is divisible by 4, so the Scale Shell repeat always ends evenly.
Scales
Hold the ornament with the tip pointing up. That way each shell grows toward the tip, and the finished scale hangs downward over the rows below it. Start at the row nearest the tip and work toward the top. Each new row then overlaps the one before it, just like a real pinecone.
Method for every row: Join yarn with a sl st in any free FL of the foundation round. Work a Scale Shell (sk 1 FL, 5 dc in next FL, sk 1 FL, sl st in next FL). Repeat from * around. On the last repeat, the final sl st goes into the joining sl st. Fasten off and weave in the ends on the inside of the scales.
How the count closes: the joining sl st occupies loop 1. Each repeat then uses the next 4 loops, and the final repeat lands back on loop 1. The number of shells always equals the free loops ÷ 4.
- Scale Row 1 (Rnd 3 FL, 16 loops): 4 shells (20 dc, 4 sl st)
- Scale Row 2 (Rnd 5 FL, 20 loops): 5 shells (25 dc, 5 sl st)
- Scale Row 3 (Rnd 7 FL, 24 loops): 6 shells (30 dc, 6 sl st)
- Scale Row 4 (Rnd 9 FL, 28 loops): 7 shells (35 dc, 7 sl st)
- Scale Row 5 (Rnd 11 FL, 32 loops): 8 shells (40 dc, 8 sl st)
- Scale Row 6 (Rnd 13 FL, 32 loops): 8 shells (40 dc, 8 sl st)
- Scale Row 7 (Rnd 15 FL, 32 loops): 8 shells (40 dc, 8 sl st)
- Scale Row 8 (Rnd 17 FL, 24 loops): 6 shells (30 dc, 6 sl st)
That makes 52 scales in total.
Staggering: for a natural look, start each new row so its first shell sits between two shells of the row below. The rows have different counts, so the alignment won’t be perfect all the way around. A loose brick pattern is exactly right.
Checkpoint: each scale measures about 0.6 in (1.5 cm) long. The rows sit 2 rounds apart, or about 0.33 in (0.8 cm), so each scale covers roughly half of the scale beneath it. Row 1 just covers the tip. The ornament now measures 3.5 in (8.9 cm) tall × 2.6 in (6.6 cm) wide.
Border: Crown and Hanging Cords
Border gauge: the crown is worked at the body gauge of 5 sts per 1 in (2.5 cm). Round 20 has 12 sts, so its circumference is 2.4 in (6.1 cm). Each petal spans 2 loops, or about 0.4 in (1.0 cm).
Crown (Rnd 20 FL, 12 loops): Hold the ornament top up. Join yarn with a sl st in any free FL of Round 20. (5 hdc in next FL, sl st in next FL) × 6. The final sl st lands in the joining st. (6 petals: 30 hdc, 6 sl st)
Why the math works: each repeat uses exactly 2 loops, and 6 × 2 = 12, which matches Round 20’s own stitch count. Hdc is shorter than dc, so the petals stay small and frame the top neatly. They add about 0.25 in (0.6 cm) of height, which brings the ornament to 3.75 in (9.5 cm).
Cords (make 2): Ch 36, which is about 6 in (15.2 cm) at 6 ch per 1 in (2.5 cm). Sl st in the back bump of the 2nd ch from the hook and in each ch across. (35 sl st) Fasten off and leave a 6 in (15.2 cm) tail at each end.
Working into the back bumps gives each cord a firm, twisted look.
Attaching the cords:
- Sew the lower end of both cords into the closed center of Round 21, between the crown petals.
- Bring the upper ends together and sew them to each other securely.
- The two cords now form a loop about 6 in (15.2 cm) tall. You can twist them gently around each other once or twice if you like.
- Weave all the tails down into the body.
Final Blocking
- Lightly mist the ornament with water. If you used acrylic, hold a steamer 1 in (2.5 cm) away instead, and never touch the iron to the yarn.
- Gently press each scale outward and downward with your fingers so it curves away from the body.
- Roll the body between your palms to even out the oval shape.
- Pinch the tip into a soft, rounded point.
- Fan the crown petals evenly around the cord base.
- Hang the ornament by its loop and let it dry completely.
- Re-measure. It should be about 3.75 in (9.5 cm) tall × 2.6 in (6.6 cm) wide.
Final Quality-Control Checklist
- The body is firm, and no stuffing shows between stitches.
- There are 8 scale rows with 4, 5, 6, 7, 8, 8, 8, and 6 shells.
- Every scale points toward the tip and overlaps the row below.
- The crown has 6 even petals.
- Both cords are the same length and securely attached.
- The ornament hangs straight without tilting.
- All ends are woven in and hidden.
- It measures 3.75 in (9.5 cm) tall × 2.6 in (6.6 cm) wide.
Troubleshooting
Scales stand straight up instead of hanging down: you probably worked them with the tip facing down. Re-block by pressing each scale toward the tip. Hold the tip up for future rows.
A shell row doesn’t end evenly: you missed or doubled a front loop. Count the free loops again. They should match the table above.
Scales ruffle too much: your tension is loose. Go down a hook size for the scale rows, or work 4 dc per shell instead of 5.
Stuffing shows through the body: the body is too loose. Remake it with a smaller hook.
The ornament leans when hanging: the stuffing is uneven, or the cords are attached off-center. Reshape the body, or re-sew the cords at the exact center.
The top hole is visible: pull the closing tail tighter and add one extra pass through the stitches.
Care
Spot clean with cool water and a mild soap. Reshape the scales while damp and air dry by hanging. Store flat or hanging so the scales keep their curve.

Final Notes
Here is the measurement chain to check as you go:
- The gauge of 5 sc × 6 rounds = 1 in (2.5 cm) sets everything else.
- The body is 21 rounds, reaching 3.5 in (8.9 cm) tall and 2 in (5.1 cm) wide at 32 sts.
- Eight rows of Scale Shells, 52 scales in all, widen it to 2.6 in (6.6 cm).
- The 6-petal crown brings it to 3.75 in (9.5 cm) tall.
- Two 35-sl-st cords form a 6 in (15.2 cm) hanging loop.
Optional: if you’d like a set, make a few in different shades. The pattern itself stays exactly the same.
Happy crocheting!