

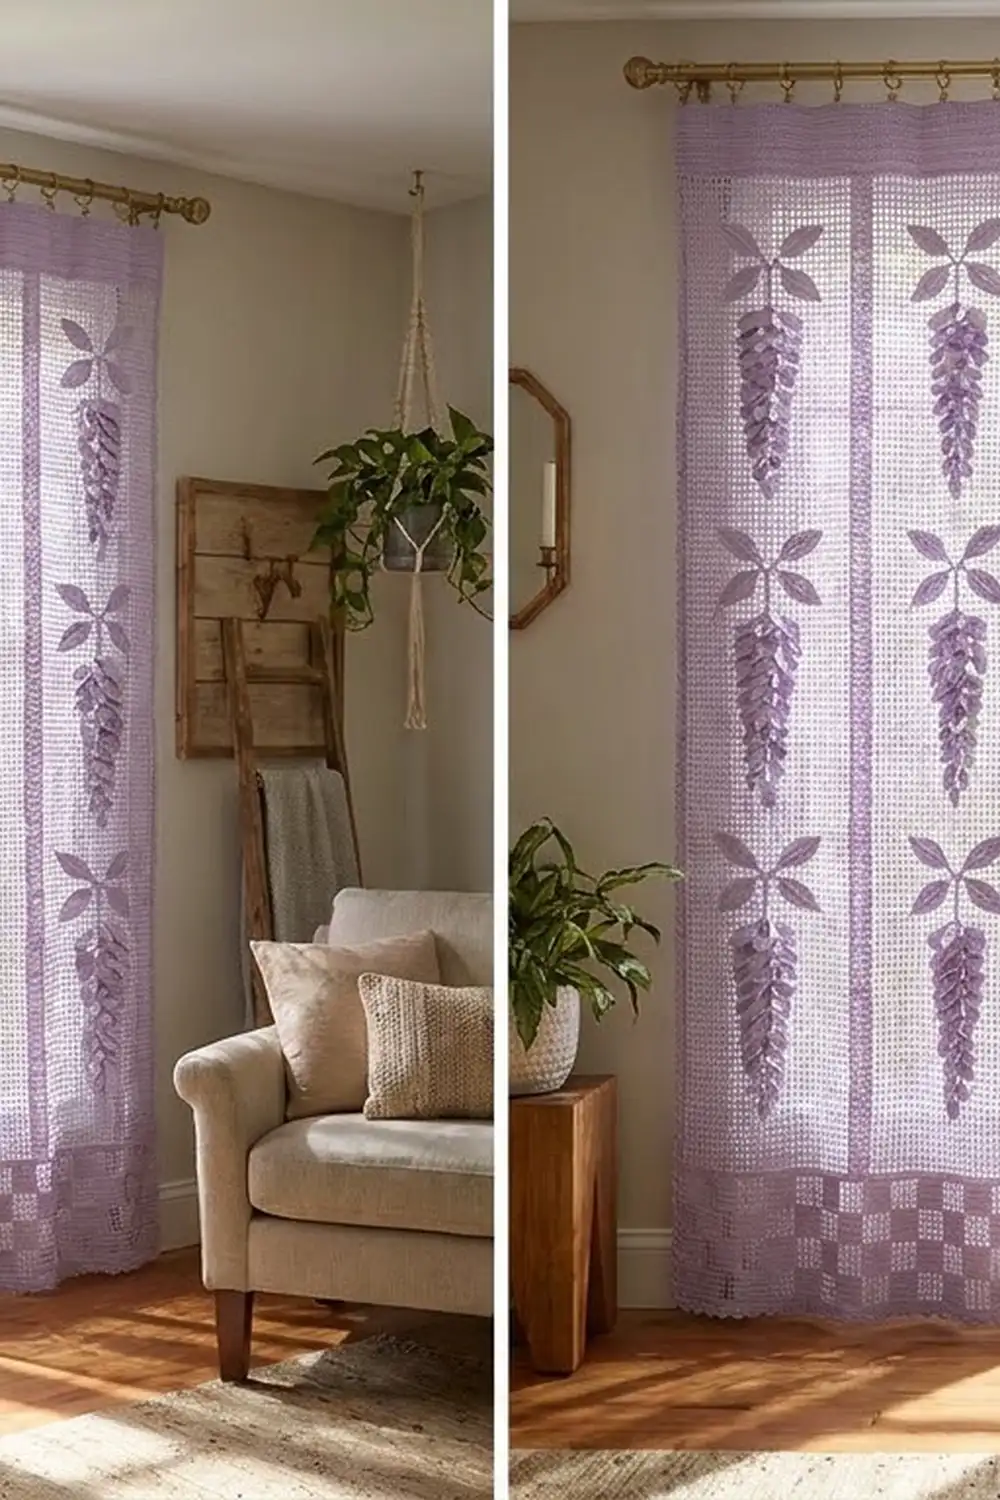
Wisteria Cascade is a long, airy filet-mesh curtain panel in soft lavender with hanging wisteria blooms. Each bloom sits under an arched, leafy sprig. The petals are three-dimensional, so they catch the light when the curtain moves.
The whole panel is one color, a light lavender sport-weight cotton, so the texture does the decorating. Narrow solid columns divide the mesh into three lanes. There is a solid header at the top and a checkerboard band at the hem.
All instructions use US terms. One finished panel measures 33 in (83.8 cm) wide by 81.25 in (206.4 cm) long, including the border. The photo shows two identical panels hung as a pair. They are not joined, so make two if you want a pair.
You work one rectangular filet panel from the top down. Then you crochet the leaves, stems, and petal clusters separately, sew them on, and finish with a two-round border that has a small shell edge along the hem.
Finished Size and Construction
- Finished size (one panel): 33 in x 81.25 in (83.8 cm x 206.4 cm)
- Skill level: Intermediate
- Terminology: US
- Yarn weight: Sport (#2 fine) cotton
- Hook: 3.0 mm
- Pieces per panel: 1 mesh panel + 12 stems + 72 leaves + 12 wisteria clusters
- Layout: 3 lanes x 4 tiers of motifs
- Lane size: 18 mesh, 9 in (22.9 cm) wide
- Size before border: 32 in x 80 in (81.3 cm x 203.2 cm)
- Border depth: 0.5 in (1.3 cm) on the top and sides; 0.75 in (1.9 cm) on the hem
Materials
Use a smooth mercerized cotton or a cotton blend in sport weight, about 310 m per 100 g. Mercerized cotton gives crisp mesh and well-defined petals. Buy one dye lot, because the panel is a large area of a single color.
- Lavender: 950 g / 2,945 m per panel (1,900 g / 5,890 m for a pair)
- Mesh panel and border: about 780 g / 2,418 m
- Appliqués: about 170 g / 527 m
These quantities include a margin of roughly 10% for swatching and sewing.
Tools:
– 3.0 mm crochet hook
– Tapestry needle
– Rust-proof pins
– Measuring tape
– Blocking mats, or a carpet covered with a clean sheet
– Spray bottle
– Clip rings and a curtain rod
Abbreviations (US Terms)
- ch – chain
- sl st – slip stitch
- sc – single crochet
- hdc – half double crochet
- dc – double crochet
- tr – treble crochet
- sk – skip
- sp – space
- st(s) – stitch(es)
Filet units:
– Mesh: ch 2, sk 2 sts (or the ch-2 sp), dc in next dc.
– Block: dc in next 3 sts. When working a block over a mesh, make 2 dc in the ch-2 sp, then dc in the next dc.
– Each unit adds 3 sts, so 64 units = 64 x 3 + 1 = 193 sts.
Petals:
– Large Petal (LP): [dc, 3 tr, dc] in the same st.
– Medium Petal (MP): [hdc, 3 dc, hdc] in the same st.
– Small Petal (SP): [sc, 3 hdc, sc] in the same st.
Gauge and Checkpoints
Gauge: 8 mesh x 8 rows = 4 in (10.2 cm). That makes one mesh 0.5 in (1.3 cm) square. For the border, 6 sc = 1 in (2.5 cm).
Test first. Ch 33, then dc in the 4th ch from the hook and in each ch across (31 sts). On the next row, ch 5 (counts as dc + ch 2), sk 2, dc in next dc; repeat across for 10 mesh. Work 9 more mesh rows and block lightly. Measure the center 8 mesh. Make one leaf and one cluster as well, and check them against the sizes below.
Checkpoints:
– After Row 4: 32 in (81.3 cm) wide, 2 in (5.1 cm) deep
– After Row 40: 20 in (50.8 cm) long
– After Row 152: 76 in (193.0 cm) long
– After Row 160: 80 in (203.2 cm) long
– Leaf: 1.5 in x 0.75 in (3.8 cm x 1.9 cm)
– Stem: 5 in (12.7 cm)
– Cluster: 5 in (12.7 cm) long, 2.5 in (6.4 cm) wide at the top
If your swatch is too big, go down 0.25 mm in hook size. If it is too small, go up 0.25 mm. Row height matters as much as width. If your rows are too tall, wrap the yarn more snugly on each dc.
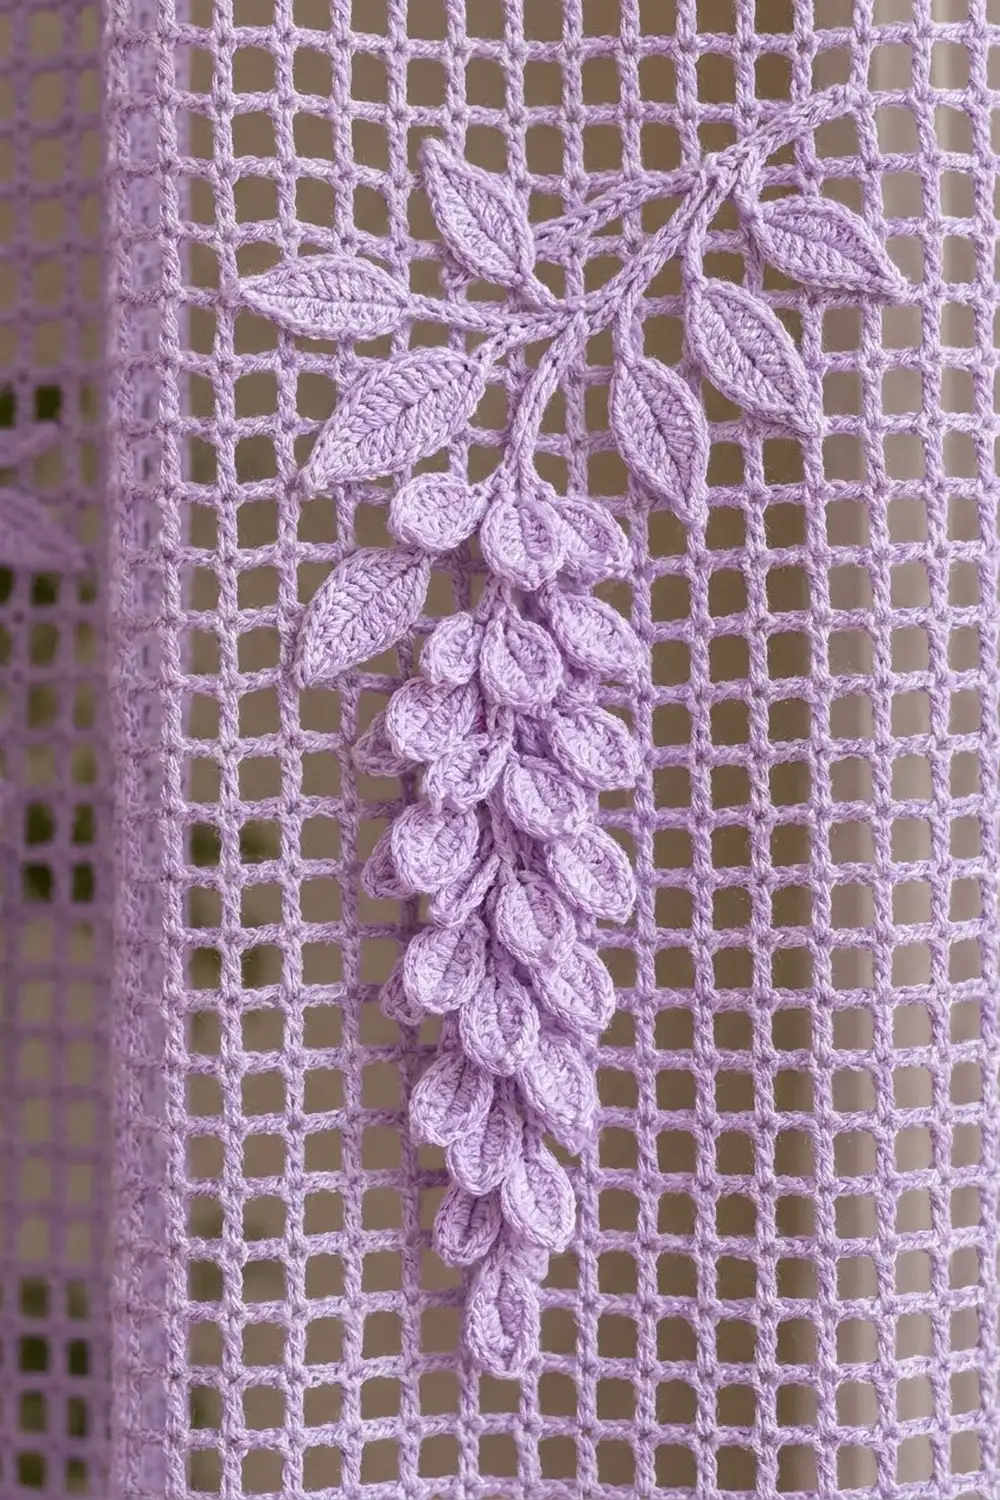
Mesh Panel
Work the panel top down in turned rows. A ch 3 at the start of a row counts as a dc.
Foundation: Ch 195.
Row 1: Dc in the 4th ch from the hook (the skipped chains count as a dc) and in each ch across. Turn. (193 sts, 64 blocks)
Rows 2–4: Ch 3, dc in each st across, with the last dc in the top of the turning ch. Turn. (193 sts each)
This solid header is 2 in (5.1 cm) deep. It holds the clip rings.
Row 5 (lane set-up): Ch 3, dc in next 9 sts (3 blocks). [Ch 2, sk 2, dc in next st] 18 times. Dc in next 6 sts (2 blocks). [Ch 2, sk 2, dc in next st] 18 times. Dc in next 6 sts. [Ch 2, sk 2, dc in next st] 18 times. Dc in next 9 sts. Turn.
(193 sts: 10 + 54 + 6 + 54 + 6 + 54 + 9; units: 3 + 18 + 2 + 18 + 2 + 18 + 3 = 64)
Rows 6–152: Repeat Row 5, working blocks over blocks and mesh over mesh. (193 sts each)
The edge strips and dividers form the solid vertical columns. The three 18-mesh lanes are the open background for the wisteria.
Hem band
Rows 153–154: Ch 3, dc in each dc, 2 dc in each ch-2 sp across. Turn. (193 sts)
Rows 155–158: Ch 3, dc in next 3 sts (block), ch 2, sk 2, dc in next st (mesh). Repeat [block, mesh] across for 32 pairs. Turn. (193 sts: 1 + 64 x 3)
Every row starts with a block and ends with a mesh. Because 64 is even, each row’s first block sits over the previous row’s last mesh, so the checkerboard happens automatically.
Rows 159–160: Repeat Rows 153–154. (193 sts) Do not fasten off.
Checkpoint: 32 in x 80 in (81.3 cm x 203.2 cm).
Make All Pieces
Make every piece in Lavender. Leave a 10 in (25.4 cm) tail on each one for sewing.
Leaf (make 72): Ch 9. Starting in the 2nd ch from the hook, work sc, hdc, 3 dc, hdc, sc (7 sts). Work 3 sc in the last ch. Then, along the other side of the chain, work sc, hdc, 3 dc, hdc, sc. Sl st to the first sc. (17 sts) Use the tail to surface sl st a center vein from base to tip.
Stem (make 12): Ch 31. Sl st in the 2nd ch from the hook and in each ch across. (30 sl sts, 5 in / 12.7 cm)
Wisteria Cluster (make 12):
– Spine: Ch 25. Sc in the 2nd ch from the hook and in each ch across. (24 sc) The last sc marks the top of the cluster.
– Side A: Ch 1, turn. Work back toward the tip: [sl st in next sc, petal in next sc, sl st in next sc] 8 times. Make the petals in this order: 3 LP, 3 MP, 2 SP. (8 petals)
– Side B: Ch 1 and rotate. Work in the free loops of the foundation chain back toward the top: [sl st, petal, sl st] 8 times. Make the petals in this order: 2 SP, 3 MP, 3 LP. (8 petals; 16 total)
– Fasten off with a long tail at the top.
Each petal is 5 sts wide but sits on a 3-st base. That’s why the petals flare and overlap like scales. The cluster tapers from 2.5 in (6.4 cm) at the top to about 1 in (2.5 cm) at the tip.
Per panel: 72 leaves, 12 stems, 12 clusters. One motif = 1 stem + 6 leaves + 1 cluster.
Layout grid (W = one motif; the row shown is where the top of the stem goes):
            Lane 1     Lane 2     Lane 3
            (mesh      (mesh      (mesh
            4-21)      24-41)     44-61)
Row 13        W          W          W
Row 49        W          W          W
Row 85        W          W          W
Row 121       W          W          W
The tiers are 36 rows (18 in / 45.7 cm) apart. Each motif is about 15 rows tall, so the lowest tier ends near Row 136, well above the hem band.
Joining: Attaching the Appliqués
Pin the panel flat and lightly mist the lanes so the mesh sits square. Each lane should measure 9 in (22.9 cm) wide.
- Stem: Center the stem in its lane at the marked row, in a gentle arch that spans about 4.5 in (11.4 cm). The ends sit 1 row lower than the middle. Whipstitch it down, catching a dc post every 0.5 in (1.3 cm).
- Leaves: Sew 3 leaves on each side of the center. Stitch each leaf by its base, with the tip angled up and outward. Tack each tip once.
- Cluster: Sew the top of the spine just below the stem’s center so the cluster hangs straight down. Tack the spine to a dc post every 1 in (2.5 cm). Leave the petals free.
Stitch logic: Always sew through a dc post or a block, not a bare ch-2. Chain loops stretch and distort the mesh.
Tension: Keep your sewing snug but not tight. If a lane pulls narrower than 9 in (22.9 cm), loosen your stitches. After each motif, check that the panel still measures 32 in (81.3 cm) across.
Border
Border gauge: 6 sc = 1 in (2.5 cm). Each sc round adds 0.25 in (0.6 cm).
Round 1: Ch 1.
– Hem: 3 sc in the first st of Row 160 (corner), sc in the next 191 sts, 3 sc in the last st (corner).
– Side: 3 sc in each row end (480 sc).
– Top: Working in the foundation chain, 3 sc in the first st (corner), sc in the next 191 sts, 3 sc in the last st (corner).
– Side: 3 sc in each row end (480 sc). Sl st to the first sc.
Counts for Round 1:
– Top and hem: 3 + 191 + 3 sc each
– Sides: 480 sc each, between the corner groups
– Total: 12 + 382 + 960 = 1,354 sc
Counting between the corner center stitches, that’s 193 sts on the top and on the hem, and 482 sts on each side.
Round 2: Sl st into the hem’s corner center sc. Ch 1 and work 3 sc in the same st.
– Hem: Sc in next st, then [sk 1, 3 dc in next st, sk 1, sc in next st] 48 times. (1 + 48 x 4 = 193 sts used; 48 shells) Work 3 sc in the corner center.
– Side: Sc in each of the 482 sts, then 3 sc in the corner center.
– Top: Sc in each of the 193 sts, then 3 sc in the corner center.
– Side: Sc in each of the 482 sts. Sl st to the first sc and fasten off.
After Round 2, there are 195 sts between corner centers on the top, 484 on each side, and 48 shells on the hem.
Why the math works:
– The top and hem each have 193 sts (64 x 3 + 1), and the border takes exactly 1 sc per stitch.
– Each dc row is 0.5 in (1.3 cm) tall. Working 3 sc per row end gives 6 sc per inch, which matches the border gauge, so the sides lie flat.
– The shell repeat needs 4n + 1 sts, and 193 = 4 x 48 + 1, so the shells end evenly at both corners.
The two sc rounds add 0.5 in (1.3 cm) to the top and to each side. On the hem, the sc round plus the shells adds 0.75 in (1.9 cm). Final size: 33 in x 81.25 in (83.8 cm x 206.4 cm).
Final Blocking
- Lay the panel face down on the mats so the appliqués are underneath.
- Pin the corners to 33 in x 81.25 in (83.8 cm x 206.4 cm).
- Pin along every edge every 3 in (7.6 cm), keeping the solid columns straight.
- Mist evenly until damp, not soaked.
- Smooth each lane so the mesh is square.
- Let it dry completely, at least 24 hours.
- Turn the panel over and fluff the petals with your fingertips.
Final Quality-Control Checklist
- Every row has 193 sts and the edges are straight.
- The lanes are 18 mesh wide and the solid columns line up.
- The hem band shows a clean checkerboard.
- There are 12 motifs, placed at Rows 13, 49, 85, and 121.
- All tails are woven in through solid stitches.
- The border lies flat and has 48 even shells.
- The panel measures 33 in x 81.25 in (83.8 cm x 206.4 cm).
Troubleshooting
- Mesh leans diagonally: Loosen the turning ch-5s and block the panel square.
- Panel narrows: Make sure you work the last dc into the top of the turning ch on every row.
- Petals lie flat: Work each petal into a single st and keep the sl sts on either side snug.
- Leaves curl: Steam them before sewing and tack the tips.
- Sides ruffle: Work 2 sc in every fourth row end instead of 3. Do the same on both sides.
- Panel grows after hanging: Cotton stretches under its own weight. Let it hang for 24 hours before you set the final rod height.
Care
Hand wash in cool water with a mild detergent, roll the panel in towels, and dry it flat. Never hang it while it’s wet.
Final Notes
Here is the measurement chain. A 0.5 in (1.3 cm) mesh square gives 64 units, or 32 in (81.3 cm) across, and 160 rows, or 80 in (203.2 cm) long. The 9 in (22.9 cm) lanes each hold 4 motif tiers. The border brings the panel to 33 in x 81.25 in (83.8 cm x 206.4 cm). Check your gauge early and measure at every checkpoint. For a pair, make a second identical panel.
Happy crocheting!