

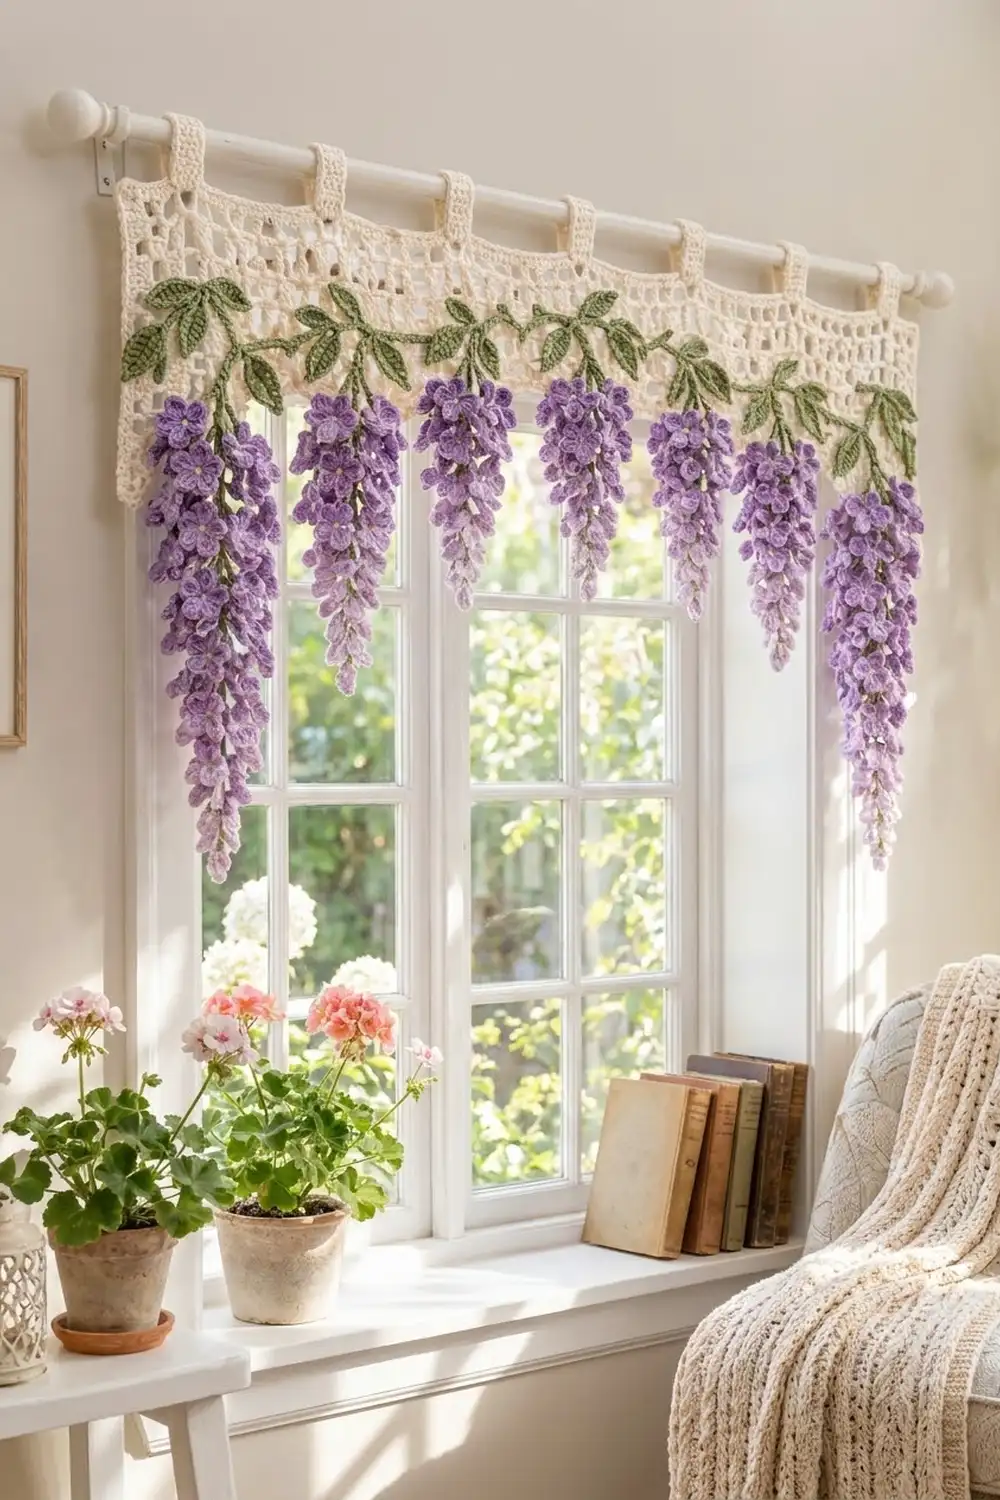
This valance brings a spring garden indoors. A cream filet mesh panel hangs from eight tab tops. A sage-green vine with leaf sprigs runs across its lower edge, and seven wisteria clusters hang from it. Each cluster is made of small five-petal flowers that start deep lavender at the top, change to medium lilac, and end in pale lilac at the tip.
The style is cottage-romantic but still airy, because the open mesh lets light through. All instructions use US crochet terms.
The finished panel measures 35 in (88.9 cm) wide and 8.25 in (21.0 cm) tall without the tabs. The tab loops add 2 in (5.1 cm) above the top edge, and the clusters hang 10 in (25.4 cm) below the shell edge. From the top of the tabs to the tips of the clusters, the valance measures 20.25 in (51.4 cm).
You work the mesh panel in rows, add a two-round border with a shell edge along the bottom, then work the tabs straight off the top edge. You make the vine, leaves, stems and flowers separately and sew them on.
Finished Size and Construction
- Finished size: 35 in x 8.25 in (88.9 cm x 21.0 cm) panel, plus 2 in (5.1 cm) tabs and 10 in (25.4 cm) drops
- Skill level: Intermediate
- Terminology: US
- Yarn weight: DK (3), cotton
- Hooks: 4 mm (G/6) for the panel; 3.5 mm (E/4) for the appliqué pieces
- Number of pieces: 1 mesh panel, 1 vine, 32 leaves, 7 stems, 168 flowers (209 pieces)
- Layout: 7 wisteria drops spaced evenly along one vine
- Panel size before border: 34 in x 7 in (86.4 cm x 17.8 cm), 85 mesh squares x 14 rows
- Border depth: 0.5 in (1.3 cm) on the top and sides; 0.75 in (1.9 cm) on the bottom
- Drop length: 12 in (30.5 cm), measured from the vine
Materials
Use a smooth, mercerized DK cotton of about 120 m per 50 g. Cotton keeps the petals crisp and blocks flat. Pick three purples that are clearly different from each other so the color change shows from across the room.
- Cream (panel, border, tabs): 100 g / 240 m
- Sage green (vine, leaves, stems): 50 g / 120 m
- Deep lavender (top flowers): 75 g / 180 m
- Medium lilac (middle flowers): 60 g / 144 m
- Pale lilac (tip flowers): 50 g / 120 m
- Optional: a small amount of cream for French knot flower centers
Tools: 4 mm (G/6) and 3.5 mm (E/4) hooks, tapestry needle, stitch markers, rust-proof pins, blocking mats, spray bottle, measuring tape, curtain rod up to 1 in (2.5 cm) thick.
All quantities include a margin of about 20% to cover tension differences and sewing tails.
Abbreviations (US Terms)
- ch: chain
- sl st: slip stitch
- sc: single crochet
- hdc: half double crochet
- dc: double crochet
- sk: skip
- sp: space
- st(s): stitch(es)
Special stitch: picot shell. Work (dc, ch 3, sl st in 3rd ch from hook, dc) all in the same stitch. This makes the small pointed shells along the bottom edge.
Gauge and Checkpoints
Mesh gauge (4 mm hook): 10 mesh squares (20 sts) and 8 rows = 4 in (10.2 cm). One square is 0.4 in (1.0 cm) wide and 0.5 in (1.3 cm) tall.
Border gauge (4 mm hook): 5 sc = 1 in (2.5 cm); 4 sc rounds = 1 in (2.5 cm).
Appliqué gauge (3.5 mm hook): 1 flower = 1 in (2.5 cm) across; 1 leaf = 1.75 in (4.4 cm) long; 5 ch = 1 in (2.5 cm).
Before you start, make one flower and a mesh swatch 10 squares wide and 8 rows tall. Check these points as you go:
- Flower: 1 in (2.5 cm) across, petal tip to petal tip.
- Panel after Row 1: 34 in (86.4 cm) wide.
- Panel after Row 14: 7 in (17.8 cm) tall.
- Panel after border: 35 in x 8.25 in (88.9 cm x 21.0 cm).
If your swatch is too big, go down half a hook size. If it is too small, go up half a hook size. Blocking can correct a small difference, but not one of more than 1 in (2.5 cm) across the full row.

Mesh Panel
With cream and the 4 mm hook, ch 174.
Row 1: Dc in 6th ch from hook (the skipped chs count as dc, ch 1 and a skipped ch), *ch 1, sk 1 ch, dc in next ch; repeat from * across. Turn. (86 dc, 85 ch-1 sps = 171 sts; 85 squares)
Row 2: Ch 4 (counts as dc and ch 1), sk first ch-1 sp, dc in next dc, *ch 1, sk ch-1 sp, dc in next dc; repeat from * across, working the last dc in the 3rd ch of the turning ch. Turn. (171 sts; 85 squares)
Rows 3–14: Repeat Row 2. Do not turn at the end of Row 14. (171 sts; 85 squares)
Checkpoint: 34 in x 7 in (86.4 cm x 17.8 cm).
Make All Pieces
Use the 3.5 mm hook for every piece below. Leave a 10 in (25.4 cm) tail on each piece for sewing.
Flowers (make 168)
Make 70 in deep lavender, 56 in medium lilac and 42 in pale lilac. That is 10, 8 and 6 per drop.
Ch 4, sl st to the first ch to form a ring.
Rnd 1: Ch 1, 10 sc in ring, sl st to first sc. (10 sc)
Rnd 2: *Ch 2, 2 dc in next sc, ch 2, sl st in next sc; repeat from * 4 more times. The last sl st goes into the joining st. (5 petals, 10 dc)
Fasten off. The ch-4 ring leaves a small center hole about 1/8 in (0.3 cm) across. You can add a cream French knot in the center if you like.
Leaves (make 32)
With sage, ch 9.
Rnd 1: Sc in 2nd ch from hook, hdc in next ch, dc in next 3 chs, hdc in next ch, sc in next ch, 3 sc in last ch. Working along the other side of the chain: sc in next ch, hdc in next ch, dc in next 3 chs, hdc in next ch, sc in last ch, sl st to first sc. (17 sts)
Fasten off. Each leaf is 1.75 in (4.4 cm) long.
Stems (make 7)
With sage, ch 56. Sl st in the back bump of the 2nd ch from hook and in each ch across. (55 sl sts; 11 in / 27.9 cm)
Vine (make 1)
With sage, ch 181. Sl st in the back bump of the 2nd ch from hook and in each ch across. (180 sl sts; 36 in / 91.4 cm)
The vine is 2 in (5.1 cm) longer than the panel because it is sewn on in a gentle wave.
Drop Layout
Each drop has 24 flowers along an 11 in (27.9 cm) stem. Counting from the top:
Top 4.5 in (11.4 cm)    deep lavender  10 flowers   tiers 3-3-2-2
Mid 3.5 in (8.9 cm)     medium lilac    8 flowers   tiers 2-2-2-2
Tip 3 in (7.6 cm)       pale lilac      6 flowers   tiers 2-2-1-1
Sew each flower to the stem through its center, angling it outward and slightly down. Overlap neighboring flowers by about one petal. Make the top tier about 3.5 in (8.9 cm) wide and narrow the drop to 1.25 in (3.2 cm) at the tip. Sew the last pale flower on by one petal only, so it hangs below the end of the stem. This brings the full drop to 12 in (30.5 cm).
Panel Layout
Counting from the left edge, the drops hang at mesh squares 7, 19, 31, 43, 55, 67 and 79. They are 12 squares apart, which is 4.8 in (12.2 cm). Each outer drop sits 2.6 in (6.6 cm) in from the side of the panel (measured before the border), so square 43 is the exact center.
Square: 1 . . 7 . . 19 . . 31 . . 43 . . 55 . . 67 . . 79 . . 85
Drop:         D1    D2     D3     D4     D5     D6     D7
Border
Continue with cream and the 4 mm hook. The border goes around the panel only. In this section, the side counts do not include the corner groups. Corners are counted separately.
Round 1: Ch 1. Work 3 sc in the last dc of Row 14 (corner), then continue around the panel:
- Side edges: 2 sc around each of the 14 row-end posts. (28 sc per side)
- Bottom corners: 3 sc at the base of each end dc.
- Bottom edge: 1 sc at the base of each dc and 1 sc in each ch-1 sp between the corners. (169 sc)
- Top edge: 1 sc in each st between the corners. (169 sc)
- Top corners: 3 sc in each end st.
Sl st to the first sc. (406 sts: 169 + 169 + 28 + 28 + 4 corners x 3)
Round 2: Ch 1.
- Top edge: 3 sc in the middle sc of each top corner, and 1 sc in each of the 171 sts between them (the 169 top sts plus one outer corner sc at each end).
- Each side: 1 sc in each of 30 sts (the 28 side sts plus one outer corner sc at each end).
- Bottom edge: Sc in the middle sc of the first bottom corner, *sk 1 st, picot shell in next st, sk 1 st, sc in next st; repeat from * 42 more times. The last sc lands in the middle sc of the second bottom corner. (43 picot shells, 44 sc)
Sl st to the first sc and fasten off.
Why the math works: On the bottom edge, Round 2 runs from one corner’s middle sc to the other’s. That run covers the 169 bottom sts plus 2 sts from each corner group, so 173 sts. One sc starts the run and each shell repeat uses 4 sts: 1 + (43 x 4) = 173. Round 2 also uses every stitch of Round 1: 1 + 171 + 1 + 30 + 173 + 30 = 406.
Checkpoint: 35 in x 8.25 in (88.9 cm x 21.0 cm). The border adds 0.5 in (1.3 cm) to each side, which takes the width from 34 in (86.4 cm) to 35 in. It adds 0.5 in (1.3 cm) at the top and 0.75 in (1.9 cm) at the bottom, which takes the height from 7 in (17.8 cm) to 8.25 in.
Tabs (make 8, worked directly)
The top edge of Round 2 has 171 sc between the corner groups. That fits 8 tabs of 10 sts and 7 gaps of 13 sts: 80 + 91 = 171.
Row 1: With the right side facing, join cream in the first sc after the top-left corner group. Ch 1, sc in the same st and in the next 9 sts. Turn. (10 sc)
Rows 2–16: Ch 1, sc in each st across. Turn. (10 sc)
Fasten off, leaving a 12 in (30.5 cm) tail. Skip 13 sts and work the next tab the same way. The 8th tab ends in the last sc before the top-right corner group.
Each tab is 2 in x 4 in (5.1 cm x 10.2 cm). Fold each tab to the back and whipstitch its last row to Round 1. This makes a 2 in (5.1 cm) loop that fits a rod up to 1 in (2.5 cm) thick.
Joining
Sew all the appliqué pieces on with a tapestry needle and matching yarn tails.
- Vine: Lay the panel right side up. Pin the vine across Rows 2–4 in a gentle wave. The low points sit on Row 2 at the 7 drop squares. The high points sit on Row 4, halfway between drops. Tuck the vine ends behind the side borders. Sew through every 2nd sl st into the dc posts underneath.
- Stems: Sew the top 0.5 in (1.3 cm) of each stem behind the vine at its drop square. Tack the stem down the mesh to the shell edge. About 2 in (5.1 cm) of stem lies on the panel and 9 in (22.9 cm) hangs free.
- Leaves: Sew 4 leaves at each drop, 2 pointing up-left and 2 pointing up-right from the stem joint. Sew 2 more leaves at each end of the vine. Sew down only the base half of each leaf so the tips lift a little.
- Tension: Pull each stitch just snug. Stitches that are too tight pucker the mesh, and stitches that are too loose let the flowers flop. Checkpoint: after the vine is on, the panel should still lie flat at 35 in (88.9 cm) wide.
Final Blocking
- Block the panel before you sew on the drops, or pin carefully around them afterward.
- Pin the panel to 35 in x 8.25 in (88.9 cm x 21.0 cm), keeping the mesh squares straight.
- Pin out each picot point along the bottom.
- Mist the panel until it is damp, not soaked.
- Lay each drop flat, open the petals with your fingers and mist lightly.
- Let everything dry completely, which takes 12 to 24 hours.
- Unpin the valance and hang it. The drops will finish settling as they hang.
Final Quality-Control Checklist
- Panel is 35 in (88.9 cm) wide and 8.25 in (21.0 cm) tall.
- 85 squares per row, 14 rows, all squares even.
- 43 picot shells along the bottom, evenly spaced.
- 8 tabs, each 10 sts wide, with 13-st gaps between them.
- 7 drops, 4.8 in (12.2 cm) apart, each 12 in (30.5 cm) long.
- Every drop shades from deep lavender to medium lilac to pale lilac.
- All tails are woven in at least 1.5 in (3.8 cm) and hidden.
Troubleshooting
- Mesh slants: You missed a ch 1 or the dc at a row end. Check that each row has 171 sts.
- Panel too narrow: Your gauge is tight. Go up a hook size, or block it to width if it is less than 1 in (2.5 cm) short.
- Petals cup: Your ch-2s are too tight. Loosen them or work ch 3 instead.
- Shell edge ruffles: Check that you skip 1 st on each side of every shell.
- Drops twist: Sew the flowers evenly on both sides of the stem.
- Vine puckers the mesh: Remove the stitching and sew the vine on again more loosely, through every 3rd sl st.
Care
Hand wash in cold water with mild soap, then press out the water in a towel and dry flat, reshaping the drops. Keep the valance out of strong direct sun so the lilac shades do not fade.
Final Notes
Every measurement depends on the one before it. The pattern starts with a 1 in (2.5 cm) flower and a 0.4 in (1.0 cm) mesh square. 85 squares make the 34 in (86.4 cm) panel, and the border brings it to 35 in (88.9 cm). The 171 top stitches fit exactly 8 tabs, and the 173 bottom stitches fit exactly 43 shells. Seven drops spaced 12 squares apart finish the cascade. If your gauge matches at the first checkpoint, every measurement after it will match too.
Happy crocheting!