

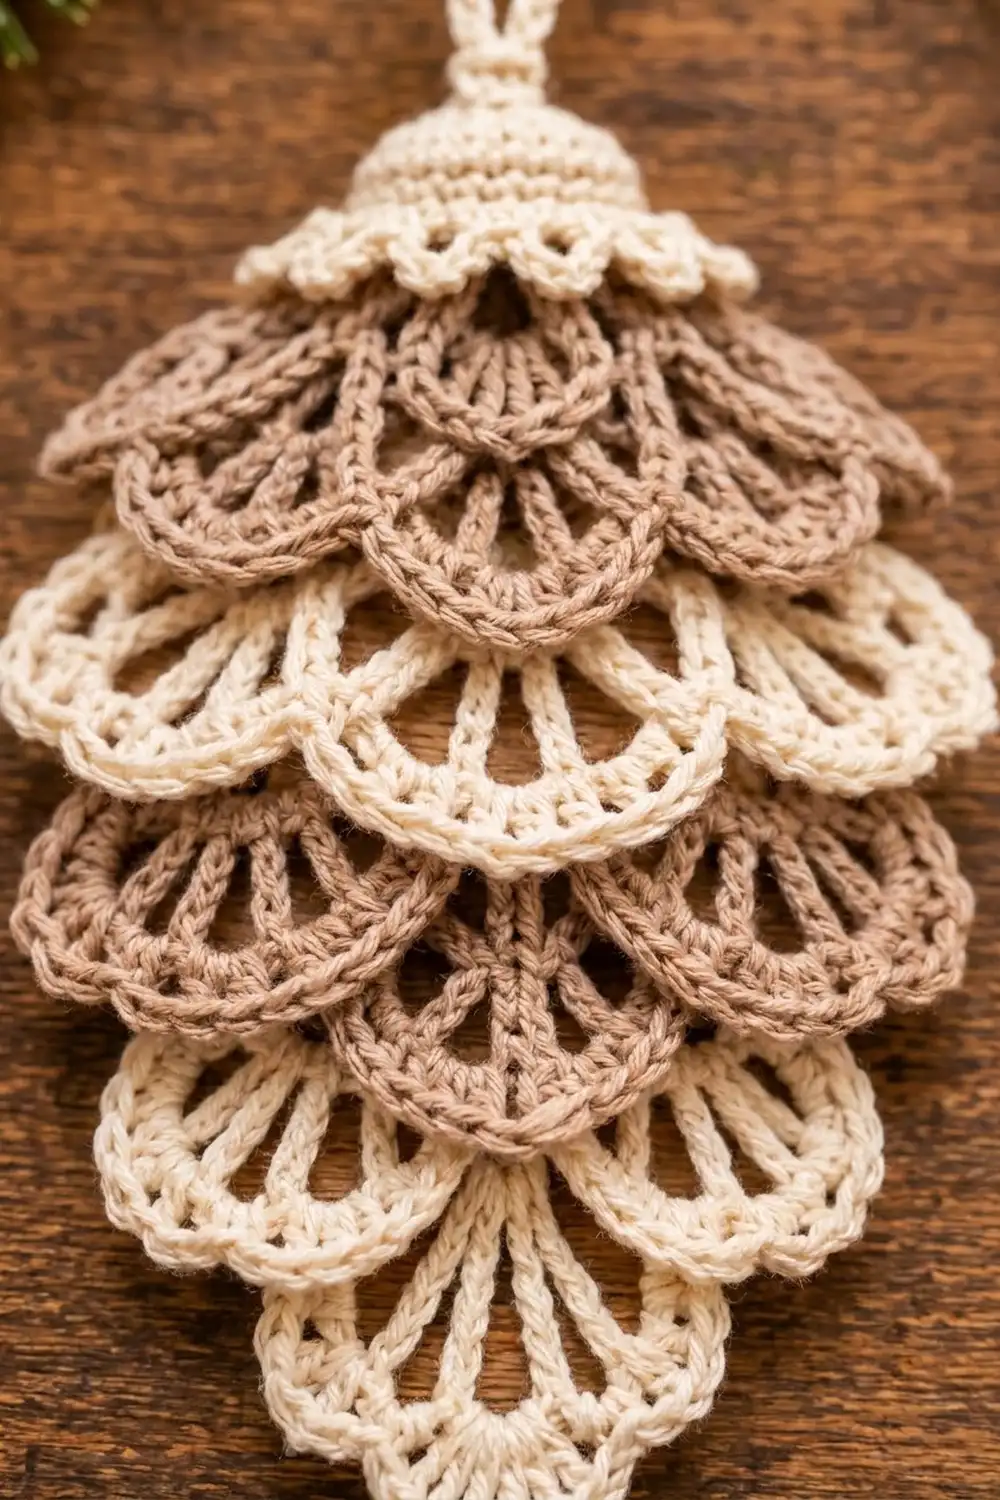
This little pinecone ornament is built from stacked lace fans, so it looks like the scales of a real cone. Each tier is a row of open scallops with fine double-crochet spokes inside a smooth single-crochet arch. When the tiers overlap, you get a soft, layered texture that catches the light on the tree.
The palette is warm and natural: a mushroom-taupe and a creamy ivory. Taupe tiers sit near the top and in the middle, and cream tiers fill the lower half and form the pointed tip. A small cream cap with a shell edge and a sturdy hanging loop finish the top.
The pattern uses US crochet terms. The finished ornament measures 3.2 in (8.1 cm) wide and 4.3 in (10.9 cm) tall. With the hanging loop it is 5.8 in (14.7 cm) tall overall.
Construction is simple and modular. First you work a small teardrop backing in taupe and edge it with one border round. Then you make seven short fan strips (the tiers), a cap and a loop. Finally you sew the tiers onto the backing from the bottom up, so each tier overlaps the one below.
Finished Size and Construction
- Finished size: 3.2 in (8.1 cm) wide × 4.3 in (10.9 cm) tall, not counting the loop
- With loop: 5.8 in (14.7 cm) tall
- Skill level: Easy-intermediate
- Terminology: US terms
- Yarn weight: DK / light (#3) cotton or cotton blend
- Hook: 3.5 mm (E-4)
- Number of pieces: one finished ornament. It is made from 1 backing, 7 tiers, 1 cap and 1 loop, all sewn into a single piece.
- Layout: 7 tiers stacked vertically, with fan counts of 2, 3, 4, 4, 3, 2, 1 from top to bottom
- Fan width: 0.8 in (2.0 cm) per fan
- Tier depth: 0.7 in (1.8 cm)
- Tier spacing: 0.5 in (1.3 cm), which equals 3 backing rows
- Backing size before border: 2.8 in (7.1 cm) wide × 3.0 in (7.6 cm) tall
- Border depth: 0.1 in (0.3 cm) per edge
- Backing size after border: 3.0 in (7.6 cm) wide × 3.2 in (8.1 cm) tall
Materials
Yarn: Use a smooth, mercerized or matte DK cotton. Cotton gives the fans crisp spokes and holds the scallop shape well after blocking. Avoid fuzzy yarns, because they blur the lace.
- Color A, Taupe: 20 g / 44 m. Used for the backing, the border and tiers 1, 2 and 4.
- Color B, Cream: 15 g / 33 m. Used for tiers 3, 5, 6 and 7, plus the cap and the loop.
These quantities include a safety margin of about 30% for swatching and sewing tails.
Tools:
– 3.5 mm (E-4) crochet hook
– Tapestry needle
– 8 locking stitch markers
– Rust-proof pins
– Small ruler or tape measure
– Spray bottle and a blocking mat or folded towel
– Scissors
Abbreviations (US Terms)
- ch – chain
- sl st – slip stitch
- sc – single crochet
- hdc – half double crochet
- dc – double crochet
- sc2tog – single crochet 2 together
- sk – skip
- sp – space
- st(s) – stitch(es)
- RS – right side
- rep – repeat
Special stitch: Fan. Work (dc, ch 2) 4 times, then dc, all into the same stitch. This gives 5 dc spokes and 4 ch-2 spaces.
Gauge and Checkpoints
Backing gauge: 10 sc × 12 rows = 2 in (5.1 cm) square, which is 5 sc and 6 rows per inch.
Fan gauge: A 4-fan tier, after Row 2, measures 3.2 in (8.1 cm) wide and 0.7 in (1.8 cm) deep.
Before you make everything, test with one piece. Make Tier 3 (4 fans) first and measure it flat.
Checkpoints:
1. Tier 3 after Row 2: 3.2 in (8.1 cm) wide.
2. Backing after Row 7: 14 sc, 2.8 in (7.1 cm) wide.
3. Backing after Row 18: 3.0 in (7.6 cm) tall.
4. Backing after the border: 3.0 in (7.6 cm) wide × 3.2 in (8.1 cm) tall.
5. Finished ornament: 3.2 in (8.1 cm) × 4.3 in (10.9 cm).
If your piece is too big: go down to a 3.25 mm or 3.0 mm hook.
If your piece is too small: go up to a 3.75 mm or 4.0 mm hook.
Fans that cup or ruffle usually mean the chains are too tight. Chain loosely, or work the foundation chain with a hook one size larger.
Backing (Color A, Taupe)
The backing is a flat teardrop worked in rows from the bottom point upward. It is hidden almost completely behind the tiers.
Foundation: Ch 3.
Row 1: Sc in 2nd ch from hook and in next ch. Turn. (2 sc)
Row 2: Ch 1, 2 sc in each st. Turn. (4 sc)
Row 3: Ch 1, 2 sc in first st, sc to last st, 2 sc in last st. Turn. (6 sc)
Rows 4–7: Rep Row 3. This gives Row 4: 8 sc, Row 5: 10 sc, Row 6: 12 sc, Row 7: 14 sc.
Checkpoint: Row 7 should measure 2.8 in (7.1 cm) wide.
Rows 8–14: Ch 1, sc in each st. Turn. (14 sc per row)
Row 15: Ch 1, sc2tog, sc to last 2 sts, sc2tog. Turn. (12 sc)
Rows 16–18: Rep Row 15. This gives Row 16: 10 sc, Row 17: 8 sc, Row 18: 6 sc.
Checkpoint: The backing is 18 rows tall, which is 3.0 in (7.6 cm), and 2.8 in (7.1 cm) at its widest. Do not fasten off; continue straight into the border.
Tiers (Make 7)
All tiers use the same two-row method. Only the number of fans (F) changes.
Foundation: Ch (6 × F) + 2.
Row 1 (fans): Sc in 2nd ch from hook. Sk 2 ch, Fan in next ch, sk 2 ch, sc in next ch. Rep from * F times. Turn.
Count: (F + 1) sc and F fans, each with 5 dc and 4 ch-2 sps.
Each repeat uses exactly 6 chains. The first sc uses 1 chain and the turning chain is 1 more, so the foundation total is 6F + 2.
Row 2 (arch outline): Ch 1, sl st in first sc.
For each fan: sc in first dc, 3 sc in next ch-2 sp, then (sc in next dc, 3 sc in next ch-2 sp) 3 times, then sc in last dc. That is 17 sc per fan (5 sc on the dc plus 12 sc in the spaces). Sl st in the next sc between fans. Rep across.
Count: (17 × F) sc and (F + 1) sl sts.
Fasten off and leave a 12 in (30.5 cm) tail for sewing.
The 3 sc in each ch-2 space make a solid curved rim. The dc spokes stay open below it, which creates the lace scale look.
| Tier | Color | Fans (F) | Foundation ch | Row 2 sc | Width |
|---|---|---|---|---|---|
| 1 (top) | A Taupe | 2 | 14 | 34 | 1.6 in (4.1 cm) |
| 2 | A Taupe | 3 | 20 | 51 | 2.4 in (6.1 cm) |
| 3 | B Cream | 4 | 26 | 68 | 3.2 in (8.1 cm) |
| 4 | A Taupe | 4 | 26 | 68 | 3.2 in (8.1 cm) |
| 5 | B Cream | 3 | 20 | 51 | 2.4 in (6.1 cm) |
| 6 | B Cream | 2 | 14 | 34 | 1.6 in (4.1 cm) |
| 7 (tip) | B Cream | 1 | 8 | see below | 0.8 in (2.0 cm) |
Tier 7 tip variation: On Row 2, when you reach the center (3rd) dc, work (sc, ch 2, sc) into it instead of a single sc. This gives 18 sc plus 1 ch-2 point, followed by the closing sl st (2 sl sts total). The ch-2 makes the soft point at the bottom of the cone.
Cap (Color B, Cream)
Rnd 1: Make a magic ring and work 6 sc into it. Do not join; work in a spiral. (6 sc)
Rnd 2: (Sc in next st, 2 sc in next st) 3 times. (9 sc)
Rnd 3: (Sc in next 2 sts, 2 sc in next st) 3 times. (12 sc)
Rnd 4: Sc in each st. (12 sc)
Rnd 5: Sc in next st, ch 3, sk 1 st. Rep from * 6 times, then sl st to the first sc. (6 sc and 6 ch-3 loops)
Rnd 6: In each ch-3 loop, work (sc, hdc, dc, hdc, sc). Sl st to the first sc. (6 small shells)
Fasten off with a 12 in (30.5 cm) tail. Press the cap flat into a half-bell. It should measure about 1.4 in (3.6 cm) across the shells and 0.7 in (1.8 cm) tall.
Hanging Loop (Color B, Cream)
Ch 26. Sl st in the back bump of the 2nd ch from the hook and in each ch across. (25 sl sts)
This makes a firm, rope-like cord about 3.1 in (7.9 cm) long. Fold it in half to form a 1.5 in (3.8 cm) loop and leave the tails for attaching.
Border (Backing, Color A)
Border gauge: 5 sc = 1 in (2.5 cm), the same as the backing.
Border Rnd 1: Continue from Row 18 with the RS facing and work around the backing:
- Top edge: 2 sc in the first st, sc in the next 4 sts, 2 sc in the last st. (8 sc, corners included)
- Left side: 1 sc in each row end, from Row 18 down to Row 1. (18 sc)
- Bottom point: 2 sc in each of the 2 foundation chain loops. (4 sc)
- Right side: 1 sc in each row end, from Row 1 up to Row 18. (18 sc)
Sl st to the first sc. Total: 8 + 18 + 4 + 18 = 48 sc. Fasten off and weave in the ends.
Why the math works: Each side has 18 rows, so one sc per row end gives exactly 18 sc per side. The sides are partly diagonal, so each one is about 4 in (10.2 cm) long. That works out to roughly 4.5 sc per inch, a little under the fabric gauge of 5. That slight snugness keeps the edge flat and firm instead of wavy.
The doubled stitches at the top corners and the bottom point turn the shape without puckering. The border adds 0.1 in (0.3 cm) to every edge, so the backing grows from 2.8 × 3.0 in (7.1 × 7.6 cm) to 3.0 × 3.2 in (7.6 × 8.1 cm).
Assembly
Lay the backing RS up. Using locking markers, mark these placement lines on the backing rows:
- Tier 1: Row 18
- Tier 2: Row 15
- Tier 3: Row 12
- Tier 4: Row 9
- Tier 5: Row 6
- Tier 6: Row 3
- Tier 7: the base of Row 1
Each line sits 3 rows, or 0.5 in (1.3 cm), above the next.
- Start at the bottom. Center Tier 7 with its foundation chain along the base of Row 1, fans hanging down. Whipstitch the foundation chain to the backing.
- Work upward. Sew Tiers 6, 5, 4, 3, 2 and 1 in order, each centered on its marked row. Each new tier’s fans fall over the foundation chain of the tier below and hide it.
- Keep the scallops free. Sew through the foundation chain only. Leave Row 2 of each tier loose so the scallops lift slightly.
- Add the cap. Place the cap over the top edge so its shells cover the Tier 1 foundation, with about 0.5 in (1.3 cm) of the cap above the backing. Sew it around its shell base.
- Add the loop. Push both loop tails through the magic-ring center of the cap, knot them on the back of the backing, and weave them in.
Size checkpoint: Measure from the top of the cap to the tip: 0.5 + 0.1 + 3.0 + 0.7 = 4.3 in (10.9 cm). Tiers 3 and 4 should span 3.2 in (8.1 cm), overhanging the 3.0 in (7.6 cm) backing by 0.1 in (0.3 cm) on each side.
Final Blocking
- Lightly mist the ornament until it is damp, not soaked.
- Lay it RS up on a blocking mat or folded towel.
- Pin the widest tier to 3.2 in (8.1 cm) wide.
- Pin the tip so the ornament measures 4.3 in (10.9 cm) from the cap top to the point.
- Ease each scallop into a round arch with your fingertips, and straighten the dc spokes so they fan out evenly.
- Pin the cap shells flat.
- Let it dry completely, at least 6 hours, before removing the pins.
Final Quality-Control Checklist
- The backing has 48 border sc: 8 on top, 18 on each side and 4 at the bottom.
- Each fan has 5 dc spokes and 17 rim sc. The Tier 7 tip has 18 sc and a ch-2 point.
- The fan counts read 2, 3, 4, 4, 3, 2, 1 from top to bottom.
- The colors read taupe, taupe, cream, taupe, cream, cream, cream.
- No foundation chains or backing edges show between tiers.
- The finished size is 3.2 × 4.3 in (8.1 × 10.9 cm), with a 1.5 in (3.8 cm) loop.
- The loop is secure and all ends are woven in.
Troubleshooting
- Fans ruffle: The foundation chain is too tight. Redo it with a larger hook.
- Fans look gappy or flat: You may have used 2 sc in the ch-2 spaces. Check for 3 sc per space.
- The tier is narrower than the chart: Recount the foundation (6F + 2). A missing skipped chain shifts every fan.
- Backing shows at the sides: Re-center the tiers, or block the widest tiers a little wider.
- The backing edge waves: You probably added extra sc along the sides. Keep to exactly 18 per side.
- The cap won’t lie flat: Press it with steam, and stitch the inner fold to the backing.
Care
Hand wash in cool water with mild soap. Press out the water in a towel and reshape flat to dry.

Final Notes
The measurement chain is short and reliable:
- One fan is 0.8 in (2.0 cm), so a 4-fan tier is 3.2 in (8.1 cm).
- The backing has 18 rows at 6 rows per inch, so it is 3.0 in (7.6 cm) tall, and the border brings it to 3.2 in (8.1 cm).
- The tiers are spaced every 3 rows, which is 0.5 in (1.3 cm).
- The cap, top border, tier stack and tip add up to 4.3 in (10.9 cm).
Check Tier 3 and the backing at their checkpoints, and the rest will fall into place. Make one in each color order, or a whole forest of them for the tree.
Happy crocheting!