

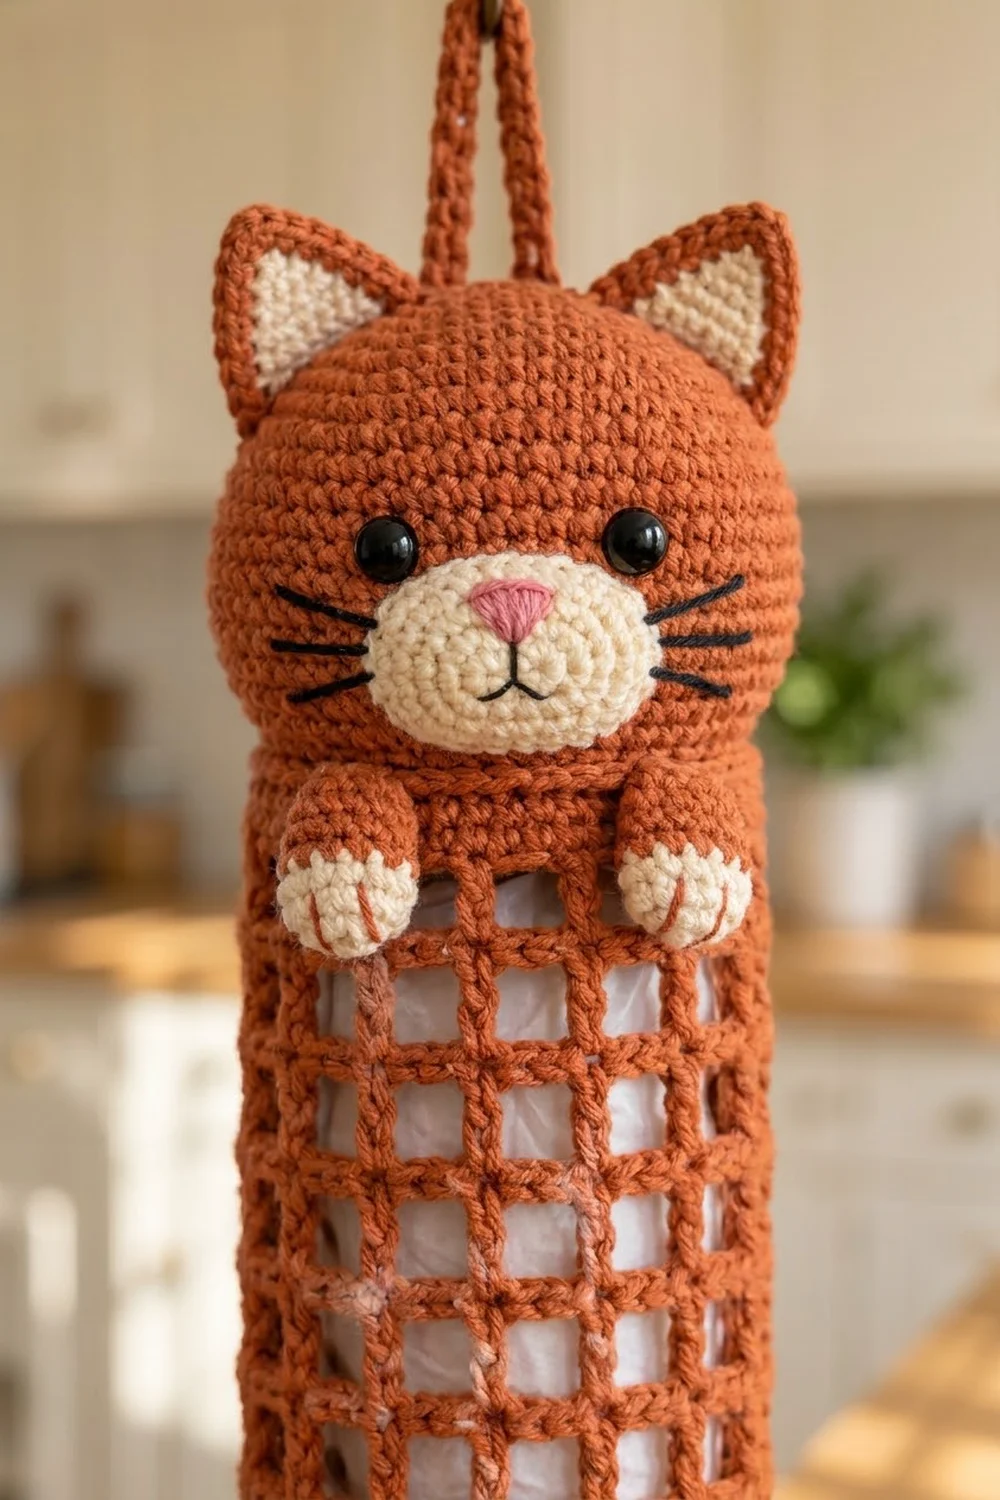
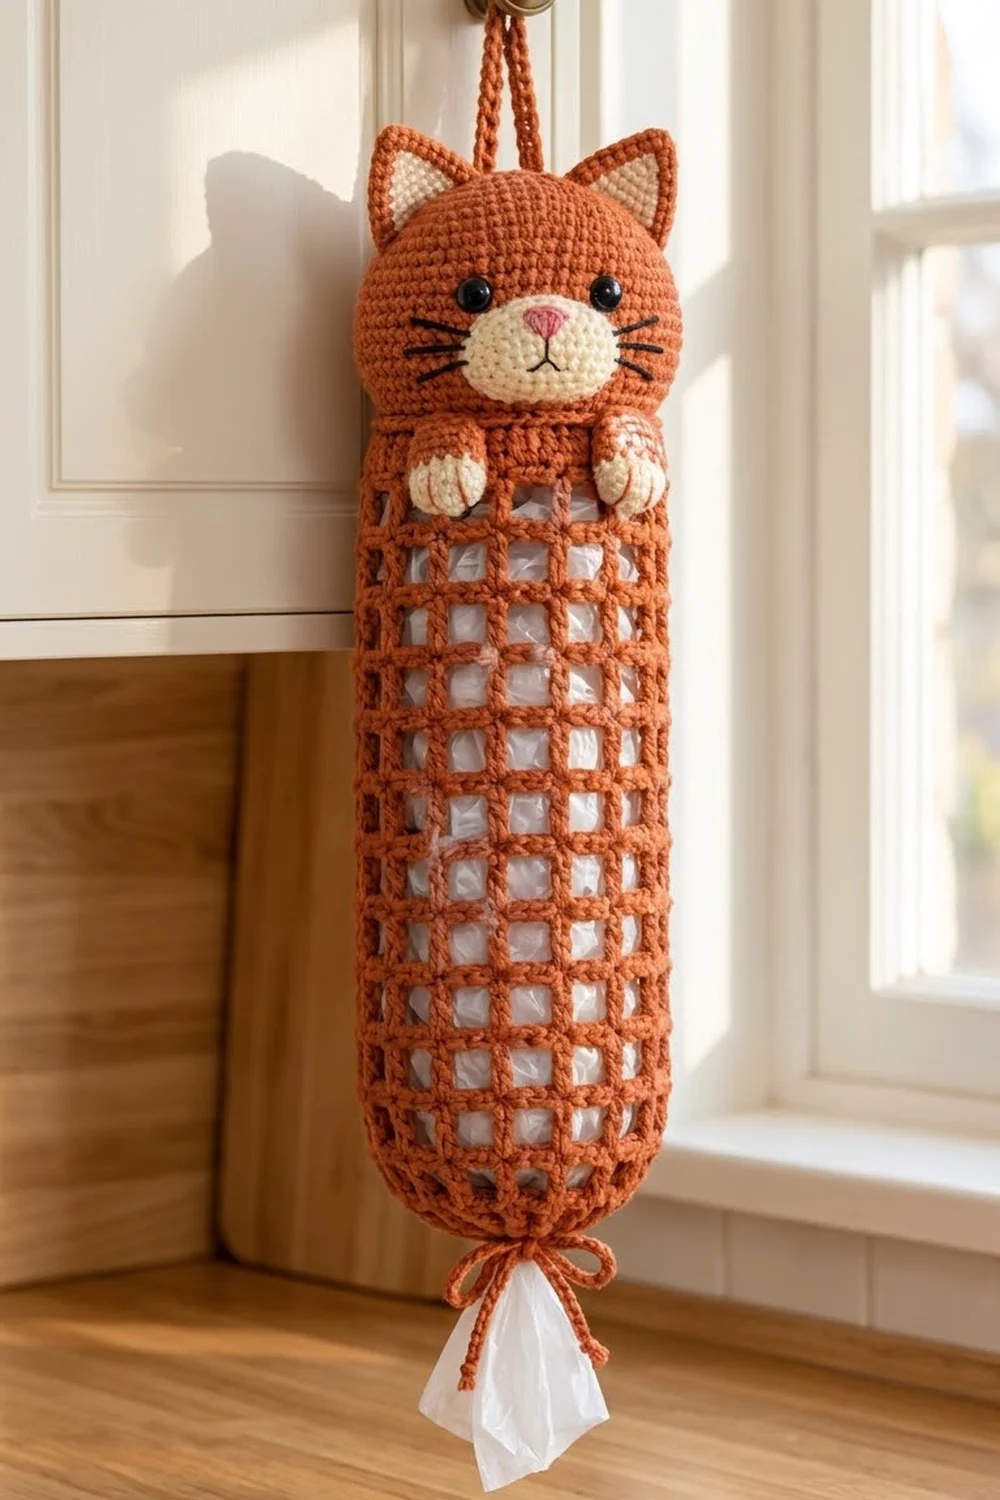
This cheerful bag holder keeps plastic grocery bags tidy behind a ginger cat face. The long body is an open filet mesh tube, so you can see how many bags are left. A round 3D cat head sits on the back of the top rim and two little paws hang over the front edge. A drawstring gathers the bottom so you can pull bags out one at a time.
The palette is simple:
- Rust-orange (ginger): body, head, ears, loop and the upper part of each paw
- Cream: muzzle, inner ears and toe tips
- Black: eyes, mouth and whiskers
- Soft pink: nose
The style is cozy amigurumi on a practical kitchen piece.
The pattern uses US crochet terms. The finished body measures 6.4 in (16.3 cm) wide laid flat and 15.5 in (39.4 cm) long. With the head attached, the holder hangs about 19 in (48.3 cm) without the loop and about 22 in (55.9 cm) with it.
You’ll make it in three stages:
- Work the body from the bottom up in joined rounds: a round of single crochet, then filet mesh, then a solid top band.
- Make the head, ears, muzzle and paws in amigurumi style.
- Sew everything on and thread a chain drawstring through the bottom mesh round.
Finished Size and Construction
- Finished size: 6.4 in (16.3 cm) flat width × 15.5 in (39.4 cm) body length. With head and loop, the holder is about 22 in (55.9 cm) overall.
- Skill level: Intermediate (filet mesh in the round plus basic amigurumi)
- Terminology: US
- Yarn weight: Worsted (#4) cotton or cotton blend
- Hooks: 4.5 mm (US 7) for the body; 3.5 mm (US E-4) for the amigurumi parts
- Number of pieces: One finished holder, assembled from a body, head, 2 ears (each with an inner-ear patch), muzzle, 2 paws, loop and drawstring
- Layout: The head sits on the center back of the rim, the paws on the front rim, the loop on top of the head and the drawstring at the bottom.
- Body circumference: 12.8 in (32.5 cm), which is 48 stitches
- Size before top band: 14.5 in (36.8 cm) long
- Top band depth: 1 in (2.5 cm), which is 4 rounds of sc
Materials
Choose a smooth worsted cotton. It holds the mesh shape well, barely stretches under the weight of the bags and washes easily. Avoid fuzzy yarns, because they hide the mesh openings and the face details.
- Rust-orange: 120 g / about 204 m
- Cream: 15 g / about 26 m
- Black: 2 g / about 5 m
- Pink: 1 g / about 2 m
Tools:
- 4.5 mm (US 7) and 3.5 mm (US E-4) hooks
- 2 black safety eyes, 10 mm
- Polyester fiberfill, about 25 g
- Tapestry needle
- Stitch markers
- Straight pins
- Measuring tape
- Scissors
Quantities include a margin of about 15 percent for swatching and tension differences.
Abbreviations (US Terms)
- ch: chain
- sl st: slip stitch
- sc: single crochet
- dc: double crochet
- inc: 2 sc in the same stitch
- dec: invisible decrease (sc2tog through front loops only)
- sc2tog: single crochet 2 together
- MR: magic ring
- sp: space
- st(s): stitch(es)
- rep: repeat
Special stitch (mesh): One mesh is 1 dc plus ch 2. The ch 2 bridges 2 skipped stitches, or the ch-2 space below it. Each mesh is 3 stitches wide.
Gauge and Checkpoints
Body gauge (4.5 mm hook):
- Mesh: 5 mesh (15 sts) = 4 in (10.2 cm) wide, and 4 mesh rounds = 3 in (7.6 cm) tall.
- Sc: 15 sts = 4 in (10.2 cm) wide, and 4 rounds = 1 in (2.5 cm) tall.
Amigurumi gauge (3.5 mm hook): 9 sc and 10 rounds = 2 in (5.1 cm). The fabric should be firm enough that no stuffing shows through.
Test the body first by working Rounds 1–5, then check these measurements:
- After Round 2: the tube is 6.4 in (16.3 cm) wide laid flat.
- After Round 5: it is 3.25 in (8.3 cm) tall from the bottom edge.
- After Round 20: it is 14.5 in (36.8 cm) tall.
- After Round 24: it is 15.5 in (39.4 cm) tall.
If the tube is too wide or too tall, go down 0.5 mm in hook size. If it’s too narrow or too short, go up 0.5 mm. Don’t change the stitch count, because the head and paws are placed by stitch number.
Body (Rust-Orange, 4.5 mm Hook)
Round 1: Ch 48 and join with a sl st, without twisting the chain. Ch 1, sc in each ch around, then join. (48 sc)
Round 2 (first mesh round):
- Ch 5 (counts as dc + ch 2), skip the next 2 sc and dc in the next sc.
- *Ch 2, skip the next 2 sc and dc in the next sc; rep from * 14 more times.
- Ch 2, skip the last 2 sc and join with a sl st in the 3rd ch of the beginning ch-5.
(16 dc and 16 ch-2 sps = 16 mesh)
Rounds 3–20:
- Ch 5 (counts as dc + ch 2) and dc in the next dc.
- *Ch 2, dc in the next dc; rep from * 14 more times.
- Ch 2 and join with a sl st in the 3rd ch of the beginning ch-5.
(16 mesh per round)
Rounds 2–20 make 19 mesh rounds, 14.25 in (36.2 cm) tall. Each dc should sit directly above the dc below it, forming straight vertical bars and square openings.
Don’t fasten off. Work the top band now (see Border) before you assemble anything.
Head (Rust-Orange, 3.5 mm Hook)
Work in continuous spirals, moving your marker up at the start of each round.
- Round 1: 6 sc in MR. (6)
- Round 2: Inc in each st. (12)
- Round 3: (Sc 1, inc) × 6. (18)
- Round 4: (Sc 2, inc) × 6. (24)
- Round 5: (Sc 3, inc) × 6. (30)
- Round 6: (Sc 4, inc) × 6. (36)
- Round 7: (Sc 5, inc) × 6. (42)
- Round 8: (Sc 6, inc) × 6. (48)
- Round 9: (Sc 7, inc) × 6. (54)
- Round 10: (Sc 8, inc) × 6. (60)
- Round 11: (Sc 9, inc) × 6. (66)
Checkpoint: Pressed flat, the piece measures about 4.4 in (11.2 cm) across.
- Rounds 12–19: Sc in each st. (66)
Insert the safety eyes between Rounds 14 and 15, with 9 stitches between them. Don’t lock them yet.
- Round 20: (Sc 9, dec) × 6. (60)
- Round 21: (Sc 8, dec) × 6. (54)
- Round 22: (Sc 7, dec) × 6. (48)
- Round 23: (Sc 6, dec) × 6. (42)
- Round 24: (Sc 5, dec) × 6. (36)
- Round 25: (Sc 4, dec) × 6. (30)
Lock the eyes and stuff the head, firmly at the front and lightly at the back. This gives a slightly flattened ball about 5 in (12.7 cm) wide and 4.5 in (11.4 cm) tall.
- Round 26: (Sc 3, dec) × 6. (24)
- Round 27: (Sc 2, dec) × 6. (18)
- Round 28: (Sc 1, dec) × 6. (12)
- Round 29: Dec × 6. (6)
Fasten off and close the hole. The magic ring is the top of the head, and Round 29 is the chin and underside.
Muzzle (Cream, 3.5 mm Hook)
- Round 1: Ch 6. Sc in the 2nd ch from the hook, sc in the next 3 ch, then 3 sc in the last ch. Working along the other side of the chain, sc in the next 3 ch, then 2 sc in the last ch. (12)
- Round 2: 2 sc in the first st, sc in the next 3, 2 sc in each of the next 3, sc in the next 3, then 2 sc in each of the last 2. (18)
- Round 3: (Sc 1, inc), sc in the next 3, (sc 1, inc) × 3, sc in the next 3, then (sc 1, inc) × 2. (24)
Sl st in the next st and fasten off, leaving a long tail. The oval measures 2.25 in × 1.25 in (5.7 cm × 3.2 cm).
Ears (Make 2)
Outer ear (rust-orange):
- Round 1: 6 sc in MR. (6)
- Round 2: (Sc 1, inc) × 3. (9)
- Round 3: (Sc 2, inc) × 3. (12)
- Round 4: (Sc 3, inc) × 3. (15)
- Round 5: (Sc 4, inc) × 3. (18)
- Round 6: Sc in each st. (18)
Fasten off with a long tail and don’t stuff. Flatten the ear into a pointed triangle 1.75 in (4.4 cm) wide at the base and 1.5 in (3.8 cm) tall.
Inner ear (cream, worked in rows):
- Row 1: Ch 7, then sc in the 2nd ch from the hook and in each ch across. (6)
- Row 2: Ch 1, turn, sc2tog, sc 2, sc2tog. (4)
- Row 3: Ch 1, turn, sc in each st. (4)
- Row 4: Ch 1, turn, sc2tog × 2. (2)
- Row 5: Ch 1, turn, sc2tog. (1)
The inner ear is a triangle 1.25 in (3.2 cm) wide and 1 in (2.5 cm) tall. Center it on the front of the outer ear with the bottom edges aligned, then whipstitch it in place.
Paws (Make 2)
- Round 1 (cream): 6 sc in MR. (6)
- Round 2: Inc in each st. (12)
- Rounds 3–4: Sc in each st. (12)
- Rounds 5–7 (rust-orange): Sc in each st. (12)
Stuff lightly. Flatten the opening and sc across both layers, working through 6 pairs of stitches. Fasten off with a long tail. Each paw is 1 in (2.5 cm) wide and 1.5 in (3.8 cm) long.
With rust-orange, embroider 2 straight stitches across the cream tip to divide it into 3 toes.
Hanging Loop and Drawstring
Loop (rust-orange, 3.5 mm hook): Ch 31, then sc in the 2nd ch from the hook and in each ch across. (30 sc) The strip measures 6.5 in (16.5 cm).
Drawstring (rust-orange, 4.5 mm hook): Ch 100. It should measure about 24 in (61.0 cm). Tie an overhand knot at each end.
Make All Pieces
Check that you have every component before you start assembling:
- Rust-orange: 1 body, 1 head, 2 outer ears, 2 paws (upper part), 1 loop, 1 drawstring
- Cream: 1 muzzle, 2 inner ears, 2 paw tips (worked as part of the paws)
- Black: safety eyes, plus yarn for embroidery
- Pink: yarn for embroidering the nose
Layout (front view):
              [ loop ]
       [ear]  [ HEAD ]  [ear]
              [muzzle]
    [paw]   --- rim ---   [paw]
    |  body: 16 mesh around    |
    |  x 19 mesh rounds        |
    |  + 4-round top band      |
            [drawstring]
Joining (Assembly)
Face:
- Pin the muzzle so its top edge sits on Round 15, with its upper corners just inside each eye.
- Stuff the muzzle lightly and whipstitch it on, one muzzle stitch to one head stitch.
- With pink, satin-stitch a triangular nose at the top center of the muzzle.
- With black, embroider a short line below the nose, a small “w” mouth, and 3 whiskers per side. The whiskers extend 0.75 in (1.9 cm) past the muzzle.
Ears: Sew each flattened base (9 stitch pairs) along Rounds 6–10 of the head, with the inner edges 2.5 in (6.4 cm) apart.
Loop: Fold the strip in half and sew both ends over the magic ring. The loop rises 3 in (7.6 cm) above the head.
Head to body:
- Flatten the body with the round join at one side fold. Stitches 1–24 are now the front and stitches 25–48 are the back.
- Set the head behind the back band so the band’s top edge sits 1 in (2.5 cm) up the back of the head. This leaves 3.5 in (8.9 cm) of head above the rim.
- Whipstitch back stitches 31–42 (12 sts) to the head, one band stitch to one head stitch.
- Tack the band to the head again 1 in (2.5 cm) lower for stability.
Leave front stitches 1–24 free; this is the bag opening.
Paws: Sew the orange end of each paw over the top edge of the front band, with the cream toes hanging down over the mesh. Place one paw over stitches 7–9 and the other over stitches 16–18. This leaves 6 stitches, 1.6 in (4.1 cm), between them.
Drawstring: Starting at center front, weave the drawstring over and under through the 16 ch-2 spaces of Round 2.
Tension: Sew with a firm, even pull. Sewing too tight puckers the band behind the head, and sewing too loose lets the head tip forward once the holder is full.
Size checkpoint: Hanging from the loop, the holder measures about 22 in (55.9 cm) overall.
Border (Top Band)
Border gauge: 15 sc and 4 rounds = 4 in × 1 in (10.2 cm × 2.5 cm) with the 4.5 mm hook. Continue from Round 20 of the body.
Round 21 (conversion round):
- Ch 1. Sc in the same st as the join, then 2 sc in the next ch-2 sp.
- *Sc in the next dc, 2 sc in the next ch-2 sp; rep from * 15 more times.
- Join with a sl st.
(16 sc worked 1 per dc + 32 sc worked into spaces = 48 sc)
Rounds 22–24: Ch 1, sc in each st around, then join. (48 sc per round, which is 24 per flat side)
Fasten off and weave in the ends.
Why the math works:
- Each mesh is 3 stitches wide, so 16 mesh × 3 = 48 stitches. This matches the 48-stitch foundation round.
- At 15 sts per 4 in (10.2 cm), 48 stitches give a 12.8 in (32.5 cm) circumference and a 6.4 in (16.3 cm) flat width.
- The band and the mesh are the same width, so the rim stays straight instead of flaring or pulling in.
- Round 1 is also 48 sc and already finishes the bottom edge, so no extra edging is needed.
Final Blocking
- Mist the body until it’s evenly damp. Keep the stuffed parts dry.
- Slide a rolled towel or a 4 in (10.2 cm) wide jar inside the tube.
- Square every opening and straighten every dc bar.
- Check that it measures 6.4 in (16.3 cm) wide flat and 15.5 in (39.4 cm) long.
- Let it dry completely.
- Lightly steam the ears from 1 in (2.5 cm) away to sharpen their points. Don’t press them.
- Pull the drawstring until the bottom opening is 1.5 in (3.8 cm) across, then tie a bow.
Final Quality-Control Checklist
- [ ] Every mesh round has 16 dc and 16 ch-2 spaces
- [ ] The top band has 48 sc and no gaps
- [ ] The eyes are level and 9 stitches apart
- [ ] There are 3 whiskers per side, placed symmetrically
- [ ] The head is centered on back stitches 31–42
- [ ] Front stitches 1–24 are open
- [ ] The paws are 1.6 in (4.1 cm) apart
- [ ] The loop is securely sewn
- [ ] The drawstring is knotted at both ends
- [ ] All ends are woven in at least 2 in (5.1 cm)
Troubleshooting
- The mesh spirals: Always join into the 3rd ch of the beginning ch-5.
- The openings are rectangles: Pull up a slightly taller first loop on each dc.
- The top band flares: Work the band with a 4.0 mm hook.
- The head flops forward: Add the lower tack row and stuff the back of the head a little more firmly.
- Bags slip out the bottom: Pull the drawstring tighter and double-knot the bow.
- Stuffing shows through the head: Remake the head with a 3.0 mm hook.
Care
Hand wash in cool water with mild soap, roll the holder in a towel to remove water, and dry it flat with the head supported. Don’t tumble dry.
Final Notes
Here is how the measurements add up:
- Width: 48 stitches (16 mesh) give a 12.8 in (32.5 cm) circumference and a 6.4 in (16.3 cm) flat width.
- Body length: Round 1 plus 19 mesh rounds reach 14.5 in (36.8 cm), and the 4-round band brings the body to 15.5 in (39.4 cm).
- Overall length: The head adds 3.5 in (8.9 cm) and the loop adds 3 in (7.6 cm), for about 22 in (55.9 cm) in total.
If each checkpoint matches, your Ginger Kitty will hang straight and hold a generous stack of bags.
Happy crocheting!