

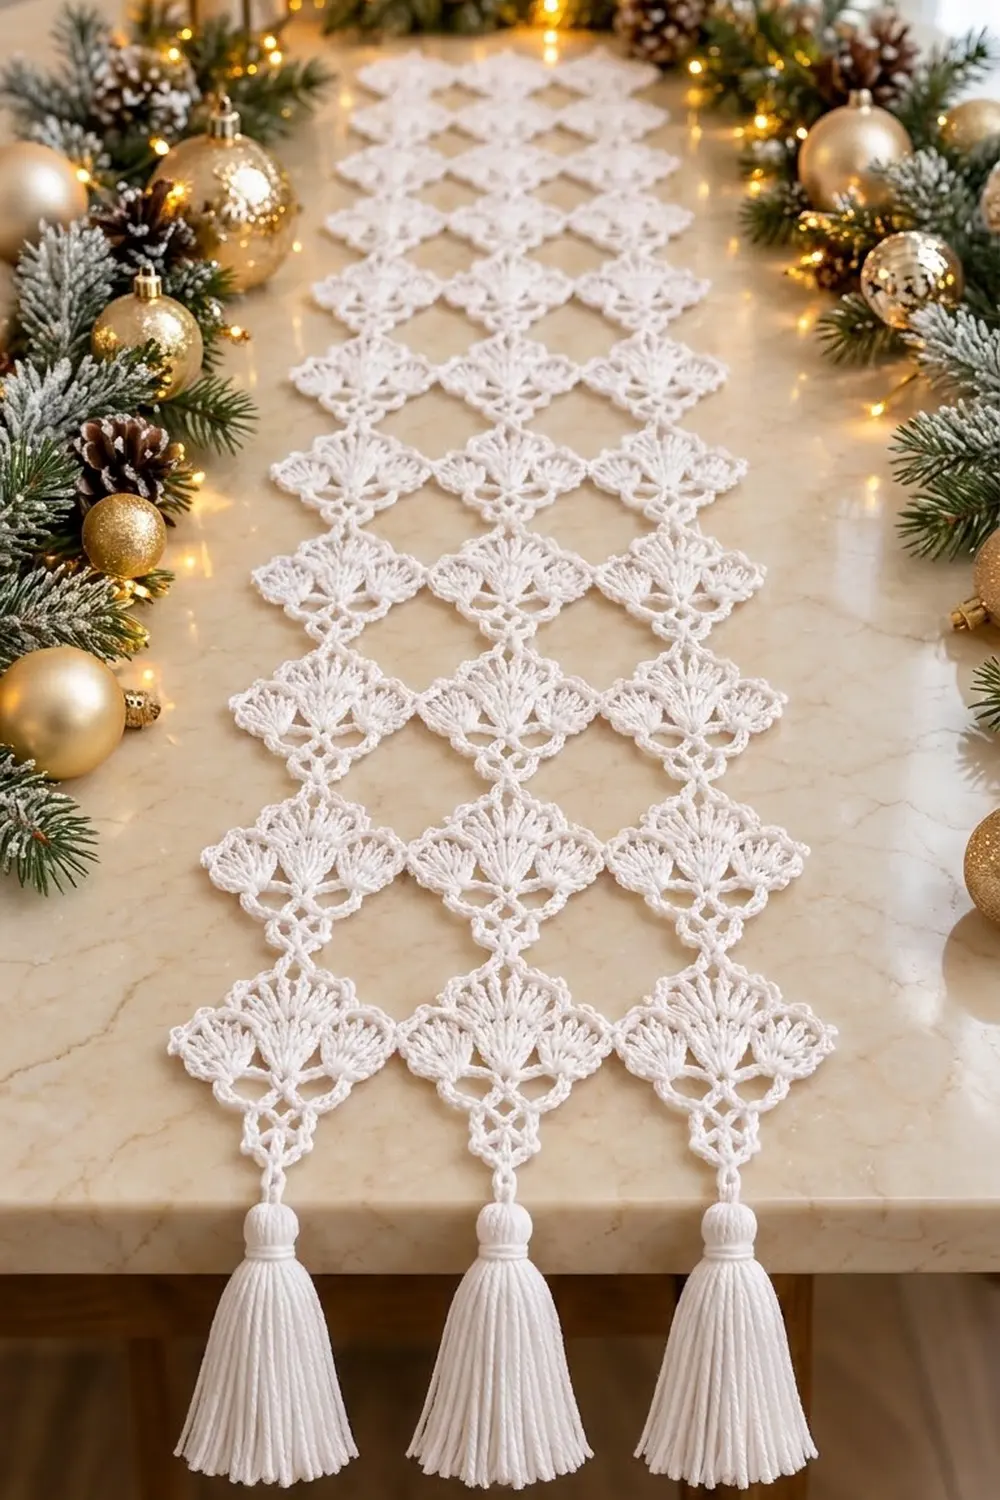
The Frosted Shell Lattice Table Runner is a lacy, all-white runner made from 30 small fan motifs joined into three straight columns. Each motif has three shell fans across the top, with the center fan rising highest. Underneath is an open chain-loop lattice that narrows to a small ring at the bottom point.
Joined together, the motifs form a lattice with diamond-shaped windows. The fans give the long edges a scalloped look, and three neat tassels hang from the bottom points at one short end. In crisp white cotton it suits a holiday table set with greenery and gold ornaments, but it’s plain enough to use all year.
This pattern uses US crochet terms. The finished runner measures 13.5 in (34.3 cm) wide by 50 in (127.0 cm) long without the tassels. With the tassels it hangs to about 55 in (139.7 cm).
You work each motif in rows from the bottom ring up: three rows of chain loops that get wider each row, then two rows of fans. Starting with the second motif, you join motifs as you go at small picots on the last row. There’s no added border. The fan scallops are the finished edge, and the tassels finish the end.
Finished Size and Construction
- Finished size: 13.5 in x 50 in (34.3 cm x 127.0 cm), plus tassels
- Skill level: Intermediate (easy lace, careful counting)
- Terminology: US crochet terms
- Yarn weight: DK / light (3) mercerized cotton
- Hook: 3.5 mm (E-4)
- Number of pieces: 30 identical motifs, joined as you go
- Layout: 3 motifs across x 10 motifs long, in straight columns
- Piece size: 4.5 in wide x 5 in tall (11.4 cm x 12.7 cm), from the bottom ring to the center-fan picot
- Size before border: 13.5 in x 50 in (34.3 cm x 127.0 cm)
- Border depth: 0 in (0 cm). There’s no crocheted border; the motif scallops are the edge
- End finish: 3 tassels, 4 in (10.2 cm) long, at one short end
Materials
Yarn: Use a smooth, mercerized DK cotton. Mercerized cotton has a slight sheen, shows the fan stitches clearly and holds its shape after blocking. Avoid fuzzy or very stretchy yarns, because the chain lattice will blur and sag.
- White: 150 g, about 330 m (360 yd). That’s three 50 g balls of about 110 m (120 yd) each.
Each motif uses about 7 m (7.7 yd), so 30 motifs need about 210 m (230 yd). The tassels use about 30 m (33 yd). The amount listed includes a margin for gauge differences, swatching and tails.
Tools:
- 3.5 mm (E-4) crochet hook
- Tapestry needle
- Scissors
- Stiff card 4.5 in (11.4 cm) tall, for wrapping tassels
- Rustproof pins and a blocking mat or folded towels
- Spray bottle and measuring tape
- Stitch marker (optional, to mark the right side)
Abbreviations (US Terms)
- ch: chain
- sl st: slip stitch
- sc: single crochet
- dc: double crochet
- tr: treble crochet
- sp: space
- sk: skip
- RS / WS: right side / wrong side
Special stitches:
- Side fan (Row 4): (dc, ch 1) 4 times, dc, all in the same stitch. This makes 5 dc and 4 ch-1 sps.
- Center fan (Row 4): (tr, ch 1) 6 times, tr, all in the same stitch. This makes 7 tr and 6 ch-1 sps.
- Picot: ch 3, sl st in 3rd ch from hook.
- Corner picot: ch 3, sl st in the top of the sc just made.
- Joining picot: ch 1, sl st in the matching picot or ring of the finished motif, ch 1, then close it like a normal picot.
Gauge and Checkpoints
Make one complete motif before you start the runner. Every later measurement depends on it.
Motif gauge: After blocking, one motif measures 4.5 in (11.4 cm) wide at the corner picots and 5 in (12.7 cm) tall, from the bottom of the ring to the center-fan picot.
Checkpoints:
- After Row 1: the two loops spread about 1.5 in (3.8 cm) across.
- After Row 3: the lattice triangle is about 4 in (10.2 cm) across the top and 2.5 in (6.4 cm) tall from the ring.
- After Row 5: the full motif measures 4.5 in x 5 in (11.4 cm x 12.7 cm) when pinned.
If your motif is too big (over 4.75 in / 12.1 cm wide), switch to a 3.25 mm hook or work tighter chains. Loose ch-5 loops are the most common cause.
If your motif is too small (under 4.25 in / 10.8 cm wide), switch to a 3.75 mm hook.
An error of just 0.25 in (0.6 cm) per motif adds up to 0.75 in (1.9 cm) across the width and 2.5 in (6.4 cm) along the length, so fix your gauge now.

Motif Pattern
Each motif starts at the bottom ring and grows upward. Turn at the end of every row.
Ring: Ch 4, sl st in first ch to form a ring.
Row 1 (RS): Ch 1, sc in ring, (ch 5, sc in ring) twice. Turn.
(3 sc, 2 ch-5 loops)
Row 2: Ch 5, sc in first ch-5 loop, ch 5, sc in next ch-5 loop, ch 5, sc in last sc. Turn.
(3 sc, 3 ch-5 loops)
Row 3: Ch 5, sc in first ch-5 loop, (ch 5, sc in next ch-5 loop) twice, ch 5, sc in last sc. Turn.
(4 sc, 4 ch-5 loops)
Each lattice row adds exactly one loop. The beginning ch-5 makes a new loop on one edge, and the final “ch 5, sc in last sc” makes a new loop on the other edge. That’s what gives the lattice its V shape: narrow at the ring and wide under the fans.
Row 3 now has 3 sc between its loops. These are the anchors for the three fans. The 4th sc sits at the edge where you’re about to turn.
Row 4 (fan base): Ch 1, sc in first sc, sc in next ch-5 loop, side fan in next sc, sc in next ch-5 loop, center fan in next sc, sc in next ch-5 loop, side fan in next sc, sc in last ch-5 loop, sc in first ch of the beginning ch-5 of Row 3. Turn.
(6 sc, 10 dc, 7 tr, 14 ch-1 sps)
The side fans have 5 dc each and the center fan has 7 tr. That makes the center fan taller and wider, which gives the motif its peaked shape.
Row 5 (fan tops): Ch 1, sc in first sc, corner picot, sc in next sc.
Side fan top: Sk first dc, 3 dc in each of next 2 ch-1 sps, picot, 3 dc in each of next 2 ch-1 sps, sk last dc, sc in next sc.
Center fan top: Sk first tr, 3 tr in each of next 3 ch-1 sps, picot, 3 tr in each of next 3 ch-1 sps, sk last tr, sc in next sc.
Second side fan top: Work as for the first side fan top, ending with sc in next sc.
Sc in last sc, corner picot. Fasten off.
(6 sc, 24 dc, 18 tr, 5 picots)
To check your count: each side fan top has 4 sps x 3 dc = 12 dc, so the two side fans give 24 dc. The center fan top has 6 sps x 3 tr = 18 tr. The 6 sc go into the 6 sc of Row 4, one each.
Each of the five picots has a job:
- The 2 corner picots join to the motifs on either side.
- The center-fan picot joins to the ring of the motif above.
- The 2 side-fan picots stay free as decoration.
Weave the starting tail in through the stitches of the ring, but leave the ring’s center open, because you’ll join into it later.
Make All Pieces
You need 30 motifs, all in White. Make the first one as written. Make the other 29 the same way, but work a Row 5 picot as a joining picot wherever it meets a finished motif.
Quantity per color: White, 30 motifs.
Layout grid (fans point toward row 1; tassels hang from row 10):
Row 1:   [M] [M] [M]
Row 2:   [M] [M] [M]
Row 3:   [M] [M] [M]
Row 4:   [M] [M] [M]
Row 5:   [M] [M] [M]
Row 6:   [M] [M] [M]
Row 7:   [M] [M] [M]
Row 8:   [M] [M] [M]
Row 9:   [M] [M] [M]
Row 10:  [M] [M] [M]   <- tassels hang from these 3 rings
Work in grid order: row 1 from left to right, then row 2 from left to right, and so on.
Joining
Method: Join as you go on Row 5 using joining picots. No sewing is needed.
Stitch-to-stitch logic:
- Side joins: If a motif has a finished neighbor on its left, work the corner picot on that side as a joining picot into the neighbor’s nearest corner picot. Each row of 3 motifs has 2 side joins.
- Vertical joins: From grid row 2 on, work the center-fan picot as a joining picot into the ring of the motif directly above. Each column has 9 vertical joins.
- Totals: 10 rows x 2 side joins = 20 side joins. 3 columns x 9 vertical joins = 27 vertical joins.
The motifs touch only at these points. The curved fans and the narrowing lattice create the open diamonds between motifs, so don’t add any extra joins.
Tension advice: Make the ch 1 on each side of the joining sl st the same size as a normal chain. If it’s too tight, the corners pull in and the runner narrows. If it’s too loose, the lattice sags between motifs. Lay each finished row flat before you start the next one.
Size checkpoints:
- After grid row 1, the strip should measure 13.5 in (34.3 cm) across the outer corner picots.
- After grid row 2, it should be 10 in (25.4 cm) long.
- After all 10 rows, it should be 50 in (127.0 cm) long before blocking.
These numbers work because the joins add no width or length. The width is 3 motifs x 4.5 in = 13.5 in (34.3 cm), and the length is 10 motifs x 5 in = 50 in (127.0 cm).
Border: Scalloped Edge and Tassels
Border gauge: There’s no crocheted border, so the border adds 0 in (0 cm) to the width and length. The motifs’ own fans form the finished edge. A solid border would fill in the scallops and change the look, so leave the edges open.
Long sides: Each long side shows 10 side-fan scallops, one per motif, with a joined corner picot between each pair. That’s 20 edge scallops in total.
Fan end (top): The 3 motifs of grid row 1 give 9 fan scallops across, with the 3 center fans rising highest.
Tassel end (bottom): There are 3 rings, one at the bottom point of each column. You’ll make 3 tassels, one per ring, so they line up with the columns.
Tassel stems (make 3): Join White with a sl st in a ring of grid row 10 and ch 6. Fasten off, leaving an 8 in (20.3 cm) tail. Each stem is about 1 in (2.5 cm) long.
Tassels (make 3):
- Wrap White 40 times around the 4.5 in (11.4 cm) card.
- Slide a 10 in (25.4 cm) strand under the wraps at the top and tie it tightly.
- Cut through the wraps at the bottom.
- Wrap a separate strand tightly around the tassel 0.5 in (1.3 cm) below the top to form the head. Knot it and bury the ends inside the tassel.
- Trim the bottom evenly to 4 in (10.2 cm).
- Use the stem tail and the tie strand to fasten the tassel to the end of its ch-6 stem. Bury both ends in the tassel head.
Total hanging length: 50 in + 1 in + 4 in = 55 in (139.7 cm).
Final Blocking
- Weave in all remaining ends along the chain loops, never across an open space.
- Soak the runner in cool water for 10 minutes. Press the water out gently in a towel; don’t wring it.
- Lay it flat on a blocking surface and mark out 13.5 in x 50 in (34.3 cm x 127.0 cm).
- Pin the corner picots first, keeping each row in a straight line. Then pin the center-fan picots so each column stays straight.
- Pin each fan into an even curve, and open the ch-5 loops so all the lattice diamonds match.
- Pin out the free side-fan picots so they stand out cleanly.
- Let it dry completely. For extra crispness, mist it lightly with spray starch while it’s still damp.
- Hold steam 2 in (5.1 cm) away from the tassels, then smooth them straight with your fingers.
Final Quality-Control Checklist
- 30 motifs, each with 3 fans and a 4-loop lattice
- Center fans are the tallest and all point toward grid row 1
- 20 side joins and 27 vertical joins, with no missed picots
- Side-fan picots are free, not joined
- Width is 13.5 in (34.3 cm) along the whole runner
- Length is 50 in (127.0 cm), plus tassels
- 3 tassels of 4 in (10.2 cm), all hanging at the same height
- No visible tails or knots
Troubleshooting
Fans ruffle or cup: You probably worked stitches into the first or last fan stitch. Skip the first and last dc (or tr) as written.
Lattice twists: You may have worked into a chain instead of around the loop. Work every sc into the ch-5 space.
Runner narrows in the middle: The joining chains are too tight. Redo the tight joins with relaxed ch 1s.
Columns wander: A center picot is joined to the wrong ring. Check the grid and redo that join.
Center fan isn’t taller than the side fans: Make sure the center fan uses tr, not dc, in both Row 4 and Row 5.
Tassels sit crooked: The stems are different lengths. Make every stem exactly ch 6.
Care
Hand wash in cool water with mild soap, then lay flat and pin to dry. Re-block whenever the fans lose their shape.
Final Notes
The measurement chain is short:
- One motif measures 4.5 in x 5 in (11.4 cm x 12.7 cm).
- Three across give 13.5 in (34.3 cm).
- Ten rows give 50 in (127.0 cm).
- Joins and edges add nothing.
- The 1 in (2.5 cm) stems and 4 in (10.2 cm) tassels bring the hanging length to 55 in (139.7 cm).
Get the first motif right and the rest will follow.
Happy crocheting!