

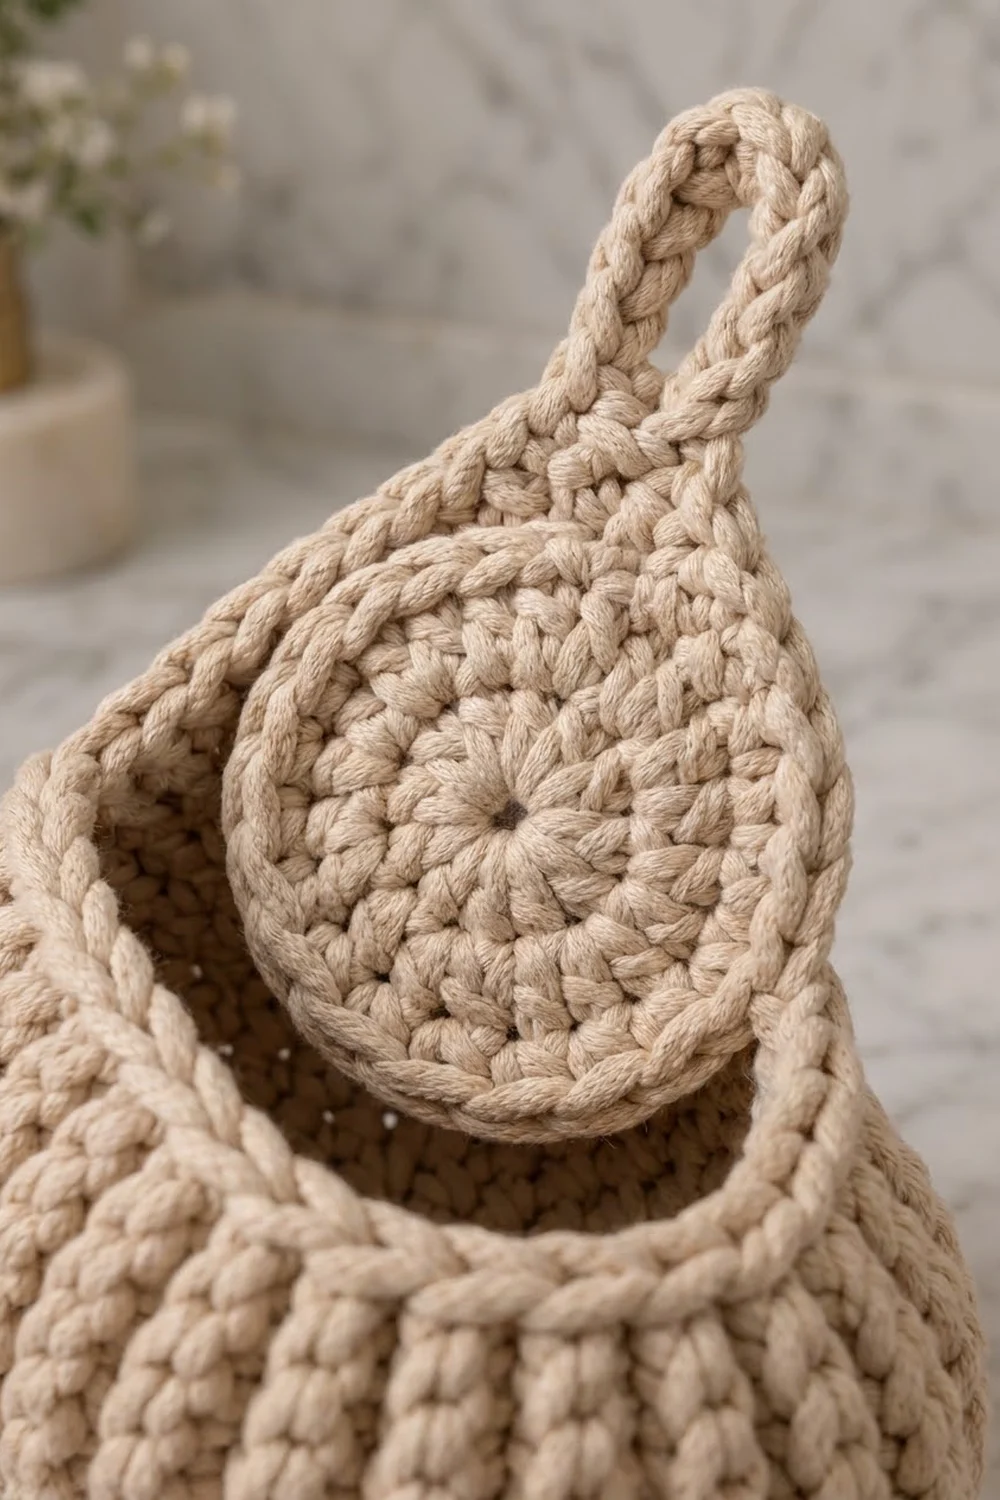
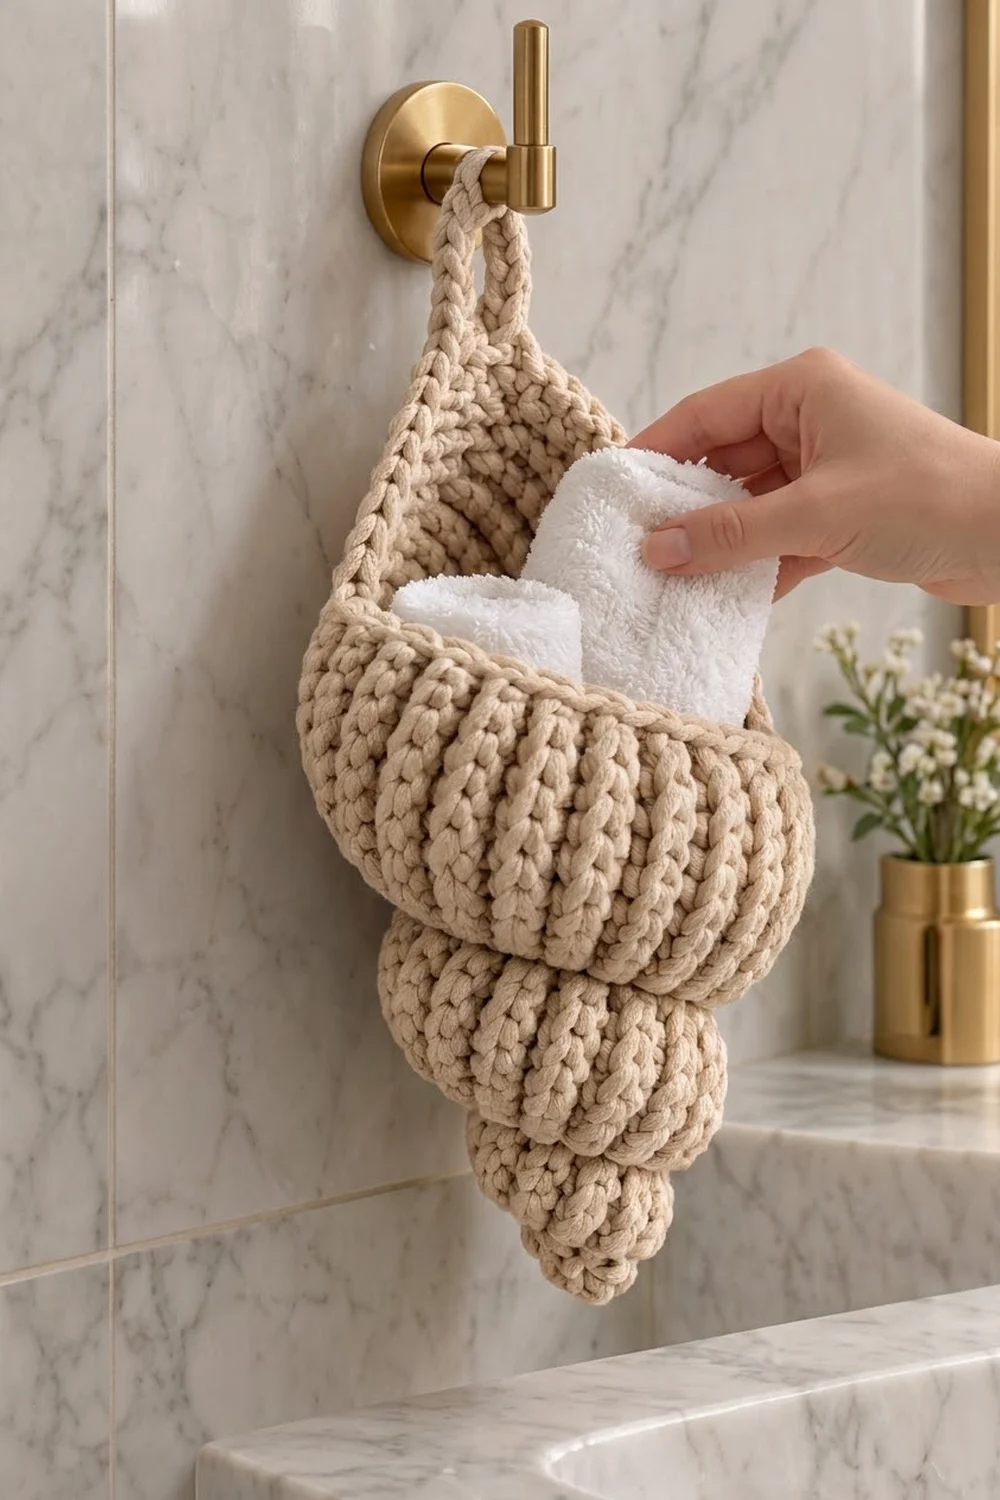
The Tidepool Conch is a hanging basket shaped like a spiral seashell. Its pointed spire is made of three stacked whorls that sit under a wide, rounded bowl. A flat teardrop panel rises behind the opening and ends in a sturdy loop, so the basket can hang from a hook, a towel bar, or a doorknob.
The sample is worked in one oatmeal-beige cotton cord. The vertical ribs look like knitting and catch the light, and a corded edge finishes the opening and the back panel. It looks calm and coastal, and it suits a bathroom, nursery, or entryway. It is sized for rolled washcloths, brushes, or small toiletries.
This pattern uses US crochet terms. The finished basket is about 12 in (30.5 cm) tall including the loop and 6.25 in (15.9 cm) across the widest part of the bowl.
The basket is made as one piece. You start at the tip of the spire with a magic ring and work in continuous spiral rounds. Each whorl grows quickly, works even, and then pinches in before the next one starts. After the bowl, you work rows over the back half of the rim to make the teardrop panel. One edging round adds the loop, and a final round of reverse single crochet gives the corded edge.
Finished Size and Construction
- Finished size: about 12 in (30.5 cm) tall including the loop; 6.25 in (15.9 cm) across the bowl
- Skill level: Intermediate
- Terminology: US crochet terms
- Yarn weight: Bulky (#5) cotton cord or chunky cotton
- Hook: 6.0 mm (US J-10)
- Number of pieces: 1
- Layout: spire of 3 whorls, then the bowl, then the back panel and loop, all in one piece
- Shell portion (tip to rim): about 7 in (17.8 cm) tall
- Size before edging: rim is 48 sts, about 17.5 in (44.5 cm) around; back panel is 3.7 in (9.4 cm) tall
- Edging depth: about 0.25 in (0.6 cm)
Materials
Yarn: Use a firm bulky cotton cord or chunky cotton with a smooth twist. Cotton holds the shell shape better than acrylic, and a cord shows the ribs clearly. Avoid fluffy or brushed yarns, because they blur the ribs.
- Oatmeal-beige: 200 g, about 220 m
The sample used about 160 g (175 m). The quantity above includes a margin for your gauge swatch and for differences between dye lots and brands.
Tools:
– 6.0 mm (US J-10) crochet hook
– 1 locking stitch marker for the start of each round, plus 2 extra markers
– Tapestry needle
– Scissors
– A small handful of fiberfill (optional, for firming the tip)
– Pins and a spray bottle for blocking
Abbreviations (US Terms)
- ch: chain
- MR: magic ring
- sc: single crochet
- inc: 2 sc in the same stitch
- sc2tog: single crochet 2 together
- BLO: back loop only
- sl st: slip stitch
- rev sc: reverse single crochet (crab stitch)
- st(s): stitch(es)
Special stitch: waistcoat stitch (ws). Insert your hook through the center of the next stitch, between the two legs of its “V” and below the top loops. Yarn over, pull up a loop, then yarn over and pull through both loops on the hook. The new stitch sits right on top of the one below, which builds a column that looks like knitting.
Rib round: *ws in next 2 sts, sc in BLO of next st; repeat from * around. The pairs of ws build raised columns. The BLO stitches sink back and form the grooves between them. Every rib round uses a stitch count that is a multiple of 3.
Gauge and Checkpoints
Gauge: 11 sc and 12 rounds = 4 in (10.2 cm) in plain sc worked in the round.
Make a test piece first: work Rounds 1–6 of the tip. It should measure about 1.4 in (3.6 cm) across. If it is bigger, change to a 5.5 mm hook. If it is smaller, change to a 6.5 mm hook. A tight fabric matters here, because the shell has to stand up by itself.
Checkpoints (measured across the widest point of each section):
– After Round 6 (Whorl 1): 1.4 in (3.6 cm) wide, about 1.5 in (3.8 cm) tall
– After Round 11 (Whorl 2): 2.8 in (7.1 cm) wide, about 3 in (7.6 cm) total height
– After Round 18 (Whorl 3): 4.2 in (10.7 cm) wide, about 4.5 in (11.4 cm) total height
– After Round 28 (bowl): 6.25 in (15.9 cm) wide
– After Round 30: about 7 in (17.8 cm) total height
If a section measures more than 0.25 in (0.6 cm) off, check your gauge before you go on. If your rib rounds pull in more than your plain rounds, use a looser tension on the waistcoat stitches only.
Pattern
Work in continuous spiral rounds and do not join unless the pattern tells you to. Move the marker up to the first stitch of each round.
Whorl 1 (Tip)
Round 1: Work 6 sc into a MR. (6 sts)
Round 2: [sc 1, inc] 3 times. (9 sts)
Round 3: Rib round. (9 sts; 3 ribs)
Round 4: [sc 2, inc] 3 times. (12 sts)
Rounds 5–6: Rib round. (12 sts; 4 ribs)
The tip should be a narrow, closed cone. If you want a firmer point, push a small pinch of fiberfill into it now.
Whorl 2
Round 7: [sc 1, inc] 6 times. (18 sts)
Round 8: [sc 2, inc] 6 times. (24 sts)
Rounds 9–11: Rib round. (24 sts; 8 ribs)
Round 12 (pinch): [sc 2, sc2tog] 6 times. (18 sts)
Rounds 7 and 8 grow quickly, so this whorl flares out over Whorl 1. Round 12 pulls the top in and makes the groove between whorls.
Whorl 3
Round 13: [sc 1, inc] 9 times. (27 sts)
Round 14: [sc 2, inc] 9 times. (36 sts)
Rounds 15–18: Rib round. (36 sts; 12 ribs)
Round 19 (pinch): [sc 2, sc2tog] 9 times. (27 sts)
Bowl
Round 20: [sc 2, inc] 9 times. (36 sts)
Round 21: [sc 3, inc] 9 times. (45 sts)
Round 22: [sc 4, inc] 9 times. (54 sts)
Rounds 23–28: Rib round. (54 sts; 18 ribs)
Round 29 (shoulder): [sc 7, sc2tog] 6 times. (48 sts)
Round 30: sc in each st around. (48 sts)
Sl st in the next st to smooth out the step at the end of the spiral. Do not fasten off.
The ribs may shift slightly where an increase round falls between rib rounds. On a shell this looks natural and suggests growth lines.
Back Panel
Flatten the basket with the yarn tail at one side fold. Find the 24 sts that make up the back half of the rim. Place a marker in the first and last of these 24 sts. The other 24 sts are the front rim. Sl st along to the first marked st if needed.
You now work in rows into both loops, turning at the end of each row.
Row 1: ch 1, sc in each of the 24 marked sts, turn. (24 sts)
Row 2: ch 1, sc across, turn. (24 sts)
Row 3: ch 1, sc2tog, sc 20, sc2tog, turn. (22 sts)
Row 4: ch 1, sc2tog, sc 18, sc2tog, turn. (20 sts)
Row 5: ch 1, sc2tog, sc 16, sc2tog, turn. (18 sts)
Row 6: ch 1, sc2tog, sc 14, sc2tog, turn. (16 sts)
Row 7: ch 1, sc2tog, sc 12, sc2tog, turn. (14 sts)
Row 8: ch 1, sc2tog, sc 10, sc2tog, turn. (12 sts)
Row 9: ch 1, sc2tog, sc 8, sc2tog, turn. (10 sts)
Row 10: ch 1, sc2tog, sc 6, sc2tog, turn. (8 sts)
Row 11: ch 1, sc2tog, sc 4, sc2tog. (6 sts)
Do not fasten off. The panel should be about 8.7 in (22.1 cm) wide at the base, measured along the curve, and 2.2 in (5.6 cm) wide at the top. It should be 3.7 in (9.4 cm) tall and form a pointed arch.
Border (Edging and Hanging Loop)
Edging gauge: The edging uses the same sc gauge, 11 sts per 4 in (10.2 cm), so each edge needs about 2.75 sts per inch of its length.
Round 1: ch 1 and turn so the right side faces you. Work down the left side of the panel: 1 sc in each row end, plus 1 extra sc in the row ends of Rows 4 and 8. (13 sts)
Continue along the front rim with 1 sc in each of the 24 unused sts of Round 30. (24 sts)
Work up the right side of the panel in the same way as the left side. (13 sts)
Work across the top of the panel: sc 3, ch 12, sc 3. (6 sc plus a ch-12 loop)
Join with a sl st to the first sc. Total: 56 sc plus the ch-12 loop.
Round 2: ch 1. Work rev sc in each of the 56 sc. When you reach the loop, work 18 rev sc into the ch-12 space, then continue. Join with a sl st. Total: 74 rev sc (56 along the edge plus 18 on the loop). Fasten off.
Why the math works: The front rim is 24 sts at 1 sc per existing stitch, so its length does not change. Each panel side slopes: it rises 3.7 in (9.4 cm) and moves in about 3.25 in (8.3 cm), so it is about 4.9 in (12.4 cm) long. At 2.75 sts per inch, that needs about 13.5 sts. Thirteen sts keep the edge flat. Eleven sts (1 per row) would pull the panel into a cup, and 15 sts would make it ripple. The top of the panel is 6 sts, which matches the last row. Each corner stitch is counted once, inside its own side. The 18 stitches on the loop wrap a 12-chain space tightly, so the loop is thick and firm.
Final Blocking
- Weave in all ends along the inside of the rib grooves, where they will not show.
- Spray the whole basket until it is damp but not dripping.
- Stuff the bowl and spire firmly with plastic bags or a rolled towel so the whorls hold their round shape.
- Pinch each groove between the whorls with your fingers to sharpen it.
- Lay the back panel flat against a towel and pin it into a smooth teardrop. Pin the loop straight up.
- Let it dry completely, which takes 24–48 hours, then remove the stuffing.
Final Quality-Control Checklist
- The tip is closed and comes to a firm point.
- There are three separate whorls, each with a visible pinched groove.
- The ribs run vertically and evenly around each whorl and the bowl.
- The bowl measures about 6.25 in (15.9 cm) across.
- The back panel stands upright and has a symmetrical teardrop shape.
- The edging lies flat along the rim and panel sides, with no ruffles or puckers.
- The loop is thick, centered, and strong enough to hold the basket’s weight.
- All ends are secured and hidden.
Troubleshooting
The ribs lean or spiral. This is normal in continuous rounds. To reduce it, keep the waistcoat stitches loose and do not twist the hook as you insert it.
The waistcoat stitches are hard to insert. Your sc base is too tight. Loosen your tension, or go up 0.5 mm for the rib rounds only.
The whorls look like a smooth cone. Make sure you worked the pinch rounds (12 and 19). Pinch the grooves again when you block.
The back panel flops forward. Your gauge is loose. Rework the panel with a hook 0.5 mm smaller, or block it flat and let it dry fully.
The edging ruffles or cups. Count again: the panel sides should have 13 sts each and the front rim 24.
The rim gapes open when hung. Round 29 may have been skipped. Check that the rim has 48 sts.
Care
Hand wash in cool water with mild soap and press out the water in a towel. Reshape the basket and dry it flat or stuffed. Do not tumble dry.
Final Notes
The measurement chain is: gauge of 11 sc per 4 in (10.2 cm), then a 1.4 in (3.6 cm) tip, then a 2.8 in (7.1 cm) second whorl, then a 4.2 in (10.7 cm) third whorl. The bowl is 6.25 in (15.9 cm) across, and the rim is 48 sts. The back panel is 24 sts at its base and 3.7 in (9.4 cm) tall. The edging has 56 sts plus 18 on the loop, for a finished basket about 12 in (30.5 cm) tall. Check each step against these numbers and your conch will hang neatly and hold its shape.
Happy crocheting!