

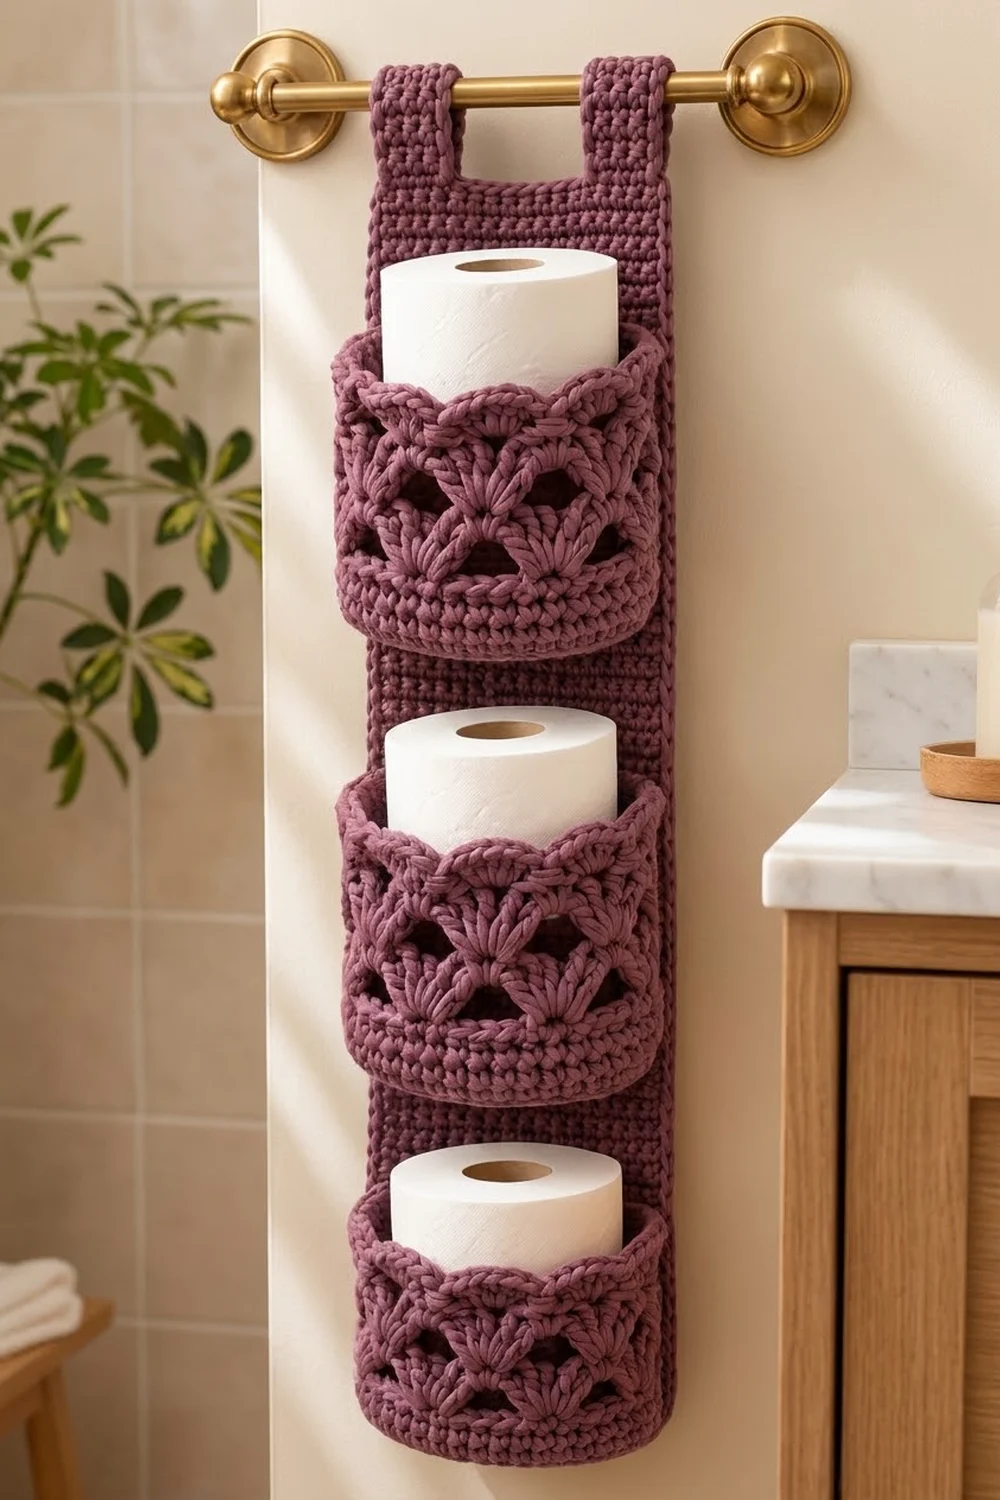
This hanging toilet paper holder brings a soft, boutique feel to a small bathroom. A long solid panel hangs from a towel bar by two tabs. Three rounded pockets, stacked one above the other, each hold one roll.
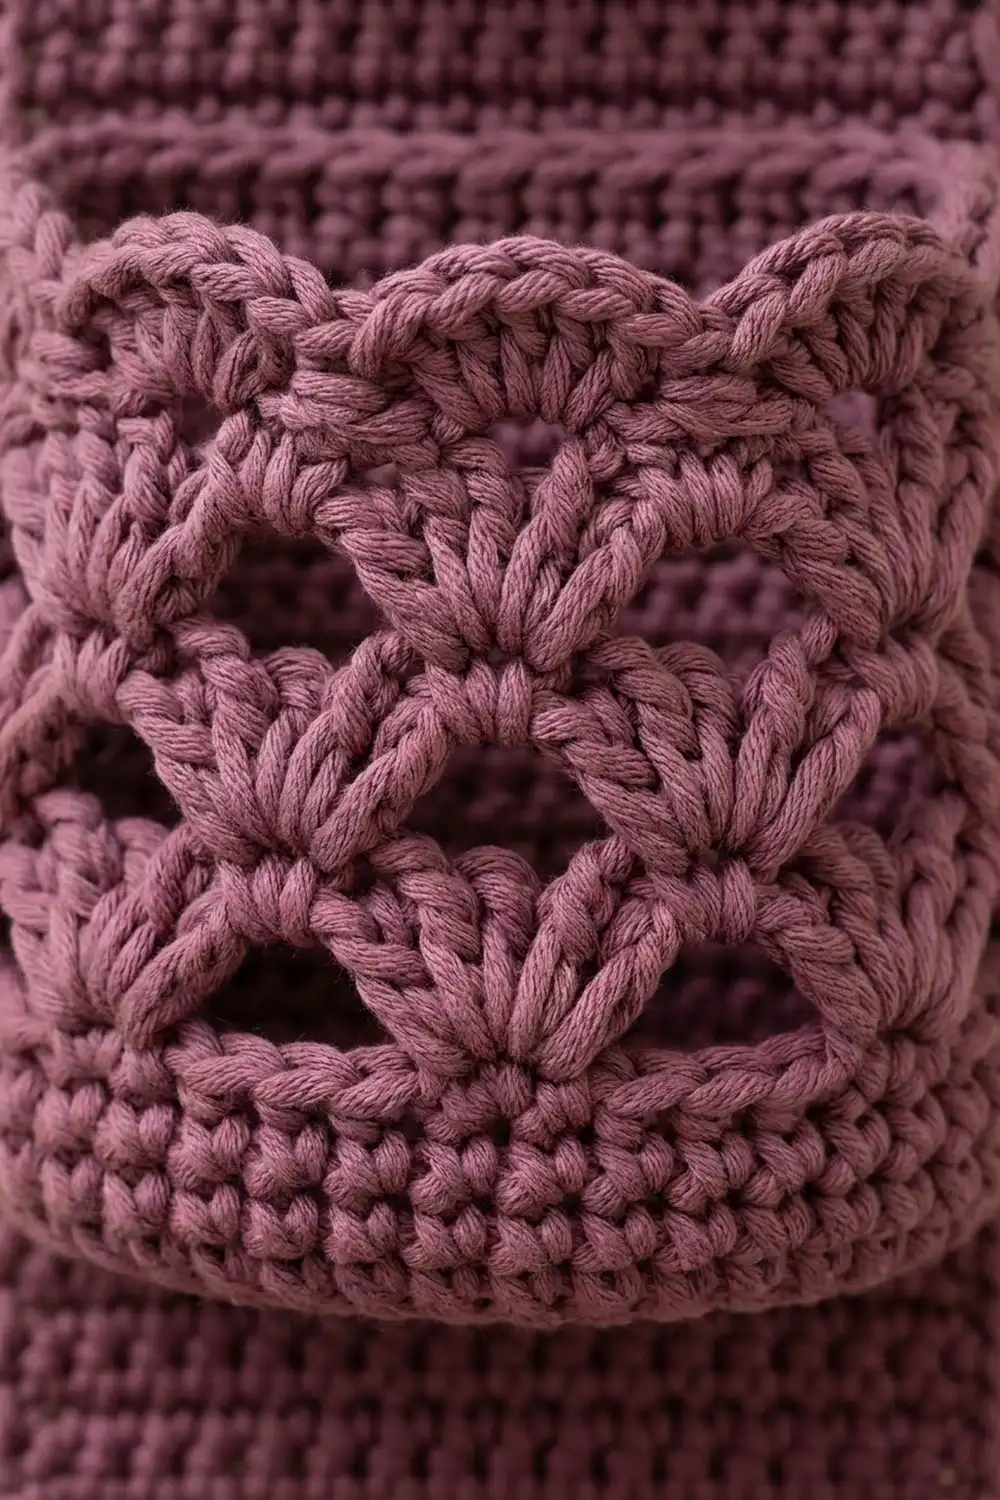
Everything is worked in one color, a dusty mauve plum, so the texture does the work. The panel is plain single crochet. Each pocket has a flat oval base, a short solid band, three rounds of shells with small triangle openings, and a scalloped rim.
The pattern uses US crochet terms. The finished holder measures 7 in (17.8 cm) wide and 25 in (63.5 cm) tall. With the 1.5 in (3.8 cm) hanging loops, the overall height is 26.5 in (67.3 cm).
Construction is simple. Crochet one panel in rows and three pockets in joined rounds, then sew the pockets to the panel. Work a two-round border around the panel, then add the hanging tabs from the top of the border.
Finished Size and Construction
- Finished size: 7 in x 25 in (17.8 cm x 63.5 cm), plus 1.5 in (3.8 cm) loops
- Skill level: Easy-intermediate
- Terminology: US crochet terms
- Yarn weight: Bulky (#5)
- Hook: 6.0 mm (US J-10)
- Number of pieces: 4 (1 back panel + 3 pockets); the tabs are worked onto the panel
- Layout: 3 pockets in one vertical column, 8 in (20.3 cm) apart, base to base
- Panel before border: 6 in x 24 in (15.2 cm x 61.0 cm)
- Pocket size: base 5.5 in x 3.5 in (14.0 cm x 8.9 cm), 16 in (40.6 cm) around, 3.5 in (8.9 cm) tall
- Border depth: 2 rounds, about 0.5 in (1.3 cm)
Materials
Choose a bulky cotton or cotton-blend yarn with good stitch definition. Cotton holds the pocket shape and handles bathroom humidity well. Avoid very fuzzy yarns, which hide the shells.
- Mauve plum: 500 g, about 700 m (766 yd), based on 100 g = 140 m (153 yd)
- Panel, border, and tabs: about 210 g
- Each pocket: about 70 g
These quantities include a margin of roughly 80 g for gauge differences and a swatch.
Tools:
– 6.0 mm (US J-10) crochet hook
– Tapestry needle
– Scissors
– 6 stitch markers or scrap yarn
– Tape measure
– Rust-proof pins and a blocking mat or folded towel
– Spray bottle
Abbreviations (US Terms)
- ch – chain
- sl st – slip stitch
- sc – single crochet
- dc – double crochet
- BLO – back loop only
- sk – skip
- sp – space
- st(s) – stitch(es)
- RS / WS – right side / wrong side
Special stitch – Shell: 5 dc in the same stitch. The center dc of a shell is its 3rd dc.
Gauge and Checkpoints
Gauge: 12 sc x 14 rows = 4 in (10.2 cm), worked in rows.
Test one piece first. Make a full pocket before you start the panel. It uses the same gauge, it’s small, and it shows right away whether a roll will fit.
Checkpoints:
– Pocket base after Rnd 6: 5.5 in x 3.5 in (14.0 cm x 8.9 cm), 48 sts.
– Pocket wall after Rnd 10: about 1 1/8 in (2.9 cm) tall.
– Pocket wall after Rnd 13: about 3 1/4 in (8.3 cm) tall.
– Finished pocket: 3.5 in (8.9 cm) tall. A standard roll, about 4.5 in (11.4 cm) across, should slide in with light pressure.
– Panel width: 6 in (15.2 cm) across 18 sts.
– Panel after Row 42: 12 in (30.5 cm). After Row 84: 24 in (61.0 cm).
If your piece is too big: go down one hook size (5.5 mm). If it’s too small: go up one size (6.5 mm). Change the hook rather than the stitch counts so the shell repeats and the border math stay correct.
Back Panel
The panel is worked flat in rows from the bottom edge up.
Row 1 (RS): Ch 19, sc in 2nd ch from hook and in each ch across. (18 sts)
Rows 2–84: Ch 1, turn, sc in each st across. (18 sts)
Check at Row 42: 12 in (30.5 cm). Check at Row 84: 6 in x 24 in (15.2 cm x 61.0 cm).
Fasten off. On the RS, mark Rows 3, 15, 31, 43, 59, and 71 with stitch markers or scrap yarn. These are the pocket placement lines.
Pocket (Make 3)
Each pocket is worked in joined rounds with the RS facing. Join each round with a sl st to the first st. The ch 1 at the start of a round does not count as a stitch.
Oval Base
Rnd 1: Ch 9. Sc in 2nd ch from hook, sc in next 6 ch, 3 sc in last ch. Working along the opposite side of the chain, sc in next 6 ch, 2 sc in last ch (the same ch as the first sc). Join. (18 sts)
Rnd 2: Ch 1, 2 sc in first st, sc in next 6, 2 sc in each of next 3, sc in next 6, 2 sc in each of last 2. Join. (24 sts)
Rnd 3: Ch 1, sc in first st, 2 sc in next, sc in next 6, (sc in next, 2 sc in next) 3 times, sc in next 6, (sc in next, 2 sc in next) 2 times. Join. (30 sts)
Rnd 4: Ch 1, sc in next 2, 2 sc in next, sc in next 6, (sc in next 2, 2 sc in next) 3 times, sc in next 6, (sc in next 2, 2 sc in next) 2 times. Join. (36 sts)
Rnd 5: Ch 1, sc in next 3, 2 sc in next, sc in next 6, (sc in next 3, 2 sc in next) 3 times, sc in next 6, (sc in next 3, 2 sc in next) 2 times. Join. (42 sts)
Rnd 6: Ch 1, sc in next 4, 2 sc in next, sc in next 6, (sc in next 4, 2 sc in next) 3 times, sc in next 6, (sc in next 4, 2 sc in next) 2 times. Join. (48 sts)
The two straight sides stay at 6 sts every round, and all 6 increases sit at the curved ends. Check: 5.5 in x 3.5 in (14.0 cm x 8.9 cm).
Solid Wall Band
Rnd 7: Ch 1, sc in BLO of each st around. Join. (48 sts) This round turns the wall up and leaves a ridge of free front loops around the base edge.
Rnds 8–10: Ch 1, sc in each st around. Join. (48 sts)
Check: the wall is about 1 1/8 in (2.9 cm) tall.
Shell Section
Rnd 11: Ch 1, sc in first st, sk 2, shell in next st, sk 2, sc in next st; repeat from * 6 more times, then sk 2, shell in next st, sk 2. Join to first sc. (8 shells, 8 sc = 48 sts)
Each repeat uses exactly 6 sts of Rnd 10, and 48 ÷ 6 = 8 repeats.
Rnd 12: Sl st in next 3 dc to reach the center of the first shell. Ch 1, sc in same st, ch 1, shell in next sc, ch 1, sc in center dc of next shell; repeat from * around, leaving off the final sc. Join to first sc. (8 shells, 8 sc, 16 ch-1 sps)
The new shells sit above the sc of Rnd 11. The ch-1s open the small triangle holes between the stacked fans.
Rnd 13: Sl st in next ch-1 sp and in next 3 dc. Ch 1, sc in same st, ch 1, shell in next sc, ch 1, sc in center dc of next shell; repeat from * around, leaving off the final sc. Join. (8 shells, 8 sc, 16 ch-1 sps)
Check: the wall is about 3 1/4 in (8.3 cm) tall. The top flares slightly, which helps the roll slide in.
Scalloped Rim
Rnd 14 (trim round): Ch 1, sk ch-1 sp, sc in each of next 5 dc, sk ch-1 sp, sl st in next sc; repeat from * 7 more times. The last sl st lands in the joining sc. (40 sc + 8 sl st = 48 sts)
Count: 48 sts worked one per existing dc or sc, plus 0 extra. Skipping the ch-1 spaces brings the rim back to the base count, so each shell becomes a rounded scallop without ruffling. Fasten off and weave in the ends.
Check: 3.5 in (8.9 cm) tall and 16 in (40.6 cm) around the base.
Make All Pieces
- Back panel: 1, mauve plum, about 210 g including the border and tabs
- Pockets: 3, mauve plum, about 70 g each
Layout (RS of panel, rows counted from the bottom):
        [tab]            [tab]
   +---------------------------+  Row 84
   |   POCKET 3  rim  Row 71   |
   |             base Row 59   |
   |   POCKET 2  rim  Row 43   |
   |             base Row 31   |
   |   POCKET 1  rim  Row 15   |
   |             base Row 3    |
   +---------------------------+  Row 1
Joining
Use a whipstitch and a 24 in (61.0 cm) length of the same yarn for each pocket. Attach all three pockets the same way.
Base line: Lay the panel flat, RS up. Flatten a pocket so one long straight side becomes the back. Find the 16 back sts of the free front-loop ridge from Rnd 7: the 6 straight sts plus 5 sts on each side. On the panel’s base row, skip the first st, then whipstitch those 16 pocket loops to the next 16 panel sts, one to one. Skip the last panel st. The seam is 16 sts, about 5.3 in (13.5 cm) long, with 1 panel st free at each side.
Rim line: Count 12 rows up to the rim row (Row 15, 43, or 71). Whipstitch the matching back 16 sts of Rnd 14 to the middle 16 sts of that row, one to one. The 12 rows measure about 3.4 in (8.6 cm), just under the 3.5 in (8.9 cm) wall, so the back wall lies smooth with no bulge.
Sides: Tack the back wall to the panel at each side with 3 or 4 stitches, from base to rim.
Tension: Pull each whipstitch snug but not tight. The panel must stay flat and 6 in (15.2 cm) wide. If the edges pucker, loosen the stitches.
Size checkpoint: After joining, the panel still measures 6 in x 24 in (15.2 cm x 61.0 cm), and the pocket bases sit 8 in (20.3 cm) apart.
Border
Border gauge: same as the panel, 12 sc = 4 in (10.2 cm). The side edges have 14 rows per 4 in (10.2 cm), so you skip some row-ends to keep the sides from rippling. Each “per side” count includes both corner center sts.
Rnd 1 (RS): Join yarn in the last st of Row 84. Ch 1, 3 sc in same st (corner), sc in next 16 sts, 3 sc in last st (corner).
Down the side: sc in next 5 row-ends, sk 1 row-end, sc in next 5 row-ends; repeat from * 11 more times, then sc in next 5 row-ends. This covers the 82 row-ends of Rows 83 to 2 and makes 70 sc.
Along the bottom: 3 sc in first foundation st, sc in next 16, 3 sc in last st. Work up the second side the same way (70 sc). Join to first sc. (184 sts)
Per side: top and bottom 20 sts each, long sides 74 sts each. Check: 20 + 20 + 74 + 74 – 4 shared corners = 184.
Rnd 2: Ch 1, sc in each st around, working 3 sc in each corner center st. Join. Fasten off. (192 sts)
Per side: top and bottom 22 sts each, long sides 76 sts each. Check: 22 + 22 + 76 + 76 – 4 = 192.
Why the math works: At 12 sts per 4 in (10.2 cm), 22 sts span about 7.3 in. That matches the 6 in (15.2 cm) panel plus about 0.5 in (1.3 cm) of border on each side, measured around the corners. The 76 side sts span about 25.3 in, which matches 24 in (61.0 cm) plus the top and bottom border. Each count is within a fraction of an inch of the real edge, so the border lies flat.
Hanging Tabs
Tab 1: With the RS facing, join yarn in the top-right corner center st. Ch 1, sc in same st and next 4 sts. (5 sts)
Rows 2–14: Ch 1, turn, sc in each st. (5 sts) Fasten off, leaving a 12 in (30.5 cm) tail.
Tab 2: Sk the next 12 sts of the top edge. Join in the next st and work as for Tab 1, ending in the top-left corner center st.
Check: 5 + 12 + 5 = 22 top sts. Each tab is about 1.7 in (4.3 cm) wide and 4 in (10.2 cm) long, with a 4 in (10.2 cm) gap between them.
Fold each tab to the WS and whipstitch its last row to the back of the panel, 1 in (2.5 cm) below the top edge. This makes a 1.5 in (3.8 cm) loop that fits a bar up to about 1 in (2.5 cm) thick.
Final Blocking
- Spray the whole piece until it is damp, not soaked.
- Lay the panel flat, RS up, on a mat or towel.
- Pin it to 7 in x 25 in (17.8 cm x 63.5 cm), keeping the corners square.
- Fill each pocket with a roll or a rolled washcloth so the shells open evenly.
- Shape each scallop on the rim with your fingers.
- Let it dry completely, at least 24 hours, before hanging.
Final Quality-Control Checklist
- The panel is 7 in x 25 in (17.8 cm x 63.5 cm) with square corners.
- Each pocket has 48 sts in Rnd 6 and 8 shells in Rnds 11–13.
- Each rim shows 8 even scallops.
- The pocket bases are on Rows 3, 31, and 59, centered and 8 in (20.3 cm) apart.
- The rim seams are 12 rows above each base and lie flat.
- The tabs are 5 sts each with a 12-st gap, and both loops are the same height.
- All ends are woven in on the WS.
Troubleshooting
- The roll won’t fit: Your gauge is tight. Remake the pocket with a 6.5 mm hook.
- The base cups up: Check that you made 6 increases per round, all at the curved ends.
- The shells lean or one is missing: Recount Rnd 10. You need exactly 48 sts.
- The rim ruffles: Make sure you skipped the ch-1 spaces in Rnd 14.
- The border ripples on the sides: Skip 1 row-end after every 5 sc, as written.
- The holder tilts on the bar: Make sure both tabs are sewn at the same depth.
Care
Hand wash in cool water and lay flat to dry. Reshape the pockets while they are damp.
Final Notes
The measurement chain starts with the gauge. At 12 sc = 4 in (10.2 cm), the 18-st panel is 6 in (15.2 cm) wide, and 84 rows make it 24 in (61.0 cm) long. Each pocket grows to 48 sts, 16 in (40.6 cm) around, and 8 shells of 6 sts each fit that count exactly. The border brings the panel to 22 by 76 sts per side, or 7 in x 25 in (17.8 cm x 63.5 cm). The 5 + 12 + 5 tabs use the full top edge. If every checkpoint matches, the finished holder will hang straight and hold three rolls neatly.
Happy crocheting!