

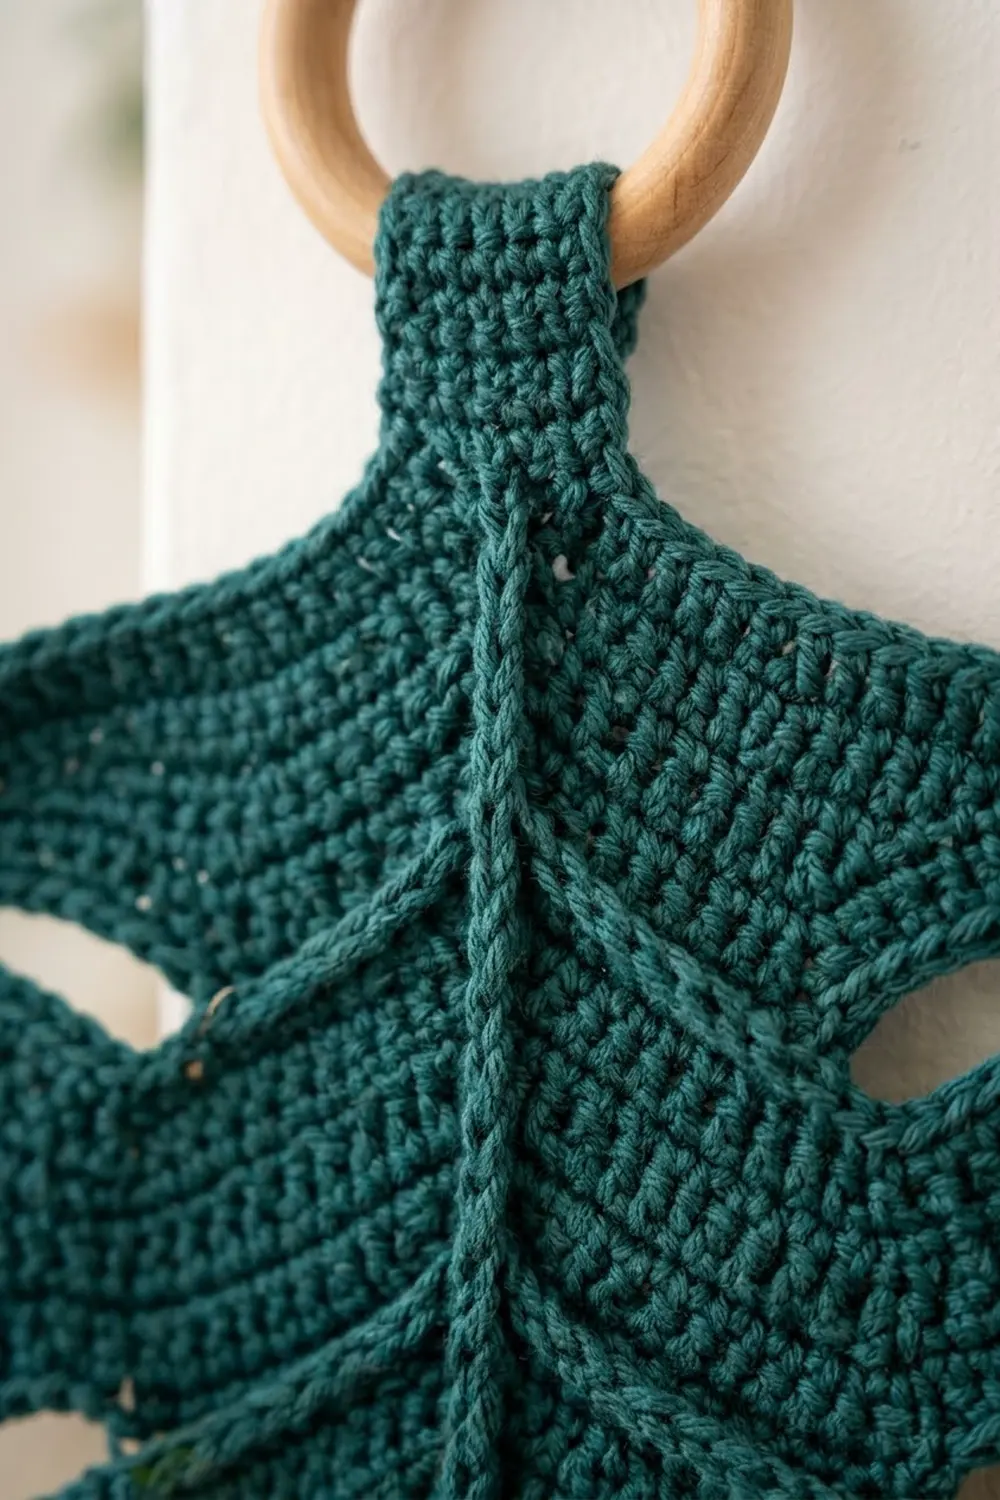
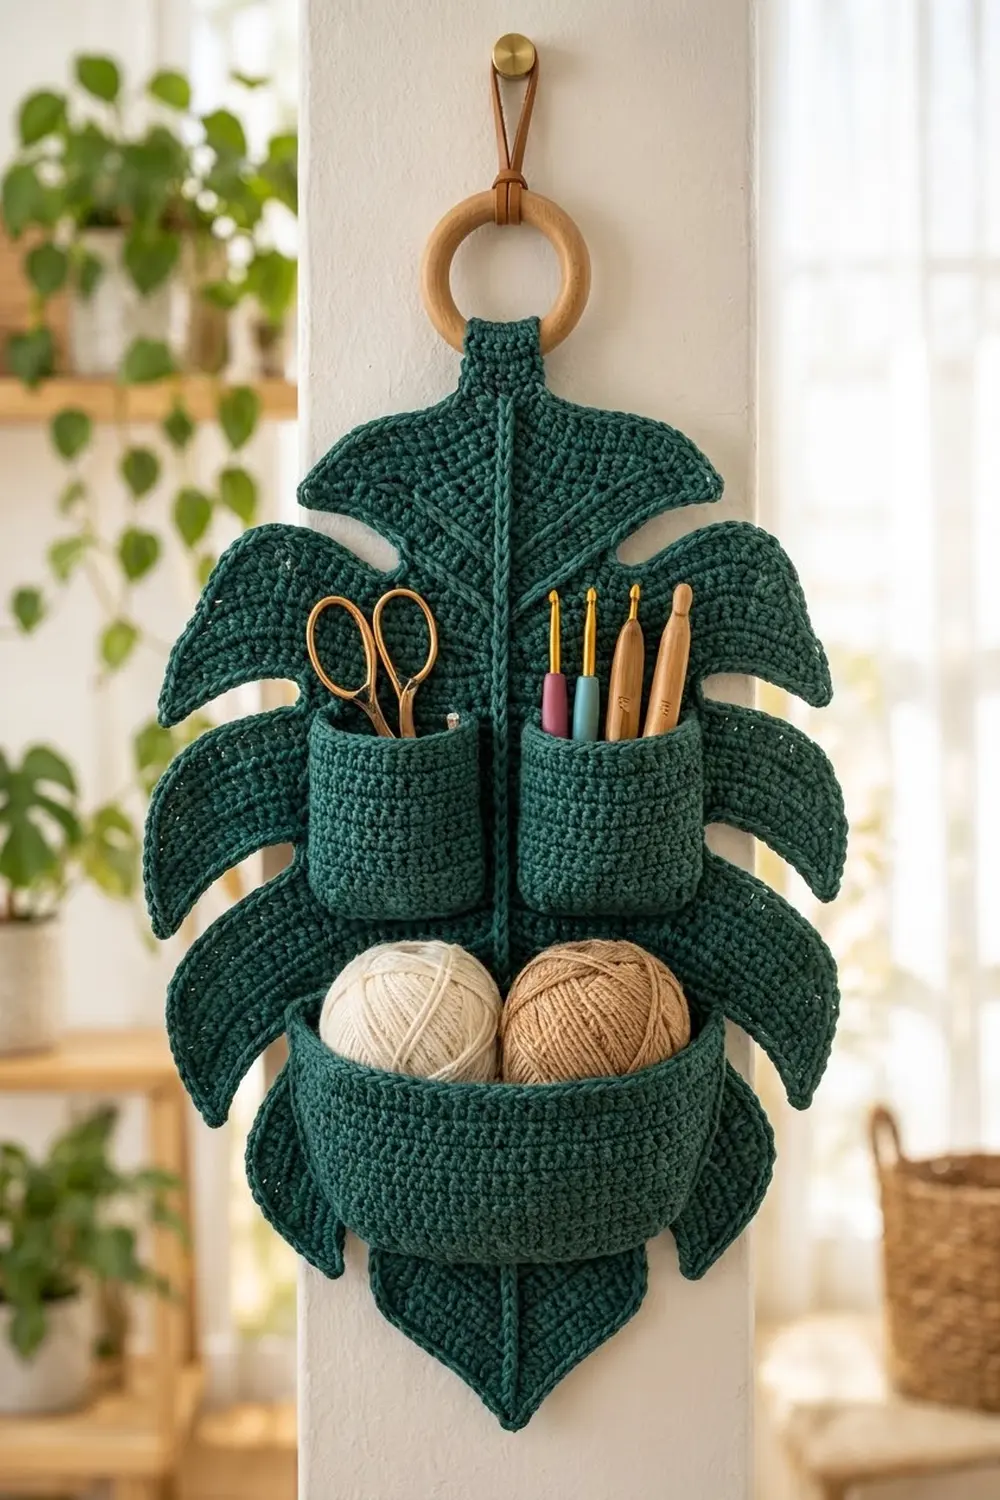
This wall organizer is a single monstera leaf in deep teal-green with three pockets sewn to its front. It has a pointed top and bottom, four lobes on each side that tilt downward, and open slits between the lobes. Raised slip-stitch veins run from a center rib into every lobe.
Two small cup pockets near the top hold scissors and hooks. A wide, bowl-shaped pocket below them holds yarn balls. The style is botanical and uses one color, so the texture carries the design. Firm single crochet keeps the leaf flat on the wall. All instructions use US terms.
The finished leaf is 15.5 in (39.4 cm) wide and 18.2 in (46.2 cm) tall. With the tab and a 3 in (7.6 cm) wooden ring, it hangs about 23 in (58.4 cm) from the top of the ring to the bottom tip.
How it’s made: You crochet a pointed oval in rounds, then work eight lobes outward in rows and add the surface veins. Next you make three pockets from the base up and sew them on. The last steps are the border, the hanging tab and blocking.
Finished Size and Construction
- Finished size: 15.5 in x 18.2 in (39.4 cm x 46.2 cm) leaf; about 23 in (58.4 cm) hanging height
- Skill level: Intermediate
- Terminology: US
- Yarn weight: Worsted (#4) cotton
- Hook: 5.0 mm (H-8)
- Number of pieces: 4 (1 leaf, 2 small pockets, 1 large pocket)
- Layout: two small pockets side by side above one large pocket, all centered
- Piece sizes: small pocket 4 in (10.2 cm) wide x 3.6 in (9.1 cm) tall; large pocket 10.5 in (26.7 cm) wide x 4.2 in (10.7 cm) tall
- Size before border: 15.1 in x 17.8 in (38.4 cm x 45.2 cm)
- Border depth: 0.2 in (0.5 cm), 1 round
Materials
Use a smooth, firm worsted cotton. Cotton holds the lobe shapes and doesn’t stretch when the pockets are full. Very soft acrylic will sag on the wall.
- Deep teal-green worsted cotton (about 170 m per 100 g): 260 g, about 442 m
Tools:
- 5.0 mm (H-8) hook
- 3 in (7.6 cm) wooden ring
- Tapestry needle
- 12 locking stitch markers
- Rust-proof pins and blocking mats
- Measuring tape, scissors and a spray bottle
The yarn quantity includes a margin of about 15% for the swatch, the veins and the sewing tails.
Abbreviations (US Terms)
- ch = chain
- sc = single crochet
- sc2tog = single crochet 2 together
- sl st = slip stitch
- BLO = back loop only
- st(s) = stitch(es)
- sp = space
- rnd = round
- RS / WS = right side / wrong side
Surface slip stitch: Hold the yarn behind the work. With RS facing, insert the hook from front to back through the fabric, pull up a loop, and draw it through the loop on the hook. Move forward one stitch or row at a time, and keep the loops loose.
Gauge and Checkpoints
Gauge: 16 sc and 18 rows = 4 in (10.2 cm).
Make one small pocket first as your test piece. It’s quick, it uses the same stitch, and you’ll need it anyway.
Checkpoints:
- Small pocket base after Rnd 3: 3.6 in x 1.3 in (9.1 cm x 3.3 cm)
- Leaf Rnd 1: 12.5 in (31.8 cm) long, not counting the tips
- Leaf after Rnd 6: 2.7 in (6.9 cm) wide
- Leaf after Rnd 12: 5.3 in x 17.8 in (13.5 cm x 45.2 cm)
- Each lobe: 3 in (7.6 cm) wide and 4.9 in (12.4 cm) long
If your piece is too big, go down half a hook size. If it’s too small, go up half a size. Row gauge matters as much as stitch gauge here, because the leaf grows sideways in rows.
Leaf Panel
Leaf Center
The end where you start is the bottom of the leaf.
Ch 51.
Rnd 1: Sc in 2nd ch from hook and in each ch across (50 sc), ch 2. Working in the free loops on the other side, sc in each ch across (50 sc), ch 2, and join with a sl st to the first sc. (100 sc and 2 ch-2 tip sps; 50 sc per side)
Rnd 2: Ch 1. Sc in each sc along the first side, (sc, ch 2, sc) in the tip ch-2 sp, sc in each sc along the second side, (sc, ch 2, sc) in the other tip sp, and join. (104 sc; 52 per side)
Rnds 3–12: Repeat Rnd 2. The totals are:
- Rnd 3: 108 sc
- Rnd 6: 120 sc
- Rnd 9: 132 sc
- Rnd 12: 144 sc (72 per side)
A “side” is every sc between the two tip spaces, including the sc next to each tip. Fasten off.
Checkpoint: 5.3 in x 17.8 in (13.5 cm x 45.2 cm).
Marking the Lobes
On each 72-st side, mark the stitches from the top tip downward:
- 6 sts left bare
- Lobe A: 12 sts
- 4-st gap
- Lobe B: 12 sts
- 4-st gap
- Lobe C: 12 sts
- 4-st gap
- Lobe D: 12 sts
- 6 sts left bare
Check: 6 + 48 + 12 + 6 = 72. Put a marker in the first and last stitch of each lobe.
Lobes (Make 8)
Join the yarn with RS facing in the first marked stitch of a lobe.
Row 1 (RS): Ch 1, sc in each of the 12 sts, turn. (12 sc)
Row 2 (shaping row): Ch 1. Work 2 sc in the edge st nearest the leaf’s bottom tip and sc2tog over the 2 edge sts nearest the top tip. Sc in every st between them, no matter which end you start from. Turn. (12 sc)
Row 3: Ch 1, sc in each st, turn. (12 sc)
Rows 4–18: Repeat Rows 2–3, ending with a shaping row. (12 sc)
You’ve now worked 9 shaping rows. Together they move both edges of the lobe down by 2.25 in (5.7 cm). Neighboring lobes move by the same amount, so the slits stay an even 1 in (2.5 cm) wide.
Row 19: Ch 1, sc2tog, sc across to the last 2 sts, sc2tog, turn. (10 sc)
Rows 20–22: Repeat Row 19. (8 sc, then 6 sc, then 4 sc)
Fasten off and weave in the ends.
Checkpoint: The leaf is 15.1 in (38.4 cm) wide (5.3 in plus two 4.9 in lobes) and 17.8 in (45.2 cm) tall.
Veins
Steam the leaf lightly so it lies flat.
Center rib: Start at the bottom tip. Work surface sl st up the line of the foundation chain to the top tip, making about 74 sl st. Then work a second line right beside it to make a double rib. Leave a 12 in (30.5 cm) tail; you’ll use it on the tab.
Side veins (8): Start at the rib, level with the center of each lobe’s Row 1. Work surface sl st down and outward along the middle of the lobe, following its tilt. Stop 1 in (2.5 cm) before the lobe tip.
Pockets
Small Pocket (Make 2)
Ch 10.
Rnd 1: Sc in 2nd ch from hook and in the next 7 ch, 3 sc in the last ch. Working in the free loops on the other side, sc in the next 7 ch, then 2 sc in the last ch (the one that already holds the first sc). Join. (20 sc)
Rnd 2: Ch 1, 2 sc in the first st, sc in the next 7, 2 sc in each of the next 3, sc in the next 7, 2 sc in each of the last 2. Join. (26 sc)
Rnd 3: Ch 1, [2 sc in next st, sc in next st] once, sc in the next 7, [2 sc in next st, sc in next st] 3 times, sc in the next 7, [2 sc in next st, sc in next st] twice. Join. (32 sc)
Rnd 4: Ch 1, sc in BLO around. Join. (32 sc)
Rnds 5–18: Ch 1, sc around. Join. (32 sc)
Rnd 19: Sl st loosely around. (32 sl st)
Fasten off, leaving a 24 in (61.0 cm) tail.
Flattened, the pocket is 4 in (10.2 cm) wide, 3.6 in (9.1 cm) tall and 1.3 in (3.3 cm) deep.
Large Pocket (Make 1)
Ch 33.
Rnd 1: Sc in 2nd ch from hook and in the next 30 ch, 3 sc in the last ch. Working in the free loops on the other side, sc in the next 30 ch, then 2 sc in the last ch. Join. (66 sc)
Rnd 2: Ch 1, 2 sc in the first st, sc in the next 30, 2 sc in each of the next 3, sc in the next 30, 2 sc in each of the last 2. Join. (72 sc)
Rnd 3: Ch 1, [2 sc in next st, sc in next st] once, sc in the next 30, [2 sc in next st, sc in next st] 3 times, sc in the next 30, [2 sc in next st, sc in next st] twice. Join. (78 sc)
Rnd 4: Ch 1, [2 sc in next st, sc in next 2 sts] once, sc in the next 30, [2 sc in next st, sc in next 2 sts] 3 times, sc in the next 30, [2 sc in next st, sc in next 2 sts] twice. Join. (84 sc)
Checkpoint: The base is 9.8 in x 1.8 in (24.9 cm x 4.6 cm).
Rnd 5: Ch 1, sc in BLO around. Join. (84 sc)
Rnds 6–22: Ch 1, sc around. Join. (84 sc)
Rnd 23: Sl st loosely around. (84 sl st)
Fasten off, leaving a 40 in (101.6 cm) tail.
Flattened, the pocket is 10.5 in (26.7 cm) wide and 4.2 in (10.7 cm) tall.
Make All Pieces
All pieces are deep teal-green:
- 1 leaf, about 150 g
- 2 small pockets, about 20 g each
- 1 large pocket, about 45 g
Layout (front view):
          [ tab + top tip ]
   [ small pocket ] [ small pocket ]
 [          large pocket           ]
          [ bottom tip ]
Joining
Sew the pockets on before you work the border.
Placement:
- Small pockets: rims 6 in (15.2 cm) below the top tip, with a 0.5 in (1.3 cm) gap between them centered over the rib
- Large pocket: rim 11 in (27.9 cm) below the top tip, centered
This leaves 3 in (7.6 cm) of leaf showing below the large pocket.
Method: Flatten each pocket so the narrow ends of the base sit at the sides, and pin it in place. Use the tail to whipstitch these parts to the leaf:
- the back half of the rim
- the back half of the front-loop ridge left at the base by the BLO round
- both side folds
Leave the front free so it bulges forward.
Stitch-to-stitch logic: The pocket rim has 4 sts per inch. Across the leaf you’re crossing rounds and lobe rows at 4.5 per inch, so catch 9 leaf rows for every 8 rim stitches:
- Small pocket: 16 rim sts over 18 rows, 4 in (10.2 cm)
- Large pocket: 42 rim sts over about 47 rows, 10.5 in (26.7 cm)
Tension: Keep the stitches snug but not tight. The leaf must stay flat when you hold it up.
Checkpoint: The leaf still measures 15.1 in x 17.8 in (38.4 cm x 45.2 cm).
Border
Border gauge: 16 sc = 4 in (10.2 cm), using the same hook as the body.
Rnd 1: With RS facing, join in the top tip sp. Ch 1, (sc, ch 2, sc) in the sp. Work down the first side:
- Sc in each of the 6 bare sts.
- Work 20 sc evenly across the 22 row ends along the lobe’s upper edge. Across the lobe tip, work 2 sc in the first st, sc in the next 2, and 2 sc in the last st (6 sc). Work 20 sc across the 22 row ends of the lower edge. Sc in each of the 4 gap sts.
- Repeat from * to * 3 more times, but skip the gap after Lobe D.
- Sc in each of the 6 bare sts.
Work (sc, ch 2, sc) in the bottom tip sp. Work the second side the same way and join.
Count per side: 6 + (4 x 46) + (3 x 4) + 6 = 208 sc. Add the 1 tip sc at each end for 210 per side.
Total: 420 sc and 2 ch-2 sps.
Why the math works: 22 rows x (16 ÷ 18) = 19.6, so 20 sc along each lobe edge matches the gauge. The bare and gap stitches are picked up 1 to 1, and the tips get the extra stitches they need to turn. The border adds 0.2 in (0.5 cm) on every side, giving 15.5 in x 18.2 in (39.4 cm x 46.2 cm). The slits finish about 0.6 in (1.5 cm) wide.
Hanging Tab
Row 1: With RS facing, join in the 3rd sc before the top tip sp. Ch 1, sc in that st and the next 2 sc, sc in the ch-2 sp, sc in the next 3 sc. Turn. (7 sc)
Rows 2–26: Ch 1, sc across, turn. (7 sc)
The tab is 1.8 in (4.6 cm) wide and 5.8 in (14.7 cm) long. Use the rib tail to continue the double rib up the tab. Fold the tab over the ring to the WS and sew Row 26 to the back of the leaf just below Row 1.
Final Blocking
- Lay the leaf face up, with the ring resting past the edge of the board.
- Mist it until it’s evenly damp.
- Pin it to 15.5 in x 18.2 in (39.4 cm x 46.2 cm).
- Pin each lobe tip so the slits stay open and even.
- Stuff the pockets with rolled towels.
- Let it dry completely, about 24 hours.
- Unpin it, check the measurements and hang it.
Final Quality-Control Checklist
- The leaf measures 15.5 in x 18.2 in (39.4 cm x 46.2 cm).
- All 8 lobes tilt evenly and end in 4-st tips.
- The slits are open and even.
- The veins are smooth, with no puckering.
- The pockets are level, secure and bulge forward.
- The border lies flat.
- The tab is centered on the ring.
- All ends are woven in on the WS.
Troubleshooting
- The center cups: Your rounds are too tight. Go up a hook size.
- The center ruffles: Use exactly (sc, ch 2, sc) at each tip.
- The lobes don’t tilt: You’re missing shaping rows. There should be 9.
- The slits close up: Keep the border to 20 sc per lobe edge.
- The veins pucker: Work looser slip stitches.
- A pocket pulls the leaf: Re-sew it at 9 rows per 8 rim stitches.
Care
Hand wash in cool water, or spot clean. Empty the pockets first, then reshape and dry flat.
Final Notes
The measurement chain:
- Gauge: 16 sc and 18 rows = 4 in (10.2 cm)
- Leaf center: 5.3 in x 17.8 in (13.5 cm x 45.2 cm)
- Two 4.9 in (12.4 cm) lobe rows: 15.1 in (38.4 cm) wide
- Border: 15.5 in x 18.2 in (39.4 cm x 46.2 cm)
- Pockets at the same gauge: 32 sts flatten to 4 in (10.2 cm) and 84 sts flatten to 10.5 in (26.7 cm)
Happy crocheting!