

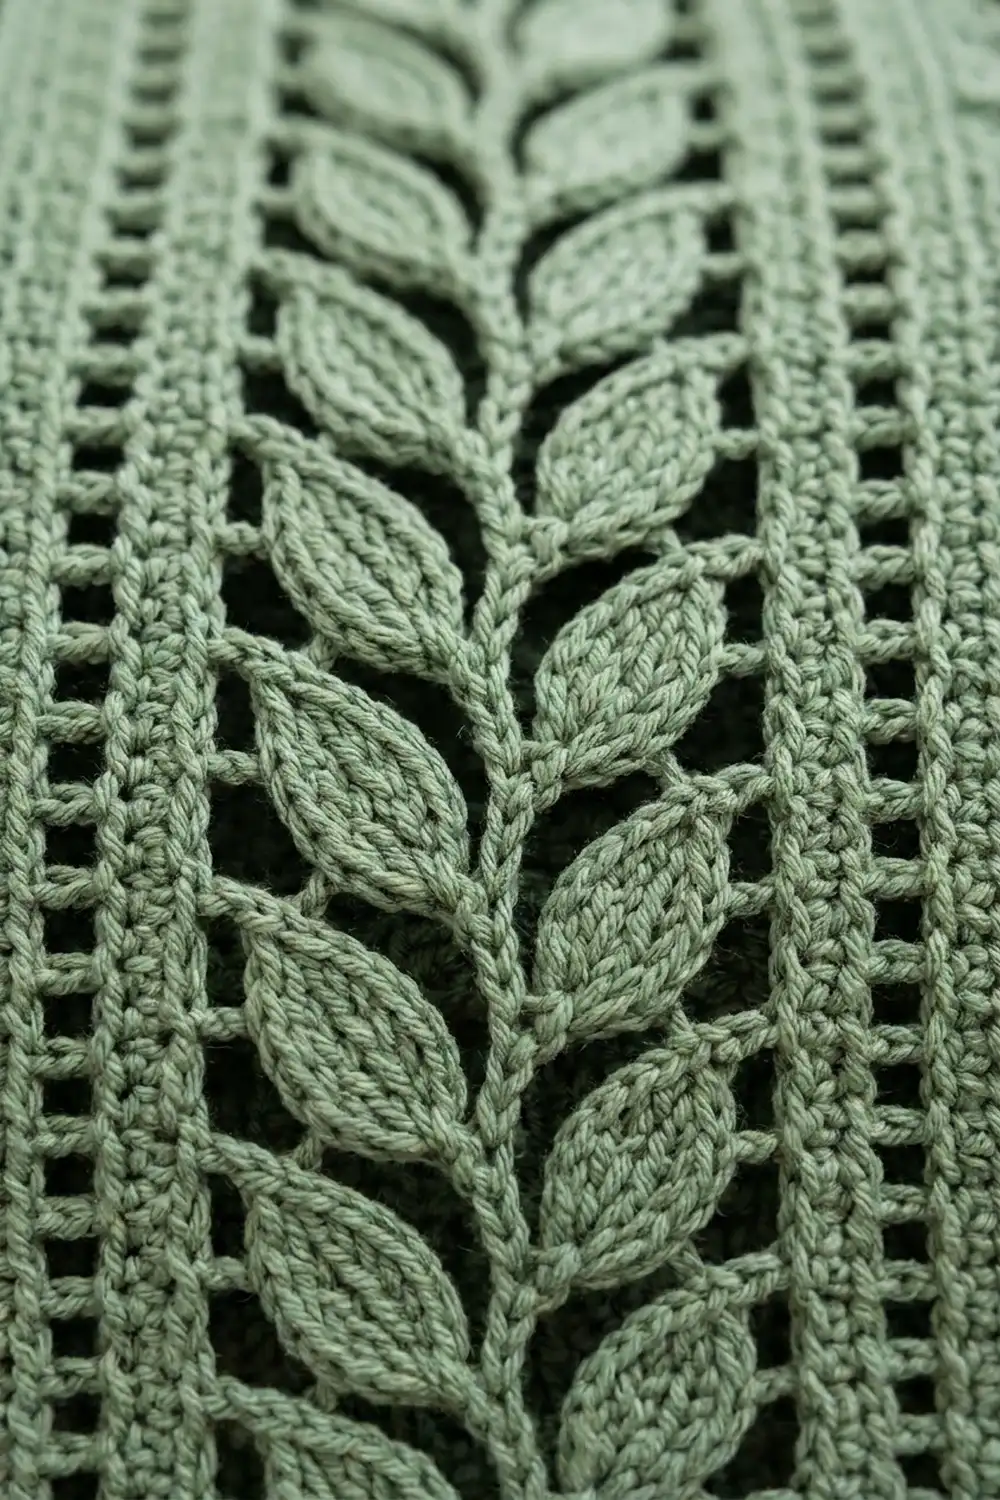
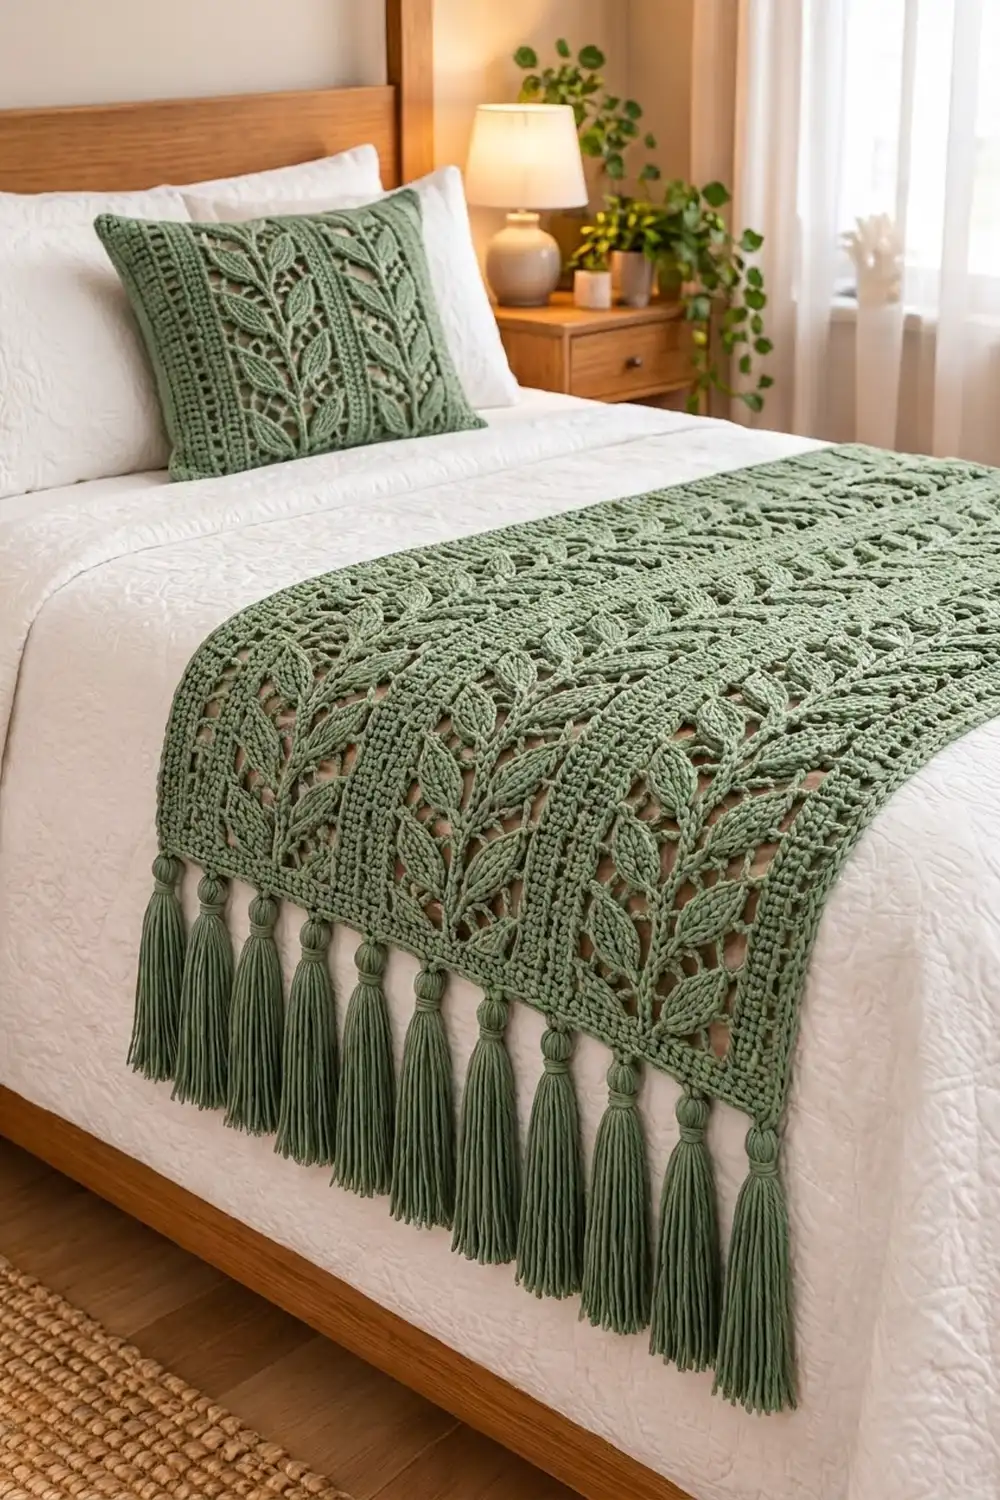
The Sage Trellis Leaf Bed Runner is a long, lacy bed scarf. Solid leaf vines climb between textured columns. Every vine has one solid stem down the middle, with leaves branching off on alternating sides. A line of small open holes runs along each solid band, which gives the fabric its trellis look.
The runner uses one calm sage green yarn, so the leaf shapes do all the decorative work. A row of thick tassels hangs from the bottom long edge and swings over the foot of the bed. The style is modern farmhouse: simple, textured, and quiet.
This pattern uses US crochet terms. The finished runner measures 61 in × 18 in (154.9 × 45.7 cm) after the border and blocking. The tassels add about 6.5 in (16.5 cm) of drop below the bottom edge.
The construction is simple. You work one long foundation chain, and then filet rows of double crochet build the fabric across the short width. Two rounds of single crochet frame the piece, and then you tie tassels onto one long edge. There’s no joining and no sewing.
Finished Size and Construction
- Finished size: 61 in × 18 in (154.9 × 45.7 cm), not counting the tassels
- Skill level: Intermediate (you need to read filet rows confidently)
- Terminology: US
- Yarn weight: Worsted (#4)
- Hook: 5.0 mm (H-8)
- Number of pieces: 1, worked flat in one piece
- Layout: 7 solid bands alternating with 6 leaf panels across the length
- Size before border: 60 in × 17 in (152.4 × 43.2 cm)
- Border depth: 0.5 in (1.3 cm) on every side
- Tassels: 20 tassels, each 6 in (15.2 cm) long, on one long edge
Materials
Yarn: Use a smooth worsted-weight yarn with good stitch definition, such as acrylic, a cotton blend or a wool blend. Smooth yarn keeps the leaf blocks crisp and the open squares clean. Avoid fuzzy or heavily variegated yarns, because they hide the vine shapes.
- Sage green: 500 g, about 1,000 yd (914.4 m)
- Body and border: about 375 g / 750 yd (685.8 m)
- Tassels: about 125 g / 250 yd (228.6 m)
These quantities include a margin of roughly 10–15% for your gauge swatch and small differences in tension.
Tools:
– 5.0 mm (H-8) crochet hook
– Tapestry needle
– Scissors
– A piece of stiff cardboard, 6.5 in (16.5 cm) tall, for the tassels
– Tape measure
– Blocking mats and rust-proof pins
– Spray bottle
Abbreviations (US Terms)
- ch – chain
- sc – single crochet
- dc – double crochet
- sk – skip
- st(s) – stitch(es)
- sp – space
- RS / WS – right side / wrong side
Special stitches (filet squares):
Every row starts with ch 3, which counts as the first dc. After that, the row is made of squares, and each square uses exactly 3 stitches.
- Filled square (F): dc in each of the next 3 sts. If the square below is open, work 2 dc into the ch-2 sp and then 1 dc in the next dc.
- Open square (O): ch 2, sk the next 2 sts (or the ch-2 sp), dc in the next dc.
Each row therefore has 1 + (squares × 3) stitches, and ch stitches count as stitches.
Section groups:
– Band (B): F, F, F (3 squares). Bands are symmetrical, so they read the same on RS and WS rows.
– Leaf Panel (L): 9 squares, worked in the row-by-row sequences given below.
Gauge and Checkpoints
Gauge: 5 squares (15 dc) = 4 in (10.2 cm) wide, and 8 rows = 4 in (10.2 cm) tall, in filet pattern.
Test piece first: Ch 21, then dc in the 4th ch from the hook and in each ch across, for 19 sts (6 squares). Work 8 rows, alternating rows of all F with rows of F, O, F, O, F, O. Five squares should measure 4 in (10.2 cm) wide, and the 8 rows should measure 4 in (10.2 cm) tall.
- Swatch too big: go down to a 4.5 mm hook.
- Swatch too small: go up to a 5.5 mm hook.
- Width is right but height is off: check your dc height. Pull up the first loop to the same height every time.
Checkpoints during the body:
– After the Foundation Row: width about 60 in (152.4 cm), with 226 sts
– After Repeat 1 (Row 9): height 4.5 in (11.4 cm)
– After Repeat 2 (Row 17): height 8.5 in (21.6 cm)
– After Repeat 3 (Row 25): height 12.5 in (31.8 cm)
– After Repeat 4 (Row 33): height 16.5 in (41.9 cm)
– After the Final Row (Row 34): 60 in × 17 in (152.4 × 43.2 cm)
Body
Layout across every row: B, L, B, L, B, L, B, L, B, L, B, L, B
= 7 bands (21 squares) + 6 leaf panels (54 squares) = 75 squares
Stitch count per row: 1 + (75 × 3) = 226 sts
Foundation chain: Ch 228.
Foundation Row (WS, Row 1): Dc in the 4th ch from the hook. The skipped 3 ch count as the first dc. Dc in each remaining ch across. (226 sts: 1 + 225 dc = 75 filled squares.) Turn.
This row forms the solid top edge of the runner.
Leaf Pattern Rows
Each row begins with ch 3, which counts as the first dc. Every band is worked as F, F, F. Each leaf panel is worked in the sequence given for that row. The sequences are already written in working order, so on WS rows you simply read them left to right as printed. The last dc of each row goes into the top of the turning ch-3. Every row has 226 sts (75 squares).
Square 5 of each leaf panel is filled in every row. This forms the continuous stem. The first and last squares of each panel are always open, which makes the ladder-hole columns beside the bands.
Pattern Row 1 (RS): Leaf Panel = 3 O, 2 F, 4 O. This is the base of the first leaf, touching the stem.
Pattern Row 2 (WS): Leaf Panel = 4 O, 3 F, 2 O. The leaf widens.
Pattern Row 3 (RS): Leaf Panel = 1 O, 2 F, 1 O, 1 F, 4 O. The leaf moves out diagonally from the stem.
Pattern Row 4 (WS): Leaf Panel = 4 O, 1 F, 2 O, 1 F, 1 O. This is the leaf tip.
Pattern Row 5 (RS): Leaf Panel = 4 O, 2 F, 3 O. This is the base of the leaf on the other side of the stem.
Pattern Row 6 (WS): Leaf Panel = 2 O, 3 F, 4 O. The leaf widens.
Pattern Row 7 (RS): Leaf Panel = 4 O, 1 F, 1 O, 2 F, 1 O. The leaf moves out diagonally.
Pattern Row 8 (WS): Leaf Panel = 1 O, 1 F, 2 O, 1 F, 4 O. This is the leaf tip.
Each sequence adds up to 9 squares. Count each panel once per row until the rhythm feels natural.
Rows 2–33: Work Pattern Rows 1–8 four times in total, for 4 leaf pairs per vine. (226 sts in every row.)
Final Row (RS, Row 34): Ch 3, then work F across all 75 squares. (226 sts.) Don’t fasten off.
The body now measures 60 in × 17 in (152.4 × 43.2 cm) and has 34 rows.
Border
Border gauge: 4 sc = 1 in (2.5 cm) along both edges. Each dc row is 0.5 in (1.3 cm) tall, so it takes 2 sc per row-end.
In this border, corners are ch-2 spaces and are not included in the per-side counts.
Round 1 (RS): Ch 1 and turn the piece so you’re working along the top of the Final Row.
– Long side 1: sc in each st across. (226 sc.)
– Corner: ch 2.
– Short side 1: work 2 sc around the post of each row-end down the side. (34 rows × 2 = 68 sc.)
– Corner: ch 2.
– Long side 2: sc in the free loop of each foundation ch. (226 sc.)
– Corner: ch 2.
– Short side 2: 2 sc in each row-end. (68 sc.)
– Corner: ch 2. Sl st to the first sc.
Round 1 total: 588 sc (226 + 68 + 226 + 68) and 4 ch-2 corner spaces.
Round 2: Ch 1. Sc in each sc around, and work (sc, ch 2, sc) in each corner ch-2 sp. Sl st to the first sc.
– Each long side: 226 + 2 = 228 sc
– Each short side: 68 + 2 = 70 sc
– Total: 596 sc and 4 ch-2 corner spaces
Fasten off and weave in the ends.
Why the math works: On the long sides, you work 1 sc into each of the 226 body stitches. That matches the body width exactly, so the edge neither ruffles nor pulls in. On the short sides, 2 sc per 0.5 in (1.3 cm) dc row gives 4 sc per inch, which matches the border gauge. Round 2 adds one sc at each end of every side, which keeps the corners square. Two sc rounds add about 0.25 in (0.6 cm) each, for 0.5 in (1.3 cm) per side. That gives 60 + 1 = 61 in (154.9 cm) by 17 + 1 = 18 in (45.7 cm).
Tassels
Make 20 tassels. Wrap the yarn 30 times around the 6.5 in (16.5 cm) card. Slide a 12 in (30.5 cm) tie strand under the top loops and knot it tightly. Cut the bottom loops. Wrap a second strand around the bundle 0.75 in (1.9 cm) below the top, about 8 times, then knot it and bury the ends inside the tassel. Trim the tassel to 6 in (15.2 cm).
Placement: Choose one long side to be the bottom, hanging edge. Use the ends of the tie strands to attach the tassels:
– one tassel in each corner ch-2 sp at the ends of that side (2 tassels)
– one tassel at sc #12, #24, #36 and so on, up to #216 of Round 2 (18 tassels)
That makes 20 tassels, spaced about 3 in (7.6 cm) apart. Knot each tassel securely on the WS and weave the tie ends into the border.
Final Blocking
- Lay the runner RS up on blocking mats.
- Pin the corners to 61 in × 18 in (154.9 × 45.7 cm).
- Pin along each long edge every 3 in (7.6 cm), keeping the edges straight.
- Use pins to open the ladder-hole columns and the open squares, and nudge the leaves into crisp diagonals.
- Mist the runner evenly until it’s damp but not soaked.
- Mist the tassels and comb the strands straight with your fingers.
- Let it dry completely, usually 12–24 hours, before you unpin it.
- Trim any uneven tassel ends to 6 in (15.2 cm).
Final Quality-Control Checklist
- Every row has 226 sts (75 squares).
- Each leaf panel shows 4 leaf pairs that alternate sides of the stem.
- The stem in every panel is unbroken from top to bottom.
- Both ladder-hole columns beside each band are fully open.
- All 7 bands are solid and the same width.
- Border Round 2 has 228 sc on each long side and 70 sc on each short side.
- The blocked size is 61 in × 18 in (154.9 × 45.7 cm).
- There are 20 tassels, evenly spaced, all 6 in (15.2 cm) long.
- All ends are woven in securely.
Troubleshooting
The stitch count is drifting. Most likely you skipped the turning ch-3 at the end of a row. Place a marker in each turning chain.
The leaves lean the wrong way. You probably read a WS row backward. The sequences are already in working order, so work them exactly as printed.
The edges ruffle. You’re working too many sc in Round 1. Keep strictly to 2 sc per row-end on the short sides.
The edges cup. Your border tension is tighter than your body tension. Go up 0.5 mm for the border.
The runner is shorter than the checkpoint. Your dc stitches are too short. Pull up the first loop a little higher, or block it firmly to size.
The open squares look slanted. Your ch-2 stitches are too loose or too tight. They should be the same width as 2 dc.
The tassels look thin. Add 5 more wraps per tassel. Each set of 5 wraps on the 6.5 in (16.5 cm) card uses about 2 yd (1.8 m) of extra yarn.
Care
Hand wash in cool water with a mild detergent and press the water out gently. Lay flat to dry, re-shaping it to 61 in × 18 in (154.9 × 45.7 cm), and smooth the tassels as it dries.
Final Notes
Here’s the measurement chain:
– The gauge swatch gives 5 squares and 8 rows to 4 in (10.2 cm).
– The 226-stitch Foundation Row gives 60 in (152.4 cm) of width.
– 34 rows give 17 in (43.2 cm) of height.
– Two sc border rounds bring it to 61 in × 18 in (154.9 × 45.7 cm).
– 20 tassels finish the hanging edge.
If you check each stage against its checkpoint, the vines will line up and the runner will lie flat across your bed.
Happy crocheting!