

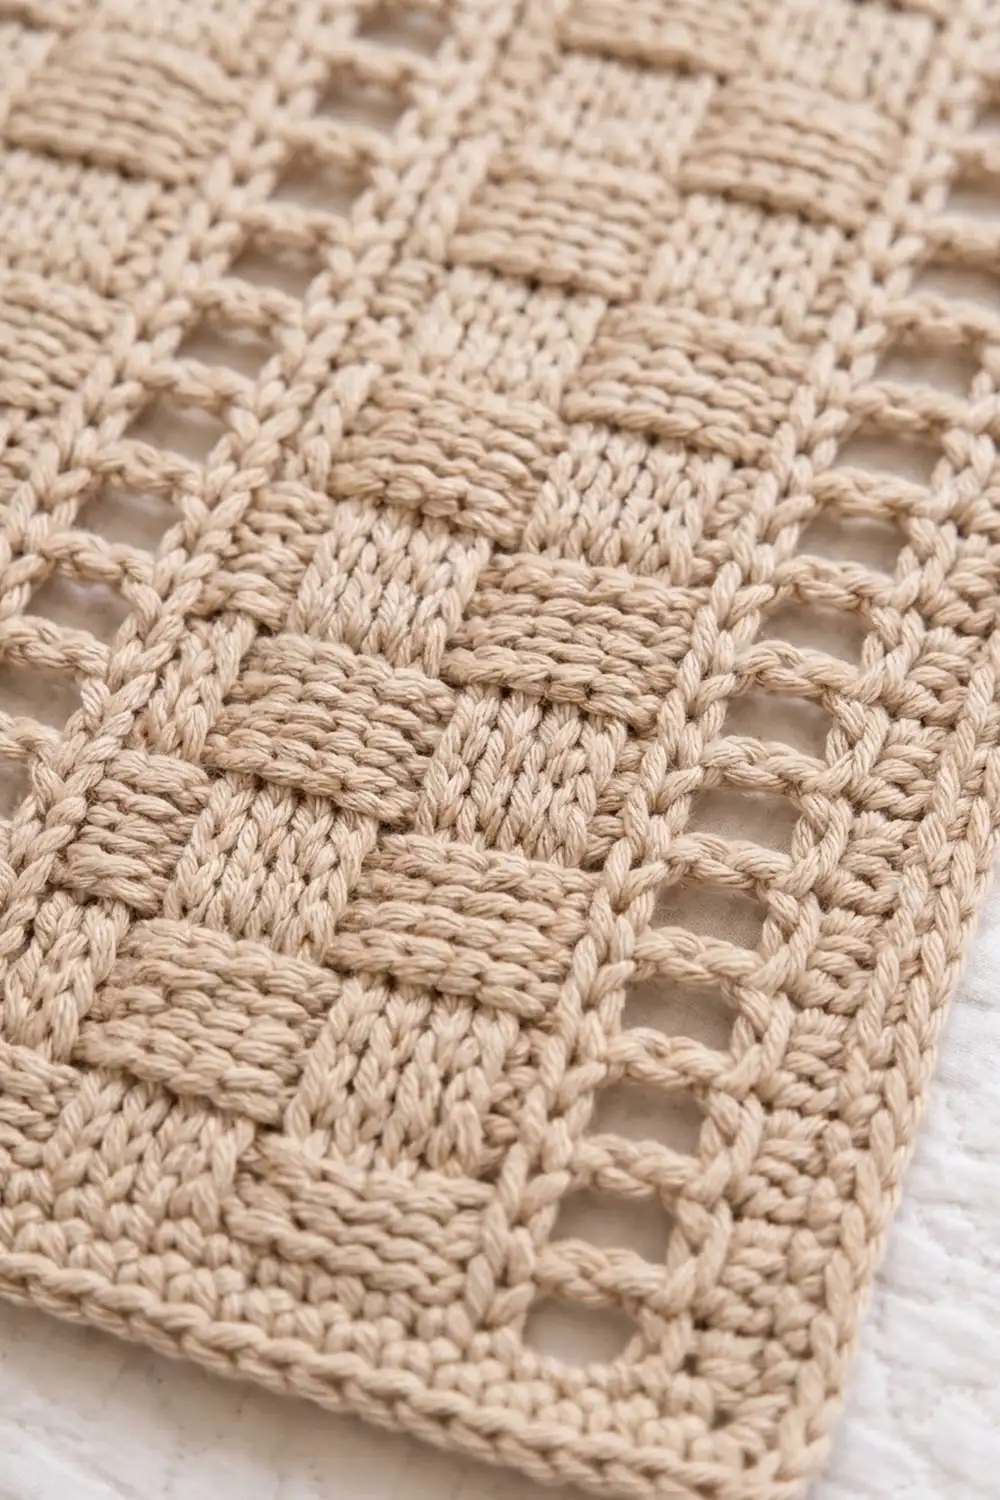
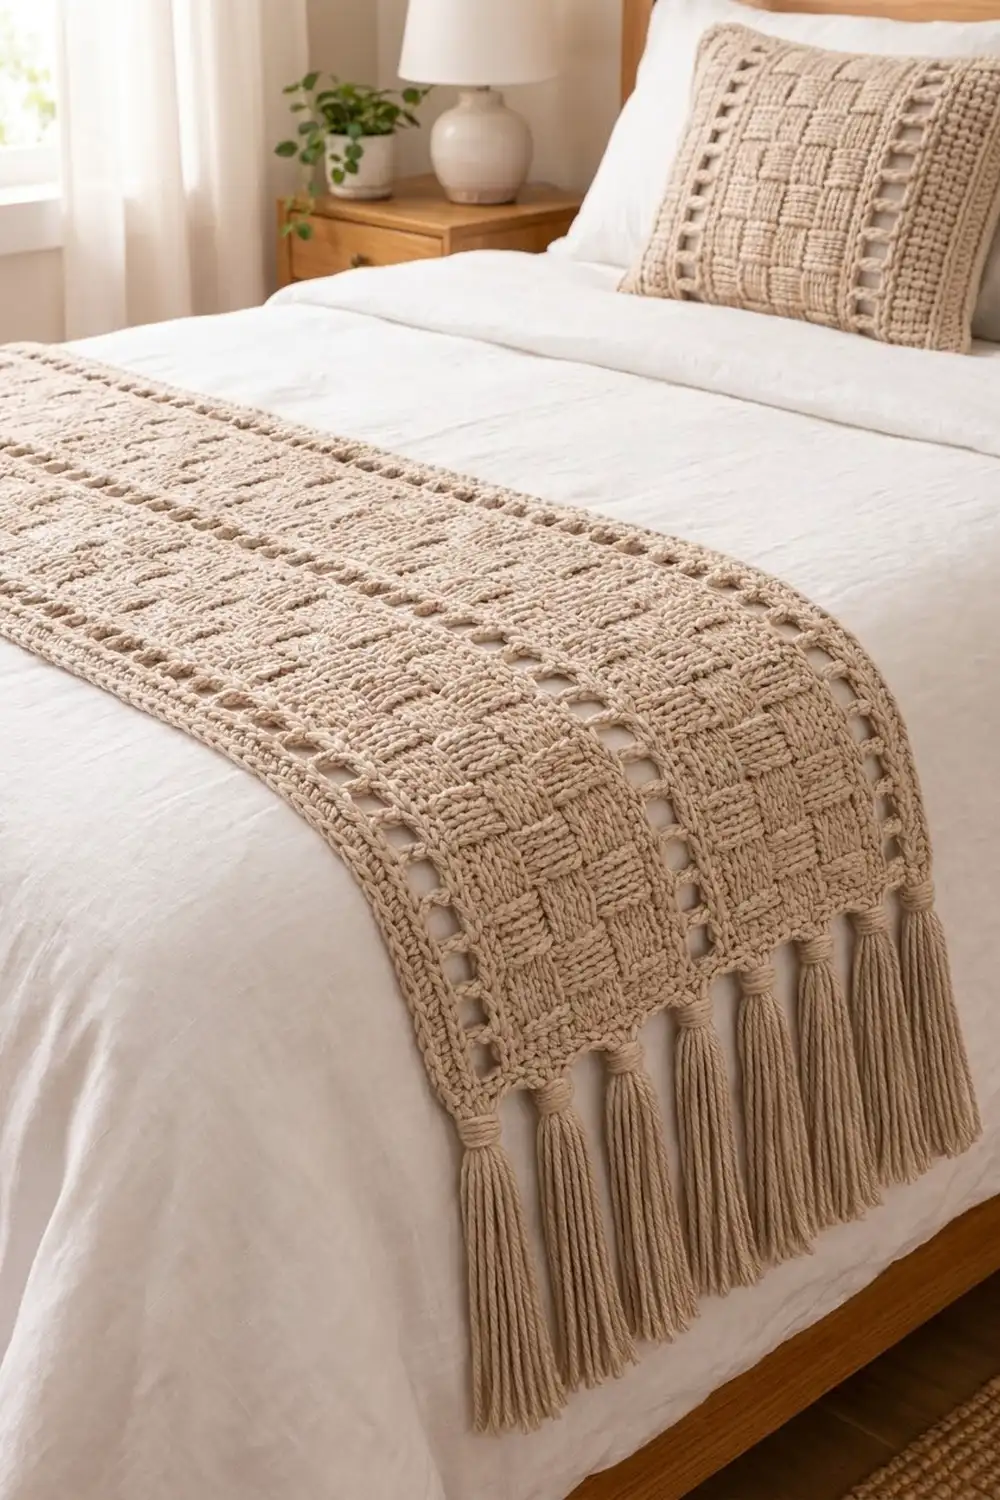
This bed runner is all about texture. Three panels of raised basketweave blocks sit between four airy ladder columns, and thick wrapped tassels finish each short end. Worked in one soft oatmeal shade, it looks calm and natural and suits a neutral or farmhouse bedroom.
The pattern uses US crochet terms. The finished runner measures 21 in × 62 in (53.3 cm × 157.5 cm) after the border, plus 6 in (15.2 cm) tassels at each short end.
You work the runner in one piece, in rows across the width, so the ladders and panels grow along the length. Front post and back post double crochet make the basketweave blocks. Chain-2 spaces stacked row on row make the ladder openings. Two rounds of single crochet tidy the edges, then you add tassels to both short ends.
There is no joining. If you can work front post and back post stitches, you can make this runner.
Finished Size and Construction
- Finished size: 21 in × 62 in (53.3 cm × 157.5 cm), not counting tassels
- Length with tassels: 74 in (188.0 cm)
- Skill level: Intermediate
- Terminology: US
- Yarn weight: Worsted (#4)
- Hook: 5.5 mm (US I-9)
- Number of pieces: 1
- Layout: 1 rectangular panel worked in rows
- Piece size before border: 20 in × 61 in (50.8 cm × 154.9 cm)
- Border depth: 0.5 in (1.3 cm) on each side
- Tassels: 15 per short end, 6 in (15.2 cm) long
Materials
Yarn: Choose a smooth worsted-weight yarn in a soft wool blend, acrylic, or cotton blend. Plied yarn gives the post stitches crisp definition. Avoid fuzzy or very splitty yarn, because it blurs the blocks and is hard to hook around posts.
- Oatmeal (one color): 900 g total, about 1,650 m (1,800 yd)
- Body and border: about 800 g (1,465 m)
- Tassels: about 100 g (183 m)
These amounts were figured for a yarn with roughly 183 m per 100 g and include about a 15% margin. Post-stitch fabric uses more yarn than plain double crochet, so buy enough yarn from one dye lot.
Tools:
- 5.5 mm (US I-9) crochet hook
- Tapestry needle
- Scissors
- Stitch markers (at least 6)
- 7 in (17.8 cm) piece of stiff cardboard for cutting tassel strands
- Measuring tape
- Blocking mats and rust-proof pins, or a large towel
Abbreviations (US Terms)
- ch – chain
- sk – skip
- sp – space
- st(s) – stitch(es)
- sc – single crochet
- dc – double crochet
- FPdc – front post double crochet
- BPdc – back post double crochet
- rep – repeat
- RS / WS – right side / wrong side
Special stitches:
- FPdc: Yarn over and insert the hook from front to back to front around the post of the next stitch. Yarn over, pull up a loop, then [yarn over, pull through 2 loops] twice.
- BPdc: Yarn over and insert the hook from back to front to back around the post of the next stitch. Finish like a regular dc.
Ladder rung: Ch 2 and skip the ch-2 space below. You do not work into the space, so each new chain lies straight above the last one and makes a stacked opening.
Gauge and Checkpoints
Gauge: 14 sts and 8 rows = 4 in (10.2 cm) over the pattern, measured after a gentle steam.
Test swatch first. It is a small version of the runner with one panel and two ladders.
- Ch 30.
- Row 1: Dc in 4th ch from hook and in next ch (3 sts). Ch 2, sk 2 ch, dc in next 18 ch, ch 2, sk 2 ch, dc in last 3 ch. You now have 28 sts.
- Work Rows 2–5 of the main pattern 3 times, using 3 edge sts instead of 4 on each side, for 13 rows total.
Swatch checkpoint: 8 in (20.3 cm) wide and 6.5 in (16.5 cm) tall.
- Too big: go down to a 5 mm (US H-8) hook.
- Too small: go up to a 6 mm (US J-10) hook.
Post stitches pull in a little, so measure the basketweave panel as well. It should be about 4.6 in (11.7 cm) wide.
Stage checkpoints for the runner:
- After Row 5: 20 in (50.8 cm) wide. If it is wider than 20.5 in (52.1 cm) or narrower than 19.5 in (49.5 cm), change hooks now.
- After Row 21: 10.5 in (26.7 cm) long.
- After Row 61: 30.5 in (77.5 cm) long, which is half the body.
- After Row 122: 61 in (154.9 cm) long.
- After the border: 21 in × 62 in (53.3 cm × 157.5 cm).
Pattern: Runner Body
Stitch layout across each row (70 sts):
4 edge dc | [ladder 2 | rail dc | basketweave panel 16 | rail dc] × 3 | ladder 2 | 4 edge dc
Check: 4 + (2 + 1 + 16 + 1) × 3 + 2 + 4 = 4 + 60 + 2 + 4 = 70 sts. Each ch-2 counts as 2 sts.
Ch 72.
Row 1 (setup): Dc in 4th ch from hook (the skipped 3 ch count as the first dc) and in next 2 ch, for 4 sts. *Ch 2, sk 2 ch, dc in next 18 ch; rep from * 2 more times. Ch 2, sk 2 ch, dc in last 4 ch. Turn.
Stitch count: 62 dc and 4 ch-2 spaces = 70 sts.
Chain check: 6 + (2 + 18) × 3 + 2 + 4 = 72 ch used.
Put a marker in the first and last dc of each 16-st panel section (the sts right after and right before each rail) so the panels are easy to see.
Row 2: Ch 3 (counts as dc throughout), dc in next 3 dc. *Ch 2, sk ch-2 sp, dc in next dc (rail), [FPdc in next 4 sts, BPdc in next 4 sts] twice, dc in next dc (rail); rep from * 2 more times. Ch 2, sk ch-2 sp, dc in next 3 dc, dc in top of turning ch. Turn. (70 sts)
Row 3: Repeat Row 2 exactly. (70 sts)
Because each panel has an even number of blocks, the same wording keeps every block raised on the same side as you work back across the row. On the RS you will see raised 4-st blocks alternating with recessed ones.
Row 4: Ch 3, dc in next 3 dc. *Ch 2, sk ch-2 sp, dc in next dc, [BPdc in next 4 sts, FPdc in next 4 sts] twice, dc in next dc; rep from * 2 more times. Ch 2, sk ch-2 sp, dc in next 3 dc, dc in top of turning ch. Turn. (70 sts)
Row 5: Repeat Row 4. (70 sts)
Rows 4–5 swap the blocks, so raised blocks now sit above recessed ones. Each block is 4 sts wide and 2 rows tall, about 1.1 in × 1 in (2.8 cm × 2.5 cm), which gives the woven checkerboard.
Rows 6–121: Repeat Rows 2–5 another 29 times. That makes 30 repeats in total, and every row has 70 sts.
Row 122 (finishing row): Ch 3, dc in next 3 dc. *Ch 2, sk ch-2 sp, dc in each of next 18 sts; rep from * 2 more times. Ch 2, sk ch-2 sp, dc in next 3 dc, dc in top of turning ch. (70 sts) Do not fasten off.
This plain row matches Row 1, so both short ends have a flat top for the border and tassels.
Ladder check: Each ladder column should have 122 stacked openings, one per row. The chain bars should lie level, with plain dc rails on both sides. If an opening looks twisted, you probably worked into the ch-2 space instead of skipping it.
Border
Border gauge: 2 rounds of sc = 0.5 in (1.3 cm). Along the row ends, 2 sc per dc row lies flat. That is 4 sc per 1 in (2.5 cm), which matches a worsted sc width.
Corner rule: Each corner gets 3 sc in one stitch. The middle sc of that group is the corner stitch. The side counts below include both corner stitches of that side.
Rnd 1: Ch 1 and turn so the RS faces you. You are working along Row 122.
- Short side (top): 3 sc in first st (corner). Sc in each of the next 68 sts, working 2 sc in each ch-2 sp. 3 sc in last st (corner).
- Long side: Rotate the work. Work 2 sc around the post of each row-end, 122 rows × 2 = 244 sc.
- Short side (foundation): 3 sc in the first ch of the foundation (corner). Sc in the free loops of the next 68 ch, including the 2 skipped ch at each ladder. 3 sc in the last ch (corner).
- Second long side: 244 sc as before.
Join with a sl st to the first sc.
Rnd 1 counts:
- Short sides: 72 sts each (1 + 1 + 68 + 1 + 1)
- Long sides: 248 sts each (1 + 1 + 244 + 1 + 1)
- Total: 72 + 72 + 248 + 248 − 4 shared corners = 636 sc
Rnd 2: Ch 1. Sc in each sc around, with 3 sc in each corner stitch. Join with a sl st and fasten off.
Rnd 2 counts:
- Short sides: 74 sts each
- Long sides: 250 sts each
- Total: 74 + 74 + 250 + 250 − 4 = 644 sc
Why the math works: Each short side starts from the body’s exact 70 sts. On each round, the corner groups add 2 stitches per side. The long sides use the fixed rate of 2 sc per row, which matches the row height to the sc width. That keeps the edges from rippling or cupping. Rnd 1 adds 8 sc in total, from 2 extra sts at each of 4 corners, and Rnd 2 adds another 8: 636 + 8 = 644.
Size check: 21 in × 62 in (53.3 cm × 157.5 cm).
Tassels
Cut strands: Wrap yarn around the 7 in (17.8 cm) cardboard and cut along one edge. Each strand is about 14 in (35.6 cm) long. For each tassel, cut 8 strands plus one wrapping strand about 18 in (45.7 cm) long. You need 30 tassels in total.
Placement: On each short side of Rnd 2 (74 sts), count in from the corner stitch. Place tassels in sts 5, 10, 15, and so on, up to st 70. That gives 15 tassels per end, about 1.4 in (3.6 cm) apart, with 4 sts left bare at each end so the spacing is symmetric.
Attach:
- Hold 8 strands together and fold them in half.
- Insert the hook from back to front through the stitch, catch the fold, and pull a loop through.
- Pull the ends through the loop and tighten. You now have 16 ends.
- Wrap the 18 in strand firmly around all the ends 0.75 in (1.9 cm) below the edge, about 6 times. Knot it, then use the tapestry needle to pull its tails down into the tassel.
- When all tassels are on, comb them straight and trim them to 6 in (15.2 cm) below the border.
Final Blocking
- Weave in all ends along rails or inside the border, never through the ladder openings.
- Lay the runner RS up on mats or a towel.
- Pin it to 21 in × 62 in (53.3 cm × 157.5 cm). Pin each long edge straight first, then the short ends.
- Run a measuring tape along each ladder and adjust until it is straight from end to end.
- Hold a steam iron 1 in (2.5 cm) above the fabric and let the steam soak in. Do not press, or you will flatten the post stitches. For cotton or wool, you can wet block instead.
- Let it dry fully, then unpin.
- Steam the tassels lightly, hang them straight, and trim again if needed.
Final Quality-Control Checklist
- 70 sts in Row 1 and Row 122
- 122 rows in total; each ladder has 122 openings
- Blocks switch every 2 rows, so the checkerboard is unbroken
- Border Rnd 2: 74 sts on each short side, 250 on each long side, 644 in total
- 15 tassels per end, evenly spaced, wrapped at 0.75 in (1.9 cm)
- Body before border 20 in × 61 in (50.8 cm × 154.9 cm); finished size 21 in × 62 in (53.3 cm × 157.5 cm)
- Edges lie flat with no ripples
Troubleshooting
- Runner gets narrower as you go: Post stitches are pulling in. Check the panel width against the 4.6 in (11.7 cm) checkpoint and go up half a hook size for the post rows only.
- Ladders slant: Make sure there is exactly 1 rail dc before and after each panel, and skip every ch-2 space.
- Blocks don’t alternate: You probably repeated Row 2 three times. Count 2 rows per block.
- Border ripples on the long sides: Too many sc. Go down to 3 sc per 2 rows on the next attempt.
- Border cups on the long sides: Too few sc. Check that you worked 2 sc in every row-end.
- Tassels look thin: Add 2 strands per tassel and allow about 15 g (27 m) extra yarn.
Care
Hand wash in cool water or use a gentle machine cycle in a mesh bag, depending on the yarn label. Lay flat to dry, then comb and trim the tassels.
Final Notes
The measurement chain is short and easy to check:
- 14 sts = 4 in (10.2 cm), so 70 sts = 20 in (50.8 cm)
- 8 rows = 4 in (10.2 cm), so 122 rows = 61 in (154.9 cm)
- Two sc rounds add 0.5 in (1.3 cm) on every side, giving 21 in × 62 in (53.3 cm × 157.5 cm)
- 6 in (15.2 cm) tassels at each short end bring the length to 74 in (188.0 cm)
Check your swatch and the Row 5 width, and the rest follows. Happy crocheting!