

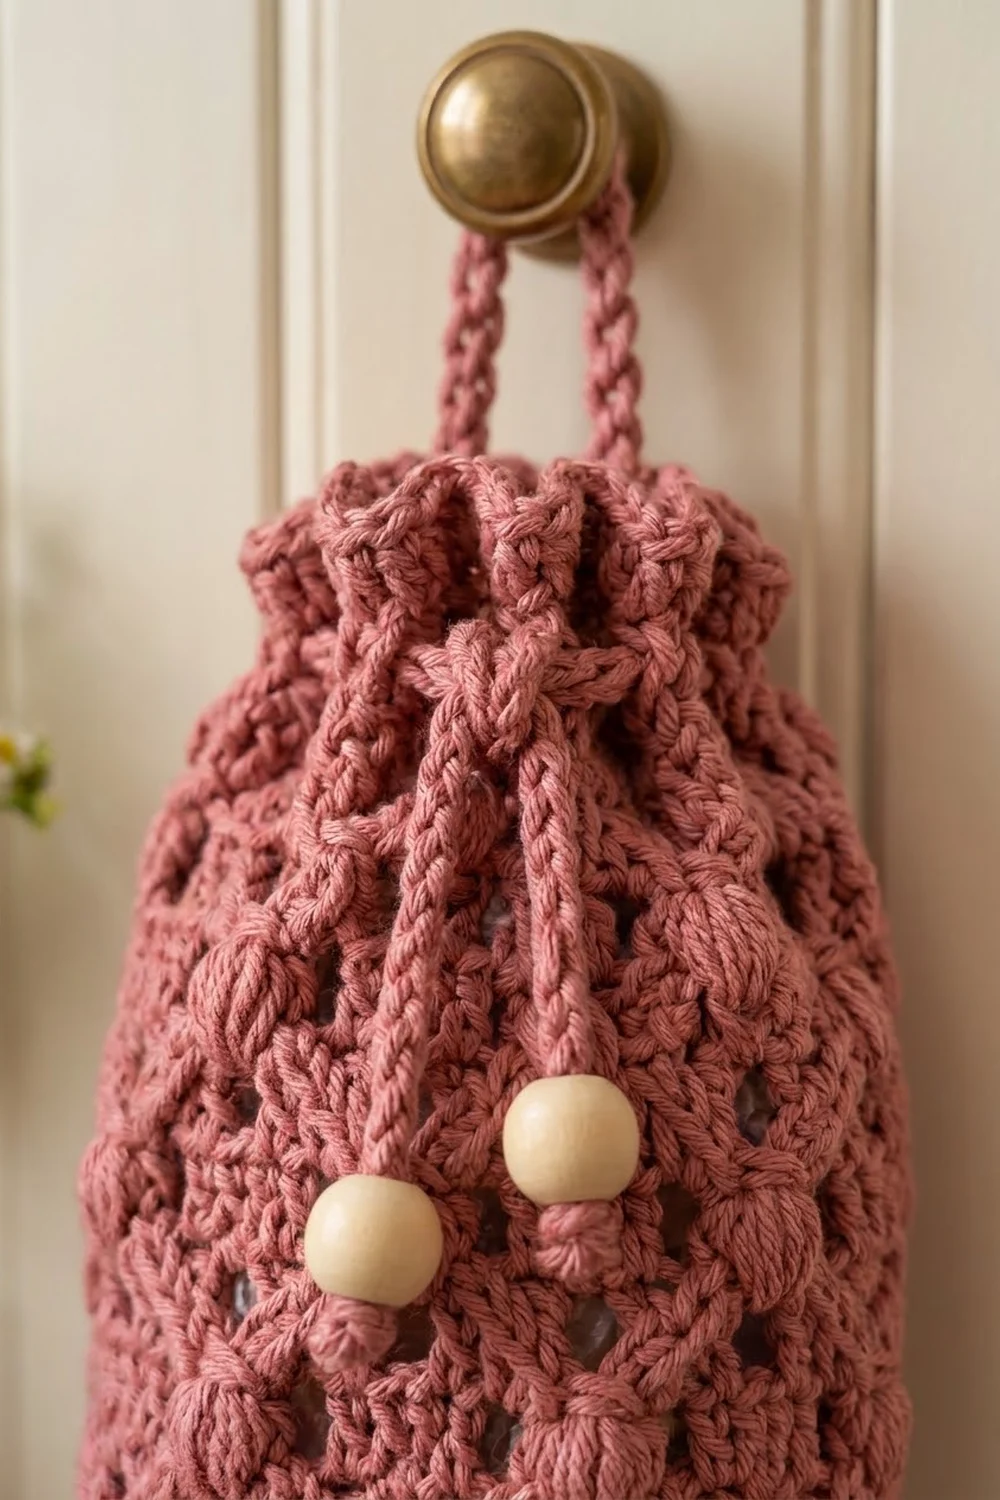
This plastic bag holder is a tall, slim tube in soft dusty rose cotton. It is covered in a diamond lattice with a small puff stitch at every point where the lines cross. A drawstring with two natural wooden beads closes the top. A chain loop hangs it from a door knob or hook. A scalloped edge finishes the narrower bottom opening, so you can pull out one bag at a time.
The look is cozy farmhouse: one solid color, lots of texture, and open diamonds that show a little of the bags inside. The same design works in cream or any other solid cotton.
This pattern uses US crochet terms. The finished holder is about 6.75″ (17.1 cm) wide laid flat and 18.5″ (47.0 cm) long, not counting the hanging loop. It is about 13.5″ (34.3 cm) around.
Construction is simple. You crochet one flat rectangle in rows and sew the side edges together to make a tube. Then you work a drawstring edge around the top and a scalloped edge around the bottom. A chain drawstring and a hanging loop finish it.
Finished Size and Construction
- Finished size: 6.75″ (17.1 cm) wide laid flat x 18.5″ (47.0 cm) long
- Skill level: Easy-intermediate
- Terminology: US crochet terms
- Yarn weight: Worsted (#4), cotton or cotton blend
- Hook: 5.0 mm (H-8)
- Number of pieces: 1 body panel, plus a chain drawstring and a hanging loop
- Layout: one rectangle seamed into a tube
- Body panel size: 13.75″ (34.9 cm) wide x 16″ (40.6 cm) tall
- Size before edgings: 6.75″ (17.1 cm) flat x 16″ (40.6 cm) long after seaming
- Edging depth: top edge 1.25″ (3.2 cm), bottom scalloped edge 1.25″ (3.2 cm)
Materials
Choose a smooth worsted weight cotton or cotton blend. Cotton keeps the puffs crisp, stops the lattice from stretching too much, and stands up to kitchen use. Avoid very fuzzy yarns, because they hide the diamonds.
- Dusty rose: 170 g (about 310 m / 339 yd)
Tools and notions:
- 5.0 mm (H-8) crochet hook
- Tapestry needle
- 2 natural wooden beads, 20 mm, with holes big enough for the cord
- Stitch markers
- Scissors and measuring tape
- Pins and a blocking surface
The yarn amount includes a margin of about 15% for your gauge swatch and small differences in tension.
Abbreviations (US Terms)
- ch – chain
- sl st – slip stitch
- sc – single crochet
- dc – double crochet
- sc2tog – single crochet 2 together
- sk – skip
- sp – space
- st(s) – stitch(es)
- RS / WS – right side / wrong side
Puff stitch (puff): (Yarn over, insert hook in the stated stitch or space, yarn over and pull up a loop about 0.5″ / 1.3 cm tall) 3 times. Yarn over and pull through all 7 loops on the hook, then ch 1 to close. The closing ch does not count as a stitch.
Center ch of a loop: the 3rd ch of a ch-5 loop. Work the puff around this chain, not into the open space, so it sits right on the lattice point.
Gauge and Checkpoints
Gauge: 16 dc = 4″ (10.2 cm). In the lattice pattern, one 6-stitch repeat is 1.5″ (3.8 cm) wide. Four pattern rows (one repeat of Rows 3–6) are 2″ (5.1 cm) tall.
Make a test swatch first. Ch 21 and work Row 1 (19 dc). Then work Rows 2–6, using 3 repeats instead of 9. The swatch should be 4.75″ (12.1 cm) wide and about 3″ (7.6 cm) tall.
Checkpoints for the body:
- After Row 1: 13.75″ (34.9 cm) wide
- After Row 10: 5″ (12.7 cm) tall
- After Row 30: 15″ (38.1 cm) tall
- After Row 32: 16″ (40.6 cm) tall
If your swatch is too big, go down one hook size. If it is too small, go up one hook size. If the width is right but the height is too long, you are pulling the puff loops up too far. Keep them at about 0.5″ (1.3 cm).
Body Panel
The panel is worked flat in rows. The stitch count is a multiple of 6, plus 1.
Foundation: Ch 57.
Row 1 (RS): Dc in the 4th ch from the hook (the 3 skipped ch count as a dc) and in each ch across, turn. (55 dc)
Row 2 (WS): Ch 1, sc in the first dc, ch 5, sk 5 dc, sc in the next dc; repeat from * 8 more times, working the last sc in the top of the turning ch, turn. (10 sc, 9 ch-5 loops)*
Row 3 (RS, puff row A): Ch 5 (counts as dc + ch 2), puff in the center ch of the first ch-5 loop, ch 2, dc in the next sc, ch 2, puff in the center ch of the next loop, ch 2, dc in the next sc; repeat from * 7 more times, turn. (10 dc, 9 puffs, 18 ch-2 sps)*
Row 4 (WS, offset lattice): Ch 1, sc in the first dc, ch 2, sc in the top of the next puff, ch 5, sc in the top of the next puff; repeat from * 7 more times, ch 2, sc in the 3rd ch of the turning ch, turn. (11 sc, 8 ch-5 loops, 2 ch-2 sps)*
Each ch-5 loop now runs from one puff to the next and skips the ch-2, dc, ch-2 between them. This half-step shift is what makes the diamonds.
Row 5 (RS, puff row B): Ch 5 (counts as dc + ch 2), dc in the next sc, ch 2, puff in the center ch of the next ch-5 loop, ch 2, dc in the next sc; repeat from * 7 more times, ch 2, dc in the last sc, turn. (11 dc, 8 puffs, 18 ch-2 sps)*
Row 6 (WS): Ch 1, sc in the first dc, ch 5, sc in the top of the next puff; repeat from * 7 more times, ch 5, sc in the 3rd ch of the turning ch, turn. (10 sc, 9 ch-5 loops)*
Row 6 matches Row 2, so the lattice is back where it started.
Rows 7–30: Repeat Rows 3–6 six more times, for 7 repeats in total. Check that the panel is 5″ (12.7 cm) tall after Row 10 and 15″ (38.1 cm) tall after Row 30.
Row 31 (RS): Work as for Row 3. (10 dc, 9 puffs, 18 ch-2 sps)
Row 32 (WS, conversion row): Ch 3 (counts as dc), 2 dc in the next ch-2 sp, dc in the next puff, 2 dc in the next ch-2 sp, dc in the next dc; repeat from * 8 more times, working the last dc in the 3rd ch of the turning ch. (1 + 9 x 6 = 55 dc)*
This row turns the open lattice back into a solid 55-stitch edge that matches Row 1. Fasten off, leaving a 24″ (61.0 cm) tail for sewing the seam.
Panel check: 13.75″ (34.9 cm) wide x 16″ (40.6 cm) tall.
Seaming the Tube
Fold the panel in half with the RS together so the two side edges meet. Line up Row 1 with Row 1 and Row 32 with Row 32, and pin every 4 rows.
Using the long tail, whipstitch through the outer post of each edge stitch, matching row end to row end. Make 2 sewing stitches in each row end so the seam lies flat. Keep the tension relaxed, because a tight seam makes the lattice pucker.
Turn the tube RS out. It should be 6.75″ (17.1 cm) wide laid flat, which is 13.5″ (34.3 cm) around. The seam takes up about 0.25″ (0.6 cm). Lay the tube with the seam at the center back.
Edgings
Edging gauge: 4 sc = 1″ (2.5 cm). Each sc round is about 0.25″ (0.6 cm) tall, and the dc eyelet round is about 0.5″ (1.3 cm) tall.
Work all edging rounds with the RS facing, and don’t turn. When the tube is laid flat, half of each round is on the front and half is on the back, so the “per side” counts below are half of each round’s total.
Top Edge
Rnd 1 (conversion round): Join yarn at the seam in the top of Row 32. Ch 1, sc in each of the 55 dc, then work 1 sc in the seam, sl st to the first sc. (55 + 1 = 56 sc; 28 per side)
Rnd 2 (eyelet round): Ch 4 (counts as dc + ch 1), sk 1 sc, dc in the next sc, ch 1, sk 1 sc; repeat from * 26 more times, sl st to the 3rd ch of the beginning ch-4. (28 dc, 28 ch-1 sps; 14 eyelets per side)*
Rnd 3: Ch 1, sc in each dc and each ch-1 sp around, sl st to the first sc. (28 + 28 = 56 sc)
Rnd 4: Ch 1, sc in each sc around, sl st to the first sc. (56 sc) Fasten off.
Why the math works: 56 is an even number, so the eyelet round splits into exactly 28 pairs with no stitch left over. Rnd 3 puts back exactly one sc for each dc and each space, which brings the count back to 56. The top rim is 14″ (35.6 cm) around, a little wider than the body. That extra width makes the soft ruffle above the drawstring when you pull it.
Bottom Scalloped Edge
Turn the tube upside down and work into the free loops of the foundation chain.
Rnd 1 (conversion round): Join yarn at the seam. Ch 1, sc in each of the 55 foundation loops, then work 1 sc in the seam, sl st to the first sc. (55 + 1 = 56 sc; 28 per side)
Rnd 2 (decrease round): Ch 1, sc in the next 5 sc, sc2tog; repeat from * 7 more times, sl st to the first sc. (8 x 6 = 48 sc; 24 per side)*
Rnd 3 (scallop round): Ch 1, sc in the first sc, sk 1 sc, 5 dc in the next sc, sk 1 sc, sc in the next sc; repeat from * 10 more times, sk 1 sc, 5 dc in the next sc, sk 1 sc, sl st to the first sc. (12 scallops, 12 sc; 6 scallops per side)* Fasten off.
Why the math works: 56 splits into 8 groups of 7, and turning each group into 6 stitches gives 48. Each scallop uses 4 stitches (sk 1, shell, sk 1, sc), and 48 ÷ 4 = 12 with nothing left over. The bottom opening is 12″ (30.5 cm) around, a little narrower than the body, so the bags stay inside until you pull them out.
Drawstring
Ch 101. Sl st in the back bump of the 2nd ch from the hook and in each ch across. (100 sl st) The cord should be about 25″ (63.5 cm) long. Fasten off and weave in the ends.
Start at the front center, opposite the seam. Weave the cord in and out of the eyelets in Rnd 2 of the top edge, going over and under 2 dc at a time. Go all the way around and bring the cord back out at the front center. Thread a wooden bead onto each end, tie an overhand knot below each bead, and trim the tails to 0.25″ (0.6 cm).
Hanging Loop
Ch 31. Sl st in the back bump of the 2nd ch from the hook and in each ch across. (30 sl st) The cord should be about 7.5″ (19.1 cm) long.
Fold the cord in half. Sew both ends to the inside of the top edge at the seam, covering Rnds 1–4. The loop rises about 3.75″ (9.5 cm) above the rim. Sew it firmly, because this spot carries the full weight of the bags.
Final Blocking
- Weave in all remaining ends along the seam or inside the edgings.
- Soak the holder in cool water for 10 minutes, then press out the water in a towel. Do not wring it.
- Slide a rolled towel inside the tube so it lies 6.75″ (17.1 cm) wide.
- Pat it out to 18.5″ (47.0 cm) long, measured from the top of Rnd 4 to the tips of the scallops.
- Open each diamond with your fingers and round out each puff.
- Pin each scallop into a neat curve, 6 on the front and 6 on the back.
- Let it dry completely before you remove the pins and hang it.
Final Quality-Control Checklist
- The tube is 6.75″ (17.1 cm) wide laid flat and 18.5″ (47.0 cm) long.
- The body panel has 55 dc in Row 1 and in Row 32.
- Every lattice point has one puff, and the diamonds are even and offset row to row.
- The seam is flat, with no pucker, and sits at the center back.
- The top edge has 28 eyelets and 56 sc in Rnds 3 and 4.
- The bottom edge has 12 evenly spaced scallops.
- The drawstring comes out at the front center with one bead on each end.
- The hanging loop is sewn on securely at the seam.
Troubleshooting
Diamonds lean to one side: Check that each puff sits on the center ch of its loop, not off to one side.
Row 3 or Row 5 doesn’t end on the last sc: Recount the row before it. Rows 2 and 6 need 9 loops. Row 4 needs 8 loops plus 2 ch-2 sps.
Panel too wide: Go down a hook size, or work the ch-5 loops a little more firmly.
Puffs look flat: Pull each loop up evenly to 0.5″ (1.3 cm) and close with a snug ch 1.
Scallops come out uneven: Rnd 2 must end with exactly 48 sc. Recount before you start the scallop round.
Drawstring won’t slide: Make the cord with looser sl sts, or weave it under single dc instead of pairs.
Bags fall out the bottom: Work Rnd 2 of the bottom edge with a 4.5 mm hook to make the opening a little tighter.
Care
Hand wash, or machine wash cool on a gentle cycle. Then reshape it and lay it flat to dry. Take off the wooden beads, or tuck them inside a sock, before machine washing.
Final Notes
Here is the measurement chain. A gauge of 16 dc = 4″ (10.2 cm) gives a 55-stitch panel 13.75″ (34.9 cm) wide. Thirty-two rows give 16″ (40.6 cm) of height. Once it’s seamed, that becomes a tube 6.75″ (17.1 cm) wide laid flat. Adding 1.25″ (3.2 cm) at the top and 1.25″ (3.2 cm) at the bottom gives the finished 18.5″ (47.0 cm) holder. Check each stage before you move on, and the edgings will come out right.
Happy crocheting!