

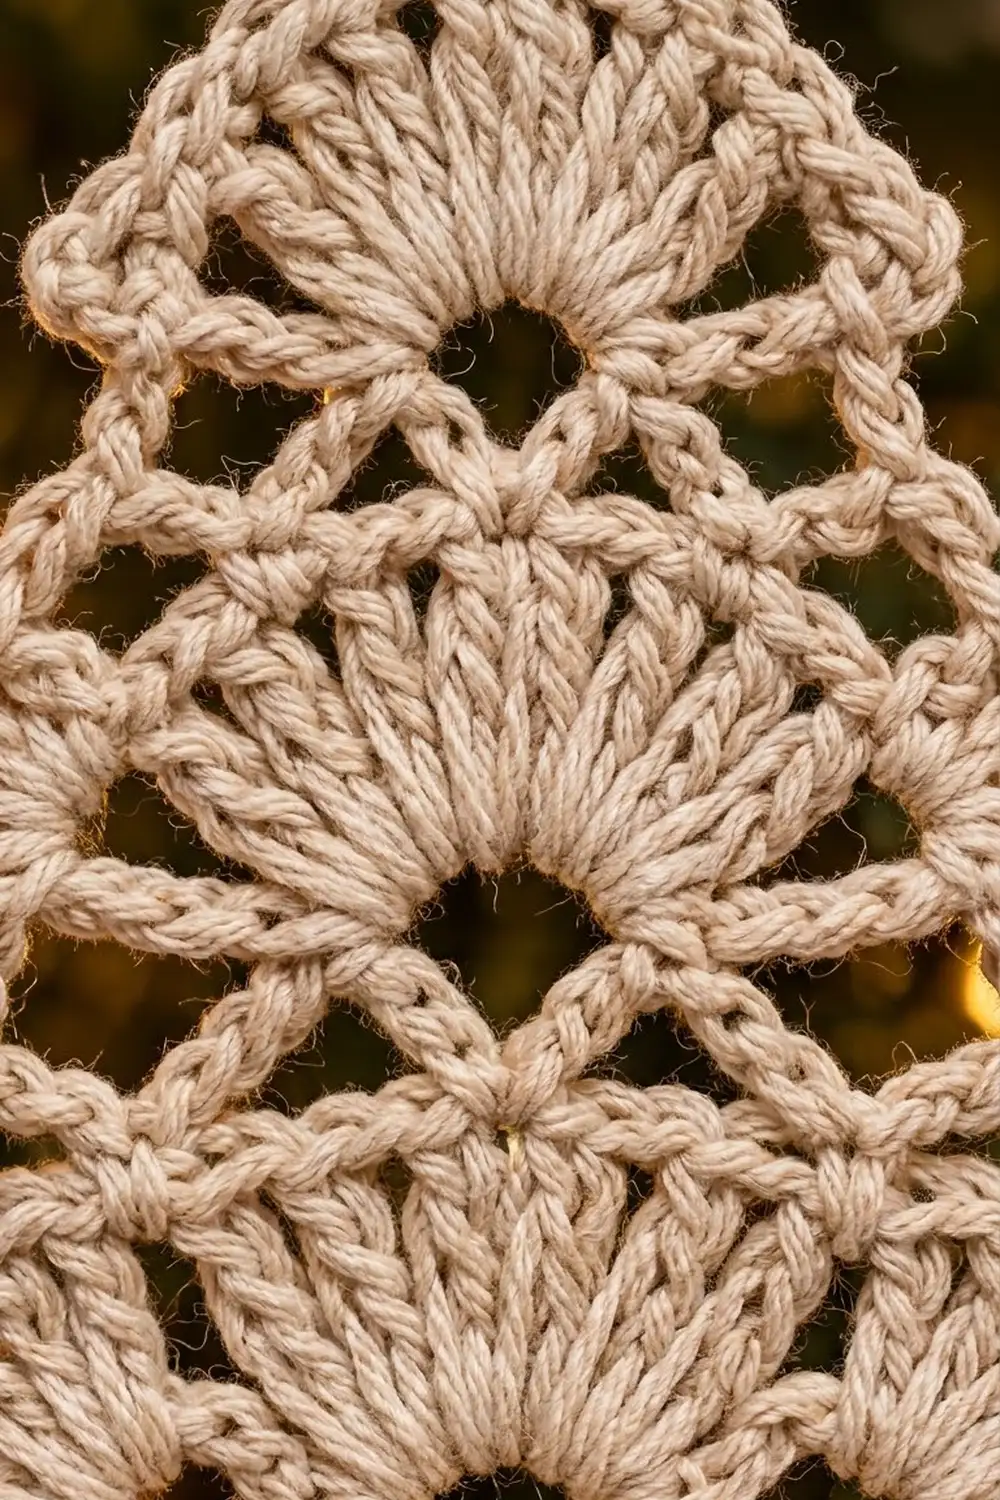
This lace tree ornament has three tiers of shell fans, diamond chain lattice between the tiers, a rope-textured edge and a small solid trunk. It looks delicate on a branch, and its stitch structure is simple and easy to repeat.
The tree is worked in a soft oatmeal-beige cotton. The trunk uses a brighter ivory so it stands out without breaking the neutral look. The ornament suits rustic, Scandinavian or white-and-gold trees, and it also works well as a gift-wrap topper.
This pattern uses US crochet terms. The finished tree measures 4 in (10.2 cm) wide by 4 in (10.2 cm) tall. With the trunk, it is 5 in (12.7 cm) tall. The hanging loop adds 1.5 in (3.8 cm), so the full hanging length is 6.5 in (16.5 cm).
You work the tree flat in rows from the bottom up. Each tier is one fan row followed by two lattice rows, and slip-stitch steps at the start of key rows narrow the triangle. A two-round border outlines the shape. Then you add the trunk to the bottom edge and finish with a chain hanging loop.
Finished Size and Construction
- Finished size: 4 in × 4 in (10.2 cm × 10.2 cm) tree; 5 in (12.7 cm) tall with trunk
- Skill level: Intermediate
- Terminology: US
- Yarn weight: Super Fine (#1) fingering-weight cotton or size 3 crochet thread
- Hook: 2.25 mm (US B-1)
- Number of pieces: 1
- Layout: single standalone ornament, no joining
- Piece size before border: 3.75 in × 3.75 in (9.5 cm × 9.5 cm)
- Border depth: about 0.125 in (0.3 cm) on each edge
- Trunk: about 0.9 in wide × 1 in tall (2.3 cm × 2.5 cm)
Materials
Choose a smooth, mercerized cotton. It shows the fan stitches clearly and holds its shape after blocking. Fuzzy or very soft yarns blur the lattice.
- Color A, oatmeal beige (tree, border, loop): 8 g, about 27 m
- Color B, ivory cream (trunk): 2 g, about 7 m
These quantities include a margin for swatching and weaving in ends.
Tools:
– 2.25 mm (US B-1) crochet hook
– Tapestry needle
– Scissors
– 1 stitch marker
– Blocking mat and rust-proof pins
– Spray starch or fabric stiffener (optional)
Abbreviations (US Terms)
- ch: chain
- sl st: slip stitch
- sc: single crochet
- tr: treble crochet (yarn over twice, insert hook, pull up a loop, then [yarn over, pull through 2 loops] 3 times)
- sc2tog: single crochet 2 together
- sc3tog: single crochet 3 together
- rev sc: reverse single crochet (crab stitch), worked from left to right
- FLO / BLO: front loop only / back loop only
- sp: space
- st(s): stitch(es)
- rep: repeat
Special stitches:
– Fan: 9 tr worked into the same stitch or space.
– Half fan: 5 tr worked into the same space. At the start of a row, ch 4 counts as the first tr.
Gauge and Checkpoints
Gauge matters less here than for a garment, but it controls the ornament’s size and how crisp the lace looks. Before cutting your main yarn, crochet Rows 1–4 as a test.
- Gauge: 8 sc = about 1 in (2.5 cm), and Row 1 (31 sts) measures 3.75 in (9.5 cm) wide.
- After Row 4 (Tier 1): about 1.25 in (3.2 cm) tall.
- After Row 7 (Tier 2): about 2.25 in (5.7 cm) tall.
- After Row 13: 3.75 in × 3.75 in (9.5 cm × 9.5 cm).
- After the border: 4 in × 4 in (10.2 cm × 10.2 cm).
- After the trunk: 5 in (12.7 cm) tall.
If Row 1 is wider than 4 in (10.2 cm), switch to a 2 mm hook. If it is narrower than 3.5 in (8.9 cm), switch to a 2.5 mm hook. A difference of up to 0.25 in (0.6 cm) is fine and will block out.
Tree Body
With Color A, ch 32.
Row 1 (eyelet base): Sc in 2nd ch from hook and next 4 ch, [ch 1, skip 1 ch, sc in next 9 ch] 2 times, ch 1, skip 1 ch, sc in last 5 ch. (31 sts: 28 sc + 3 ch-1 sps.)
The three ch-1 spaces become the eyelets at the base of the bottom fans.
Tier 1
Row 2 (fans): Ch 1, turn. Sc in first sc, skip 4 sts, Fan in next ch-1 sp, skip 4 sts, sc in next sc; rep from * 2 more times. (31 sts: 3 Fans of 9 tr + 4 sc.)*
From here on, treat the side facing you on Row 2 as the right side (RS).
Row 3 (lattice A): Ch 1, turn. Sc in first sc, ch 5, sc in 5th tr of next Fan, ch 5, sc in next sc; rep from * 2 more times. (7 sc, 6 ch-5 sps.)*
Row 4 (lattice B): Turn. Sl st in first sc and in next 3 ch. Ch 1, sc in same ch-5 sp, [ch 5, sc in next ch-5 sp] 5 times. Leave the last sc unworked. (6 sc, 5 ch-5 loops.)
The new loops sit across the Row 3 loops and form the diamond lattice. The 3rd loop is centered directly above the middle fan.
Checkpoint: about 1.25 in (3.2 cm) tall.
Tier 2
Row 5 (fans): Turn. Sl st in first sc and in next 2 ch. Ch 4 (counts as tr), 4 tr in same loop to make a Half fan. Sc in next loop, Fan in next (center) loop, sc in next loop, then work a Half fan of 5 tr in the next loop. Leave the last sc unworked. (21 sts: 5 tr + 1 sc + 9 tr + 1 sc + 5 tr.)
The outer tr of each Half fan points down and out, which makes the small tier points on the sides.
Row 6 (lattice A): Ch 1, turn. Sc in first tr, ch 5, sc in next sc, ch 5, sc in 5th tr of the center Fan, ch 5, sc in next sc, ch 5, sc in top of the turning ch-4. (5 sc, 4 ch-5 sps.)
Row 7 (lattice B): Turn. Sl st in first sc and in next 3 ch. Ch 1, sc in same sp, [ch 5, sc in next ch-5 sp] 3 times. Leave the last sc unworked. (4 sc, 3 ch-5 loops; the 2nd loop is centered.)
Checkpoint: about 2.25 in (5.7 cm) tall.
Tier 3
Row 8 (top fan): Turn. Sl st in first sc and in next 3 ch. Ch 1, sc in same loop, Fan in next (center) loop, sc in next loop. Leave the last sc unworked. (11 sts: 1 sc + 9 tr + 1 sc.)
Row 9 (lattice A): Ch 1, turn. Sc in first sc, ch 5, sc in 5th tr of Fan, ch 5, sc in last sc. (3 sc, 2 ch-5 sps.)
Row 10 (lattice B): Turn. Sl st in first sc and in next 3 ch. Ch 1, sc in same sp, ch 5, sc in next ch-5 sp. Leave the last sc unworked. (2 sc, 1 ch-5 loop.)
Tip
Row 11: Ch 1, turn. Sc in first sc, 3 sc in ch-5 loop, sc in last sc. (5 sc.)
Row 12: Ch 1, turn. Sc2tog, sc in next st, sc2tog. (3 sc.)
Row 13: Ch 1, turn. Sc3tog. (1 st: the apex.)
Do not fasten off. Place a marker in the apex stitch.
Checkpoint: 3.75 in × 3.75 in (9.5 cm × 9.5 cm).
Border
The border uses two rounds. Round 1 frames the outline with chain loops anchored at fixed points. Round 2 fills each loop with crab stitch to make the rope edge.
Border gauge: Round 2 places 1 rev sc per sc and 1 rev sc per chain. That 1:1 ratio is what keeps the edge flat.
Side anchor points: Each slanted side has 7 anchors. From the bottom up, they are:
- Row 3 end sc
- Row 4 end sc
- Row 6 end sc
- Row 7 end sc
- Row 9 end sc
- Row 10 end sc
- Row 12 end st
Round 1: Ch 1, sc in apex.
- First side (top to bottom): Ch 3, sc in anchor 7. Ch 3, sc in anchor 6. Ch 3, sc in anchor 5. Ch 5, sc in anchor 4. Ch 3, sc in anchor 3. Ch 5, sc in anchor 2. Ch 3, sc in anchor 1. Ch 5.
- Bottom edge: Working into the free loops of the foundation chain, sc in each of the 31 loops. The first and last of these sc are the corners.
- Second side (bottom to top): Ch 5, sc in anchor 1. Ch 3, sc in anchor 2. Ch 5, sc in anchor 3. Ch 3, sc in anchor 4. Ch 5, sc in anchor 5. Ch 3, sc in anchor 6. Ch 3, sc in anchor 7. Ch 3, sl st to the first sc.
Round 1 counts:
– Bottom edge: 31 sc, including both corners.
– Each slanted side: 7 sc and 8 loops (3 ch-5 loops and 5 ch-3 loops).
– Apex: 1 sc.
– Total: 46 sc and 16 loops.
Round 2: Ch 1, do not turn. Work rev sc as follows:
- 1 rev sc in the apex sc.
- Down the first side: 1 rev sc in each sc, 3 rev sc in each ch-3 loop and 5 rev sc in each ch-5 loop.
- Across the bottom: 1 rev sc in the FLO of each of the 31 sc. This leaves the back loops free for the trunk.
- Up the second side: work the same as the first side.
Sl st to the first st and fasten off.
Round 2 counts:
– Bottom edge: 31.
– Each slanted side: 7 + (5 × 3) + (3 × 5) = 37.
– Apex: 1.
– Total: 31 + 37 + 37 + 1 = 106. As a cross-check, 46 sc + 30 ch from the ch-3 loops + 30 ch from the ch-5 loops also equals 106.
Why the math works: Each stitch in Round 2 replaces exactly one Round 1 stitch or chain, so nothing ruffles or pulls in. The bottom edge stays at 31 stitches, the same as Row 1, so its width doesn’t change. The border adds only depth, about 0.125 in (0.3 cm) per edge. That turns the 3.75 in (9.5 cm) piece into a 4 in (10.2 cm) tree.
Trunk
Hold the tree upside down with the RS facing you. Count 12 sts in from either bottom corner.
Row 1: Join Color B with a sl st in the BLO of the 13th Round 1 sc. Ch 1, sc in BLO of the same st and in the BLO of the next 6 sts. (7 sc: sts 13–19, which leaves 12 sts on each side.)
Rows 2–8: Ch 1, turn, sc in each st across. (7 sc each row.)
Fasten off.
Checkpoint: The trunk measures about 0.9 in × 1 in (2.3 cm × 2.5 cm). The full ornament is 5 in (12.7 cm) tall.
Hanging Loop
- Join Color A in the apex stitch of Round 2.
- Ch 30, then sl st in the same apex stitch to close the loop.
- Sl st in each of the 30 ch around the loop to firm it up, and sl st in the apex again.
- Fasten off.
The loop hangs 1.5 in (3.8 cm) above the tip.
Final Blocking
- Weave in all ends along the solid sc areas: the trunk, the tip and the border.
- Soak the ornament in cool water for 10 minutes. Press out the water in a towel; don’t wring it.
- On the blocking mat, mark a triangle 4 in (10.2 cm) wide at the base and 4 in (10.2 cm) tall.
- Pin the apex and both bottom corners first.
- Pin each tier point outward, matching the two sides.
- Gently pin the top of each fan so it curves evenly, and open each eyelet with a pin.
- Pin the trunk square at 0.9 in × 1 in (2.3 cm × 2.5 cm).
- If you want a crisper ornament, spray it with starch.
- Let it dry completely, at least 12 hours, before unpinning.
Final Quality-Control Checklist
- Rows 2, 5 and 8 have the correct number of fans and half fans (3 fans; 1 fan and 2 half fans; 1 fan).
- Every fan sits above an eyelet or a centered loop.
- The diamond lattice is even on both sides.
- Both slanted sides have 7 anchors and 8 loops.
- The border totals 106 stitches and lies flat.
- The trunk is centered, with 12 stitches on each side.
- The tree measures 4 in × 4 in (10.2 cm × 10.2 cm), and the overall height is 5 in (12.7 cm).
- The hanging loop is firm and the ornament hangs straight.
Troubleshooting
- The fans cup or ruffle: Your tr stitches are too loose, or you added an extra tr. Count 9 per fan and go down a hook size.
- The lattice sags: Chain more tightly, or work ch 4 instead of ch 5 in Rows 3, 6 and 9 only.
- The tree leans: The slip-stitch steps don’t match. Check that Rows 4, 7 and 10 each leave exactly one sc unworked at the end.
- The border pulls in: You worked fewer stitches into the loops than the loops have chains. Use 3 per ch-3 loop and 5 per ch-5 loop.
- The trunk is off-center: Recount the 31 bottom stitches before you join Color B.
Care
Hand wash in cool water, reshape and dry flat. Re-starch if needed after washing.

Final Notes
The measurement chain is:
- Row 1 is 3.75 in (9.5 cm) wide.
- The three tiers bring the height to 3.75 in (9.5 cm).
- The border brings the tree to 4 in × 4 in (10.2 cm × 10.2 cm).
- The trunk brings the overall height to 5 in (12.7 cm).
- The loop adds 1.5 in (3.8 cm).
If you check your size at each step, the finished ornament will come out right.
Happy crocheting!