

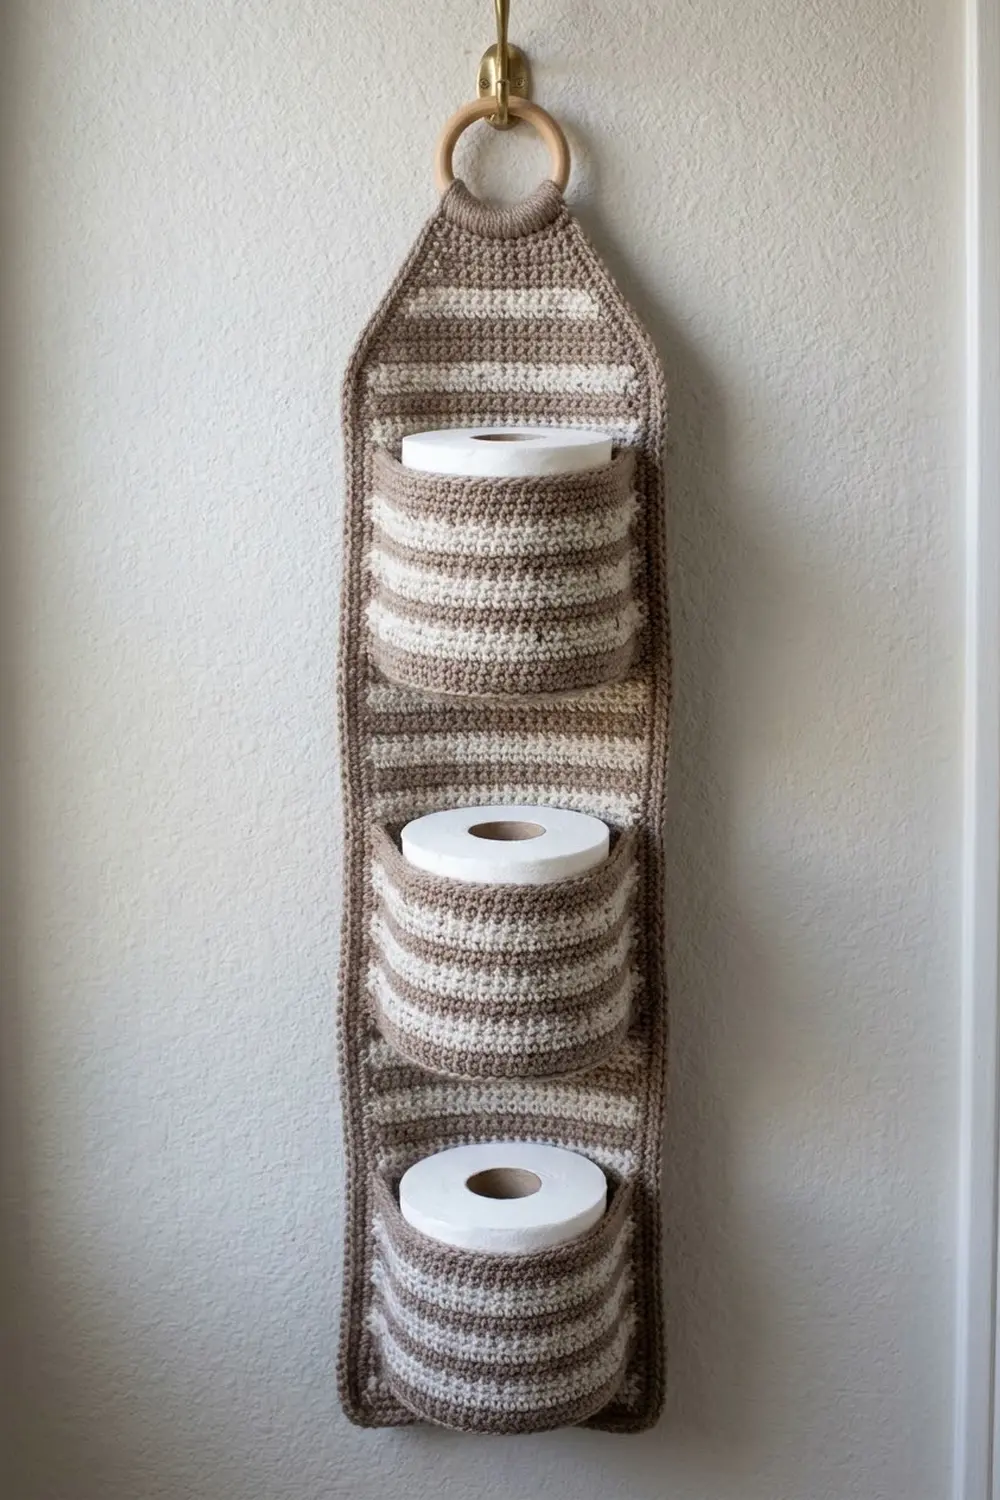
This hanging holder stores three spare toilet rolls in a narrow vertical strip. It has a long striped backing panel that narrows at the top into a tab, and the tab folds over a wooden ring for hanging. Three round, cup-shaped pockets are sewn down the front, and each one holds a standard roll upright with about 1 in (2.5 cm) showing above the rim.
The colors are a warm taupe and a soft cream in 2-row stripes. Where the single crochet tops interlock, the cream rows pick up small flecks of taupe, which gives the fabric a speckled, stone-like texture. A taupe border frames the panel, and each pocket ends with a taupe rim. It looks calm and natural in a spa-style bathroom.
This pattern uses US crochet terms. The finished panel is 6.5 in (16.5 cm) wide and 28 in (71.1 cm) long before folding. Once the tab is folded over the ring, the holder hangs 26 in (66.0 cm) below the ring.
You will work the panel flat in rows, add one border round, and then crochet three pockets in joined rounds from the base up. The pockets are whipstitched to the panel, and the tab is folded around the ring and sewn down.
Finished Size and Construction
- Finished panel size: 6.5 in x 28 in (16.5 cm x 71.1 cm)
- Hanging length after folding: 26 in (66.0 cm)
- Skill level: Easy / advanced beginner
- Terminology: US
- Yarn weight: Worsted (#4), cotton or cotton blend
- Hook: 5 mm (H-8)
- Number of pieces: 4 (1 backing panel, 3 pockets)
- Layout: 1 column of 3 pockets, stacked vertically
- Panel size before border: 6 in x 27.5 in (15.2 cm x 69.9 cm)
- Border depth: 0.25 in (0.6 cm), so 1 round of sc
- Pocket size: 4.4 in (11.2 cm) base diameter, 3.5 in (8.9 cm) tall
Materials
Use a smooth cotton or cotton-acrylic worsted yarn. Cotton holds its shape under the weight of the rolls and copes well with bathroom humidity. Avoid fuzzy or very stretchy yarns, because the pockets will sag.
- Color A, Taupe: 150 g, about 285 m
- Color B, Cream: 60 g, about 114 m
These quantities include a margin of about 15 percent for your swatch and for small differences in tension.
Tools:
- 5 mm (H-8) crochet hook
- 1 wooden ring, 3.5 in (8.9 cm) outer diameter, about 2.75 in (7.0 cm) inner diameter
- Tapestry needle
- 6 locking stitch markers
- Rust-proof pins
- Measuring tape
- Scissors
Abbreviations (US Terms)
- ch: chain
- sc: single crochet
- sc2tog: single crochet 2 together (insert hook in next st, pull up a loop, insert hook in following st, pull up a loop, yarn over and draw through all 3 loops)
- BLO: back loop only
- sl st: slip stitch
- st(s): stitch(es)
- MR: magic ring
- RS / WS: right side / wrong side
Special technique, clean color change: Work the last sc of the old color until 2 loops remain on the hook. Then yarn over with the new color and pull through. In rounds, carry the unused color loosely inside the pocket. In rows, carry it up the right-hand edge, where the border will cover it.
Gauge and Checkpoints
Gauge: 14 sc and 16 rows = 4 in (10.2 cm) in sc worked in rows.
Begin with one pocket, not the panel. A pocket is quick to make and tests your round gauge, the fit of the roll, and how the stripes look, all at once.
Checkpoints:
- Pocket base after Round 4 (24 sts): 2.2 in (5.6 cm) across
- Pocket base after Round 8 (48 sts): 4.4 in (11.2 cm) across
- Pocket after Round 22: 3.5 in (8.9 cm) tall, with a 13.7 in (34.8 cm) circumference
- Panel after Row 28: 6 in (15.2 cm) wide, 7 in (17.8 cm) long
- Panel after Row 84: 21 in (53.3 cm) long
If your piece is too big, change to a 4.5 mm hook. If it is too small, change to a 5.5 mm hook. Before you start the panel, check that a roll slides into the pocket easily and does not stretch the wall. The pocket needs to be a little loose for the roll to come out easily.

Backing Panel
Work in rows. Ch 1 at the start of each row does not count as a stitch. Turn at the end of every row.
Stripe sequence: 2 rows A, 2 rows B. Repeat.
With A, ch 22.
Row 1 (RS): Sc in 2nd ch from hook and in each ch across. Turn. (21 sts)
Row 2: Ch 1, sc in each st across. Turn. (21 sts)
Rows 3–84: Repeat Row 2, following the stripe sequence. Rows 3–4 are B, Rows 5–6 are A, and so on. Row 84 ends a B stripe. (21 sts in every row)
Checkpoint: 6 in x 21 in (15.2 cm x 53.3 cm). That is 21 full stripe repeats.
Taper
Each decrease row removes 1 st at each end.
Row 85 (A): Ch 1, sc2tog, sc in each st to last 2 sts, sc2tog. (19 sts)
Row 86 (A): Ch 1, sc in each st across. (19 sts)
Row 87 (B): Repeat Row 85. (17 sts)
Row 88 (B): Repeat Row 86. (17 sts)
Row 89 (A): Repeat Row 85. (15 sts)
Row 90 (A): Repeat Row 86. (15 sts)
Row 91 (B): Repeat Row 85. (13 sts)
Row 92 (B): Repeat Row 86. (13 sts) Cut B.
Row 93 (A): Repeat Row 85. (11 sts)
Row 94 (A): Repeat Row 86. (11 sts)
The taper adds 2.5 in (6.4 cm) to the length.
Hanging Tab
Rows 95–110 (A): Ch 1, sc in each st across. (11 sts in every row)
Fasten off. The tab measures 3.1 in (7.9 cm) wide and 4 in (10.2 cm) long. The panel before the border measures 6 in x 27.5 in (15.2 cm x 69.9 cm).
Pockets (Make 3)
Work in joined rounds with the RS facing you. Ch 1 at the start of a round does not count as a stitch. Join each round with a sl st to the first sc. Keep the joins lined up, because they will be hidden against the panel.
Base (A)
Round 1: 6 sc in MR. Join. (6 sts)
Round 2: 2 sc in each st. Join. (12 sts)
Round 3: Sc in next st, 2 sc in next st, repeat 6 times. Join. (18 sts)
Round 4: Sc in next 2 sts, 2 sc in next st, repeat 6 times. Join. (24 sts)
Round 5: Sc in next 3 sts, 2 sc in next st, repeat 6 times. Join. (30 sts)
Round 6: Sc in next 4 sts, 2 sc in next st, repeat 6 times. Join. (36 sts)
Round 7: Sc in next 5 sts, 2 sc in next st, repeat 6 times. Join. (42 sts)
Round 8: Sc in next 6 sts, 2 sc in next st, repeat 6 times. Join. (48 sts)
Walls
Round 9 (A): Ch 1, sc BLO in each st. Join. (48 sts) The front loops left unworked form a ridge, and the wall turns upward here.
Rounds 10–22: Ch 1, sc in each st. Join. (48 sts in every round)
Wall colors: Round 10 is A. Rounds 11–12 are B, 13–14 are A, 15–16 are B, 17–18 are A, 19–20 are B, and 21–22 are A. That gives 14 wall rounds, which is 3.5 in (8.9 cm).
Round 23, rim (A): Sl st loosely in each st around. (48 sl sts) Fasten off and leave a 30 in (76.2 cm) tail for sewing.
Make All Pieces
- Panel: 1 (A and B)
- Pockets: 3 (A and B)
Layout (front view, top to bottom):
   [ ring ]
   [ tab  ]
  [ taper  ]
 [ Pocket 3 ]  base Row 61, rim Row 75
 [ Pocket 2 ]  base Row 33, rim Row 47
 [ Pocket 1 ]  base Row 5,  rim Row 19
 [  bottom  ]
Border (Panel Only)
Put the border on before sewing the pockets, so that you can count the rows cleanly.
Border gauge: One sc round adds 0.25 in (0.6 cm) on each edge. That brings the panel to 6.5 in x 28 in (16.5 cm x 71.1 cm).
With the RS facing and A, join in the first st of Row 110.
Round 1:
- Top edge (Row 110): 3 sc in first st, sc in next 9 sts, 3 sc in last st. (11 sts worked + 4 extra = 15 sc)
- Left side: Work 96 sc down the row ends. Work 14 sc across the 16 tab rows (7 sc for every 8 rows). Work 10 sc across the 10 taper rows (1 per row). Work 72 sc across Rows 84–1 (6 sc for every 7 rows). (96 sc)
- Bottom edge (foundation chain): 3 sc in first st, sc in next 19 sts, 3 sc in last st. (21 sts worked + 4 extra = 25 sc)
- Right side: Work 96 sc up the row ends, mirroring the left side (72 + 10 + 14). Catch the carried yarn strands inside these stitches. (96 sc)
Join with a sl st to the first sc. (Total: 15 + 96 + 25 + 96 = 232 sc)
The side counts do not include the corner groups, which are already counted in the top and bottom totals.
Why the math works: At gauge, 14 sts equal 16 rows, a ratio of 0.875 sts per row. On the straight sides, 6 sc per 7 rows (0.857) lies flat and keeps the edges slightly firm so they don’t flare. The tab uses the exact ratio of 7 per 8 rows. The taper rows are diagonal, so each one is a little longer than a straight row, and 1 sc per row fills them without cupping.
Joining
Use whipstitch with the pocket’s long tail, going through both loops on the pocket and one full stitch on the panel. Place a marker on each pocket’s join so that the join seam sits at the back.
Stitch-to-stitch logic: Each pocket has a flat back of 19 sts, which is 5.4 in (13.7 cm). That matches panel sts 2–20 of the original 21-st rows, leaving 1 st on each side plus the border. The other 29 sts curve forward to make the cup.
- Pin the bottom pocket so that 19 sts of Round 9 (the base ridge) lie along panel Row 5, sts 2–20. This is 1.25 in (3.2 cm) up from the finished bottom edge.
- Whipstitch these 19 base sts to the 19 panel sts, one to one.
- Sew the 19 matching rim sts of Round 23 to Row 19, sts 2–20.
- Sew the two vertical sides of the back down the panel, from Row 5 to Row 19, one wall round to each panel row. The 14 rounds match the 14 rows exactly.
- Repeat for Pocket 2 (Rows 33–47) and Pocket 3 (Rows 61–75). The bases are 7 in (17.8 cm) apart.
Tension: Pull each stitch snug but not tight. If the panel puckers, the stitching is too tight. If you can see gaps, the stitches are too far apart.
Folding the tab: Pass the tab through the ring from front to back. The 3.6 in (9.1 cm) bordered tab gathers softly inside the 2.75 in (7.0 cm) opening. Fold 2 in (5.1 cm) down behind and whipstitch the top edge across the back of the panel.
Size checkpoint: The holder hangs 26 in (66.0 cm) below the ring, and there is 3.5 in (8.9 cm) of panel between one pocket rim and the next pocket’s base.
Final Blocking
- Lay the holder face down on a towel.
- Pin the panel to 6.5 in x 28 in (16.5 cm x 71.1 cm) before folding. If the tab is already sewn, pin to 26 in (66.0 cm) below the ring.
- Fill each pocket with a roll wrapped in a plastic bag so the pocket keeps its round shape.
- Hover a steam iron 1 in (2.5 cm) above the fabric. Do not press it.
- Let it dry completely, at least 4 hours, before you unpin it.
Final Quality-Control Checklist
- Panel is 6.5 in (16.5 cm) wide along its whole straight section
- Border count is 232 sc, and the corners lie flat
- The taper is symmetrical on both sides
- Every pocket has 48 sts and the base ridge is clearly visible
- The pockets are centered, square to the panel, and spaced 7 in (17.8 cm) apart
- Joining seams are hidden at the back of each pocket
- The tab is sewn securely, and the ring hangs straight
- All tails are woven in at least 2 in (5.1 cm)
Troubleshooting
- Pockets sag forward: Your gauge is too loose. Go down a hook size, or sew the vertical side seams more firmly.
- Roll is too tight: Add 1 increase round (54 sts) and keep the back at 19 sts.
- Panel edges wave: You worked too many border sc on the sides. Use 5 sc per 6 rows instead.
- Panel edges pull in: You worked too few border sc. Use 1 sc per row on the straight sides.
- Stripes jog in the pockets: This is normal in joined rounds. Keep the joins at the back.
- Panel twists: Block it again and check that each pocket was sewn to the same stitch columns.
Care
Hand wash in cool water with a mild detergent, then press out the water in a towel. Dry the holder flat with the pockets stuffed so they keep their shape.
Final Notes
The measurements build on each other in order. Gauge is 14 sts and 16 rows to 4 in (10.2 cm). That makes a 21-st panel 6 in (15.2 cm) wide and 27.5 in (69.9 cm) long, and the 232-st border brings it to 6.5 in x 28 in (16.5 cm x 71.1 cm). Each pocket is 48 sts around and 3.5 in (8.9 cm) tall, and it is sewn across 19 panel sts and 14 panel rows. Folding the tab over the ring gives a hanging length of 26 in (66.0 cm). If your swatch is accurate, every later step will fit.
Happy crocheting!