

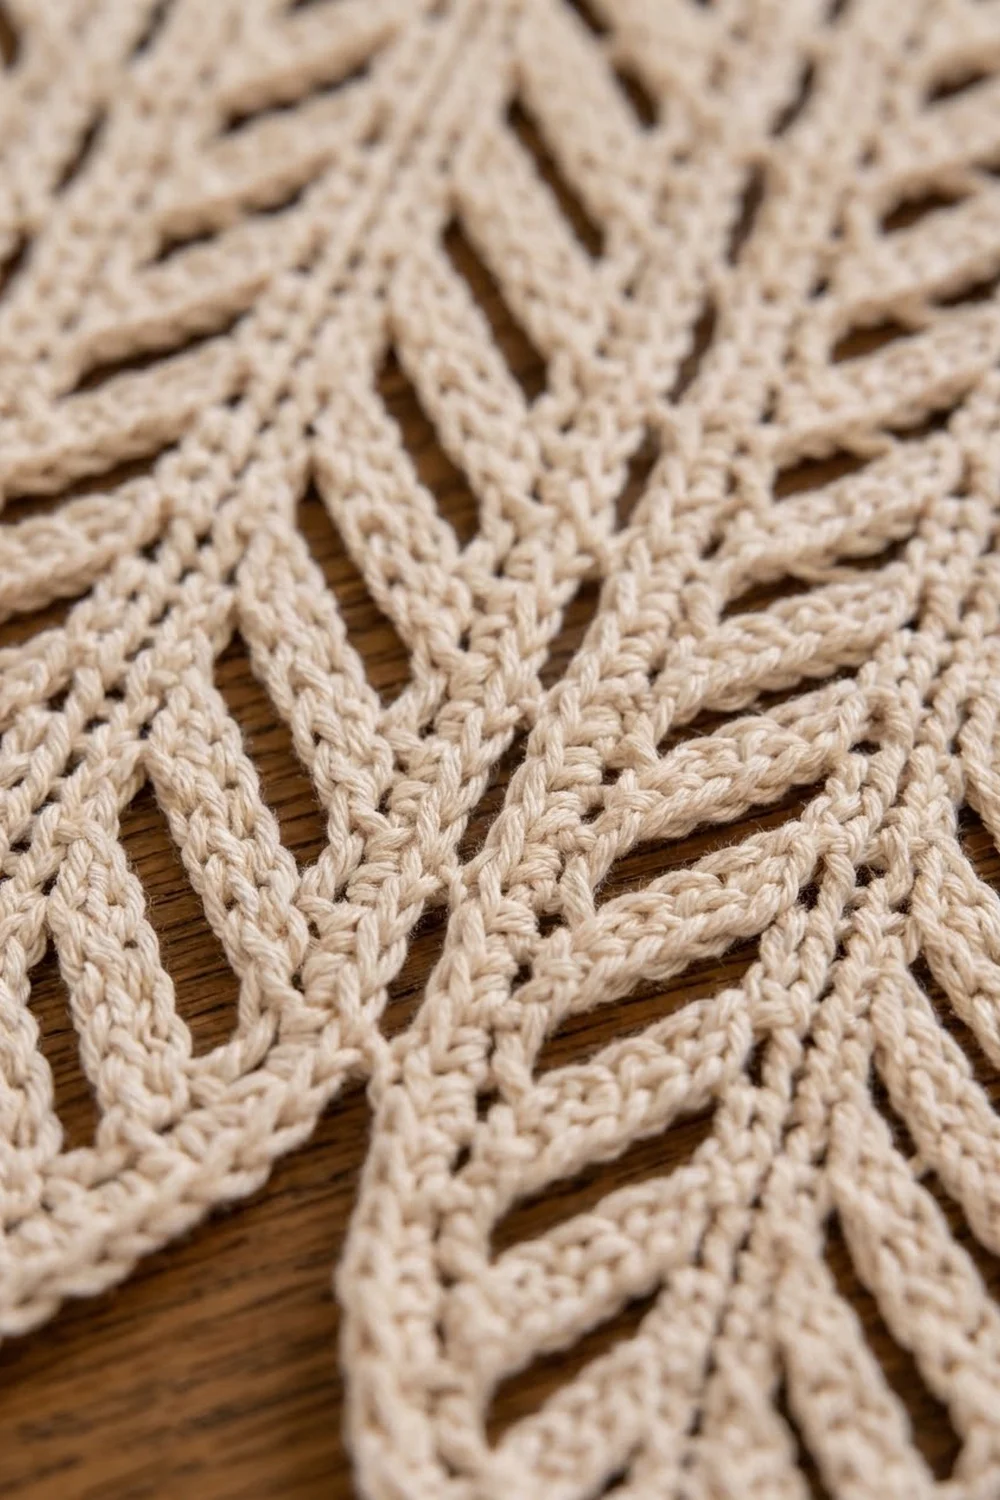
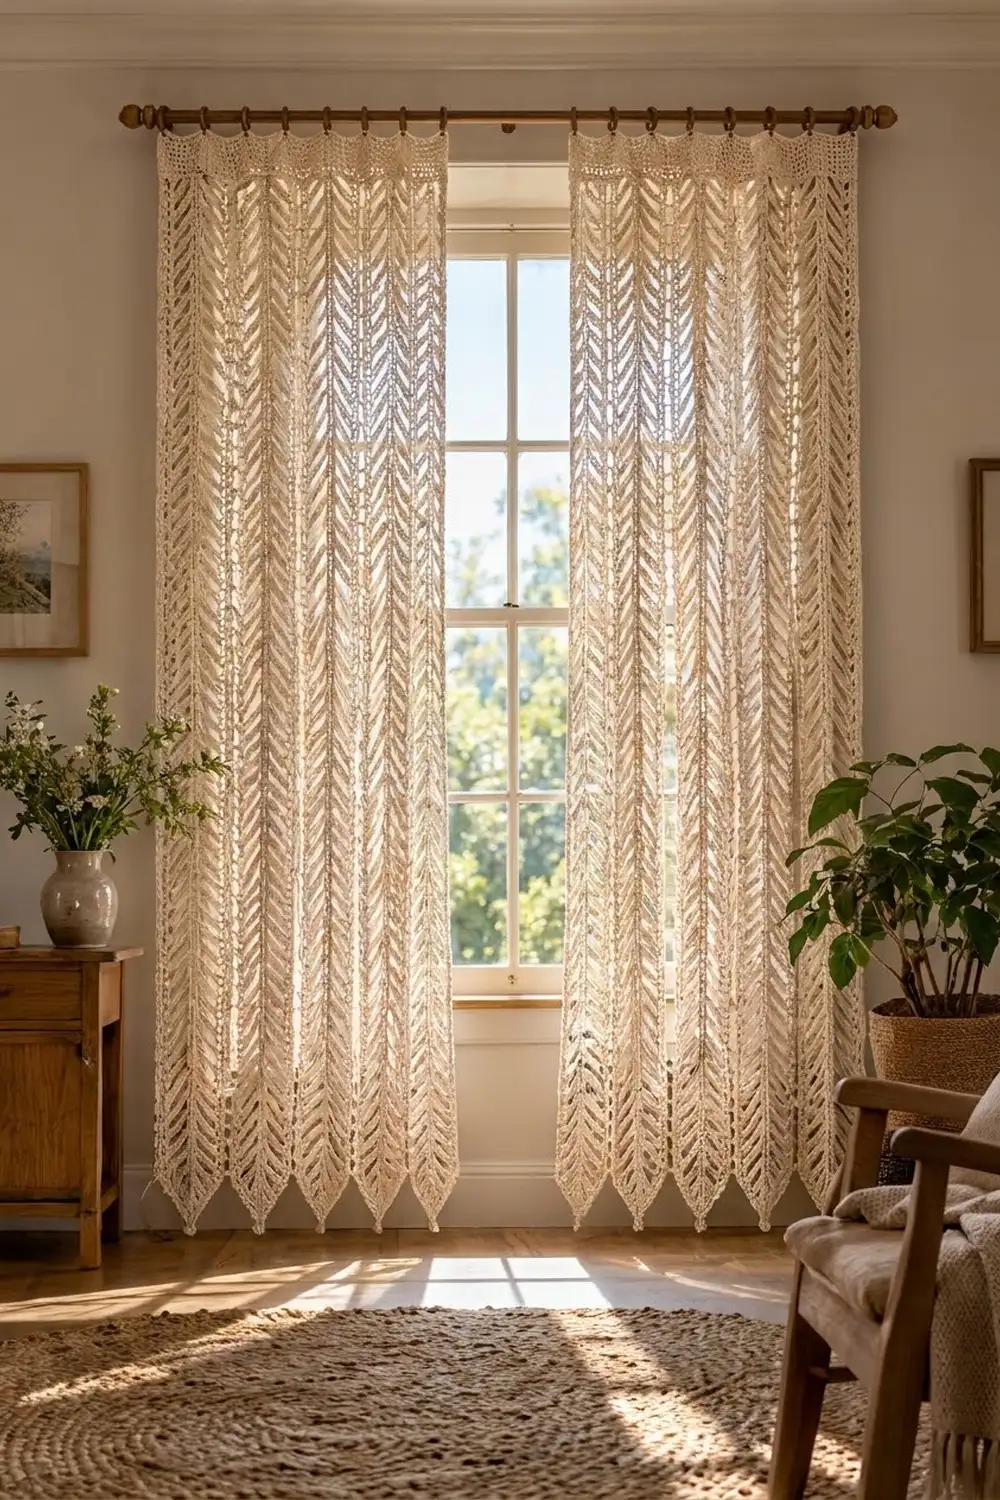
The Willow Feather Curtain is a light, airy panel made from long leaf-shaped strips. Each strip has a solid center spine with open slots running up and out from it on both sides, like the veins of a feather. The strips are joined side by side, and their pointed tips form a zigzag hem.
The sample uses a single shade of natural cream cotton, which lets light through and suits a relaxed, boho or farmhouse room. All instructions use US crochet terms.
One finished panel measures 46.2 in (117.3 cm) wide by 78.0 in (198.1 cm) long, including the top band. To make a pair like the one shown, make two panels.
Each strip is worked flat from the top down. You work a fixed-width body, shape a pointed tip, and then work a single-crochet edging round. Seven strips are joined along their straight sides, and a solid top band finishes the panel and holds the clip rings.
Finished Size and Construction
- Finished panel size: 46.2 in x 78.0 in (117.3 cm x 198.1 cm)
- Skill level: Intermediate
- Terminology: US terms
- Yarn weight: DK (#3) cotton
- Hook: 4.0 mm (US G-6)
- Number of pieces: 7 strips per panel (14 for a pair)
- Layout: 7 strips in 1 row, side by side
- Strip size after edging: 6.6 in x 77.0 in (16.8 cm x 195.6 cm)
- Size before border: 46.2 in x 77.0 in (117.3 cm x 195.6 cm)
- Border depth: a top band 1.0 in (2.5 cm) deep
Materials
Yarn: Use a smooth DK cotton or cotton blend with good stitch definition. Mercerized or combed cotton keeps the slots crisp. Avoid fuzzy yarns, because they blur the openwork.
- Cream/ecru: 750 g, about 1,650 m, per panel
- For a pair: 1,500 g, about 3,300 m
These quantities include a margin of roughly 10% for your gauge swatch, seams and tails.
Tools:
- 4.0 mm (US G-6) crochet hook
- Tapestry needle
- Stitch markers
- Tape measure
- Rust-proof pins and blocking mats (or a clean floor and towels)
- 8 curtain clip rings per panel
Abbreviations (US Terms)
- ch – chain
- sc – single crochet
- dc – double crochet
- sk – skip
- st(s) – stitch(es)
- sl st – slip stitch
- sc2tog – single crochet 2 together
- sc3tog – single crochet 3 together
- dc2tog – double crochet 2 together
- RS / WS – right side / wrong side
Special stitch, Beg dc2tog (beginning decrease): Ch 2, then dc in the next st. The ch-2 sits on the first st and the dc uses the second, so 2 sts become 1. The ch-2 counts as part of the decrease.
Stitch counting note: On every row, count each chain as 1 stitch. The sc rows are worked into every stitch, including chains, so the count always matches the row below.
Gauge and Checkpoints
Gauge: In pattern, 20 sts and 10 rows (5 bar rows plus 5 sc rows) = 4 in x 3 in (10.2 cm x 7.6 cm).
Each sc row is 0.2 in (0.5 cm) tall. Each bar row plus sc row pair is 0.6 in (1.5 cm). One 6-row repeat is 1.8 in (4.6 cm).
Test one piece first. Work Row 1 and one repeat (Rows 2–7) as your swatch. It should measure 6.2 in (15.7 cm) wide by 2.0 in (5.1 cm) tall.
Checkpoints:
- After Row 7: 6.2 in x 2.0 in (15.7 cm x 5.1 cm)
- After 10 repeats: 18.2 in (46.2 cm) long
- End of body (40 repeats): 72.2 in (183.4 cm) long
- Tip: 4.4 in (11.2 cm) long
- Strip before edging: 76.6 in (194.6 cm) long
- Strip after edging: 6.6 in x 77.0 in (16.8 cm x 195.6 cm)
If your swatch is too big, go down one hook size. If it is too small, go up one size. If only the length is off, keep your hook and change the number of repeats instead: each repeat adds or removes 1.8 in (4.6 cm). Every strip must have the same number of repeats.
Strip Pattern
Row Layout
Every full-width row has 31 sts, made up of:
- 2 edge sts
- 12 side sts
- 3 spine sts
- 12 side sts
- 2 edge sts
Each bar row moves its dc one stitch closer to the spine than the bar row before it. Because you work top-down, the bars climb outward from the spine when the strip hangs, which creates the feather slant.
Body
Foundation: Ch 32.
Row 1 (WS): Sc in the 2nd ch from hook and in each ch across, turn. (31 sc)
Row 2 (RS, Bar Row Type 1):
- Ch 3 (counts as dc), dc in the next st.
- [Dc in next st, ch 2, sk 2] 4 times.
- Dc in each of the next 3 sts (spine).
- [Ch 2, sk 2, dc in next st] 4 times.
- Dc in the last 2 sts, turn.
(31 sts: 2 + 12 + 3 + 12 + 2)
Row 3 (WS): Ch 1 (does not count), sc in each st and each ch across, ending in the top of the turning ch, turn. (31 sc)
Row 4 (RS, Bar Row Type 2):
- Ch 3, dc in the next st.
- Ch 1, sk 1, [dc in next st, ch 2, sk 2] 3 times, dc in next st, ch 1, sk 1.
- Dc in each of the next 3 sts.
- Ch 1, sk 1, dc in next st, [ch 2, sk 2, dc in next st] 3 times, ch 1, sk 1.
- Dc in the last 2 sts, turn.
(31 sts)
Row 5: Repeat Row 3. (31 sc)
Row 6 (RS, Bar Row Type 3):
- Ch 3, dc in the next st.
- Ch 2, sk 2, [dc in next st, ch 2, sk 2] 3 times, dc in next st.
- Dc in each of the next 3 sts.
- Dc in next st, [ch 2, sk 2, dc in next st] 3 times, ch 2, sk 2.
- Dc in the last 2 sts, turn.
(31 sts)
Row 7: Repeat Row 3. (31 sc)
Rows 8–241: Repeat Rows 2–7 another 39 times. That makes 40 repeats in total, and you end on a WS sc row. (31 sc)
Check here: the strip should be 72.2 in (183.4 cm) long and 6.2 in (15.7 cm) wide.
Pointed Tip
On every tip row, you decrease 1 st at each edge, while the 3 spine dc stay centered. On bar rows, work the second side as a mirror of the first: do the steps in reverse order and finish with dc2tog over the last 2 sts.
Sc row rule: Ch 1, sc2tog, sc in each st and ch across to the last 2 sts, sc2tog, turn.
Tip Row 1 (RS): Beg dc2tog, [ch 2, sk 2, dc in next st] 4 times, dc in next 3 sts, mirror, turn. (29 sts)
Tip Row 2: Work the sc row rule. (27 sts)
Tip Row 3: Beg dc2tog, ch 1, sk 1, [ch 2, sk 2, dc in next st] 3 times, dc in next 3 sts, mirror. (25 sts)
Tip Row 4: Sc row rule. (23 sts)
Tip Row 5: Beg dc2tog, dc in next st, ch 1, sk 1, [ch 2, sk 2, dc in next st] 2 times, dc in next 3 sts, mirror. (21 sts)
Tip Row 6: Sc row rule. (19 sts)
Tip Row 7: Beg dc2tog, [ch 2, sk 2, dc in next st] 2 times, dc in next 3 sts, mirror. (17 sts)
Tip Row 8: Sc row rule. (15 sts)
Tip Row 9: Beg dc2tog, dc in next st, ch 2, sk 2, dc in next st, dc in next 3 sts, mirror. (13 sts)
Tip Row 10: Sc row rule. (11 sts)
Tip Row 11: Beg dc2tog, ch 1, sk 1, dc in next st, dc in next 3 sts, mirror. (9 sts)
Tip Row 12: Sc row rule. (7 sts)
Tip Row 13: Beg dc2tog, dc in next 3 sts, dc2tog. (5 sts)
Tip Row 14: Sc row rule. (3 sts)
Tip Row 15: Ch 1, sc3tog. (1 st) Do not fasten off.
Check here: the tip should be 4.4 in (11.2 cm) long, and the whole strip 76.6 in (194.6 cm) long.
Edging Round (outline)
Turn so the RS is facing. Work in this order, around the whole strip:
- 3 sc in the point st.
- Up the first tip edge: 22 sc (2 sc in each bar-row end, 1 sc in each sc-row end).
- Up the first body side: 361 sc, using the same rule. There are 121 sc-row ends and 120 bar-row ends, so 121 + 240 = 361.
- Across the top, working into the foundation chains: 2 sc in the first ch, sc in the next 29 ch, 2 sc in the last ch. (33 sc)
- Down the second body side: 361 sc.
- Down the second tip edge: 22 sc.
- Sl st to the first sc and fasten off.
Round total: 3 + 22 + 361 + 33 + 361 + 22 = 802 sc.
The edging adds 1 st on each side, so the width becomes 33 sts, or 6.6 in (16.8 cm). It also adds 0.2 in (0.5 cm) at the top and at the point, so the length becomes 77.0 in (195.6 cm).
Make All Pieces
- One panel: 7 strips, all cream, each with 40 repeats and the same tip.
- A pair: 14 strips.
Put a marker on the RS of each strip. Before joining, lay all 7 strips together and check that their lengths match within 0.4 in (1.0 cm).
Layout grid (one panel, top edge at the top, tips at the bottom):
[S1][S2][S3][S4][S5][S6][S7]
 V   V   V   V   V   V   V
Joining
Method: Slip-stitch seam on the WS.
- Hold S1 and S2 with RS together and the top edges lined up.
- Starting at the top corner, sl st through both loops of both layers, matching the 361 side sc of one strip to the 361 side sc of the other, stitch for stitch.
- Stop where the body ends and the tip shaping begins. The 22 tip sts on each strip stay free, so the points hang separately.
- Fasten off.
- Join S3 to S2 the same way, and continue until all 6 seams are done.
Tension: Keep the slip stitches as loose as the edging itself. A tight seam pulls the panel and makes it pucker. If the seam ripples, go up one hook size for joining only.
Checkpoint: The joined panel should measure 46.2 in x 77.0 in (117.3 cm x 195.6 cm). The width is 7 strips x 33 sts = 231 sts at 5 sts per inch.
Border (Top Band)
The side and hem edges are already finished by each strip’s edging round, so the border is a solid band across the top only.
Border gauge: 5 sc and 5 rows = 1 in (2.5 cm).
Row 1 (RS): Join the yarn at the top-right corner. Sc in each edging sc across the top of all 7 strips, adding no stitches at the seams, turn. (7 x 33 = 231 sc)
Rows 2–5: Ch 1, sc in each st across, turn. (231 sc)
Fasten off after Row 5.
- Top edge count: 231 sts on every row.
- Side counts: 5 row ends on each side. These add no width.
Why the math works: Each strip already contributes 33 sts across its top, including its corner increases. Because you add nothing at the seams, 7 x 33 = 231. At 5 sts per inch that is 46.2 in (117.3 cm), exactly the joined width, so the band lies flat without gathering or flaring. Five rows at 0.2 in (0.5 cm) each give the 1.0 in (2.5 cm) band and bring the panel to 78.0 in (198.1 cm).
Final Blocking
- Soak the panel in cool water with a little wool wash for 15 minutes.
- Press out the water by rolling it in towels. Never wring it.
- Lay it flat on mats or a clean, towel-covered floor.
- Pin the top band straight at 46.2 in (117.3 cm).
- Pin each seam line straight and parallel. Check that each strip is 6.6 in (16.8 cm) wide.
- Pin each tip to a sharp point, with the spine centered.
- Open the slots gently with your fingers so the bars sit at an even angle.
- Let it dry completely, then unpin.
Final Quality-Control Checklist
- All strips have 40 repeats and identical tips.
- Each bar row has 31 sts and each sc row has 31 sc.
- The spine is a straight, unbroken column of 3 sts.
- The slots slant the same way on every strip.
- Each edging round has 802 sc.
- Seams are flat, and all tips hang free.
- The top band has 231 sc on every row.
- The panel measures 46.2 in x 78.0 in (117.3 cm x 198.1 cm).
- All ends are woven into the solid stitches, not the slots.
Troubleshooting
- Strip narrows or widens: Count 31 sts after every row. Chains count as stitches.
- Slots don’t slant: Check the bar row order: Type 1, then 2, then 3.
- Tip is off-center: Make sure the mirror side reverses the first side exactly.
- Edges wave: Use 2 sc per bar-row end, not 3.
- Panel puckers at the seams: Loosen the slip stitches or use a larger hook for joining.
- Strips differ in length: Block them to match, or add or remove one repeat per strip.
Care
Hand wash cool or machine wash on a gentle cycle in a mesh bag. Lay flat to reshape and dry, and never hang it wet, because the long strips will stretch.
Final Notes
The measurement chain:
- The swatch is 6.2 in x 2.0 in (15.7 cm x 5.1 cm).
- The body reaches 72.2 in (183.4 cm).
- The tip adds 4.4 in (11.2 cm).
- The edging brings each strip to 6.6 in x 77.0 in (16.8 cm x 195.6 cm).
- Seven joined strips give 46.2 in (117.3 cm) of width.
- The 1.0 in (2.5 cm) band finishes the panel at 78.0 in (198.1 cm).
Check each stage and the next one follows. Happy crocheting!