

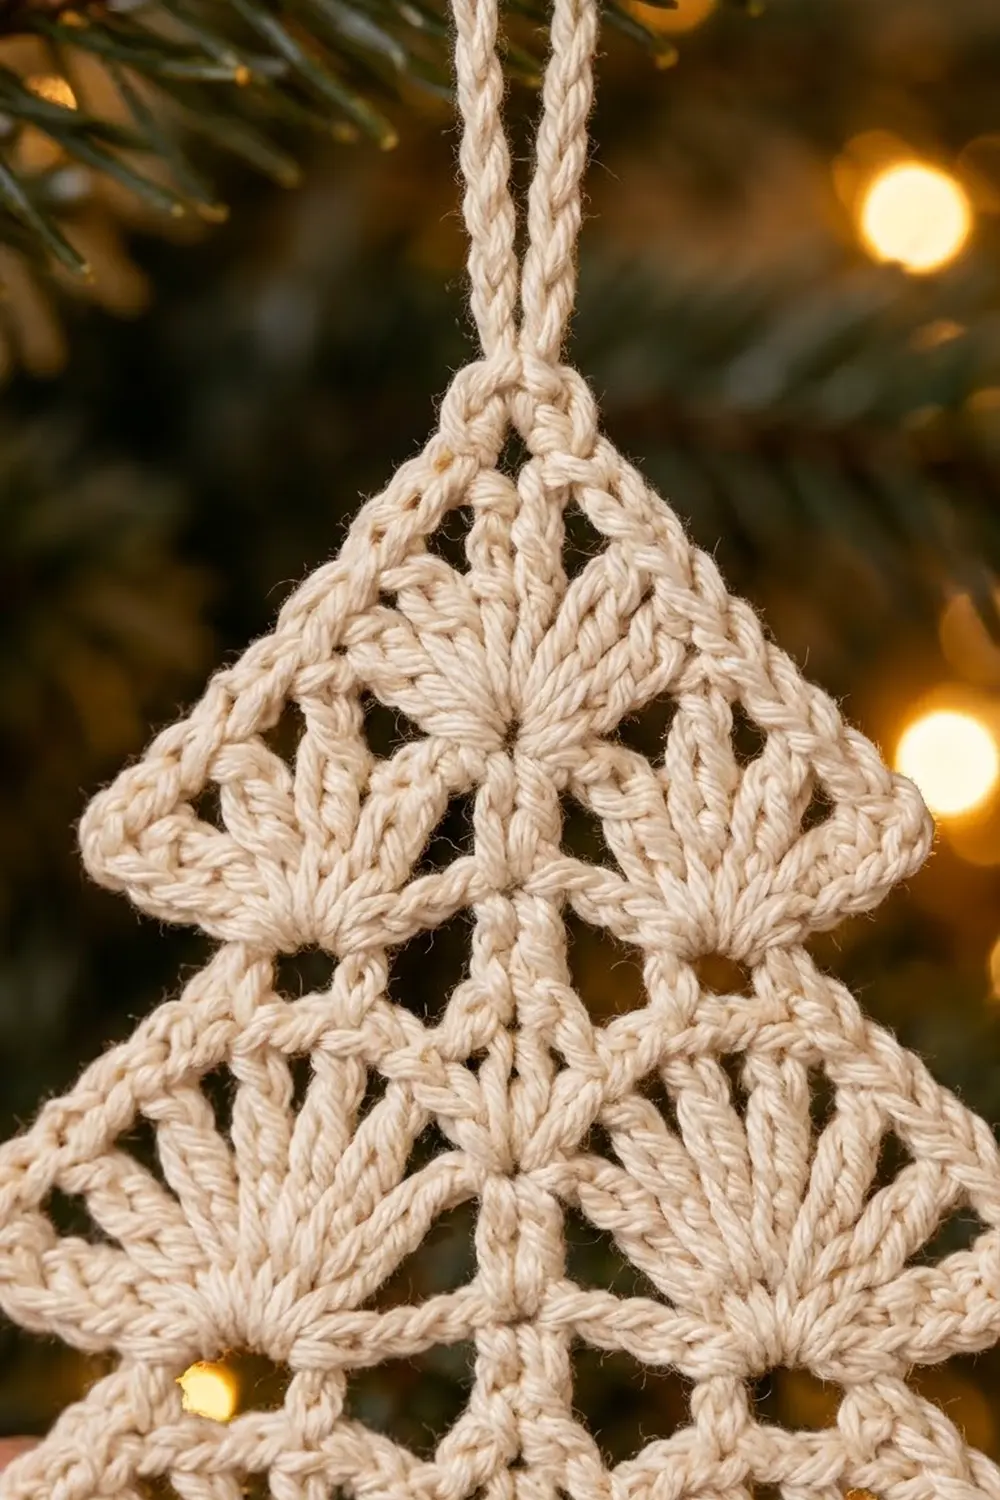
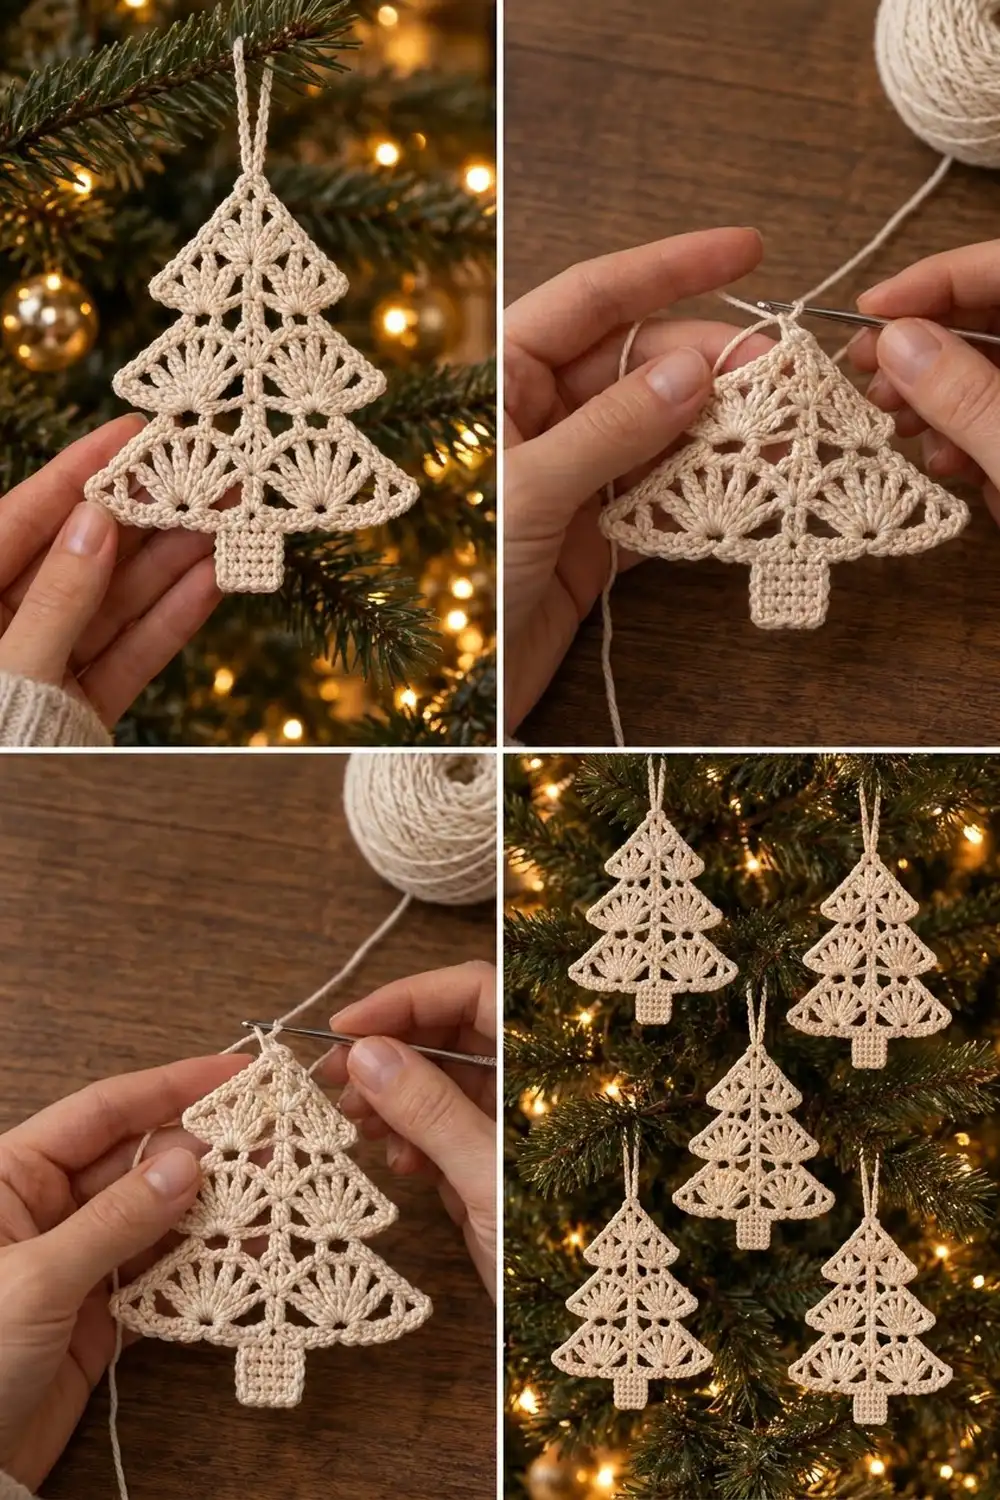
The Frosted Fan Christmas Tree is a lacy, flat ornament with three stacked tiers. Each tier has a pair of fans on either side of a center spine, with chain arches above them that meet in soft Y-shapes. A square single-crochet trunk sits at the bottom, a rope-textured edge outlines the whole tree, and a cord loop at the top lets it hang.
This pattern uses one color: cream or ivory cotton. That keeps it looking like snowy lace against green branches, and the stitch texture stays easy to see. It also makes a good gift tag, card topper, or window decoration.
The pattern uses US crochet terms. The finished ornament measures 4 in (10.2 cm) wide and 4.7 in (11.9 cm) tall without the loop. With the 1.5 in (3.8 cm) loop it is 6.2 in (15.7 cm) tall.
You work the tree in one piece from the bottom up. Each tier is a foundation row, a fan row, and narrowing mesh rows. Each new tier starts by extending past the edges of the tier below, which makes the notched sides. Then you add the trunk to the underside of the first tier, work two border rounds, and finish with the hanging loop.
Finished Size and Construction
- Finished size: 4 in (10.2 cm) wide x 4.7 in (11.9 cm) tall; 6.2 in (15.7 cm) including the loop
- Skill level: Intermediate (uses foundation single crochet to extend rows)
- Terminology: US
- Yarn weight: Fingering-weight cotton (similar to size 3 crochet thread)
- Hook: 2.5 mm
- Number of pieces: 1
- Layout: Single flat ornament worked bottom-up in turned rows
- Piece size before border: 3.6 in (9.1 cm) wide x 4.3 in (10.9 cm) tall
- Border depth: 0.2 in (0.5 cm) on every edge (2 rounds)
Materials
Yarn: Use a smooth, mercerized fingering-weight cotton so the fans and arches stay crisp. Fuzzy or very soft yarns blur the lace.
- Cream/ivory: 8 g, about 27 m (30 yd) per ornament
The amount includes about a 50% margin for your gauge swatch, joining, and weaving in ends. One ornament uses about 5 g.
Tools:
– 2.5 mm crochet hook
– Tapestry needle
– Scissors
– Rustproof pins and a foam blocking mat
– Spray bottle with water
– Optional: fabric stiffener or starch spray
Abbreviations (US Terms)
- ch – chain
- sl st – slip stitch
- sc – single crochet
- dc – double crochet
- sc3tog – single crochet 3 together
- rev sc – reverse single crochet (crab stitch)
- fsc – foundation single crochet
- sp(s) – space(s)
- st(s) – stitch(es)
- RS – right side
Special stitch: fsc extension. Use this to add stitches at the end of a row without chaining first. Insert your hook into the base (the “chain” part) of the last sc you made. Yarn over, pull up a loop, yarn over, and pull through 1 loop (this makes the new base chain). Yarn over and pull through both loops. That is 1 fsc. For each next fsc, insert your hook into the base chain of the fsc you just made.
Reverse sc: Work single crochet from left to right (left-handed crocheters work right to left), inserting your hook into the next stitch to the right. This makes a twisted, rope-like edge.
Gauge and Checkpoints
Gauge: 14 sc x 16 rows = 2 in (5.1 cm) in rows of sc.
Make one full ornament before you plan a batch. Thread lace can be hard to judge from a swatch, so check these measurements as you go:
- Tier 1, Row 1 (25 sc): 3.6 in (9.1 cm) wide
- End of Tier 1: about 1 in (2.5 cm) tall
- Tier 2, Row 1 (19 sc): 2.7 in (6.9 cm) wide
- End of Tier 2: about 2 in (5.1 cm) total height
- Tier 3, Row 1 (15 sc): 2.1 in (5.3 cm) wide
- End of Tier 3: about 3.4 in (8.6 cm) total height
- After trunk: 4.3 in (10.9 cm) tall; the trunk alone is 0.7 in (1.8 cm) wide x 0.9 in (2.3 cm) tall
- After border: 4 in (10.2 cm) x 4.7 in (11.9 cm)
If your ornament is too big, go down to a 2.25 mm hook. If it is too small, go up to a 2.75 mm hook. Don’t add or remove stitches: the fan placement and border counts depend on the exact numbers.
Tier 1 (Bottom Tier)
Row 1: Ch 26. Sc in the 2nd ch from hook and in each ch across. (25 sc)
Check: 3.6 in (9.1 cm) wide. Count the stitches as sts 1–25. St 13 is the center.
Row 2 (fans): Ch 1, turn. Sc in st 1, skip the next 5 sts, 9 dc in st 7, skip the next 5 sts, dc in st 13 (this is the spine), skip the next 5 sts, 9 dc in st 19, skip the next 5 sts, sc in st 25. (21 sts: 2 sc, two 9-dc fans, 1 spine dc)
Each fan opens upward from one base stitch. That is what gives the radiating fans in the lower half of the tier.
Row 3 (arches): Ch 1, turn. Sc in the first sc, ch 4, sc in the 5th (center) dc of the first fan, ch 4, sc in the spine dc, ch 4, sc in the 5th dc of the next fan, ch 4, sc in the last sc. (5 sc, 4 ch-4 sps)
Row 4 (narrowing): Ch 1, turn. Sl st in the first sc and the next 2 ch. Ch 1, sc in the same sp. [Ch 4, sc in the next ch-4 sp] 3 times. (4 sc, 3 ch-4 sps)
These arches meet above the fans and form the Y-shapes. Do not fasten off.
Tier 2 (Middle Tier)
Row 1 (extension row): Ch 4, turn. Sc in the 2nd ch from hook and in the next 2 ch (3 sc). Sc in the next sc, 3 sc in the next ch-4 sp; repeat from * 2 more times, sc in the last sc (13 sc worked into Row 4). Work 3 fsc. (19 sc total = 13 worked into existing sts + 3 new sts on each end)*
The middle sc of the 13 sits over the spine. The 3 new stitches on each end stick out past Tier 1 and make the first notch. Check: 2.7 in (6.9 cm) wide.
Row 2 (fans): Ch 1, turn. Sc in st 1, skip the next 3 sts, 7 dc in st 5, skip the next 4 sts, dc in st 10 (spine), skip the next 4 sts, 7 dc in st 15, skip the next 3 sts, sc in st 19. (17 sts)
Row 3: Ch 1, turn. Sc in the first sc, ch 3, sc in the 4th dc of the fan, ch 3, sc in the spine dc, ch 3, sc in the 4th dc of the next fan, ch 3, sc in the last sc. (5 sc, 4 ch-3 sps)
Row 4: Ch 1, turn. Sl st in the first sc and the next ch. Ch 1, sc in the same sp. [Ch 3, sc in the next ch-3 sp] 3 times. (4 sc, 3 ch-3 sps)
Tier 3 (Top Tier)
Row 1 (extension row): Ch 2, turn. Sc in the 2nd ch from hook (1 sc). Sc in the next sc, 3 sc in the next ch-3 sp; repeat from * 2 more times, sc in the last sc (13 sc). Work 1 fsc. (15 sc total = 13 worked into existing sts + 1 new st on each end)*
Check: 2.1 in (5.3 cm) wide.
Row 2 (fans): Ch 1, turn. Sc in st 1, skip the next 2 sts, 5 dc in st 4, skip the next 3 sts, dc in st 8 (spine), skip the next 3 sts, 5 dc in st 12, skip the next 2 sts, sc in st 15. (13 sts)
Row 3: Ch 1, turn. Sc in the first sc, ch 3, sc in the 3rd dc of the fan, ch 3, sc in the spine dc, ch 3, sc in the 3rd dc of the next fan, ch 3, sc in the last sc. (5 sc, 4 ch-3 sps)
Row 4: Ch 1, turn. Sl st in the first sc and the next ch. Ch 1, sc in the same sp. [Ch 3, sc in the next sp] 3 times. (4 sc, 3 sps)
Row 5: Repeat Row 4, working [ch 3, sc in the next sp] 2 times. (3 sc, 2 sps)
Row 6: Repeat Row 4, working [ch 3, sc in the next sp] once. (2 sc, 1 sp)
Row 7 (peak): Ch 1, turn. Sl st in the first sc and the next ch. Ch 1, sc in the same sp. (1 sc: the peak)
Fasten off and weave in the end. Check: 3.4 in (8.6 cm) tall.
Trunk
Hold the tree with the bottom edge of Tier 1 facing up. Find the center 5 loops on the underside of Row 1 (the loops below sts 11–15).
Row 1: Join yarn in the loop below st 11. Ch 1, sc in the same st and in the next 4 sts. (5 sc)
Rows 2–7: Ch 1, turn, sc in each st across. (5 sc)
Check: the trunk is 0.7 in (1.8 cm) wide x 0.9 in (2.3 cm) tall, and the whole piece is 4.3 in (10.9 cm) tall. Do not fasten off. The border starts here.
Border
Border gauge: One round of sc plus one round of rev sc adds 0.2 in (0.5 cm) to each edge. Along a straight edge, the border keeps the same 7 sts per inch as the main gauge.
Before you start, look at both sides of the piece and pick the neater one as the RS. The fans look almost the same from both sides.
Round 1 (sc): Ch 1, turn so the RS faces you.
- Trunk bottom: 2 sc in the first st, sc in the next 3 sts, 2 sc in the last st. (7 sc)
- Side A, going up the side:
- Trunk side: 1 sc in each of the 7 row ends (7)
- Tier 1 underside, moving outward: 1 sc in each of sts 10–2, then 3 sc in st 1 (12)
- Tier 1 slope: 1 sc in the end of Row 2, 4 sc in the end ch-4 sp of Row 3, 4 sc in the end ch-4 sp of Row 4 (9)
- Tier 2 overhang: 1 sc in each of the 2 inner extension sts, then 3 sc in the outer corner st (5)
- Tier 2 slope: 1 sc in the end of Row 2, 3 sc in the end sp of Row 3, 3 sc in the end sp of Row 4 (7)
- Tier 3 overhang: 3 sc in the single extension st (3)
- Tier 3 slope: 1 sc in the end of Row 2, 3 sc in each end sp of Rows 3, 4 and 5, then 1 sc in the end sc of Row 6 (11)
- Side A total: 54 sc
- Peak: 3 sc in the peak sc. (3)
- Side B: Mirror Side A going down: 11, 3, 7, 5, 9, 12, 7. (54)
Sl st to the first sc to join. (118 sc = 7 + 54 + 3 + 54)
Round 2 (rope edge): Ch 1. Do not turn. Rev sc in each st around. (118 rev sc) Sl st to the first st to join, and fasten off.
Hanging loop: Join yarn at the center stitch at the peak. Ch 24, then sl st in the same st. Ch 1 and work 32 sc over the ch-24 loop. Sl st to the base and fasten off. The loop hangs 1.5 in (3.8 cm) tall.
Why the math works:
– Each sc row end gets 1 sc. At 8 rows to 7 sts per inch, this lies flat on a short edge like the 7-row trunk.
– Each ch-4 sp gets 4 sc and each ch-3 sp gets 3 sc, so you work 1 sc per chain.
– Each outside corner gets 3 sc so the edge turns without cupping.
– Inside corners get no extra stitches, which keeps the notches sharp.
– Both sides use the same counts, so Round 1 is symmetrical and the peak sits exactly over the spine.
– Round 2 is a 1:1 round with no increases, so the count stays at 118.
Final Blocking
- Weave in all ends along the border or the spine, where they stay hidden.
- Spray the ornament until it is damp all the way through, but not dripping.
- Lay it RS up on the mat. Pin the trunk square at 0.7 in (1.8 cm) x 0.9 in (2.3 cm).
- Pin the Tier 1 corners 4 in (10.2 cm) apart, measured across the border.
- Pin the peak so the tree measures 4.7 in (11.9 cm) from the trunk bottom to the peak.
- Pin the corners of Tiers 2 and 3 straight out to the sides so the notches open evenly.
- Use a pin tip to lift each fan’s dc into an even half-circle, and straighten the chain arches.
- For a crisp hanging ornament, spray lightly with stiffener or starch.
- Leave it to dry completely before you unpin it, usually 6–12 hours.
Final Quality-Control Checklist
- The width is 4 in (10.2 cm) and the height is 4.7 in (11.9 cm) without the loop.
- Each tier has two even fans: 9 dc, 7 dc, and 5 dc from bottom to top.
- The spine dc, arch stitches, and peak line up in one vertical line.
- Both sides of each tier stick out by the same amount.
- The trunk is centered under sts 11–15 and sits square.
- The rope edge is even all the way around, with no gaps at the corners.
- The loop is firmly attached at the peak and the ornament hangs straight.
- All ends are woven in and trimmed.
Troubleshooting
The fans ruffle or cup. Your dc are too loose for the skipped stitches. Go down a hook size, or block the fans flatter.
The arches sag. Your chains are too long. Work the chains tighter than your other stitches.
The tiers lean to one side. You started an extension row on the wrong side, or miscounted the sts worked into Row 4. Recount 13 sts into Row 4 every time.
The border ripples. You added extra sc along the row ends. Use the exact section counts.
The border pulls in or puckers. You skipped corner increases. Make sure every outer corner has 3 sc.
The trunk is off-center. Count the underside loops again and join below st 11.
The ornament curls after blocking. Re-wet it, pin it more firmly, and use stiffener.
Care
Hand wash in cool water with mild soap, press the water out in a towel, and re-block flat. Store it flat or hanging, away from damp.
Final Notes
Here is the full measurement chain from start to finish:
– Gauge: 14 sc x 16 rows = 2 in (5.1 cm)
– Tier widths: 25 sc at 3.6 in (9.1 cm), 19 sc at 2.7 in (6.9 cm), and 15 sc at 2.1 in (5.3 cm)
– Stacked tiers: 3.4 in (8.6 cm) tall
– With the 0.9 in (2.3 cm) trunk: 3.6 in (9.1 cm) x 4.3 in (10.9 cm)
– After the 118-st border, which adds 0.2 in (0.5 cm) per edge: 4 in (10.2 cm) x 4.7 in (11.9 cm)
– With the loop: 6.2 in (15.7 cm) tall
If your gauge matches, every stage will land where it should. Make one ornament, check it against these numbers, and then make as many as you like for the tree.
Happy crocheting!