

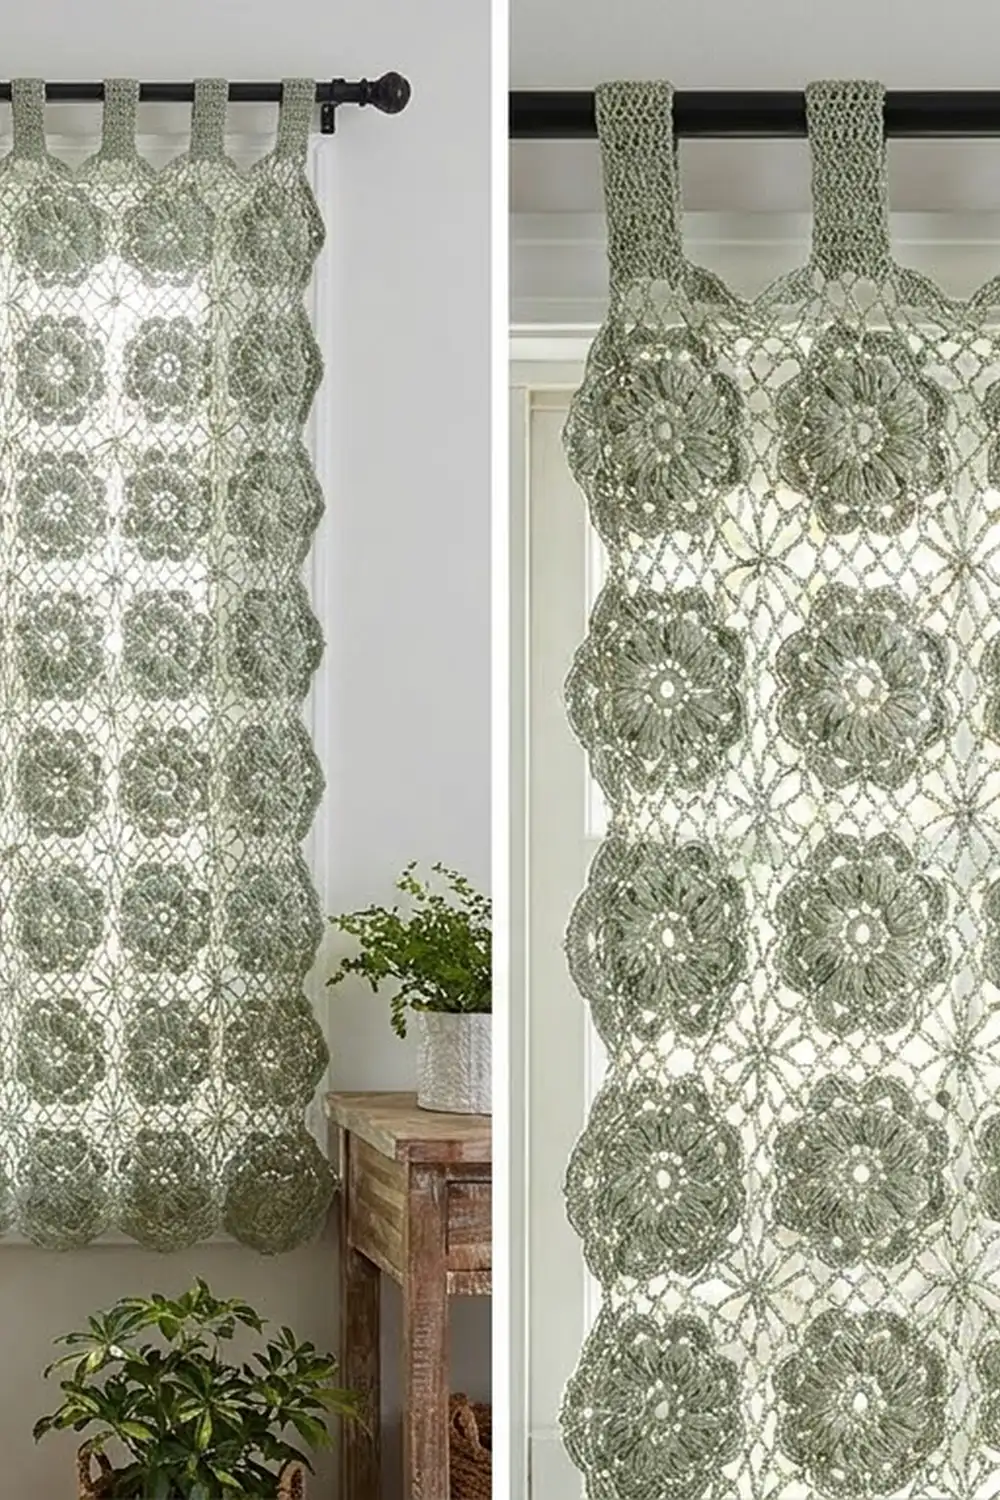
These curtains are made from round flower motifs in soft sage green. Each motif has a small open center, a ring of puffy cluster petals, a lacy middle and a scalloped edge. Joined in a grid, the motifs make an open lace that filters sunlight and looks good in a cottage or farmhouse room.
The pattern uses one color and a cotton yarn with clear stitch definition. It is written in US crochet terms.
Each finished panel measures 25.5 x 85.5 in (64.8 x 217.2 cm), not counting the hanging tabs. The tabs add about 2.75 in (7.0 cm) above the top edge. The pattern makes two panels.
How it’s built: you crochet 56 motifs per panel and join them as you go, at the scallop tips, into a grid 4 motifs wide and 14 motifs tall. Small filler stars close the gaps between motifs. A 3-round border straightens the edges and adds a shell trim, and 7 tabs are worked along the top.
Finished Size and Construction
- Finished panel size: 25.5 x 85.5 in (64.8 x 217.2 cm), plus tabs
- Skill level: Intermediate
- Terminology: US crochet terms
- Yarn weight: DK (#3) cotton or cotton blend
- Hook: 4.0 mm (US G-6)
- Number of pieces: 2 panels, each made of 56 motifs and 39 fillers
- Layout: 4 motifs wide x 14 motifs tall per panel
- Motif size: 6 in (15.2 cm), measured from one scallop tip to the opposite tip
- Size before border: 24 x 84 in (61.0 x 213.4 cm)
- Border depth: 0.75 in (1.9 cm) on each side
Materials
Choose a smooth, mercerized or combed cotton DK. It holds the cluster petals crisply and blocks flat. Avoid fuzzy or very stretchy yarn, because long panels hang from their own weight.
- Sage green DK cotton: 1,200 g / about 2,760 m. That’s 24 balls of 50 g / 115 m.
- Per panel: 600 g / about 1,380 m
- Per motif: about 8 g / 18.4 m
- These quantities include a margin of about 10% for gauge swatches, joining and weaving in ends.
Tools
– 4.0 mm (US G-6) crochet hook
– Tapestry needle
– Stitch markers
– Tape measure
– Blocking mats, rust-proof pins and a spray bottle
– Curtain rod up to 1.25 in (3.2 cm) in diameter
Abbreviations (US Terms)
- ch: chain
- sl st: slip stitch
- sc: single crochet
- dc: double crochet
- tr: treble crochet
- sp(s): space(s)
- sk: skip
- st(s): stitch(es)
- RS: right side
- rep: repeat
Special stitches
- 3-dc cluster (cl): Work this whole stitch into one stitch. (Yarn over, insert hook, pull up a loop, yarn over, pull through 2 loops) 3 times. You now have 4 loops on the hook. Yarn over and pull through all 4.
- Beginning cluster (beg cl): Ch 2. Then (yarn over, insert hook, pull up a loop, yarn over, pull through 2 loops) 2 times in the same stitch. Yarn over and pull through all 3 loops.
- Shell: 9 dc worked into one ch-6 loop.
- Drop-loop join: Finish the 5th dc of a shell. Take the hook out of the loop and insert it, front to back, through the top of the center (5th) dc of the matching shell on the neighboring motif. Pick up the dropped loop, pull it through, and continue with the 6th dc. This join adds no stitches.
Gauge and Checkpoints
Make one complete motif first and wet-block it before you commit to the full project.
- Motif gauge: One blocked motif measures 6 in (15.2 cm) from scallop tip to opposite scallop tip.
- Border gauge: 19 sc = 4 in (10.2 cm), measured over a strip of sc.
Checkpoints while making the test motif (diameter, unblocked):
– After Rnd 1: 1.25 in (3.2 cm)
– After Rnd 2: 2.25 in (5.7 cm)
– After Rnd 3: 3.25 in (8.3 cm)
– After Rnd 4: 4.25 in (10.8 cm)
– After Rnd 5: 5 in (12.7 cm)
– After Rnd 6: 6 in (15.2 cm)
If your motif is too big, go down to a 3.75 mm hook. Each extra 1/4 in (0.6 cm) per motif adds 1 in (2.5 cm) across the panel width and 3.5 in (8.9 cm) to its length.
If your motif is too small, go up to a 4.5 mm hook.
If the motif cups or ruffles even though the size is right, check that you are not pulling the chain loops tight in Rnds 3 and 5.
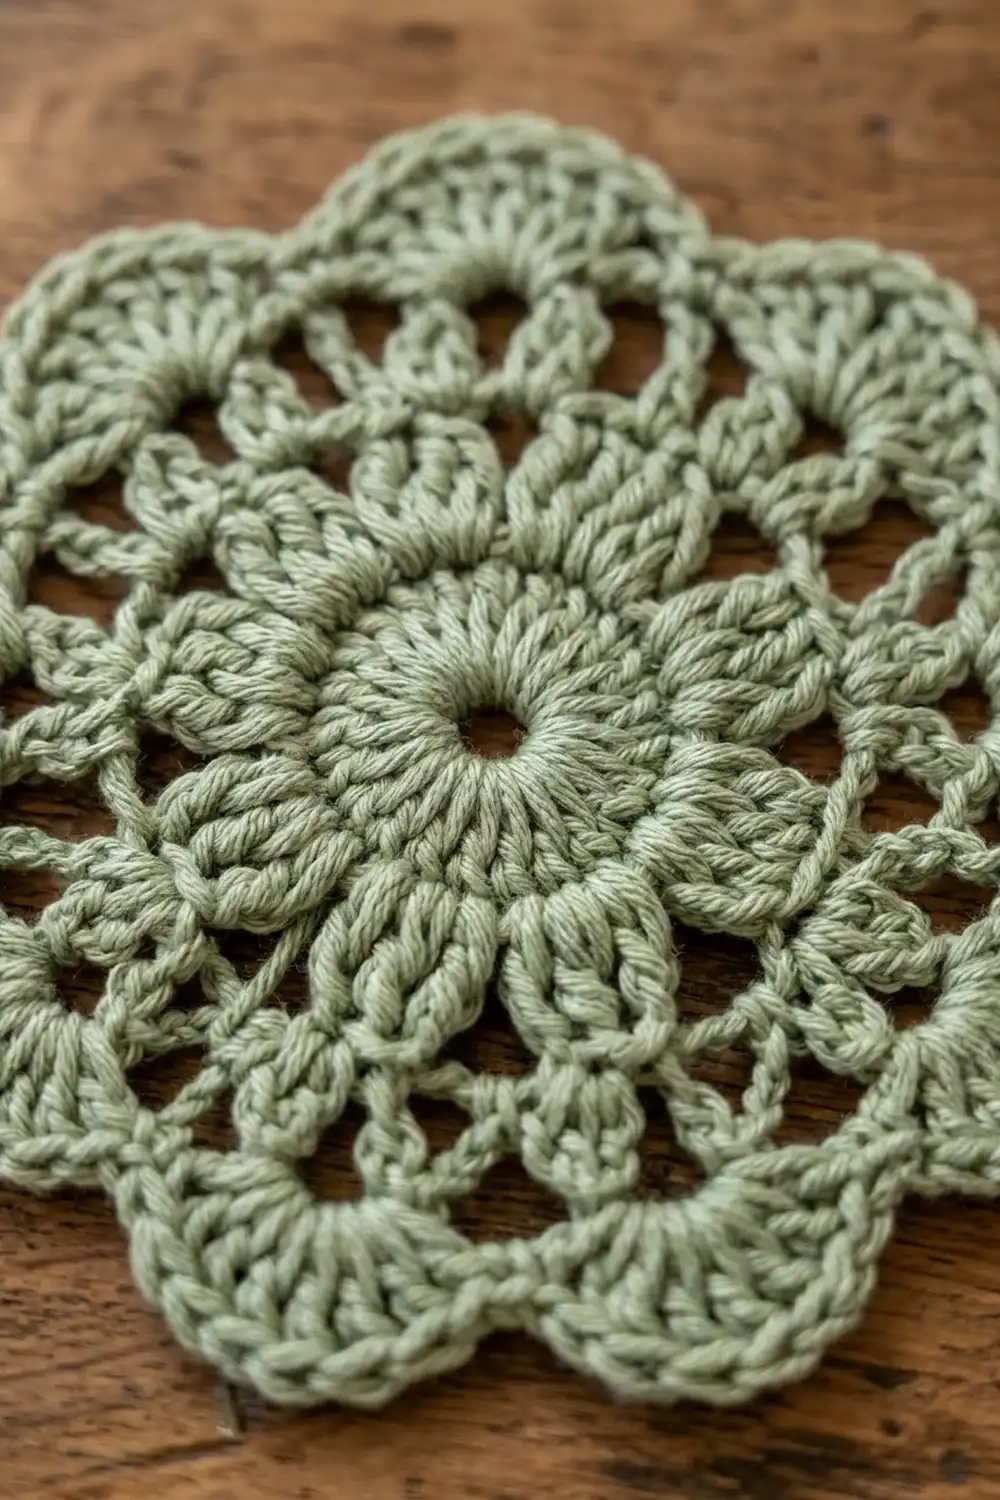
Motif (make 112: 56 per panel)
Rnd 1: Ch 6 and sl st to the first ch to form a ring. Ch 3 (counts as dc), then work 15 dc in the ring. Sl st to the top of the ch-3. (16 dc)
Rnd 2: Work a beg cl in the same st, then ch 2. Cl in the next dc, ch 2. Rep from * 14 more times. Sl st to the top of the beg cl. (16 clusters, 16 ch-2 sps)
Rnd 3: Sl st into the first ch-2 sp. Ch 1, sc in the same sp, ch 5. Sc in the next ch-2 sp, ch 5. Rep from * 14 more times. Sl st to the first sc. (16 sc, 16 ch-5 loops)
Rnd 4: Sl st into the first ch-5 loop. Ch 3 (counts as dc), then work (dc, ch 2, 2 dc) in the same loop. (2 dc, ch 2, 2 dc) in the next loop. Rep from * 14 more times. Sl st to the top of the ch-3. (64 dc and 16 ch-2 sps, forming 16 V-shells)
Rnd 5: Sl st in the next dc and into the ch-2 sp. Ch 1, sc in the same sp, ch 6. Sc in the next ch-2 sp, ch 6. Rep from * 14 more times. Sl st to the first sc. (16 sc, 16 ch-6 loops)
Rnd 6 (scallops): Sl st into the first ch-6 loop. Ch 1 and sc in the same loop. Work a shell (9 dc) in the next loop. Sc in the next loop, shell in the next loop. Rep from * 6 more times. Sl st to the first sc and fasten off. (8 shells of 9 dc + 8 sc = 80 sts)
Shell positions: Hold the motif with Rnd 6’s first shell at the top. If you crochet right-handed, the shells run counterclockwise in this order:
| Shell | 1 | 2 | 3 | 4 | 5 | 6 | 7 | 8 |
|---|---|---|---|---|---|---|---|---|
| Position | N | NW | W | SW | S | SE | E | NE |
Left-handed crocheters should mirror this order.
The center dc of each shell (its 5th dc) is that shell’s tip. All joins and border stitches are anchored at tips.
Make All Pieces
Per panel you need 56 motifs and 39 filler stars. For both panels, that’s 112 motifs and 78 fillers, all in sage green.
Only the first motif of each panel is made on its own. Every other motif is joined to its neighbors during Rnd 6.
Layout per panel (M = motif, F = filler):
Row 1 (top):   M   M   M   M
                 F   F   F
Row 2:         M   M   M   M
                 F   F   F
Row 3:         M   M   M   M
  ...  repeat the pattern down to ...
Row 14 (bottom): M   M   M   M
That gives 14 rows of 4 motifs (56 in total) and 13 rows of 3 fillers (39 in total).
Joining
Method: Join as you go, in Rnd 6, with the drop-loop join at shell tips. Work Rnds 1–5 as usual, then work Rnd 6 and join where needed. Each motif connects to its neighbors at one tip per neighbor:
- Motif to its left neighbor: join its W shell (shell 3) to the left motif’s E shell (shell 7).
- Motif to the motif above it: join its N shell (shell 1) to the upper motif’s S shell (shell 5).
Work the panel row by row from the top, left to right:
- Row 1, motif 1: no joins.
- Row 1, motifs 2–4: join at the W shell only.
- Every first motif in a row: join at the N shell only.
- All other motifs: join at both the N and W shells.
The diagonal shells (NW, SW, SE and NE) stay free for now.
Tension advice: Pull the dropped loop through firmly, but don’t let it shorten the 5th dc. If the join is too tight, the motifs pucker. If it’s too loose, the grid sags out of line.
Filler star (make 39 per panel): Work each filler after the 4 motifs around its gap are joined. Ch 5 and sl st to form a ring. Ch 1. Then work (2 sc in the ring, ch 5, sl st in the tip of the next diagonal shell facing the gap, ch 5) 4 times. Sl st to the first sc and fasten off. (8 sc and 4 chain arms)
Each arm should lie flat. If the arms buckle, use ch 4. If they pull the motifs inward, use ch 6.
Size checkpoint: After Row 1, the strip measures 24 in (61.0 cm) wide. After Row 3, the panel measures 24 x 18 in (61.0 x 45.7 cm). When all rows are done, it measures 24 x 84 in (61.0 x 213.4 cm).
Border
Border gauge: 19 sc = 4 in (10.2 cm).
The four corner motifs each have one corner shell. For the top-left motif it’s the NW shell, for the top-right the NE shell, and so on.
Along each edge, every motif shows 3 edge shells: a diagonal shell, a middle shell and another diagonal shell. On the top edge, for example, that’s NW, N and NE.
Rnd 1 (squaring round):
- First corner: With RS facing, join the yarn with a sl st at the tip of any corner shell. Ch 4 (counts as tr), ch 3 and tr at the same tip. This makes the corner.
- Rest of the first motif on this side: Ch 9, sc at the tip of the middle edge shell, ch 9, tr at the tip of the next diagonal shell.
- Each following motif: Ch 7 across the valley to the next motif. Then tr at the tip of that motif’s first diagonal shell, ch 9, sc at the middle edge shell, ch 9, tr at the tip of its last diagonal shell.
- Next corner: On the last motif of the side, that last diagonal shell is the next corner shell. Work (tr, ch 3, tr) at its tip. The first tr finishes this side and the second tr starts the next side.
- Work every side this way. To close, sl st to the top of the beginning ch-4.
Each motif gives a 21-stitch segment per side: tr + 9 ch + sc + 9 ch + tr. The valley chains between motifs are the only seam additions: 7 ch at each seam, nothing else. Each side’s count includes its 2 corner tr and does not include the corner ch-3 sps.
- Short sides: 4 x 21 + 3 x 7 = 105 sts each
- Long sides: 14 x 21 + 13 x 7 = 385 sts each
- Corners: 4 ch-3 sps
The tr stitches rise from the lower diagonal tips up to the level of the middle shell tips, so the scalloped edge becomes a straight line.
Rnd 2: Ch 1. Sc in each st and each ch along every side, and work 3 sc in each corner ch-3 sp. Sl st to the first sc.
- Short sides: 105 sc each
- Long sides: 385 sc each
- Corners: 3 sc each
- Total: 2 x 10⁵ + 2 x 385 + 4 x 3 = 992 sts
The middle sc of each 3-sc corner group is the corner st. Counting from one corner st to the next (not including either), there are 105 + 2 = 107 sts on each short side and 385 + 2 = 387 sts on each long side.
Rnd 3 (shell trim):
- Sl st to the next corner st. Ch 3 (counts as dc) and work 6 dc in the same st. This makes the 7-dc corner shell.
- Along the side, sk 1, sc in the next st, sk 1, 5 dc in the next st. Rep from * to the last 3 sts before the next corner st.
- To finish the side, sk 1, sc in the next st, sk 1.
- Work 7 dc in the corner st.
- Rep steps 2–4 around. Sl st to the top of the ch-3 and fasten off.
Per side:
– Short side: 26 shells + 27 sc. Check: 26 x 4 + 3 = 107 ✓
– Long side: 96 shells + 97 sc. Check: 96 x 4 + 3 = 387 ✓
– Totals: 4 corner shells, 248 side shells and 248 sc
Why the math works: Each motif segment plus its valley is 28 sts. At 4.75 sc per in, 28 sts measure 5.9 in (15.0 cm), just under the 6 in (15.2 cm) motif pitch. That small tightness keeps the border flat instead of wavy. The 4-st shell repeat fits 107 and 387 exactly, so every corner lands cleanly.
Hanging tabs (top edge only): Choose one short side as the top. Count its 27 sc from Rnd 3, then mark sc numbers 1, 5, 9, 14, 19, 23 and 27. That’s 7 tabs, spaced symmetrically: 4, 4, 5, 5, 4 and 4 sc apart.
For each tab:
1. Join with a sl st in a marked sc and ch 26.
2. Sl st in the same sc to form a loop.
3. Ch 1 and work 34 sc into the loop.
4. Sl st in the base sc and fasten off.
Each finished loop drops about 2.75 in (7.0 cm).
Final Blocking
- Weave in all ends along the dc stitches and not through the chain loops, so the ends stay hidden.
- Soak the panel in cool water for 15 minutes, then press the water out gently. Don’t wring it.
- Roll the panel in towels to remove extra water.
- Lay it flat on the mats, working in sections if needed.
- Pin the corners first, to a 25.5 x 85.5 in (64.8 x 217.2 cm) rectangle.
- Pin along the straight border every 3 in (7.6 cm), then pin out each corner shell.
- Check that the motif centers line up in straight columns. Gently pull the filler arms straight.
- Let it dry completely, then unpin.
- Repeat for the second panel. Lay the two panels side by side and compare their lengths.
Final Quality-Control Checklist
- [ ] Every motif has 8 shells of 9 dc
- [ ] All N/S and W/E joins are made at the 5th dc of the shell
- [ ] Each panel has 39 fillers, and every filler has 4 arms
- [ ] Border Rnd 2 has 105 sts on each short side and 385 on each long side
- [ ] Border Rnd 3 has 26 shells on each short side and 96 on each long side
- [ ] 7 tabs are evenly spaced along the top
- [ ] Each blocked panel is 25.5 x 85.5 in (64.8 x 217.2 cm)
- [ ] The two panels match in length within 1/2 in (1.3 cm)
Troubleshooting
- Motif cups: Rnd 3 or Rnd 5 loops are too tight. Loosen them, or add 1 ch to each loop.
- Motif ruffles: The shells are too full for your tension. Go down a hook size for Rnd 6 only.
- Joins twist: Insert the hook front to back every time, from the RS.
- Grid drifts out of line: Count the shell positions again. You may have joined at shell 2 instead of shell 3.
- Border waves: Cut the valley chains to ch 6. Then recount Rnd 2 and change the 3-sc corners to keep the Rnd 3 math exact.
- Border pulls in: Lengthen the valley chains to ch 8 and check your sc gauge.
- Panel grows long when hung: This is normal for cotton lace, typically by up to 1 in (2.5 cm). Block again and let it dry flat.
Care
Hand wash cool, or machine wash on a gentle cycle in a mesh bag. Dry flat and re-pin the edges, and don’t tumble dry.
Final Notes
The measurement chain is simple:
- One motif measures 6 in (15.2 cm).
- Four motifs across make 24 in (61.0 cm).
- Fourteen motifs down make 84 in (213.4 cm).
- A 0.75 in (1.9 cm) border on every side brings each panel to 25.5 x 85.5 in (64.8 x 217.2 cm).
- The tabs add 2.75 in (7.0 cm) above the top.
If the test motif matches, the border counts will work out on the first try. Hang the panels in a sunny window and enjoy the filtered light.
Happy crocheting!