

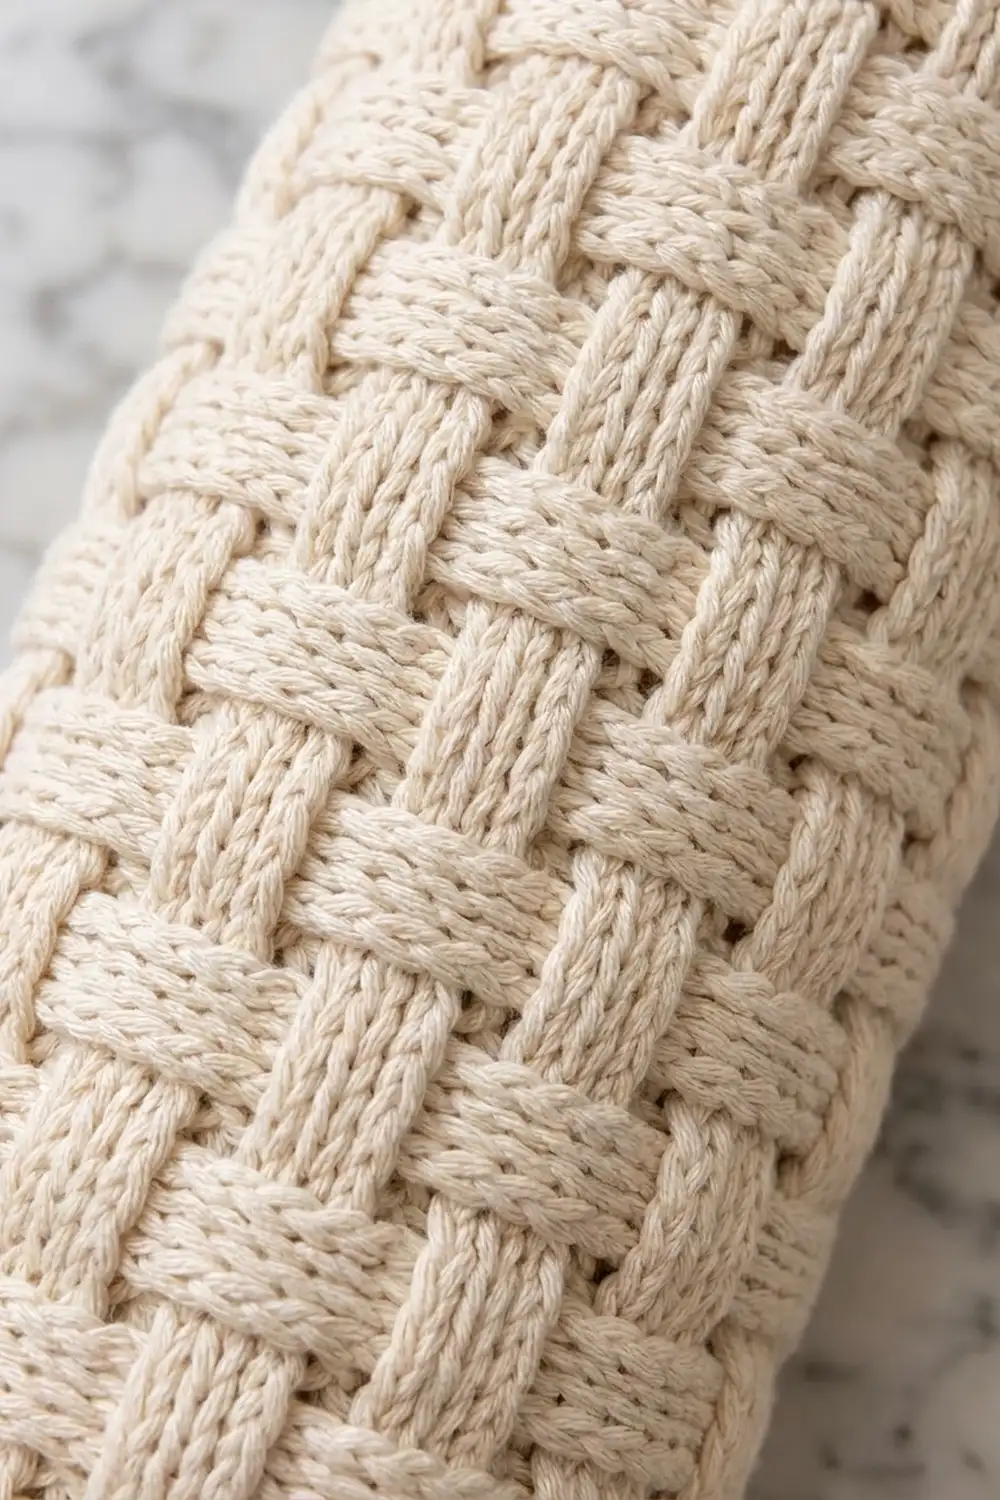
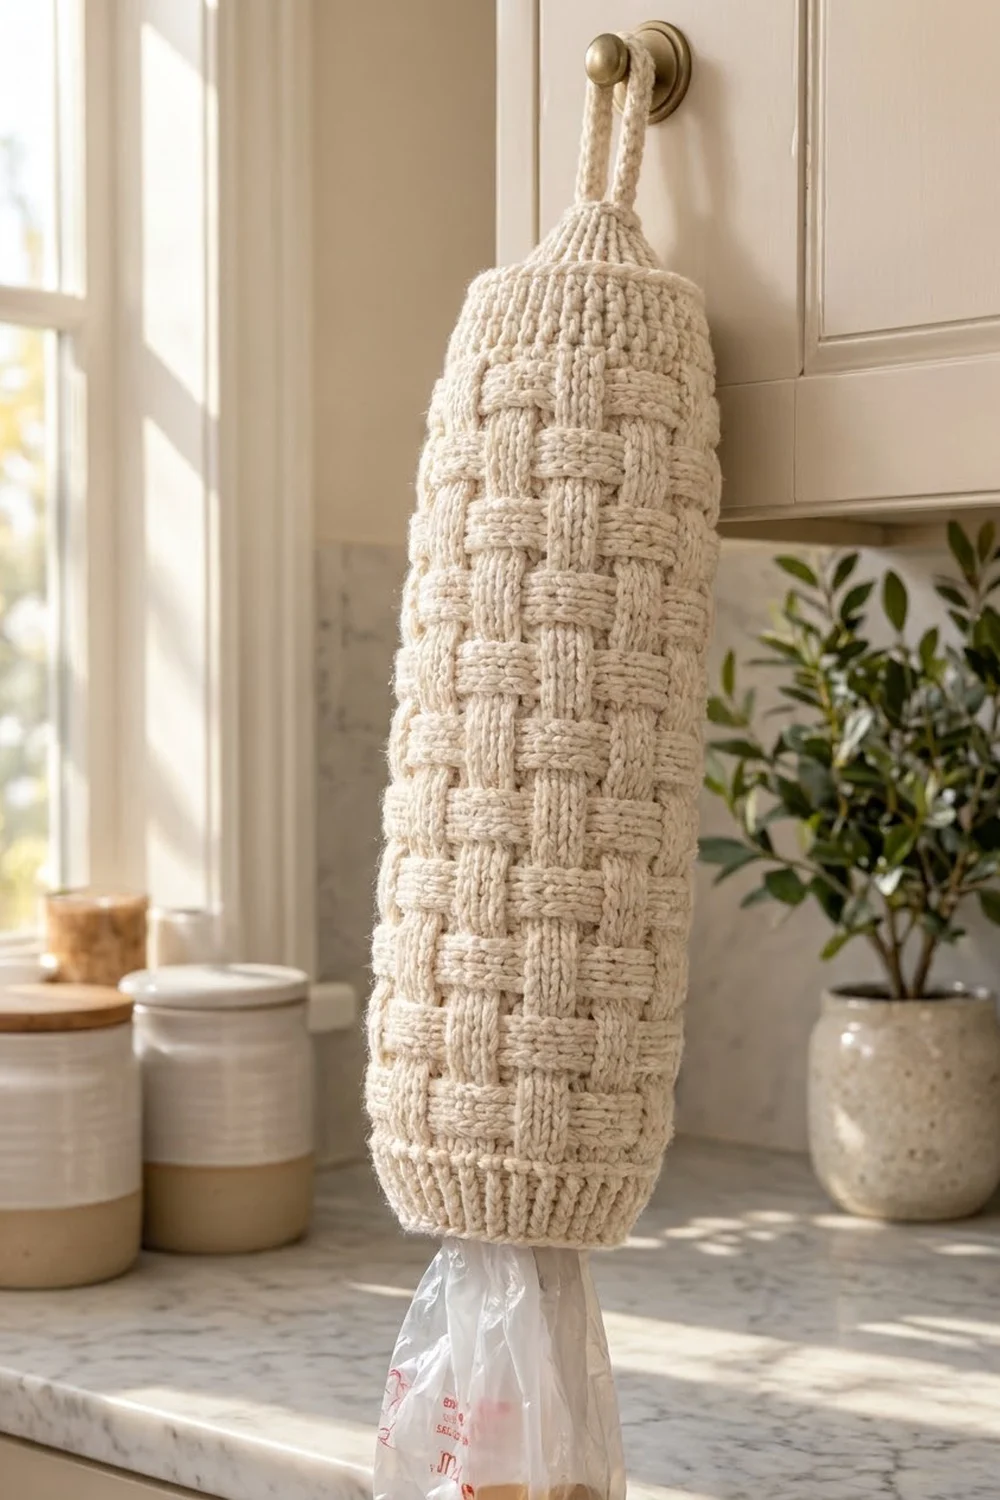
This bag holder brings a woven-basket texture to the kitchen. The body is a raised basketweave of front and back post double crochet blocks. Some blocks stand up as vertical posts and the ones next to them sink back, so the fabric looks plaited.
The sample is worked in a creamy ivory worsted-weight cotton, which shows off the texture well. Any light neutral such as oatmeal, linen or soft taupe keeps the same calm farmhouse look. The pattern uses US crochet terms throughout.
The finished holder measures about 21.75 in (55.2 cm) tall without the loop and 24.75 in (62.9 cm) with it. Its circumference is 16 in (40.6 cm), so it measures about 8 in (20.3 cm) wide when flattened.
Here is how it’s made: you crochet one flat basketweave rectangle, sew it into a tube, and then work rounds off the top edge. Those rounds form a ribbed, tapered cap that closes into a dome with a hanging loop. Last, you work a ribbed cuff into the bottom edge, which draws in so the bags stay inside until you pull them out.
Finished Size and Construction
- Finished size: 21.75 in (55.2 cm) tall body; 24.75 in (62.9 cm) including the loop
- Circumference: 16 in (40.6 cm); about 8 in (20.3 cm) wide when flattened
- Skill level: Intermediate (post stitches, simple seaming)
- Terminology: US crochet terms
- Yarn weight: Worsted (#4), cotton or cotton blend
- Hook: 5.0 mm (H-8)
- Number of pieces: 1
- Layout: One rectangle seamed into a tube, with rounds worked off both open edges
- Panel size: 58 sts × 33 rows, about 16.6 in × 16.5 in (42.2 cm × 41.9 cm)
- Size before border: 16.5 in (41.9 cm) body plus a 3 in (7.6 cm) top cap = 19.5 in (49.5 cm)
- Border (bottom cuff) depth: 2.25 in (5.7 cm)
Materials
Yarn: Use a smooth worsted-weight cotton or cotton blend. Cotton holds the post-stitch texture crisply and doesn’t stretch much when the holder is packed full. Avoid very fuzzy or loosely plied yarns, because they blur the edges of the weave.
- Cream (sample color): 200 g, about 340 m (372 yd)
Post-stitch fabric uses roughly a third more yarn than plain double crochet. The amount above already includes a margin of about 15% for your gauge swatch and small tension differences.
Tools:
– 5.0 mm (H-8) crochet hook
– Yarn needle
– 2 locking stitch markers
– Measuring tape
– Pins and a blocking surface
– Scissors
– Optional: a rolled towel or paper-towel tube for shaping
Abbreviations (US Terms)
- ch – chain
- sl st – slip stitch
- sc – single crochet
- sc2tog – single crochet 2 together
- dc – double crochet
- fpdc – front post double crochet: yarn over, insert the hook from front to back to front around the post of the stitch, then complete a dc
- bpdc – back post double crochet: yarn over, insert the hook from back to front to back around the post, then complete a dc
- st(s) – stitch(es)
- rep – repeat
- RS / WS – right side / wrong side
- tch – turning chain
Special stitch – fpdc2tog (front post dc 2 together): *Yarn over, insert the hook from front to back to front around the post of the next st, yarn over, pull up a loop, yarn over, pull through 2 loops. Repeat from * around the following st, then yarn over and pull through all 3 loops on the hook. This is 1 stitch made from 2.
Gauge and Checkpoints
Gauge in basketweave: 14 sts and 8 rows = 4 in (10.2 cm). One block of 4 sts × 2 rows is about 1.1 in (2.8 cm) wide and 1 in (2.5 cm) tall.
Gauge in sc (for the shaping rounds): 16 sc = 4 in (10.2 cm).
Test one piece first. The panel is the whole holder, so treat the first 9 rows as your swatch and measure before going on:
- After Row 1: 58 dc should measure about 16.6 in (42.2 cm) across.
- After Row 9: the panel should be about 4.5 in (11.4 cm) tall.
- After Row 17: about 8.5 in (21.6 cm) tall.
- After Row 33: about 16.5 in (41.9 cm) tall.
- After seaming: the tube’s circumference should be about 16 in (40.6 cm).
If your panel is too wide, go down one hook size. If it’s too narrow, go up one size. A difference of 0.5 in (1.3 cm) across the width is fine, but a difference of 1 in (2.5 cm) or more changes how the cuff fits. If your row height is off but the width is right, add or leave out one 4-row repeat instead of changing hooks.
Panel (Basketweave Body)
The panel is worked flat in rows. The ch-3 at the start of each row counts as the first stitch, and the edge stitches at each end (the ch-3 and the last dc) become the seam allowance.
Ch 60.
Row 1 (foundation): Dc in the 4th ch from the hook (the skipped 3 ch count as a dc) and in each ch across. Turn. (58 sts)
Row 2 (RS), Pattern Row A: Ch 3 (counts as dc). Fpdc around each of the next 4 sts, bpdc around each of the next 4 sts; rep from * 6 more times. Dc in the top of the tch. Turn. (58 sts: 2 edge dc + 7 repeats of 8 post sts = 56)*
Row 3 (WS): Repeat Pattern Row A. (58 sts)
Because the row has an even number of blocks (14), the same instruction on the WS row lands each stitch on the right block. The posts you raised on Row 2 are pushed toward the RS again, so each block stays 2 rows tall.
Row 4 (RS), Pattern Row B: Ch 3. Bpdc around each of the next 4 sts, fpdc around each of the next 4 sts; rep from * 6 more times. Dc in the top of the tch. Turn. (58 sts)*
Row 5 (WS): Repeat Pattern Row B. (58 sts)
Rows 4–5 swap the blocks, so raised posts now sit above recessed blocks and the checkerboard is formed.
Rows 6–33: Repeat Rows 2–5 seven more times. (58 sts in every row)
That makes 8 repeats of the 4-row pattern (32 rows), plus the foundation row, for 33 rows. Don’t fasten off your working yarn yet if you’d like to use it for the seam. Otherwise, fasten off and leave a 30 in (76.2 cm) tail.
Seaming the Tube
Fold the panel with the RS facing out, bringing the two short edge columns together. Rows should line up 1 to 1, and Row 33 should be at the top.
Thread the tail onto a yarn needle. Whipstitch through the edge dc columns on both sides, catching one full stitch post on each side per row. Work 2 stitches per dc row so you don’t get gaps.
The seam takes up the 2 edge stitches, which leaves 56 working stitches around the tube. Block 1 (raised in Rows 2–3) now sits next to block 14 (recessed in Rows 2–3), so the checkerboard continues across the seam without a break. The seam forms one neat raised line up the back, as in the sample.
Size checkpoint: circumference about 16 in (40.6 cm); 56 sts ÷ 3.5 sts per in = 16 in.
Top Cap and Hanging Loop
Hold the tube with Row 33 at the top and the RS facing out. Join the yarn at the seam. All rounds are joined with a sl st to the first st. Turning chains do not count as stitches.
Rnd 1 (conversion round): Ch 1. Sc in each of the 56 basketweave sts, skipping the 2 edge sts folded into the seam. Join. (56 sts = 56 worked 1 per existing pattern st + 0 extra)
Rnd 2: Ch 2. Fpdc around the next st, bpdc around the next st; rep from * 27 more times. Join. (56 sts)*
Rnd 3: Ch 2. Fpdc around each fpdc and bpdc around each bpdc. Join. (56 sts)
Rnd 4 (decrease): Ch 2. [Fpdc, bpdc] 3 times, fpdc2tog over the next 2 sts; rep from * 6 more times. Join. (49 sts)*
Rnd 5: Ch 2. Fpdc around each fpdc and fpdc2tog, and bpdc around each bpdc. Join. (49 sts)
The ribbing is now about 2 in (5.1 cm) tall. Every 7th rib is a little wider where a decrease sits, and that disappears into the curve of the cap.
Rnd 6: Ch 1. Sc in the next 5 sts, sc2tog; rep from * 6 more times. Join. (42 sts)*
Rnd 7: Ch 1. Sc in the next 4 sts, sc2tog; rep from * 6 more times. Join. (35 sts)*
Rnd 8: Ch 1. Sc in the next 3 sts, sc2tog; rep from * 6 more times. Join. (28 sts)*
Rnd 9: Ch 1. Sc in the next 2 sts, sc2tog; rep from * 6 more times. Join. (21 sts)*
Rnd 10: Ch 1. Sc in the next st, sc2tog; rep from * 6 more times. Join. (14 sts, about 3.5 in / 8.9 cm around)*
Rnd 11: Ch 1. Sc2tog 7 times. Join. (7 sts)
Fasten off and leave a 6 in (15.2 cm) tail. Weave the tail through the front loops of all 7 sts, pull it closed and secure it on the inside.
Hanging loop: Join the yarn at the center top of the dome. Ch 30, then sl st into the same center st to close a ring.
Loop round (conversion round): Ch 1. Work 1 sc in each of the 30 ch, then sl st into the center top. (30 sc = 30 worked 1 per ch + 0 extra)
Fasten off and weave the end in through the dome. The finished loop hangs about 3 in (7.6 cm) tall.
Checkpoint: the cap should be about 3 in (7.6 cm) tall from the top of Row 33 to the top of the dome.
Border (Bottom Cuff)
The cuff is the holder’s only border. It’s worked around the bottom edge, into the base of the Row 1 stitches.
Border gauge: the rib matches the basketweave gauge at 14 sts = 4 in (10.2 cm). The sc rounds use 16 sc = 4 in (10.2 cm).
A tube has no corners. When it’s flattened, though, it has two “sides” (front and back), and the counts per side are given for those.
Turn the holder upside down with the RS facing out and join the yarn at the seam.
Rnd 1 (conversion round): Ch 1. Sc in the base of each of the 56 pattern sts, skipping the 2 seamed edge sts. Join. (56 sts = 56 worked 1 per existing st + 0 extra; 28 per flattened side)
Rnd 2: Ch 2. Fpdc, bpdc; rep from * 27 more times. Join. (56 sts; 28 per side)*
Rnd 3 (decrease): Ch 2. [Fpdc, bpdc] 3 times, fpdc2tog; rep from * 6 more times. Join. (49 sts; split 24/25 between the sides)*
Rnd 4: Ch 2. Fpdc around each fpdc and fpdc2tog, and bpdc around each bpdc. Join. (49 sts)
Rnd 5: Ch 1. Sc in the next 5 sts, sc2tog; rep from * 6 more times. Join. (42 sts; 21 per side)*
Rnd 6: Ch 1. Sc in each st around. Join. (42 sts; 21 per side)
Fasten off and weave in the end.
Why the math works: The seam removes exactly 2 edge stitches, so the cuff starts from the same 56 that the basketweave repeat uses: 14 blocks × 4. Since 56 divides evenly by 8, the decrease round works out to exactly 7 repeats, taking 56 down to 49. Since 49 divides evenly by 7, the sc decrease takes it to 42. At 16 sc = 4 in, 42 sc gives an opening of about 10.5 in (26.7 cm) around and about 3.3 in (8.4 cm) across. That’s narrow enough to hold the bags in but wide enough to reach into.
The cuff adds 2.25 in (5.7 cm): 0.25 in (0.6 cm) for Rnd 1, 1.5 in (3.8 cm) for the three rib rounds, and 0.5 in (1.3 cm) for the two sc rounds. Added to the 19.5 in (49.5 cm) body and cap, the total is 21.75 in (55.2 cm).
Final Blocking
- Weave in all remaining ends on the inside, following the post stitches so they stay hidden.
- Mist the whole holder until it’s damp but not soaked, or steam-block from about 1 in (2.5 cm) away without touching the yarn.
- Slide a rolled towel or a paper-towel tube inside to round out the body.
- Gently pinch each raised block so the posts stand upright, and press the recessed blocks back.
- Straighten the seam so it runs vertically from the cuff to the cap.
- Lay the holder on its side and check that it’s 16.5 in (41.9 cm) from the cuff to the cap and about 8 in (20.3 cm) wide when flattened.
- Shape the dome by hand, then let everything dry completely before removing the towel.
Final Quality-Control Checklist
- The panel has 58 sts in every row and 33 rows in total.
- The blocks alternate cleanly, including across the seam.
- The seam is straight, with no gaps between rows.
- The circumference is about 16 in (40.6 cm).
- The top cap counts are 56, 56, 56, 49, 49, 42, 35, 28, 21, 14 and 7.
- The dome is closed tightly with no hole.
- The loop is 30 sc and about 3 in (7.6 cm) tall.
- The cuff counts are 56, 56, 49, 49, 42 and 42.
- The overall height is about 21.75 in (55.2 cm), plus the loop.
- All ends are woven in on the inside.
Troubleshooting
The blocks look striped instead of checkered. You probably repeated Pattern Row A or B one time too many. Each block should be exactly 2 rows tall.
The raised blocks are flat on the RS. Check your WS rows. Work the stitches as written, and remember that fpdc on the WS pushes posts to the RS.
The panel slants or the edges ripple. You may have missed the edge dc in the top of the tch. Count to 58 at the end of every row.
The seam gapes. Whipstitch 2 times per dc row and pull snug, but not so tight that the edge puckers.
The cap won’t close neatly. Pull the gathering tail through the front loops only, then make a second pass and tighten again.
The cuff opening is too loose. Repeat Rnd 5 with sc 4, sc2tog to take it to 35 sts.
The cuff flares out. Go down one hook size for the cuff only.
Care
Hand wash or machine wash cold on a gentle cycle, then reshape and lay flat to dry. Don’t wring it, because twisting can flatten the post stitches.
Final Notes
Everything in this pattern comes from one measurement chain. A 58-stitch panel at 14 sts = 4 in (10.2 cm) becomes a 56-stitch tube measuring 16 in (40.6 cm) around. From there, 33 rows give a body 16.5 in (41.9 cm) tall, the ribbed cap adds 3 in (7.6 cm), and the cuff adds 2.25 in (5.7 cm), for a finished holder 21.75 in (55.2 cm) tall with a 3 in (7.6 cm) loop. If you check your gauge on the first rows and count after each round, the finished holder will match those numbers. Hang it on a cabinet knob, fill it from the top and pull bags from the bottom.
Happy crocheting!