

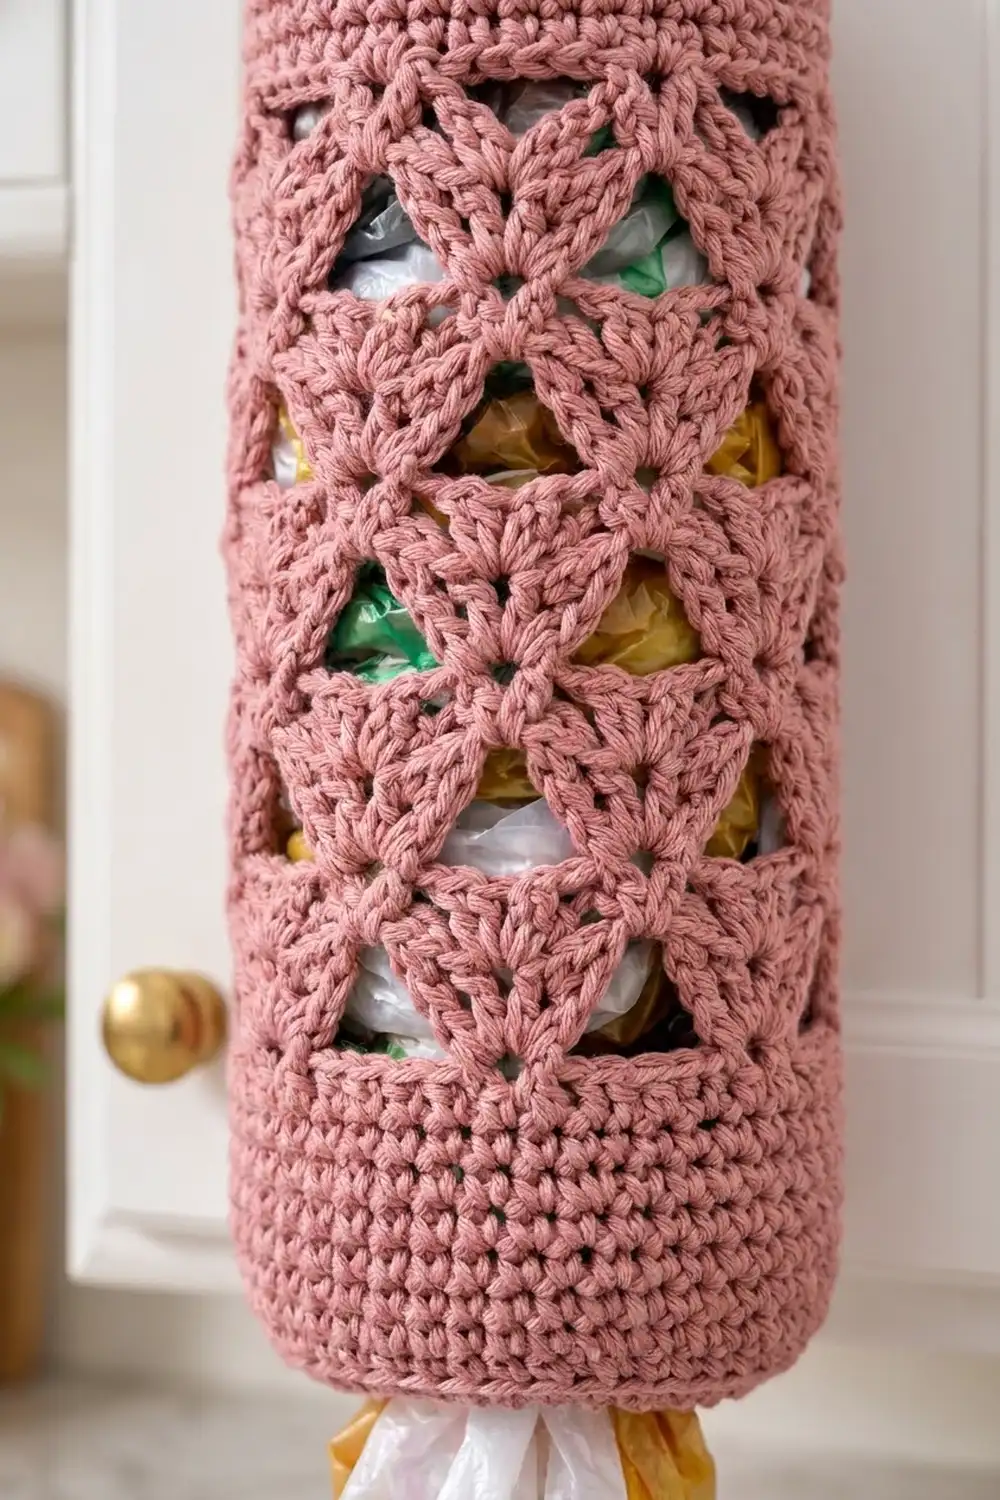
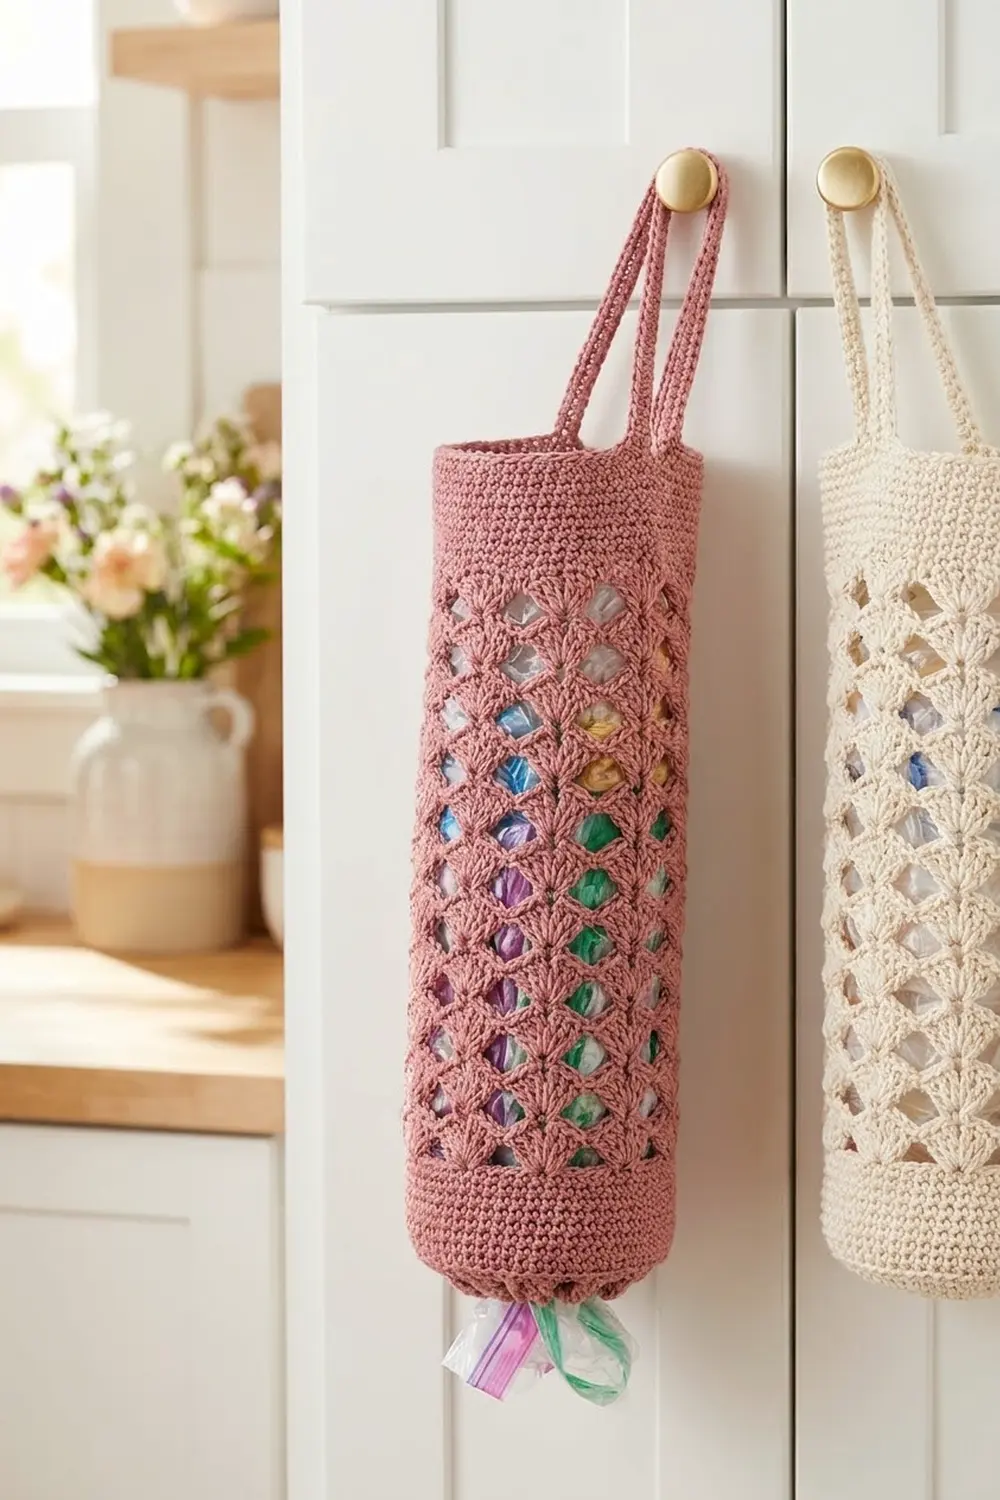
This grocery bag holder is a tall, soft tube that hangs from a cabinet knob. It keeps loose plastic bags tidy and lets you pull them out one at a time. The middle section is an open fan lattice. Rows of five-double-crochet fans sit offset from each other, so the spaces between them form diamond-shaped windows.
The sample is worked in dusty rose worsted-weight cotton. Firm single crochet bands at the top and bottom give the holder its shape. The look is calm and a little vintage, and it suits a farmhouse or cottage kitchen. Cream, sage, or soft gray work just as well.
This pattern uses US crochet terms. The finished holder is about 15 in (38.1 cm) around and about 16 1/4 in (41.3 cm) tall, not counting the hanging loop. The loop adds about 4 1/2 in (11.4 cm).
Construction is simple. You crochet one flat rectangle in rows: a solid band, the lace section, and a second solid band. Then you seam the side edges to make a tube. You close the top with decreasing rounds, add the hanging loop, and finish the bottom with a short border that narrows the opening so the bags stay put.
Finished Size and Construction
- Finished size: 15 in (38.1 cm) around, about 4 3/4 in (12.1 cm) across, and 16 1/4 in (41.3 cm) tall, plus a 4 1/2 in (11.4 cm) loop
- Skill level: Easy intermediate
- Terminology: US
- Yarn weight: Worsted (#4), cotton or cotton blend
- Hook: 5.0 mm (H-8)
- Number of pieces: 1 (a single panel, seamed into a tube)
- Layout: Worked flat in rows, seamed up the back, with the crown and border worked in rounds
- Flat panel size: 15 1/4 in wide × 14 3/4 in tall (38.7 × 37.5 cm)
- Size before border: The tube is 15 in (38.1 cm) around and 15 3/4 in (40.0 cm) tall once the crown is added
- Border depth: About 1/2 in (1.3 cm) of added height; the rest of the border curves inward
Materials
Yarn: Use a smooth worsted-weight cotton or cotton blend. Cotton holds its shape, doesn’t stretch much under the weight of the bags, and makes the fan stitches look crisp. Avoid fuzzy or very stretchy acrylic, because the lattice will sag.
- Dusty rose (main color): 170 g, about 275 m (300 yd)
- Optional cream version: The same amount, 170 g, about 275 m (300 yd)
These quantities include a margin of about 20% for your gauge swatch and for differences in tension.
Tools:
– 5.0 mm (H-8) crochet hook
– Tapestry needle
– Locking stitch markers (at least 2)
– Scissors
– Measuring tape
– Rust-proof pins and a rolled towel or tube for blocking
Abbreviations (US Terms)
- ch: chain
- sl st: slip stitch
- sc: single crochet
- dc: double crochet
- sc2tog: single crochet 2 together
- sp: space
- st(s): stitch(es)
- RS / WS: right side / wrong side
Special stitches
- Fan: 5 dc in the same stitch.
- Half fan: 3 dc in the same stitch. At the start of a row, this is ch 3 plus 2 dc in the first stitch.
- sc2tog: Insert the hook in the next st, yarn over and pull up a loop. Insert the hook in the following st, yarn over and pull up a loop. Yarn over and pull through all 3 loops on the hook.
Gauge and Checkpoints
- Single crochet: 16 sts and 16 rows = 4 in (10.2 cm)
- Lace pattern: 2 fan repeats (12 sts) = 3 in (7.6 cm) wide; 4 lace rows = 2 1/2 in (6.4 cm) tall
Test first. Chain 26 and work 10 rows of sc on 25 sts. Then work Lace Rows 1–5 across 25 sts (4 repeats + 1). The sc section should measure 6 1/4 in (15.9 cm) wide. If it does, the full panel will come out right.
Checkpoints:
1. After the bottom band (12 rows): 15 1/4 in (38.7 cm) wide, 3 in (7.6 cm) tall
2. After Lace Row 14: 11 3/4 in (29.8 cm) total height
3. After the top band: 14 3/4 in (37.5 cm) total height
4. After seaming: 15 in (38.1 cm) around
If your swatch is too big, go down to a 4.5 mm hook. If it is too small, go up to a 5.5 mm hook. Don’t change the stitch counts: the lace needs a multiple of 6 + 1 stitches.
Main Panel
The panel is worked flat in turned rows. The turning ch 1 never counts as a stitch. The ch 3 and ch 5 turning chains count as stitches where stated.
Bottom Band
Foundation: Ch 62.
Row 1 (RS): Sc in the 2nd ch from the hook and in each ch across, turn. (61 sc)
Rows 2–12: Ch 1, sc in each st across, turn. (61 sc)
Checkpoint: 15 1/4 in (38.7 cm) wide and 3 in (7.6 cm) tall.
Lace Section
Lace Row 1 (RS): Ch 1, sc in the first st, skip 2 sts, fan in the next st, skip 2 sts, sc in the next st; repeat from * 9 more times, turn.
(10 fans + 11 sc = 61 sts)*
Lace Row 2 (WS): Ch 5 (counts as dc + ch 2), sc in the center dc of the next fan, ch 2, dc in the next sc, ch 2; repeat from * across, ending the last repeat at , turn.
(11 dc + 10 sc + 20 ch-2 sps = 61 sts, counting each chain)*
Lace Row 3 (RS): Ch 3 (counts as dc), 2 dc in the first dc (half fan made), skip the ch-2 sp, sc in the next sc, skip the ch-2 sp, fan in the next dc; repeat from * 8 more times. Skip the ch-2 sp, sc in the next sc, skip the ch-2 sp, 3 dc in the 3rd ch of the turning ch (half fan), turn.
(2 half fans + 9 fans + 10 sc = 61 sts)*
Lace Row 4 (WS): Ch 1, sc in the first dc, ch 2, dc in the next sc, ch 2, sc in the center dc of the next fan; repeat from * across. On the final repeat, work the last sc in the top of the turning ch. Turn.
(11 sc + 10 dc + 20 ch-2 sps = 61 sts)*
Lace Row 5 (RS): Ch 1, sc in the first sc, skip the ch-2 sp, fan in the next dc, skip the ch-2 sp, sc in the next sc; repeat from * across, turn.
(10 fans + 11 sc = 61 sts)*
Lace Rows 6–13: Repeat Lace Rows 2–5 twice more.
Lace Row 14 (WS): Repeat Lace Row 2. (61 sts)
The lace section now has 7 tiers of fans in offset rows. Full-fan rows (1, 5, 9, 13) alternate with half-fan rows (3, 7, 11). Together they make the diamond lattice. The ch-2 spaces form the open triangular windows.
Checkpoint: 11 3/4 in (29.8 cm) total height.
Top Band
Row 1 (RS, conversion row): Ch 1, sc in each dc and each sc, and work 2 sc in each ch-2 sp, turn.
(21 sts worked 1-per-stitch + 40 sts worked into the 20 ch-2 sps = 61 sc)
Rows 2–12: Ch 1, sc in each st across, turn. (61 sc)
Fasten off, leaving a 24 in (61.0 cm) tail for seaming.
Checkpoint: The panel measures 15 1/4 × 14 3/4 in (38.7 × 37.5 cm).
Seam the Tube
Fold the panel in half with RS together, so the two short side edges meet. Using the long tail and the tapestry needle, whipstitch through the outer loops of the row-end stitches, row for row. Line up the bottom-band rows, the lace rows, and the top-band rows so the stripes match.
Keep the tension snug but not tight. The seam should lie flat and not pucker. Turn the tube RS out.
Checkpoint: The tube measures 15 in (38.1 cm) around. The seam takes up about 1/4 in (0.6 cm).
Top Crown
Work in continuous rounds, moving a marker up to the first stitch of each round.
Rnd 1: With RS facing, join yarn at the seam in the top edge of the tube. Ch 1, then sc in each st around. Work the two seam-edge stitches together as one sc2tog.
(59 sc + 1 sc2tog = 60 sts)
Rnd 2: Sc 8, sc2tog; repeat from * 5 more times. (54 sts)*
Rnd 3: Sc 7, sc2tog; repeat from * 5 more times. (48 sts)*
Rnd 4: Sc 6, sc2tog; repeat from * 5 more times. (42 sts)*
Rnd 5: Sc 5, sc2tog; repeat from * 5 more times. (36 sts)*
Rnd 6: Sc 4, sc2tog; repeat from * 5 more times. (30 sts)*
Rnd 7: Sc 3, sc2tog; repeat from * 5 more times. (24 sts)*
Rnd 8: Sc 2, sc2tog; repeat from * 5 more times. (18 sts)*
Rnd 9: Sc 1, sc2tog; repeat from * 5 more times. (12 sts)*
Rnd 10: Sc2tog 6 times. (6 sts)
Fasten off. Weave the tail through the front loops of the last 6 sts, pull it tight to close the hole, and secure it on the inside.
The crown forms a gently domed top that adds about 1 in (2.5 cm) of height.
Hanging Loop
Join yarn in the center of the crown. Ch 36, then sl st into the same center stitch to form the loop. Sc in each ch along the loop. (36 sc) Sl st into the center stitch, then fasten off and weave the tail down through the crown.
The loop is about 9 in (22.9 cm) around and hangs about 4 1/2 in (11.4 cm) when folded double over a knob.
Border (Bottom Dispensing Edge)
Border gauge: The border uses the same sc gauge as the body: 4 sts per inch (per 2.5 cm).
Rnd 1: With RS facing, join yarn at the seam on the bottom edge. Ch 1, then sc in the free loop of each foundation chain around. Work the two seam-edge stitches together as one sc2tog. Place a marker.
(59 sc + 1 sc2tog = 60 sts)
Rnd 2: Sc 3, sc2tog; repeat from * 11 more times. (48 sts)*
Rnd 3: Sc 2, sc2tog; repeat from * 11 more times. (36 sts)*
Rnd 4: Sc in each st around. (36 sts)
Rnd 5: Sl st loosely in each st around. (36 sl sts)
Fasten off and weave in the end.
Why the math works: The panel has 61 stitches across. Seaming merges the two edge stitches into one, so 60 stitches go around the tube. At 4 sts per inch, that is 15 in (38.1 cm), the same as the measured tube. Twelve evenly spaced decreases in each of Rnds 2 and 3 bring the edge down to 36 sts, which is 9 in (22.9 cm) around. That makes an opening just under 3 in (7.6 cm) across. It is wide enough to stuff bags in and narrow enough to hold them until you pull one out. Spacing the decreases evenly keeps the edge rounded instead of pleated.
Final Blocking
- Weave in all ends inside the tube, along the seam or the solid bands.
- Soak the holder in cool water for 10 minutes, then press out the water gently. Don’t wring it.
- Roll it in a towel to remove more moisture.
- Slide a rolled towel or a 4 3/4 in (12.1 cm) cylinder (a large bottle or a rolled poster tube) inside the holder.
- Pull the lace section lengthwise until the fans open evenly. Check that the height is 14 3/4 in (37.5 cm) from the bottom band edge to the start of the crown.
- Pin the fan tips if needed so each diamond window is the same size.
- Shape the crown into a smooth dome and let the bottom border curve inward.
- Let it dry completely before removing the form.
Final Quality-Control Checklist
- [ ] The panel had 61 sts on every row
- [ ] Full-fan rows have 10 fans; half-fan rows have 9 fans + 2 half fans
- [ ] There are 7 fan tiers, offset evenly
- [ ] The seam is flat, with matching rows and no puckering
- [ ] The tube is 15 in (38.1 cm) around
- [ ] The crown is fully closed with no gap at the center
- [ ] The hanging loop is firmly anchored at the center top
- [ ] The bottom border ends at 36 sts, with an opening just under 3 in (7.6 cm) across
- [ ] All ends are woven in on the inside
Troubleshooting
The lace section is wider than the bands. Your dc tension is looser than your sc tension. Use a hook 0.5 mm smaller for the lace rows only.
The fans lean to one side. You may be working into the wrong stitch on Rows 2 and 4. Each sc must go into the center (3rd) dc of a fan, and each dc goes into an sc.
The stitch count is off after Lace Row 3. Make sure you worked a half fan at each end and skipped both ch-2 spaces around each sc.
The crown is puckered or cone-shaped. Your sc rounds may be tight. Loosen your tension, or work Rnd 7 without decreases if you want a flatter top.
Bags fall out of the bottom. Work one more round: sc 4, sc2tog 6 times, for 30 sts.
The seam is visible from the front. Turn the holder so the seam faces the cabinet when it hangs.
Care
Hand wash in cool water with mild soap, press out the water, and dry flat or over a form. Don’t put it in the dryer, because cotton can shrink and the lattice may distort.
Final Notes
Every measurement depends on the gauge. At 16 sts per 4 in (10.2 cm), 61 stitches make a 15 1/4 in (38.7 cm) panel. Seaming turns that into a 60-stitch tube, 15 in (38.1 cm) around. Twelve sc rows give a 3 in (7.6 cm) band, fourteen lace rows add 8 3/4 in (22.2 cm), and twelve more sc rows bring the panel to 14 3/4 in (37.5 cm). The crown and border then bring the finished holder to about 16 1/4 in (41.3 cm) tall. Check each stage as you go, and your holder will hang straight and hold plenty of bags.
Happy crocheting!