

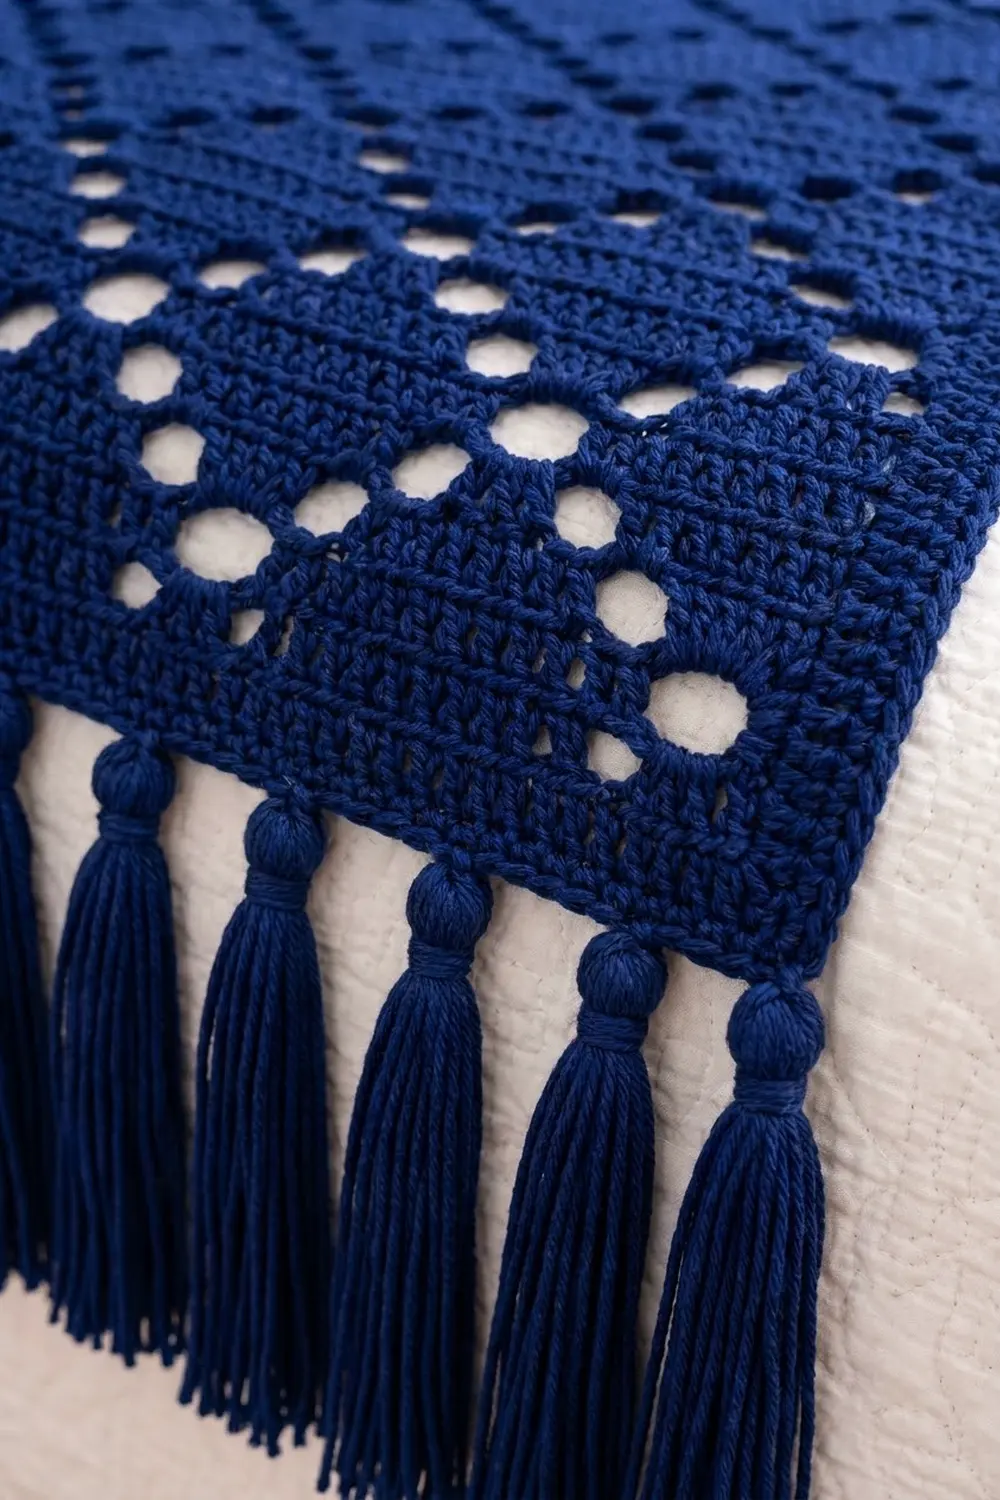
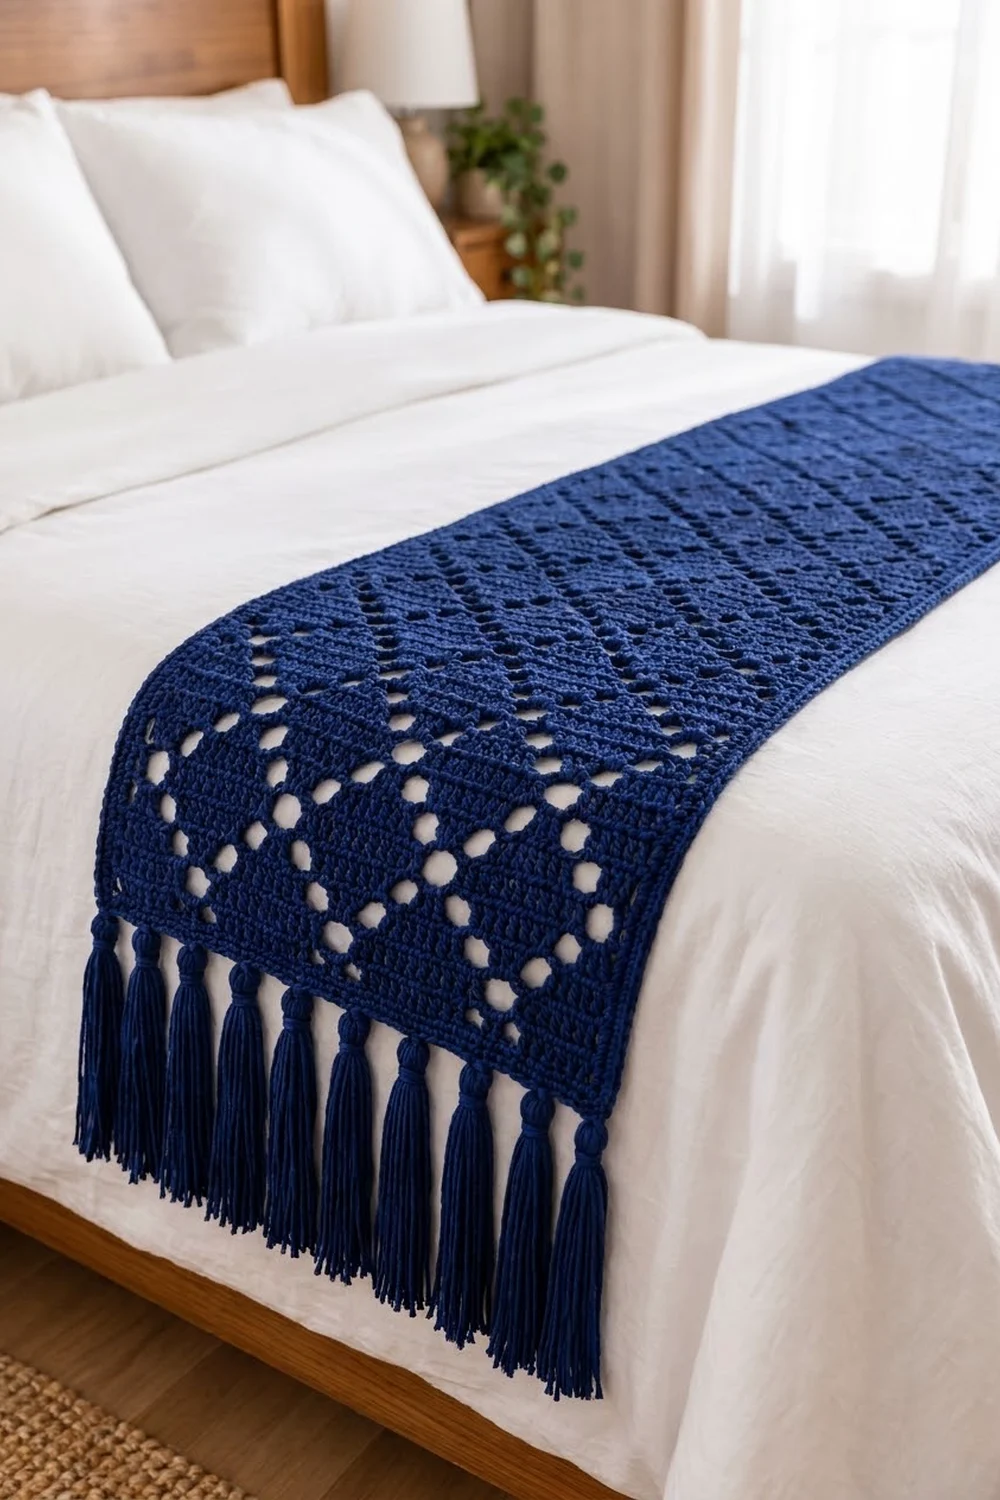
The Midnight Lattice Bed Runner is a single long rectangle in deep navy. Lines of round eyelets cross the whole piece to make a diamond lattice, and each diamond is filled with solid double crochet. Thick wrapped tassels finish both short ends, so the runner hangs well over the foot of a bed.
It uses one color only, which keeps the look calm and tailored. Navy suits white bedding, wood furniture, and warm lamplight, but any solid, saturated color will show the eyelets clearly.
This pattern uses US crochet terms. The finished runner measures 17.75 in x 70.5 in (45.1 cm x 179.1 cm) without the tassels. Each tassel adds about 6.5 in (16.5 cm) at its end.
It is worked as one piece in rows, using a filet-style grid of 2-stitch “blocks” and “spaces.” Then you add a 2-round single crochet border all the way around and attach 12 tassels to each short end.
Finished Size and Construction
- Finished size: 17.75 in x 70.5 in (45.1 cm x 179.1 cm), plus tassels
- Skill level: Intermediate
- Terminology: US
- Yarn weight: Worsted (#4)
- Hook: 5.0 mm (H-8)
- Number of pieces: 1 (single rectangle)
- Layout: worked flat in rows from one short end to the other
- Piece size before border: 16.75 in x 69.5 in (42.5 cm x 176.5 cm)
- Border depth: 0.5 in (1.3 cm) per side, in 2 rounds
- Diamond repeat: 3 in x 3 in (7.6 cm x 7.6 cm)
Materials
Yarn: Use a smooth worsted-weight cotton, cotton blend, or soft acrylic in a solid color. Plied, mercerized yarns give the clearest eyelets. Avoid fuzzy or heavily textured yarn, because it fills the holes.
- Navy: 600 g, about 1,200 yd (1,097 m). Plan on about 340 g for the body and border and about 125 g for the tassels. The rest is margin.
Tools:
- 5.0 mm (H-8) crochet hook
- Tapestry needle
- Scissors
- Stiff cardboard cut to 7 in (17.8 cm) tall, for the tassels
- Tape measure
- Blocking mats and rust-proof pins
- Spray bottle
Yarn quantities include a margin of roughly 25% for gauge differences and tassel trimming.
Abbreviations (US Terms)
- ch – chain
- dc – double crochet
- sc – single crochet
- sk – skip
- sl st – slip stitch
- st(s) – stitch(es)
- sp – space
- rep – repeat
Special stitches
- Block (B): dc in each of the next 2 sts. If the stitch below is a ch-1 sp, work the dc into that space.
- Space (S): ch 1, sk next st, dc in next st.
Every block and every space uses 2 stitches of the row below and makes 2 stitches. A ch-1 counts as a stitch. Each row begins with ch 3, which counts as the first dc. After that come 33 meshes (blocks or spaces), so every row has 1 + (33 x 2) = 67 sts.
Gauge and Checkpoints
Gauge: 16 dc and 8 dc rows = 4 in (10.2 cm), measured after blocking.
Test first: make a swatch with one repeat. Ch 21. Work Row 1 below over that chain, which gives 19 sts. Then work Pattern Rows A, B, C, D, C, and B, then Row A again, then 1 solid row. In each pattern row, work the bracketed repeat once instead of 5 times. That gives 9 meshes per row and 9 rows in total.
- Swatch width: 19 sts = 4.75 in (12.1 cm)
- Swatch height: 9 rows = 4.5 in (11.4 cm)
- Check that one complete diamond is clearly outlined by eyelets.
Checkpoints on the runner:
- After Row 3: 16.75 in (42.5 cm) wide and 1.5 in (3.8 cm) tall
- After Row 9: 4.5 in (11.4 cm) tall
- After Row 39: 19.5 in (49.5 cm) tall
- After Row 139: 69.5 in (176.5 cm) tall
If your swatch is too big, go down one hook size. If it is too small, go up one hook size. If only the height is off, change how high you pull up your loops rather than changing hooks. Square meshes are what keep the diamonds from looking squashed.
Body
Each row has 67 sts. Turn at the end of every row. The pattern rows read the same from either end, so they work the same on right-side and wrong-side rows.
Foundation: Ch 69.
Row 1: Dc in 4th ch from hook. The 3 skipped ch count as the first dc. Dc in each remaining ch across. (67 sts)
Rows 2–3: Ch 3 (counts as first dc throughout), sk first st, dc in each st across. Work the last dc in the top of the turning ch. (67 sts)
These 3 solid rows form the bottom band.
Lattice Pattern Rows
Every pattern row starts with ch 3, which counts as the first dc. Then work the meshes in order. The first and last B are the solid edge columns.
Pattern Row A: Ch 3, B, [S, B, B, B, B, B] 5 times, S, B. (33 meshes: 61 dc + 6 ch = 67 sts)
Pattern Row B: Ch 3, B, [B, S, B, B, B, S] 5 times, B, B. (57 dc + 10 ch = 67 sts)
Pattern Row C: Ch 3, B, [B, B, S, B, S, B] 5 times, B, B. (57 dc + 10 ch = 67 sts)
Pattern Row D: Ch 3, B, [B, B, B, S, B, B] 5 times, B, B. (62 dc + 5 ch = 67 sts)
Check the meshes in each row: 1 edge B + 30 bracketed meshes + 2 final meshes = 33.
How the diamonds form: The eyelets step one mesh sideways on every row. Two diagonal lines meet at a single eyelet in Row A and again in Row D. The solid area between the lines is the diamond.
Working the Length
Rows 4–135: Work Pattern Rows A, B, C, D, C, B in that order 22 times. That is 132 rows.
Row 136: Work Pattern Row A once more. This closes the last row of diamonds so both ends match.
Rows 137–139: Ch 3, sk first st, dc in each st across. (67 sts)
Fasten off and weave in the ends.
Row total: 3 + 132 + 1 + 3 = 139 rows. At 0.5 in (1.3 cm) per row, that is 69.5 in (176.5 cm).
Checkpoint: Before you start the border, lightly steam or pin the piece to 16.75 in x 69.5 in (42.5 cm x 176.5 cm). You should see 22 full diamond rows along the length and 5 full diamonds across the width, with half-diamonds touching the edge columns.
Border
Border gauge: 16 sc = 4 in (10.2 cm). Each round of sc adds 0.25 in (0.6 cm) to each side.
The border needs:
- 1 sc per stitch along the short ends
- 2 sc per dc row-end along the long sides
At 4 sc per inch, this exactly matches the piece’s measurements.
Round 1: With the right side facing, join yarn in the first st of Row 139 (the top right corner).
- Top edge: Ch 1, 3 sc in the same st (corner). Sc in each of the next 65 sts. 3 sc in the last st (corner).
- Long side: Work 2 sc into each of the 139 row-ends, working around the post of each end dc or turning ch. (278 sc)
- Bottom edge: Work into the free loops of the foundation ch. 3 sc in the first loop (corner), sc in each of the next 65 loops, 3 sc in the last loop (corner).
- Second long side: 2 sc into each of the 139 row-ends. (278 sc)
- Sl st to the first sc.
Round 1 counts between the corner trios:
- 65 sts on each short side
- 278 sts on each long side
- 4 corner groups of 3 sc
Total: 130 + 556 + 12 = 698 sts.
Round 2: Ch 1. Sc in each st around, and work 3 sc in the center sc of each corner group. Sl st to the first sc.
Round 2 counts between the corner centers:
- 65 + 2 = 67 sts on each short side
- 278 + 2 = 280 sts on each long side
- 4 corner groups of 3 sc
Total: 134 + 560 + 12 = 706 sts.
Fasten off and weave in the ends.
Why the math works: The short side is 67 sts over 16.75 in, which is exactly 4 sts per inch. The long side is 139 rows x 0.5 in = 69.5 in, and 69.5 x 4 = 278 sc, so the border sits flat with no ruffling or pulling. Two rounds add 0.5 in (1.3 cm) per side. That gives 16.75 + 1 = 17.75 in (45.1 cm) for the width and 69.5 + 1 = 70.5 in (179.1 cm) for the length.
Tassels
Make 24 tassels, 12 for each short end.
- Wrap yarn 24 times around the 7 in (17.8 cm) card.
- Slide a 12 in (30.5 cm) tie strand under the loops at the top and knot it tightly. Leave both tails long.
- Cut the loops at the bottom of the card.
- Wrap a separate strand 6 times around the bundle 0.75 in (1.9 cm) below the top. This forms the rounded head and the neck. Knot the strand and bury its tails inside the tassel.
- Trim the strands evenly so the tassel is 6.5 in (16.5 cm) long.
Placement: On Round 2 of each short side, number the 67 sts between the corners from 1 to 67. Attach a tassel at sts 1, 7, 13, 19, 25, 31, 37, 43, 49, 55, 61, and 67. That is every 6th st: (67 − 1) ÷ 6 + 1 = 12 tassels.
To attach a tassel, pull the two tie tails through the stitch from front to back. Knot them securely on the wrong side and weave them in.
Final Blocking
- Soak the runner in cool water for 15 minutes. Press the water out gently. Do not wring it.
- Roll it in towels to remove excess water.
- Lay it flat on blocking mats. You may need to block it in sections.
- Pin the width to 17.75 in (45.1 cm) at intervals of every 6 in (15.2 cm) along the length.
- Pin the length to 70.5 in (179.1 cm). Keep the long edges straight and parallel.
- Use your fingertips to open each eyelet into a round shape.
- Let it dry completely.
- Smooth the tassels, steam them lightly, and re-trim them evenly to 6.5 in (16.5 cm).
Final Quality-Control Checklist
- Every row had 67 sts. Spot-check the edge columns: the edges should be straight.
- 22 full rows of diamonds, with matching solid bands at both ends.
- The eyelet lines run in unbroken diagonals and meet at single eyelets.
- Border Round 2 has 706 sts, with 67 on each short side and 280 on each long side between the corners.
- The corners lie flat and square.
- 12 tassels on each end, evenly spaced, all the same length.
- All ends are woven in securely.
- Blocked size is 17.75 in x 70.5 in (45.1 cm x 179.1 cm).
Troubleshooting
The diamonds look wide and flat. Your rows are too short. Pull up taller loops, or try a yarn with more drape.
An eyelet line jogs or breaks. You worked a B where an S belonged. Count meshes from the edge, not stitches. Each bracket holds exactly 6 meshes.
The piece gets narrower as you go. You may be skipping the last dc into the turning ch. Count to 67 every few rows.
The long border ripples. Work slightly tighter, or work 3 sc in every second row-end instead of 2 sc in each, only if your row gauge is taller than 0.5 in (1.3 cm).
The long border pulls in. Your row gauge is taller than designed. Check your height checkpoint and add sc as needed.
The tassels look thin. Increase to 28 wraps and allow for extra yarn.
Care
Hand wash in cool water with a mild detergent, then lay flat to dry and reshape it. Do not hang the runner wet, because the weight of the tassels can stretch the length.
Final Notes
The whole design comes down to one measurement chain. At gauge, each 2-stitch mesh is 0.5 in (1.3 cm) square, so 33 meshes make 67 sts and 16.75 in (42.5 cm) of width. 139 rows make 69.5 in (176.5 cm) of length. The 2-round border adds 1 in (2.5 cm) in each direction, for a finished 17.75 in x 70.5 in (45.1 cm x 179.1 cm). Check your swatch, count at each checkpoint, and the lattice will line up from end to end.
Happy crocheting!