

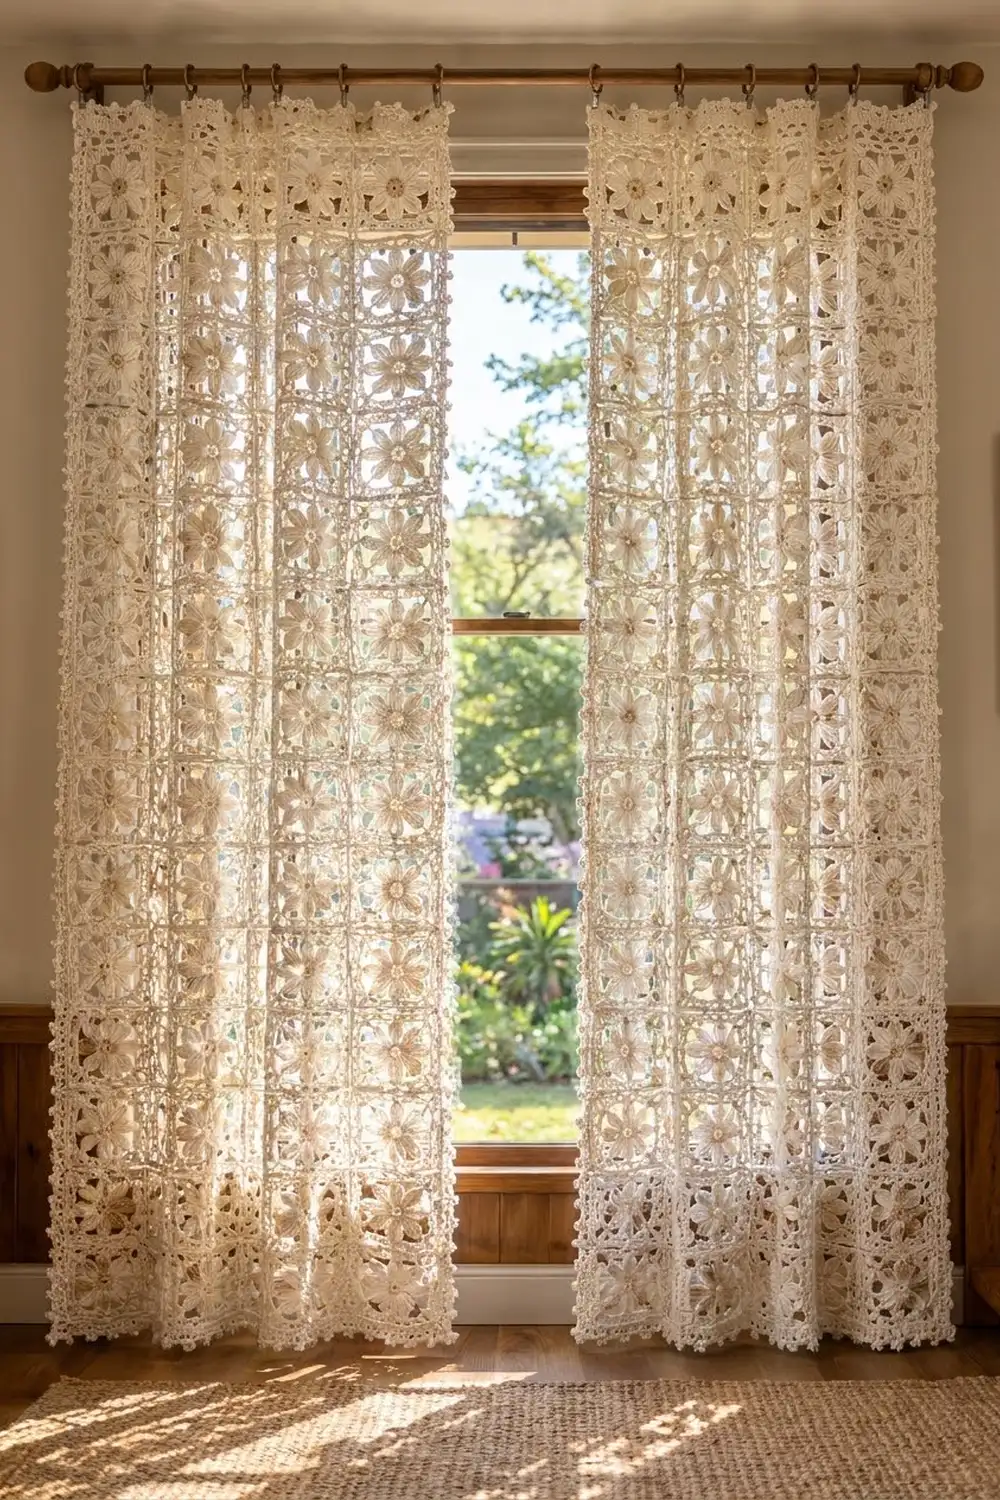
The Ecru Daisy Lace Curtain is a pair of light-filtering panels made from small flower squares. Each square has a soft beige center, eight long puff-stitch petals, and an open lattice frame. When the panels hang in a sunny window, the light comes through the lace and the daisies show up clearly against it.
Everything is worked in one creamy ecru cotton, with a warm beige accent at the center of each flower. The style is calm and cottage-like, so it suits bedrooms, kitchens, and sunrooms.
This pattern uses US crochet terms. Each finished panel measures 24 in x 79 in (61.0 cm x 200.7 cm). You make 56 squares per panel, join them in a 4 x 14 grid with a raised slip-stitch seam, then add a three-round border that ends in a picot edge.
The instructions cover one panel. Repeat everything once more for the matching second panel.
Finished Size and Construction
- Finished panel size: 24 in x 79 in (61.0 cm x 200.7 cm)
- Skill level: Intermediate
- Terminology: US
- Yarn weight: Worsted (#4) cotton
- Hook: 5.0 mm (H-8)
- Number of pieces: 56 squares per panel, 112 squares for the pair
- Layout: 4 squares wide x 14 squares tall per panel
- Square size: 5.5 in x 5.5 in (14.0 cm x 14.0 cm)
- Panel size before border: 22 in x 77 in (55.9 cm x 195.6 cm)
- Border depth: 1 in (2.5 cm) on every side
- Hanging: clip rings on a curtain rod
Materials
Choose a smooth, mercerized or combed worsted-weight cotton. Cotton holds the petal shape, blocks crisply, and doesn’t sag much in a vertical drape. Avoid acrylic: it relaxes when it hangs and the panel will stretch longer.
The quantities below assume yarn of roughly 170 m per 100 g.
- Color A, Ecru/Cream (petals, frames, joining, border): 675 g / 1,148 m per panel; 1,350 g / 2,295 m for the pair
- Color B, Warm Beige (flower centers): 65 g / 111 m per panel; 130 g / 221 m for the pair
Tools:
– 5.0 mm (H-8) crochet hook
– Tapestry needle
– Stitch markers
– Scissors
– Blocking mats, rust-proof pins, and a spray bottle
– Measuring tape
– 14 to 16 clip rings per panel
All quantities include a margin of about 10 to 12 percent for swatching, joining, and dye-lot safety. Buy all of Color A in one dye lot.
Abbreviations (US Terms)
- ch – chain
- sl st – slip stitch
- sc – single crochet
- dc – double crochet
- sk – skip
- sp – space
- st(s) – stitch(es)
- RS – right side
- rep – repeat
Special stitches:
- Tall puff (tpuff): (Yarn over, insert hook in st, pull up a loop to 3/4 in / 1.9 cm tall) 4 times, then yarn over and pull through all 9 loops on hook. Ch 1 to close. The ch 1 is not counted as a st.
- Picot: Ch 3, sl st in the 3rd ch from hook.
Gauge and Checkpoints
Make one complete square before anything else, then wet block it and let it dry. Measure only after blocking.
Gauge: One blocked square = 5.5 in (14.0 cm) square. In Rnd 7, 21 sc span one full side, which is about 3.8 sc per inch, or about 15 sc = 4 in (10.2 cm).
Checkpoints for the test square (lightly pressed flat):
– After Rnd 2 (flower): about 3.25 in (8.3 cm) across, tip to tip
– After Rnd 4: about 4.25 in (10.8 cm) square
– After Rnd 5: about 5 in (12.7 cm) square
– After Rnd 6: about 5.25 in (13.3 cm) square
– After Rnd 7: 5.5 in (14.0 cm) square
If the square is too big: go down to a 4.5 mm hook, and keep the tpuff loops at 3/4 in (1.9 cm), no taller.
If the square is too small: go up to a 5.5 mm hook, and check that the ch-5 loops in Rnd 3 aren’t pulled tight.
A difference of just 1/8 in (0.3 cm) per square adds up to 1.75 in (4.4 cm) over the panel’s length, so it’s worth getting the gauge right.
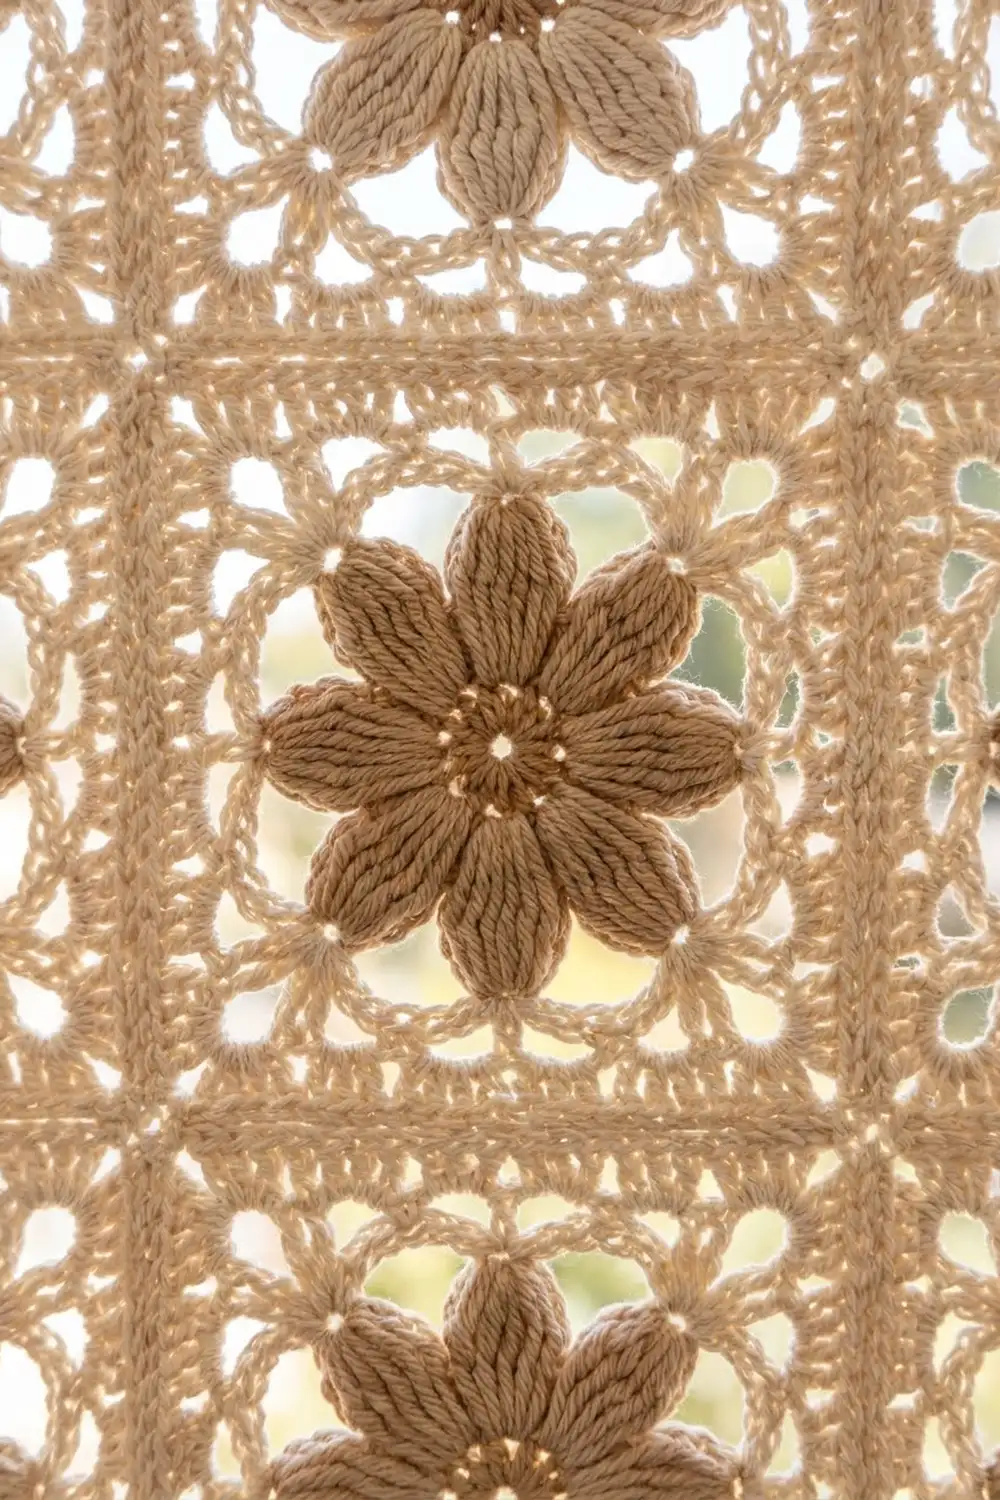
Daisy Lace Square
Make 56 per panel.
Rnd 1 (Color B): Make a magic ring. Ch 3 (counts as dc), 15 dc in ring. Pull the ring closed and join with sl st to top of ch-3. Fasten off. (16 dc)
Rnd 2 (Color A): Join Color A in any dc. Ch 2 (does not count as a st), tpuff in same st, ch 3, sk next st, tpuff in next st, ch 3, sk next st; rep from * 6 more times. Join with sl st to top of first tpuff. (8 tpuffs, 8 ch-3 sps)*
The 8 petals are now formed. They should sit flat and radiate evenly around the beige center.
Rnd 3: Ch 1, sc in top of same tpuff, ch 5, sc in top of next tpuff, ch 5; rep from * 6 more times. Join with sl st to first sc. (8 sc, 8 ch-5 sps)*
These ch-5 loops make the first open ring of the lattice, framing the petal tips.
Rnd 4 (squaring round): Sl st into first ch-5 sp. Ch 3 (counts as dc), (2 dc, ch 3, 3 dc) in same sp for a corner, 7 dc in next ch-5 sp for a side, (3 dc, ch 3, 3 dc) in next ch-5 sp, 7 dc in next ch-5 sp; rep from * 2 more times. Join with sl st to top of ch-3.
(52 dc: 13 dc per side between corner ch-3 sps, which is 3 + 7 + 3, plus 4 corner ch-3 sps)*
Rnd 5 (mesh round): Sl st in next 2 dc and into the corner ch-3 sp. Ch 3 (counts as dc), (dc, ch 3, 2 dc) in same sp. Ch 1, sk next dc, (dc in next dc, ch 1, sk next dc) 6 times, (2 dc, ch 3, 2 dc) in next corner sp; rep from * 2 more times. Ch 1, sk next dc, (dc in next dc, ch 1, sk next dc) 6 times. Join with sl st to top of ch-3.
(Per side between corner sps: 2 dc + 7 ch-1 sps + 6 dc + 2 dc = 17 sts. Total: 40 dc, 28 ch-1 sps, 4 ch-3 corner sps)*
This round makes the windowed frame you can see around each flower.
Rnd 6: Sl st in next dc and into the corner ch-3 sp. Ch 1, (sc, ch 2, sc) in same sp, sc in each dc and each ch-1 sp across (17 sc), (sc, ch 2, sc) in next corner sp; rep from * 2 more times, sc in each dc and ch-1 sp across (17 sc). Join with sl st to first sc.
(Per side: 1 + 17 + 1 = 19 sc. Total: 76 sc, 4 ch-2 sps)*
Rnd 7: Sl st into corner ch-2 sp. Ch 1, (sc, ch 2, sc) in same sp, sc in each of next 19 sc, (sc, ch 2, sc) in next corner sp; rep from * 2 more times, sc in each of next 19 sc. Join with sl st to first sc. Fasten off and weave in ends.
(Per side: 1 + 19 + 1 = 21 sc. Total: 84 sc, 4 ch-2 corner sps)*
The square’s stitch count is 21 sc per side, including the corner sc at each end, with a ch-2 sp at each corner. The joining and border math is built on this count.
Make All Squares
Per panel: 56 squares
– Color B: 56 centers (Rnd 1)
– Color A: 56 squares (Rnds 2–7)
For the pair: 112 squares in total.
Block every square to 5.5 in (14.0 cm) before joining. It’s much easier to fix size on a single square than on a joined panel.
Layout grid (one panel, 4 wide x 14 tall):
Row 1:  [D][D][D][D]   <- top edge (rod)
Row 2:  [D][D][D][D]
Row 3:  [D][D][D][D]
Row 4:  [D][D][D][D]
Row 5:  [D][D][D][D]
Row 6:  [D][D][D][D]
Row 7:  [D][D][D][D]
Row 8:  [D][D][D][D]
Row 9:  [D][D][D][D]
Row 10: [D][D][D][D]
Row 11: [D][D][D][D]
Row 12: [D][D][D][D]
Row 13: [D][D][D][D]
Row 14: [D][D][D][D]   <- bottom edge
D = Daisy Lace Square
Joining
Method: Raised slip-stitch seam, worked from the RS with Color A.
- Lay two squares side by side, RS up, with the edges to be joined touching.
- Start in the matching corner ch-2 sps. Insert the hook through the ch-2 sp of both squares, pull up a loop, and ch 1.
- Sl st through the back loop of the 1st sc on Square A and the back loop of the 1st sc on Square B together.
- Keep going stitch by stitch: sc 1 to sc 1, sc 2 to sc 2, and so on through sc 21. That’s 21 sl sts per square edge.
- Sl st through the next pair of corner ch-2 sps. Without cutting the yarn, carry on to the next pair of squares along the same line.
Order: Work all 13 horizontal seams first, each across 4 squares (84 sl sts plus the corner sps). Then work the 3 vertical seams, each down 14 squares (294 sl sts plus the corner sps). Where seams cross, work one sl st through all four corner sps.
Tension: The sl sts should be as loose as the sc underneath them. If the seam puckers, change to a hook one size larger for joining only. The seams make the slightly raised chain lines that outline every square.
Size checkpoint: The joined panel, laid flat, should measure 22 in x 77 in (55.9 cm x 195.6 cm). That’s 4 x 5.5 in by 14 x 5.5 in, with no extra width added at the seams.
Border
Border gauge: Same as the squares, about 3.8 sc per inch. 84 sc / 22 in = 3.8 and 294 sc / 77 in = 3.8, so the border sits flat without stretching or ruffling.
Starting counts: Short sides: 4 squares x 21 sc = 84 sts. Long sides: 14 squares x 21 sc = 294 sts. At each seam, the two joined corner ch-2 sps are held by the seam and are not worked. Nothing is added at the seams.
Rnd 1 (sc): Join Color A in any outer corner ch-2 sp. Ch 1, (sc, ch 2, sc) in the corner. Sc in each sc along the side, then work (sc, ch 2, sc) in each remaining outer corner. Join.
(Short sides: 84 + 2 corner sc = 86 sc. Long sides: 294 + 2 corner sc = 296 sc. Total 764 sc, 4 ch-2 sps)
Rnd 2 (mesh): Sl st into the corner sp. Ch 6 (counts as dc + ch 3), dc in same sp. Along each side: dc in next st, ch 1, sk next st; rep from * across, then work (dc, ch 3, dc) in each remaining corner sp. Join with sl st to 3rd ch of beginning ch-6.
(Short sides: 43 dc + 43 ch-1 sps = 86 sts worked 1-per-existing-st, + 2 corner dc = 88 sts. Long sides: 148 dc + 148 ch-1 sps = 296, + 2 corner dc = 298 sts)*
This round repeats the windowed mesh from Rnd 5 of the squares.
Rnd 3 (picot edge): Sl st into corner sp. Ch 1, (sc, picot, sc) in corner sp. Along each side, working into every dc and ch-1 sp: sc in next 2 sts, picot, sc in next 3 sts; rep from * across to the last 2 sts, picot, sc in last 2 sts. Work (sc, picot, sc) in each corner. Join and fasten off.
(Short sides: 2 + (28 x 3) + 2 = 88 sc + 2 corner sc = 90 sc, with 29 side picots. Long sides: 2 + (98 x 3) + 2 = 298 sc + 2 corner sc = 300 sc, with 99 side picots. Plus 4 corner picots)*
Why the math works: Both side counts in Rnd 2 are even, so the dc/ch-1 mesh ends cleanly at each corner. In Rnd 3, both 88 and 298 equal 4 + a multiple of 3 (84 = 28 x 3 and 294 = 98 x 3), so the picots are spaced symmetrically from corner to corner. The total border depth is 1 in (2.5 cm): about 1/4 in (0.6 cm) for Rnd 1, 1/2 in (1.3 cm) for Rnd 2, and 1/4 in (0.6 cm) for Rnd 3.
Final Blocking
- Soak the panel in cool water with a little wool wash for 15 minutes.
- Press the water out gently. Roll the panel in towels; do not wring.
- Lay it flat on mats, RS up.
- Pin the four corners to 24 in x 79 in (61.0 cm x 200.7 cm).
- Pin along each seam line so the squares stay at 5.5 in (14.0 cm).
- Open each picot with a pin, and fluff each petal with your fingertips.
- Let it dry completely, usually 24 to 48 hours.
Final Quality-Control Checklist
- All 56 squares measure 5.5 in (14.0 cm) per side
- Every square has 8 petals and a beige center
- Every square edge has 21 sc
- Seams are straight and lie flat
- Joined panel is 22 in x 77 in (55.9 cm x 195.6 cm)
- Border counts: 90 sc on the short sides and 300 sc on the long sides in Rnd 3
- Finished panel is 24 in x 79 in (61.0 cm x 200.7 cm)
- All ends are woven in at least 2 in (5.1 cm)
- Both panels match in length to within 1/2 in (1.3 cm)
Troubleshooting
Petals look short or lumpy: Pull every tpuff loop up to the full 3/4 in (1.9 cm) before closing.
Square cups in the middle: The Rnd 3 ch-5 loops are too tight. Chain more loosely, or work ch 6.
Square ruffles: Your tension is too loose in Rnd 4. Go down one hook size for Rnds 4–7.
Corners won’t line up during joining: Recount Rnd 7. Every side must have exactly 21 sc.
Border waves: You have extra sts at the seams. Check that the seam corner sps were skipped in Rnd 1.
Panel grows longer after hanging: This is normal for cotton. Block again and let the panel dry flat.
Care
Hand wash cool or machine wash on a gentle cycle inside a mesh bag, then dry flat. Don’t tumble dry, and don’t hang the panel while it’s wet.
Final Notes
The whole curtain depends on one chain of measurements. One square is 5.5 in (14.0 cm) with 21 sc per side. Four squares across give 22 in (55.9 cm), and fourteen down give 77 in (195.6 cm). A 1 in (2.5 cm) border brings each panel to 24 in x 79 in (61.0 cm x 200.7 cm). Make the second panel to the same numbers, clip both to the rod, and enjoy the light coming through your daisies.
Happy crocheting!