

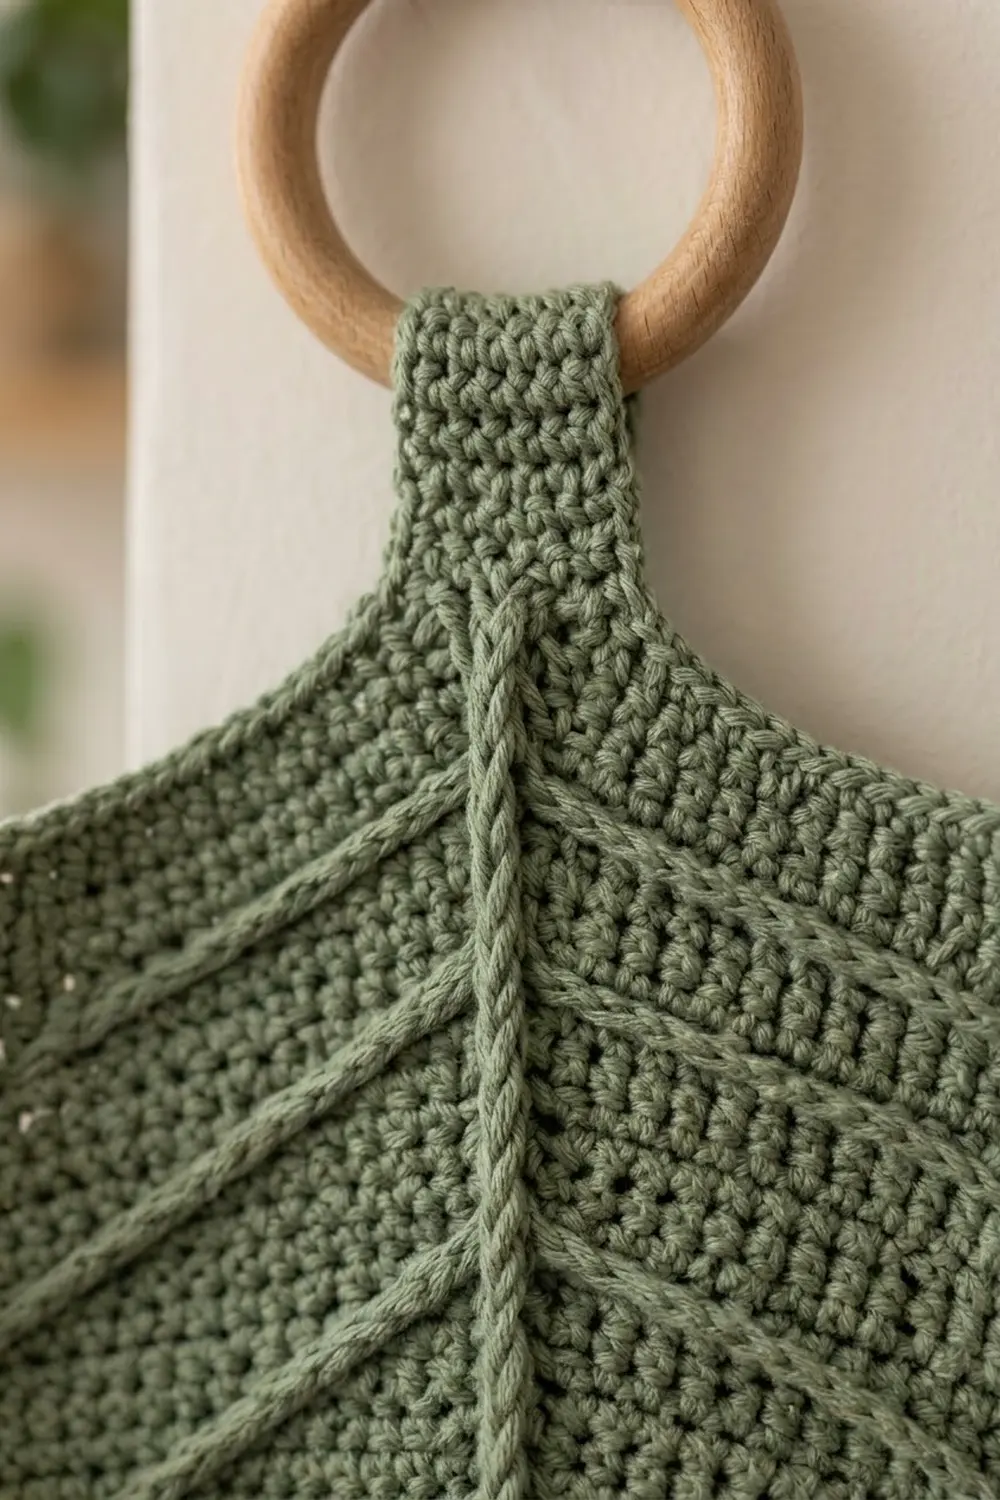
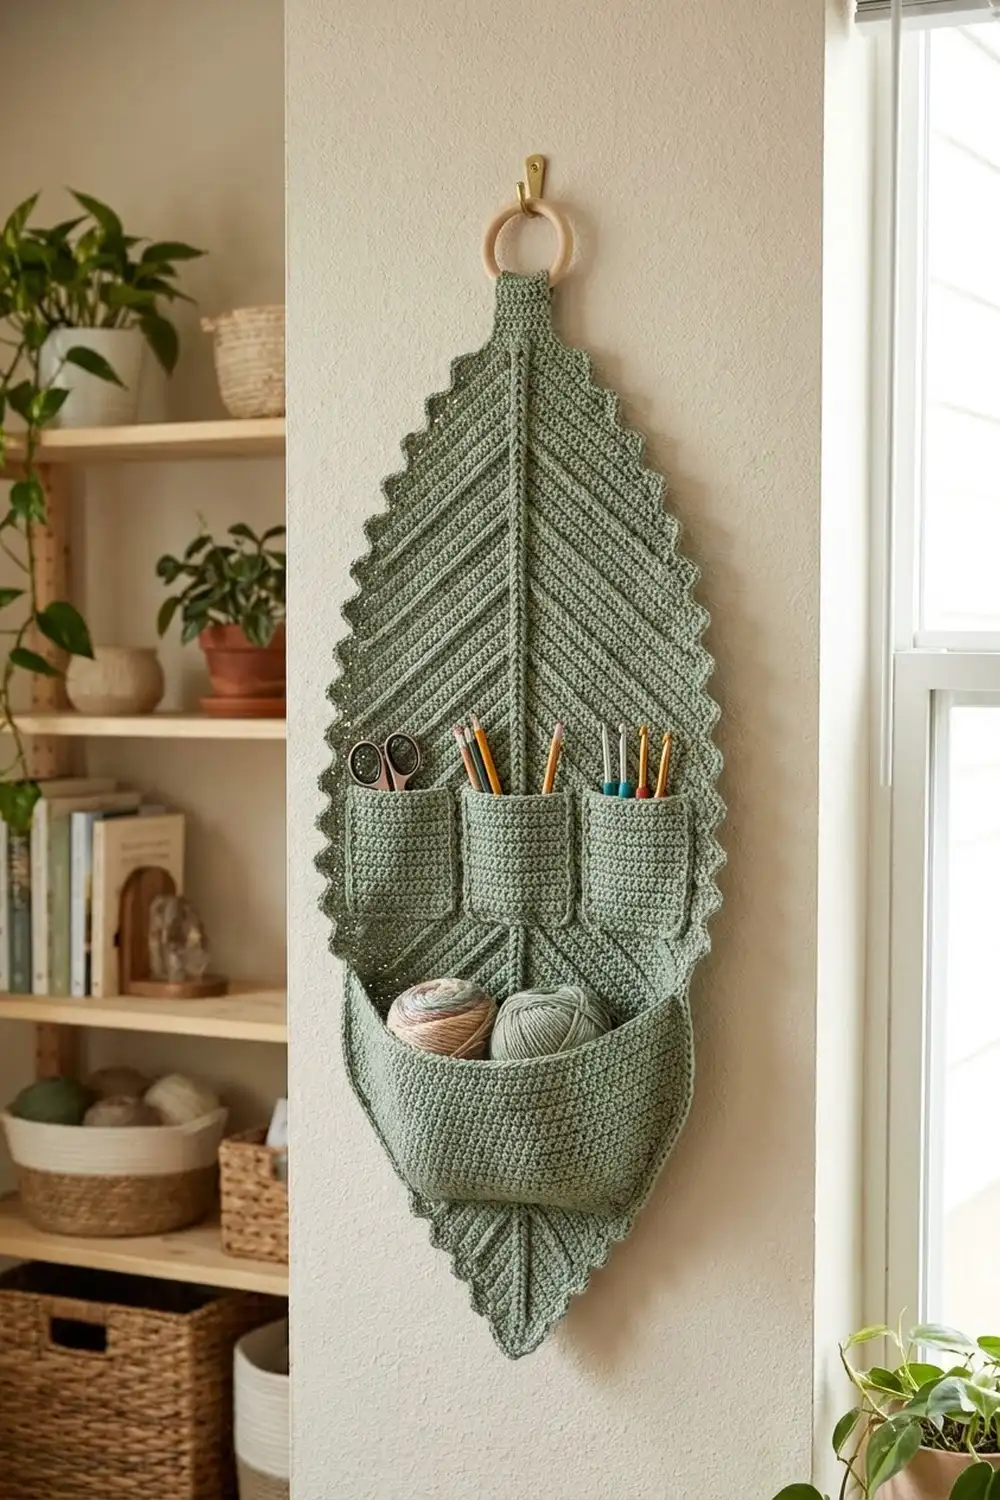
This sage leaf wall organizer is a crocheted leaf that hangs on the wall and holds your hooks, scissors, pencils and a couple of yarn cakes. It has a pointed tip, a narrow tab that loops through a wooden ring, a raised center vein, and a serrated edge of small pointed teeth all the way around.
The whole piece uses one color, a soft sage green. Single crochet gives it a dense, sturdy fabric that stays flat on the wall. The style is calm and botanical, and it looks good next to houseplants.
The pattern uses US crochet terms. The finished organizer is about 12¼ in (31.1 cm) wide at its widest point and 23 in (58.4 cm) tall from the leaf tip to the top of the visible tab, not counting the ring.
You crochet the leaf panel flat from the tip upward and continue straight into the tab. Then you add surface slip stitch veins and a two-round serrated border. Next you make four pockets and sew them on. Last, you fold the tab around the ring.
Finished Size and Construction
- Finished size: about 12¼ in × 23 in (31.1 cm × 58.4 cm), not counting the ring
- Skill level: Intermediate
- Terminology: US crochet terms
- Yarn weight: Worsted (#4), cotton or cotton blend
- Hook: 4.0 mm (G-6)
- Number of pieces: 1 leaf panel with tab and 4 pockets sewn onto it, making 1 finished organizer
- Layout: large curved pocket on the lower half; three small pockets in a row above it, one to the left of the center vein and two to the right
- Leaf body before border: 10¾ in × 19¾ in (27.3 cm × 50.2 cm)
- Border depth: about ¾ in (1.9 cm) at the tooth points
- Pocket sizes: large pocket 9 in × 5¾ in (22.9 cm × 14.6 cm); small pockets 3 in × 3½ in (7.6 cm × 8.9 cm) and 2 in × 3½ in (5.1 cm × 8.9 cm)
Materials
Choose a smooth worsted-weight cotton or cotton blend. Cotton holds its shape under the weight of tools and shows the surface veins clearly. Avoid fuzzy or very stretchy yarn, because the pockets will sag.
- Sage green: 220 g, about 375 m (410 yd)
This amount includes a margin of about 10%. Expect to use about 120 g for the panel and tab, 55 g for the pockets and 25 g for the veins and border.
Tools and notions:
- 4.0 mm (G-6) crochet hook
- Yarn needle
- 4–6 locking stitch markers
- Wooden ring, 2½ in (6.4 cm) across
- Rust-proof pins, a blocking mat and a spray bottle
- Measuring tape
Abbreviations (US Terms)
- ch: chain
- sl st: slip stitch
- sc: single crochet
- hdc: half double crochet
- dc: double crochet
- sc2tog: single crochet 2 stitches together
- inc: 2 sc in the same stitch
- BLO: back loop only
- st(s): stitch(es)
- RS / WS: right side / wrong side
Special stitches:
- Surface slip stitch: Hold the yarn behind the work. Insert the hook from front to back, pull up a loop, and draw it through the loop on your hook.
- Picot: Ch 3, sl st in the 3rd ch from the hook.
- Point (worked over 6 sts): Sl st in next st, sc in next st, hdc in next st, (dc, picot, dc) in next st, hdc in next st, sc in next st.
Gauge and Checkpoints
Gauge: 16 sc × 18 rows = 4 in (10.2 cm) in single crochet worked in rows.
Test piece first. Before you start the panel, make the left upper pocket (see Pockets). It is 12 sts wide and 16 rows tall, and it should measure 3 in × 3½ in (7.6 cm × 8.9 cm). If it does, it works as your gauge swatch and you can use it in the organizer.
Panel checkpoints:
- After Row 9: 19 sts, about 4¾ in (12.1 cm) wide and 2 in (5.1 cm) tall
- After Row 36: 43 sts, about 10¾ in (27.3 cm) wide and 8 in (20.3 cm) tall
- After Row 52: 43 sts, about 11½ in (29.2 cm) tall
- After Row 89: 7 sts, about 19¾ in (50.2 cm) tall
If your piece is too big, go down to a 3.75 mm hook. If it is too small, go up to a 4.5 mm hook. Change the hook and keep the stitch counts the same, because the border and pocket placement depend on them.
Leaf Panel
Work in rows of sc from the bottom tip upward. The ch 1 at the start of each row does not count as a stitch. Every row has an odd number of stitches, so there is always one center stitch. That column of center stitches becomes the midrib.
Row 1 (RS): Ch 2, 3 sc in the 2nd ch from the hook, turn. (3 sts)
Row 2: Ch 1, inc in first st, sc in each st to last st, inc in last st, turn. (5 sts)
Rows 3–9: Repeat Row 2. (Row 9: 19 sts)
These fast increases make the sharp pointed tip.
Row 10: Repeat Row 2. (21 sts)
Row 11: Ch 1, sc in each st across, turn. (21 sts)
Rows 12–29: Repeat Rows 10–11 nine more times. (Row 28: 39 sts; Row 29: 39 sts)
Rows 30–31: Ch 1, sc across, turn. (39 sts)
Row 32: Repeat Row 2. (41 sts)
Rows 33–35: Ch 1, sc across, turn. (41 sts)
Row 36: Repeat Row 2. (43 sts)
Rows 37–52: Ch 1, sc across, turn. (43 sts) This is the widest part of the leaf.
Row 53: Ch 1, sc2tog, sc in each st to last 2 sts, sc2tog, turn. (41 sts)
Rows 54–56: Ch 1, sc across, turn. (41 sts)
Row 57: Repeat Row 53. (39 sts)
Row 58: Ch 1, sc across, turn. (39 sts)
Row 59: Repeat Row 53. (37 sts)
Row 60: Ch 1, sc across, turn. (37 sts)
Rows 61–89: Repeat Rows 59–60, ending with a decrease row. (Row 71: 25 sts; Row 81: 15 sts; Row 89: 7 sts)
Rows 59 to 89 include 16 decrease rows, which take you from 39 sts down to 7. Do not fasten off.
Hanging Tab
Rows 90–109: Ch 1, sc in each st across, turn. (7 sts)
The tab is about 4½ in (11.4 cm) long and 1¾ in (4.4 cm) wide. Fasten off, leaving a 12 in (30.5 cm) tail.
Veins
Work all the veins with the RS facing you, before you add the border.
Midrib: Hold two strands of yarn together. Starting at the center stitch of Row 1, work surface slip stitch straight up the center column, 1 sl st per row, to Row 89. Fasten off and weave in the ends on the WS. The double strand makes the midrib thicker and more raised than the side veins.
Side veins: Use a single strand. Start each vein in the stitch next to the midrib. At each step, move up 1 row and 2 sts outward, then work 1 surface sl st. Stop 1 st before the side edge.
Start one vein on each side of the midrib at Rows 6, 14, 60, 67, 74 and 81. That gives 6 veins per side, all slanting upward. The middle of the panel has no veins because the pockets cover it.
Border
The border goes around the leaf body only, from the base of the tab on one side to the base of the tab on the other. You work it from end to end and do not join it.
Border gauge: Work 1 sc per row end. That is about 4½ sc per 1 in (2.5 cm) of edge, which gives just enough fullness to go around the curves without cupping.
Round 1 (RS): Join the yarn in the row end of Row 89 on the right-hand edge, just below the tab.
- First side: Work 1 sc in each row end down to Row 2 (88 sc), then 2 sc in the row end of Row 1. (90 sts)
- Tip: Work 1 sc in the free loop of the foundation ch. This is the tip stitch. (1 st)
- Second side: Work 2 sc in the row end of Row 1, then 1 sc in each row end up to Row 89 (88 sc). (90 sts)
Total: 181 sts, made up of 176 sts worked 1 per row end (Rows 2–89 on both sides), 4 sts in the two Row 1 row ends, and 1 tip stitch. Fasten off.
Round 2 (RS): Rejoin the yarn in the first st of Round 1.
- First side: Work the Point 15 times. (15 points)
- Tip: In the tip stitch, work (hdc, dc, picot, dc, hdc). (1 point)
- Second side: Work the Point 15 times. (15 points)
Fasten off and weave in the ends.
Why the math works: Each side has exactly 90 sts, and 90 ÷ 6 = 15 points with no stitches left over. The tip stitch sits between the two sides and gets its own centered point, so the leaf stays symmetrical. Each point is about 1⅓ in (3.4 cm) wide.
Pockets
Work all pockets flat in rows of sc. The ch 1 at the start of each row does not count as a stitch. The BLO row near the top of each pocket makes a ridged edge.
Small Pockets (make 3)
Left pocket: Ch 13.
- Row 1: Sc in the 2nd ch from the hook and in each ch across, turn. (12 sts)
- Rows 2–14: Ch 1, sc across, turn. (12 sts)
- Row 15: Ch 1, sc in BLO across, turn. (12 sts)
- Row 16: Ch 1, sc across. (12 sts) Fasten off, leaving a 24 in (61.0 cm) tail.
The left pocket measures 3 in × 3½ in (7.6 cm × 8.9 cm).
Right pockets (make 2): Ch 9 and work as for the left pocket. (8 sts) Each one measures 2 in × 3½ in (5.1 cm × 8.9 cm).
Large Curved Pocket
Row 1: Ch 25, sc in the 2nd ch from the hook and in each ch across, turn. (24 sts)
Rows 2–7: Ch 1, inc in first st, sc to last st, inc in last st, turn. (Row 2: 26 sts; Row 7: 36 sts)
Rows 8–24: Ch 1, sc across, turn. (36 sts)
Row 25: Ch 1, sc in BLO across, turn. (36 sts)
Row 26: Ch 1, sc across. (36 sts) Fasten off, leaving a 40 in (101.6 cm) tail.
The large pocket is 9 in (22.9 cm) wide at the top and 5¾ in (14.6 cm) tall. The increases in Rows 2–7 round off the bottom corners.
Attaching the Pockets
Pin every pocket in place before you sew, counting stitches outward from the midrib. Whipstitch the side and bottom edges through the outer loops of the pocket and the matching panel stitches. Leave the top edges open.
Large pocket: Center its Row 1 on panel Row 17, from the 12th st left of the midrib to the 12th st right. Pin the top corners at panel Row 42, 16 sts left and 16 sts right of the midrib. That covers 33 panel stitches. The pocket is 36 sts wide, so the extra 3 sts, about ¾ in (1.9 cm), make it bow out into a shallow cup. Each pocket side has 26 rows, and panel Rows 17–42 are also 26 rows, so you can sew the sides row to row.
Small pockets: Place each bottom edge on panel Row 43 and each top edge at Row 58.
- Left pocket: from the 2nd st to the 13th st left of the midrib
- First right pocket: from the 2nd st to the 9th st right of the midrib
- Second right pocket: from the 10th st to the 17th st right of the midrib, right next to the first one
At Row 58 there are 19 sts on each side of the center stitch, so the right pockets stop 2 sts in from the edge. Sew with snug, even stitches. If you pull too hard, the panel will pucker.
Ring: Slip the tab through the ring from front to back. Fold the top 8 rows, about 1¾ in (4.4 cm), to the WS and whipstitch them down. About 2½ in (6.4 cm) of tab stays visible between the leaf and the ring.
Final Blocking
- Weave in all ends on the WS through at least 2 in (5.1 cm) of stitches.
- Lay the organizer face up on a blocking mat.
- Pat it out to 12¼ in (31.1 cm) across at the widest points and 23 in (58.4 cm) from the tip to the top of the tab.
- Pin all 31 points. Start with the tip, then pin up both sides in pairs.
- Shape the large pocket into a gentle curve. Stuff it with a rolled towel if it needs support.
- Mist with water until the piece is damp.
- Let it dry for at least 24 hours before you unpin it.
Final Quality-Control Checklist
- The body is 10¾ in × 19¾ in (27.3 cm × 50.2 cm) before the border.
- The midrib runs straight up the center column.
- There are 6 evenly slanted veins on each side.
- There are 15 points on each side plus 1 at the tip.
- The large pocket bows out evenly, with no folds.
- The tops of the small pockets line up on Row 58.
- The tab is centered and the ring hangs straight.
Troubleshooting
The leaf leans to one side: You missed a shaping stitch. Compare the stitch count of each row with the counts in the pattern.
The midrib wanders: Mark the center stitch every 10 rows before you start.
The border ruffles: Use a hook half a size smaller for Round 1.
The border cups: Make sure you worked 1 sc in every row end.
The points look flat: Pin each picot outward during blocking.
The large pocket sags: Pin each top corner 1 st farther out to reduce the ease.
The panel puckers: Your sewing stitches are too tight. Remove them and sew again more loosely.
Care
Empty the pockets, hand wash in cool water, reshape and dry flat. Don’t hang the organizer up while it is still wet.
Final Notes
Each measurement depends on the one before it. A gauge of 16 sts × 18 rows = 4 in (10.2 cm) gives a body 43 sts and 10¾ in (27.3 cm) wide and 89 rows and 19¾ in (50.2 cm) tall. That body gives exactly 90 border stitches per side, which makes 15 points per side. With the border and tab added, the organizer is 12¼ in × 23 in (31.1 cm × 58.4 cm). If your test pocket measures correctly, the rest will match.
Happy crocheting!